
Windows Server 2016 includes the distributed access file system feature CSV, which was first introduced in Windows Server 2008 R2. When enabled, CSV allows multiple nodes to simultaneously access the same NTFS or ReFS file system, providing your cluster environment with flexibility and reliability. CSV also brings all disks in the cluster to a single location, improving access and management, and it also improves operational efficiency by increasing availability.
Since Windows 2012, CSV has been used by other Windows roles, such as file servers, and by other applications, such as SQL Server, and is no longer dedicated to Hyper-V. CSV provides the following benefits:
- Enables all servers in a Windows Failover Cluster to access a common NTFS or ReFS volume
- Provides a layer of abstraction above the NTFS or ReFS volume
- Provides an application's complete abstraction with respect to which nodes actually own the logical unit number (LUN)
- Applications can failover without requiring drive letter ownership changes
- No dismounting and remounting of volumes is required
- CSV allows for faster failover times
CSV is strongly recommended when using Hyper-V with Failover Clustering. That said, you will also see how to enable CSV to your disks within Failover Clustering.
CSV is only available through Failover Clustering. Before you start, make sure you have a cluster with the storage already added. The Installing and configuring the Windows Failover Clustering feature recipe in this chapter is a good start if you have not created your cluster yet.
The following steps will demonstrate how to add your cluster disks into a CSV:
- To enable CSV to your disks, launch the Start menu and type
Cluadmin.mscto open Failover Cluster Manager. - In the Failover Cluster Manager window, in the left-hand pane, expand Storage and click on Disks.
- A list with the added disks will be displayed. Select the disk or disks on which you want to enable CSV, and click on Add to Cluster Shared Volumes, using either one of the options shown in the following screenshot:

Failover Cluster Manager – Adding a Cluster Shared Volume
- Every disk will now be listed and accessed in the path
C:ClusterStorage. To see the available disks within the CSV, open Windows Explorer and navigate to the folderC:ClusterStorage. - To use the CSV disk, when creating your virtual machines, select one of the volumes within the
ClusterStoragefolder.
CSV is a Failover Clustering feature to be used by Hyper-V. It is simply an NTFS or ReFS volume that accepts read and write operations by all nodes in the cluster. By default, CSV is not enabled, but it is a best practice to enable it when using in conjunction with Hyper-V virtual machines. The process of enabling CSV has been improved from previous Windows versions. To do so, you must open Failover Cluster Manager, select the disk you want, and click on Add to Cluster Shared Volume; it's as simple as that! When enabled, CSV puts all disks as folders in C:ClusterStorage. It makes management and access easier once all disks are shown in a single path.
CSV drastically reduces the number of LUNs required for your virtual machines. Rather than using one LUN per virtual machine, you can place more virtual machines within a CSV volume.
Disks with CSV enabled now appear as CSV Proxy File System (CSVFS). Although it is still using NTFS or ReFS as the filesystem, CSVFS is used as a label in the disks, enabling applications to know they are running under CSV disks.
Note
One of the benefits of ReFS over NTFS is Accelerated VHDX Operations—oddly named, as it applies to both VHD and VHDX files—which means that new VHD and VHDX creations, extending existing VHD or VHDX operations, and growing dynamic VHD or VHDX file operations, happen almost instantaneously on a ReFS volume.
In the past, these typical operations with dynamic VHDX files involved growing the file, and incurred a performance penalty, as the blocks had to be zeroed before use.
Now when a VHD or VHDX file is extended, instead of zeroing out the actual blocks on the disk, ReFS updates the metadata, to respond back that the content is zeroed, and this avoids incurring the performance penalty of actually zeroing them out.
You can also add available disks in a CSV volume by using the command Add-ClusterSharedVolume. The following command gets all disks and adds them in the CSV:
Get-ClusterResource *disk* | Add-ClusterSharedVolume
One of the abilities of CSV is to enable the CSV Cache. When the cache is configured, all read-only unbuffered I/O is cached, which is ideal for Virtual Desktop Infrastructure (VDI) scenarios. CSV Cache uses RAM to write the cache information, delivering high performance for your applications. Thus, some applications running on a virtual machine that require high read requests improve in performance.
As CSV Cache depends on the workload and application requirements, it's disabled by default. To enable CSV Cache, you first need to specify the cache in MB. Only 20 percent of the available RAM can be used for CSV Cache.
The following command can be used to set the cache size. The cache used in this example (512 MB) is a default value, which is recommended in most scenarios:
(Get-Cluster).SharedVolumeBlockCacheSizeinMB = 512
After setting the cache value, you must enable it on the disks you want to use CSV Cache for. The following command demonstrates how to enable it for a disk called Cluster Disk 2:
Get-ClusterSharedVolume "Cluster Disk 2" | Set-ClusterParameter CsvEnableBlockCache 1
When the second command is typed, a warning message is displayed saying that the disks must be taken offline to apply the changes.
Make sure the disk is not being used by any role or services, open Failover Cluster Manager, expand Storages, and click on Disks. Select the disk you want to bring offline, right-click on it, and select Take Offline, as shown in the following screenshot:
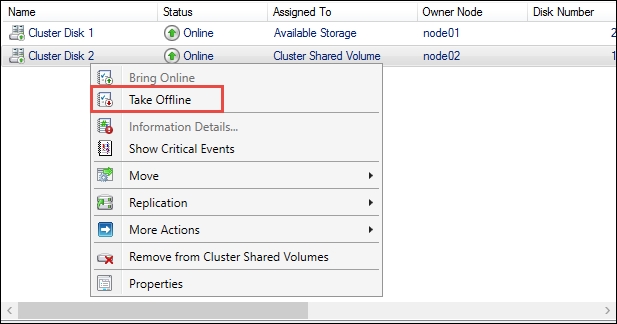
Failover Cluster Manager – Taking a disk offline
In the Offline Cluster Shared Volume message, click on Yes to confirm and take the disk offline. To bring the disk online again, right-click on the disk and select Bring Online.