
Creating and adding a virtual switch to a virtual machine is not the end of the story in Windows Server 2016 Hyper-V. Many of the features and settings were introduced in Windows 2012 R2 version; these can be configured using the graphical interface, such as DHCP Guard, Router Guard, Port Mirroring, and other options that require PowerShell such as Port ACLs, for example.
If you think this is not enough, no problem! Hyper-V supports extensible switches, allowing you to write your own code, creating new capabilities for monitoring, forwarding, and filtering virtual switch traffic.
This recipe will cover these advanced networking features and explain how they work.
This recipe shows the advanced options of a virtual switch, but note that it doesn't show how to create one. Use the previous recipe to create a virtual switch before you start the next steps.
The following steps will demonstrate all the advanced virtual switch options such as VMQ, IPSec Task Offload, SR-IOV, DHPC Guard, Router Guard, and Port Mirroring.
- To modify the advanced network settings, open Hyper-V Manager, right-click on the virtual machine you want to change by clicking on Settings, as shown in the following screenshot:
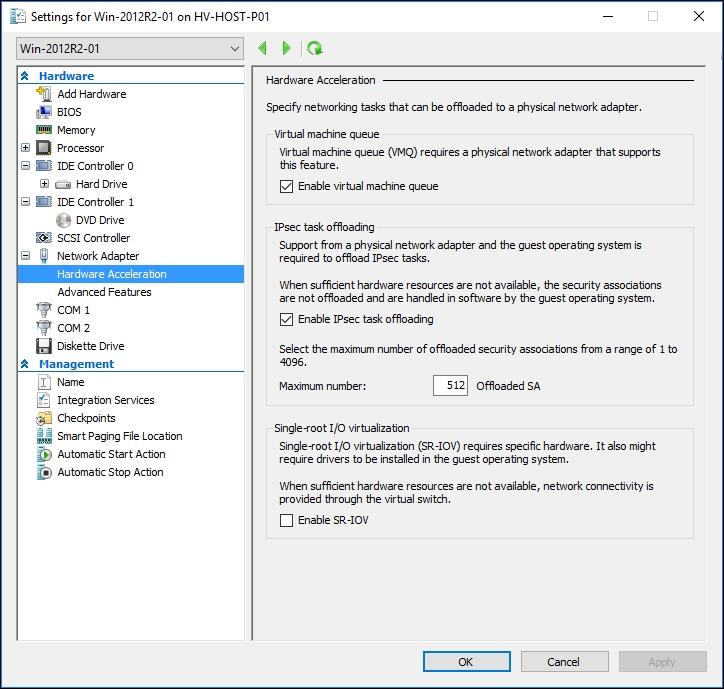
Hardware Acceleration
- Select the network adapter that you want to manage and click on the plus icon (+) to open the options Hardware Acceleration and Advanced Features, as shown in the previous image.
- To disable Virtual Machine Queue (VMQ), uncheck the Enable Virtual machine queue option.
- To disable IPSec task offloading, uncheck the option Enable IPSec task offloading.
- To enable the SR-IOV feature, check the Enable SR-IOV box.
- Now, select the Advanced Feature under the network adapter to change the advanced network adapter settings, as shown in the following screenshot:

Advanced Features
- To change the MAC address to static, select Static and specify the static MAC address.
- To enable the MAC address spoofing option, select the checkbox Enable MAC address spoofing.
- To enable the DHCP guard, check the Enable DHCP guard option.
- To enable the router guard, check the Enable router advertisement guard option.
- To enable port mirroring, select the mirroring mode from the drop-down list; Destination or Source.
- After selecting and modifying the advanced options that you've chosen, click on OK and the virtual machine will start getting all the configurations that have been modified.
Now that you have seen how to enable the advanced features in the virtual network adapter, let's see the explanation for all of them.
The first one, called Virtual Machine Queue (VMQ), spreads the physical network adapter processing dynamically across all the available CPUs in the host server. This decreases the CPU utilization when network utilization is being used to a large extent. If this feature is disabled, the CPU in the host computer will be stressed while processing multiple network I/Os.
IPSec task offloading can also reduce the CPU utilization when large IPSec packets are used by the network, thus saving CPU performance and making a better use of the bandwidth. In this new version of Hyper-V, the IPSec task offloading uses a new version (V2) that supports additional cryptography algorithms and IPv6.
Another interesting configuration available in Windows 2016 Hyper-V is Single-root I/O virtualization (SR-IOV). This feature allows a network adapter to be bound directly to a virtual machine. In other words, Hyper-V doesn't manage the network adapter as it does in other network types. It simply passes all the traffic between the virtual machine and the physical network adapter. This feature is perfect when the virtual machine requires a large network workload, thus reducing the network latency and the CPU utilization on the host server. Another interesting point is that you can still use all the other features such as snapshots, save, pause, storage, and live migration, making it easier to adopt, but you can't use Hyper-V extensible switch features and NIC teaming.
In the MAC address setting, you can specify a static MAC address instead of a dynamic address. With the dynamic MACs, the VM gets a different MAC every time you turn it on. If the VM requires the MAC to always be the same, you can set up a static one through this option.
The MAC Spoofing checkbox can be enabled in cases when the virtual machine needs to send and receive traffic using different MAC addresses, flooded unicast packets, or when it needs to override on their MAC. This option is common when Network Load Balancing is used within the VM.
The last configuration, Port mirroring, allows the network traffic to be mirrored with another virtual machine so that you can use it to monitor all the incoming and outgoing traffic to the destination VM. You have to select the source and the destination virtual machine in order to use port mirroring.
Every setting for network adapters and virtual switches can also be configured via PowerShell using the cmdlet, Set-VMNetworkAdapter.
In this following example, we'll be using the Get-VM command to get all the VMs, and turning on the DHCP Guard, MAC address spoofing, and the Router guard at the same time for all of them:
Get-VM * | Set-VMNetworkAdapter –DhcpGuard On –MacAddressSpoofing On –RouterGuard On
- The Configuring Port ACLs recipe in Chapter 6, Security and Delegation of Control