
The Hyper-V Manager console is an in-box tool for diagnosing and managing your local Hyper-V host and a small number of remote hosts.
Hyper-V Manager in Windows 10 and Windows Server 2016 allows you to manage the following Hyper-V hosts:
- Windows 10
- Windows 8.1
- Windows 8
- Windows Server 2016 + Windows Server Core, Nano Server, and Hyper-V Server
- Windows Server 2012 R2 + Windows Server Core, Datacenter, and Hyper-V Server
- Windows 2012 + Windows Server Core, Datacenter, and Hyper-V Server
Hyper-V Manager in Windows 8.1 and Windows Server 2012 R2 allows you to manage the following Hyper-V hosts:
- Windows 8.1
- Windows 8
- Windows Server 2012 R2 + Windows Server Core, Datacenter, and Hyper-V Server
- Windows 2012 + Windows Server Core, Datacenter, and Hyper-V Server
Hyper-V Manager in Windows 8 and Windows Server 2012 allows you to manage the following Hyper-V hosts:
- Windows 8
- Windows 2012 + Windows Server Core, Datacenter, and Hyper-V Server
Hyper-V became available on the Windows client starting from Windows 8. Prior to Windows 8.1/Server 2012 R2, Hyper-V Manager only managed matched versions of Hyper-V.
One important point to note is Hyper-V Manager functionality matches the functionality available for the version you're managing. In other words, if you're managing a remote Server 2012 host from Server 2012 R2, the new Hyper-V Manager tools from 2012 R2 won't be available.
The PowerShell module for Hyper-V is an in-box tool for diagnosing and managing your local Hyper-V host and a large number of remote hosts.
In Windows Server 2016 and Windows 10, Microsoft added two Hyper-V PowerShell modules in-box and separated them into two versions, V1.1 and V2.0, hence you can manage cross-version Hyper-V hosts.
The PowerShell module for Hyper-V in Windows 10 and Windows Server 2016 allows you to manage the following Hyper-V hosts:
- Windows 10
- Windows 8.1
- Windows 8
- Windows Server 2016 + Windows Server Core, Nano Server, and Hyper-V Server
- Windows Server 2012 R2 + Windows Server Core, Datacenter, and Hyper-V Server
- Windows 2012 + Windows Server Core, Datacenter, and Hyper-V Server
Version 1.1 allows you to manage prior to Windows 8.1/Server 2012 R2, and Version 2.0 allows you to manage Windows 10 and Server 2016.
The PowerShell module for Hyper-V became available in Windows 8 and Windows Server 2012.
This recipe will show you how to manage remote Hyper-V hosts with Hyper-V Manager in the same domain, in different domains, and in a workgroup environment.
This recipe will also show you how to manage cross-version Hyper-V hosts with both PowerShell modules V1.1 and V2.0.
In order to manage remote Hyper-V hosts using Hyper-V Manager, remote management must be enabled on both the local computer and remote host.
You can do this through Server Manager | Remote management, as shown in the following screenshot:
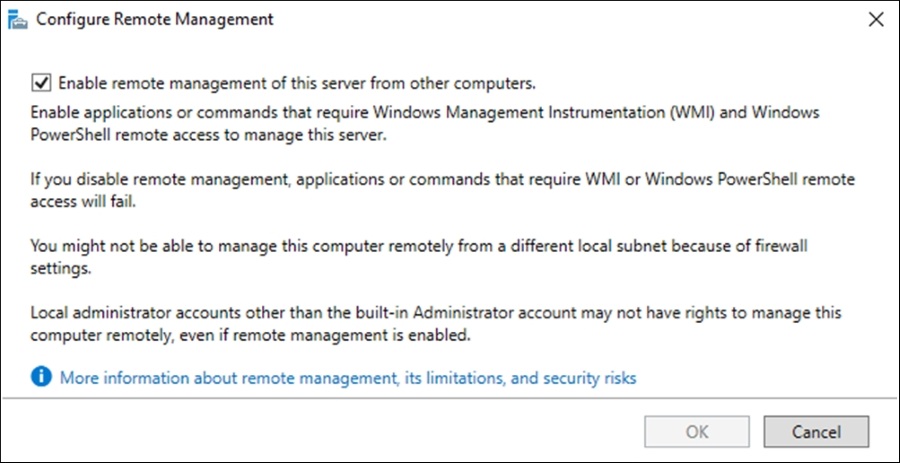
You can also do it by running the following PowerShell command as Administrator:
Enable-PSRemoting
Make sure the Hyper-V Platform role is enabled, as described in the Verifying Hyper-V requirements recipe in Chapter 1, Installing and Managing Hyper-V in Full, Server Core and Nano Server, to see if Hyper-V is supported.
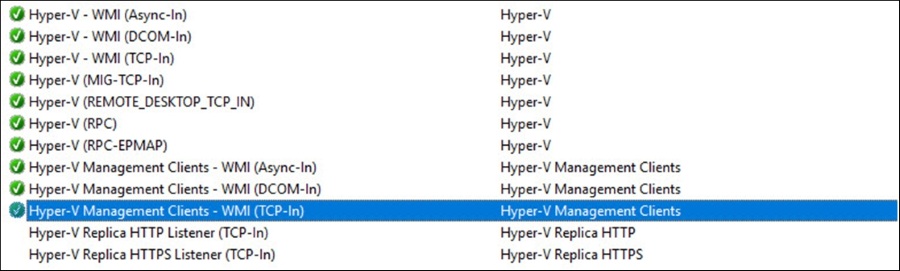
To save some time and unnecessary complications, make sure the two computers have their network configurations, such as IP address, computer name, and so on, already set. The following firewall rules must also be enabled on the remote Hyper-V host to be managed:
When connecting remotely, the current user account you are using should match a Hyper-V administrator account on the remote host in order to connect successfully. However, connecting as another user is supported in Windows Server 2016. We will get into that in a bit.
The following steps will walk you through the details to connect to a remote Hyper-V host using Hyper-V Manager:
- From a Windows 10 client computer, open Control Panel and click on the Programs and Features option.
- In the Programs and Features window, click on Turn Windows Features on or off in the pane on the left-hand side.
- From the Windows Features window, open Hyper-V and select Hyper-V Management Tools, as shown in the following screenshot:
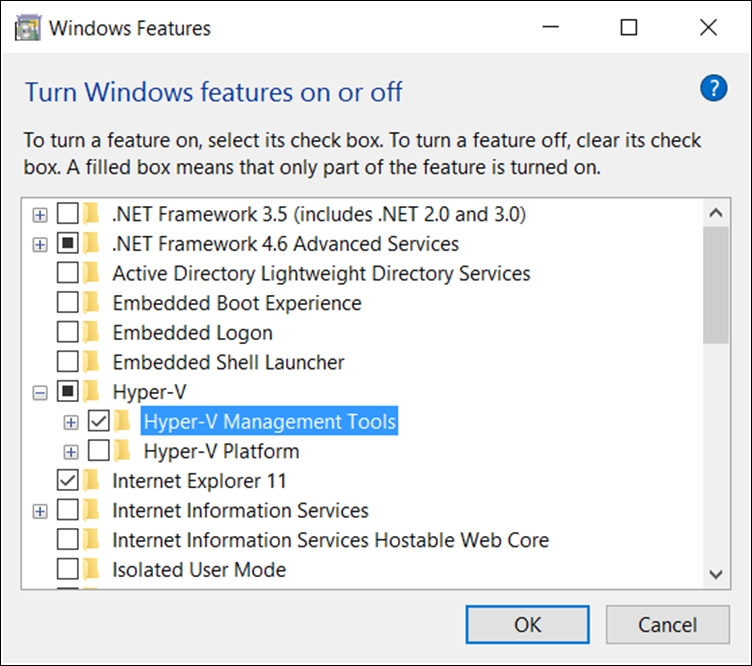
- Click on OK and wait for the installation to be completed.
- You can also install Hyper-V Management Tools on Windows 10 using PowerShell:
Enable-WindowsOptionalFeature -Online -FeatureName Microsoft-Hyper-V-Tools-All -Verbose - To install Hyper-V Management Tools on Windows Server 2016, you can run the following PowerShell cmdlet:
Enable-WindowsOptionalFeature -Online -FeatureName RSAT-Hyper-V-Tools-Feature -Verbose - Click on Start, type Hyper-V in the Start menu, and select the Hyper-V Manager.
- Open the Hyper-V Manager console, make sure Hyper-V Manager is selected, as shown in the following screenshot, and click on Connect to Server…:

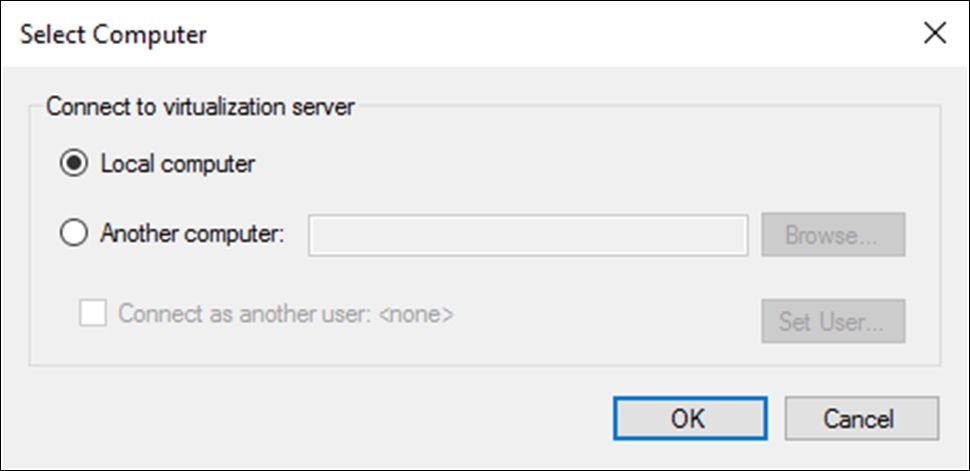
- To add a local host to Hyper-V Manager as a Hyper-V host, Click Connect to Server… and select Local computer in the Select Computer dialog box, as shown in the following screenshot:
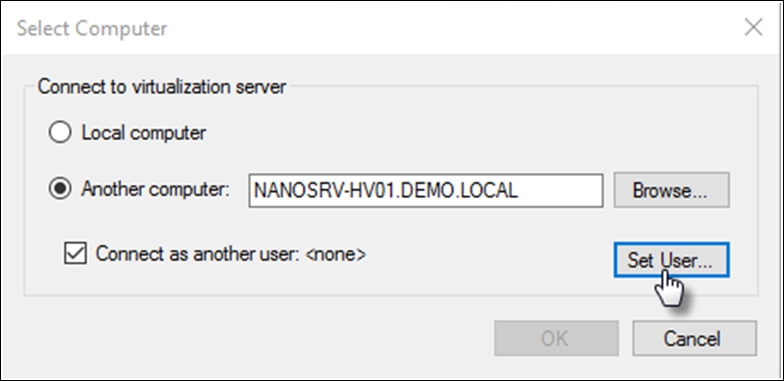
- To manage another Hyper-V host in the same domain, add a remote Hyper-V host to Hyper-V Manager by selecting Another computer in the Select Computer dialog box, and enter the remote host's hostname, NetBIOS, or FQDN into the text field, as shown in the following screenshot:

As mentioned previously, you can connect to a remote Windows 10 or later host using either the host name or IP address. Hyper-V Manager now supports alternate user credentials as well. This is only available when connecting to a Windows 10, Windows Server 2016 or later remote host.
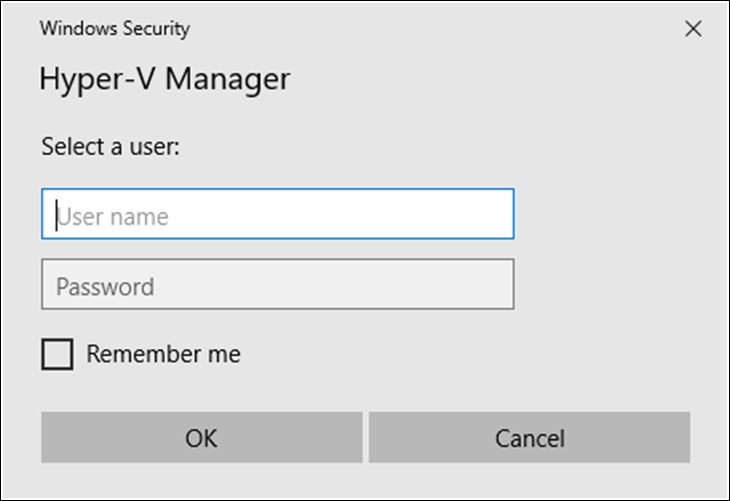
In Windows 10 or Server 2016, if you are not running with the correct user account for the remote host, you can connect as another user with alternative credentials.
To specify credentials for the remote Hyper-V host, select Connect as another user: in the Select Computer dialog box, then select Set User..., as shown in the following screenshot:
Sometimes it's easier to connect using IP Address rather than host name. Windows 10 and Server 2016 allows you to do that by entering the IP Address into the Another Computer text field:
To manage another Hyper-V host in a workgroup environment or in a different domain, you need to run the following commandlets as an administrator on the Hyper-V host to be managed:
Enable-PSRemotingEnable-PSRemotingwill create the necessary firewall rules for private network zones. To allow this access on public zones you will need to enable the rules for CredSSP and WinRM.
Enable-WSManCredSSP -Role server
On the management machine from which you want to connect, run the following commands as Administrator:
Set-Item WSMan:localhostClientTrustedHosts -value "fqdn-of-hyper-v-host"- You can allow all hosts to be trusted to manage by adding an asterisk
*after the-valueparameter; however, this is not recommended in a production environment: please allow only the trusted hosts.
- You can allow all hosts to be trusted to manage by adding an asterisk
Enable-WSManCredSSP -Role client -DelegateComputer "fqdn-of-hyper-v-host"- You can allow all hosts to be trusted to manage by adding asterisk
*after the-DelegateComputerparameter as well; however, this is not recommended in a production environment: please allow only the trusted hosts.
- You can allow all hosts to be trusted to manage by adding asterisk
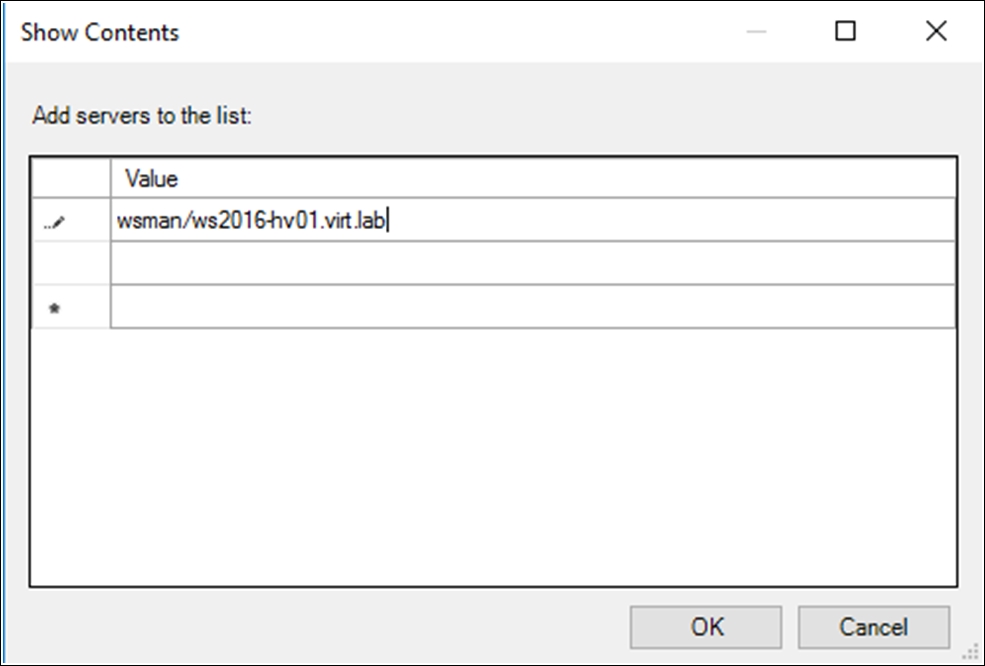
- Additionally, you may need to configure the following group policy: Computer Configuration | Administrative Templates | System | Credentials Delegation | Allow delegating fresh credentials with NTLM-only server authentication
- Click Enable and add
wsman/fqdn-of-hyper-v-hostunder Add servers to the list:, as shown in the following screenshot:
- Click Enable and add
As mentioned previously, Microsoft added two Hyper-V PowerShell modules in Windows 10 and Server 2016 and separated them into two versions, V1.1 and V2.0, so you can manage cross-version Hyper-V hosts.
If you want to manage down-level hosts and Server 2016, you need to have a separate PowerShell session. In other words, every time you want to manage Server 2012 R2 or below, you want to remove the default PowerShell module V2.0 and load PowerShell module V1.1, as shown in the following screenshot.
Alternatively, you can open two PowerShell windows and load the desired version:
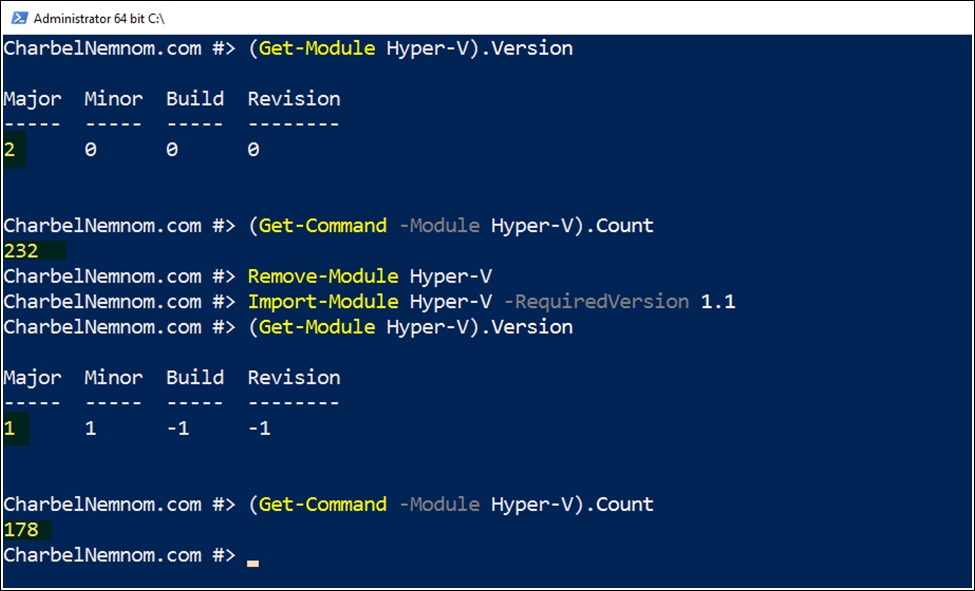
If you noticed, we have 232 commandlets in Version 2.0 and 178 commandlets in the older Version 1.1.
I definitely agree that this is a pain today; hopefully things will change in the near future.
Hyper-V Manager in Windows Server 2016 has been updated to communicate with remote Hyper-V hosts using WinRM and the WS-MAN protocol instead of the WMI V2 namespace, which permits CredSSP, Kerberos, or NTLM authentication. The WS-MAN-based infrastructure also makes it easier to enable a host for remote management. WS-MAN connects over port 80, which is opened by default.
When the client and the server that you want to manage remotely are members of the same domain environment, the process is much simpler. The only things that you need to do are configure the firewall, install Hyper-V Management Tools from the client or server you want to use to connect, open Hyper-V Manager, and connect to the server using an account that is a member of the Hyper-V Administrators group on the destination Hyper-V server.
However, in the case of non-domain-joined computers and workgroup environments, a couple of other settings must be configured on the remote Hyper-V host to be managed. The first thing to be done is to enable PowerShell Remoting, which will create the necessary firewall rules for private network zones. To allow this access on public zones, you will need to enable the firewall rules for CredSSP and WinRM as well. After that, you want to allow the hosts to be trusted and managed. Finally, you need to enable WS-Man CredSSP.
Most of the configurations we have looked at used Hyper-V UI and PowerShell commands, so you can use the same process for all the Hyper-V versions, such as the free Hyper-V Server, Windows Server 2016 Hyper-V with Desktop Experience, Core installation, and Nano Server.
Windows 10 and Windows Server 2016 greatly expanded the possible combinations of remote connection types to manage cross-version Hyper-V hosts.
When you enable Hyper-V on Windows 10 and Windows Server 2016, all the bits and binaries for the Hyper-V Manager UI will be installed automatically under C:Program FilesHyper-V, as shown in the following screenshot:
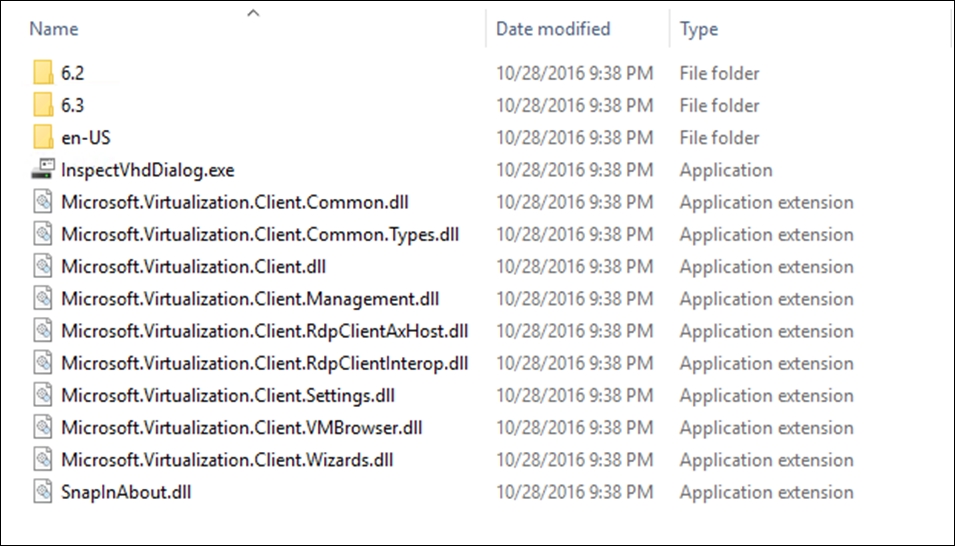
The folder named 6.2 is for Windows Server 2012, the 6.3 folder is for Windows Server 2012 R2. and the remaining bits are for Windows Server 2016, so if you have multiple servers registered in the Hyper-V Manager console and each one is running a different version of Hyper-V, when you click on the server, the correct bits will load automatically to match that exact version. This is a great way to explore all the changes that have been made in the UI over the years. For instance, if you install Windows 10 or the Windows Server 2016 UI and connect to Windows Server 2012, you will notice that Checkpoints are called Snapshots, because Microsoft did not change any of the snap-ins.
You can also connect to a remote Windows 10 or later Hyper-V host using either the host name or IP address.
Hyper-V Manager now supports alternative user credentials as well, so you can choose a different user that is a member of the Hyper-V Administrator group on the remote host, and connect.
- Chapter 7, Configuring High Availability in Hyper-V
- The Managing virtual machines with PowerShell Direct recipe in this chapter
- The Enabling and working with remote connection and administration through PowerShell recipe in this chapter