Every virtual machine on Hyper-V supports IDE and SCSI disks, each one having its own set of benefits, limits, and its own configuration.
It is important to identify when they are necessary, what their limitations are, and (most importantly) how to add and manage them as you will see in the following tasks.
By default, every virtual machine has two IDE controllers and one SCSI controller that can be used to add devices like virtual hard disks or DVD drives. You can use these steps to add a device, for example, virtual hard disk or attach a controller to an existing virtual machine.
The following steps show how to add devices and attach IDE and SCSI controllers to a virtual machine:
- To add a new controller for a virtual machine, open Hyper-V Manager, select the virtual machine on which you want to add a new controller and click Settings in the pane on the right-hand side (or with a right-click on the VM).
- By default, you can see the two IDE controllers on the virtual machine settings. To add a hard drive or a DVD drive, select IDE Controller 0 or 1, select the drive type, and click on Add.
- When adding a new hard drive, you can specify the VHD path under Virtual Hard Disk or use the New button to open the Virtual Hard Disk Wizard.
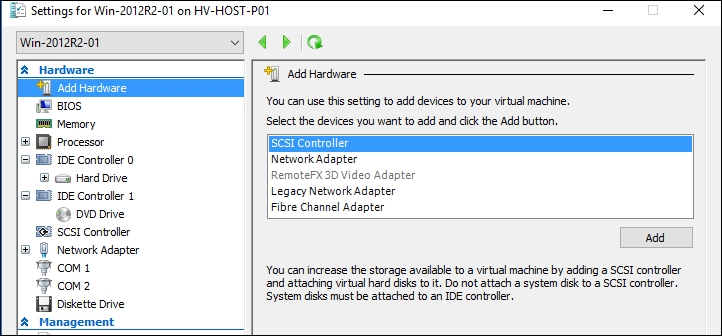
- If you prefer to add a SCSI controller for a virtual machine, select Add Hardware on the left, select SCSI Controller and click on Add as shown in the following screenshot:

Adding Hardware
- Select the new or the existing SCSI controller on the pane on the left-hand side and click on Add to insert a new hard drive.
- Specify the hard drive path or use the New button to create a new
VHDXfile. - By clicking on OK, your virtual machine will be configured with the new controller and its disks attached to it.
On Hyper-V, all the virtual machines by default come with two IDE controllers and one SCSI controller as explained, with the ability to add or remove them, based on the limits that each one has.
For Generation 1 virtual machines, the IDE disk has to be used by default because it is the only supported method to boot an operating system. You can mix IDE and SCSI controllers for the same VM, but the start-up disk used to boot the operating system of your VM, for this generation type, must be on an IDE controller. You can have up to two IDE controllers per virtual machine and two disks per IDE controller.
Note
One of the benefits of a Generation 2 virtual machine (VM) over a Generation 1 VM, is that it will allow a VM to boot from a SCSI virtual hard disk. However, Generation 2 VMs do not support the original VHD virtual hard disk format and so there is a trade-off that needs to be taken into consideration, when designing your VMs storage.
If you have a virtual machine that requires more than four disks, the best option is the SCSI controller. It has a limitation with respect to large environments, with support for up to 256 disks divided into four SCSI devices (64 disks per SCSI controller). Another benefit is its ability to add disks while the virtual machine is running, without the need to shut it down.
Note
A good starting point when deciding your virtual machine's storage layout is to use the IDE controllers for the boot disk, and the attached drive will contain the operating system, and use SCSI controllers for additional data disks, with the benefit of being able to add more VHDX virtual disks on the fly.
PowerShell also provides a few cmdlets for managing IDE and SCSI controllers, such as Get-VMScsiController, Get-VMIdeController, Add-VMScsiController, and, Remove-VMScsiController.
In this handy example, we get every virtual machine with the name that starts with Win-2012R2-0* and add a new SCSI controller:
Get-VM –Name Win-2012R2-0* | Add-VMScsiController
Thanks to the ability to be able to combine PowerShell cmdlets, you can specify the virtual machine to which you want to add the SCSI controller using a single command, without the need to use the Get-VM first:
Add-VMScsiController –VMName Win-2012R2-0*
These two commands do the same thing—adding a new SCSI controller to every VM with their names starting with Win-2012R2-0*. This is a good option to demonstrate how easy it is to use PowerShell.
