
When creating a virtual machine, you also need to specify its disk configuration. Hyper-V has a set of options and advanced settings for different scenarios when you specifically need to optimize your virtual machine (VM) storage setup.
On a daily basis, the administration of your virtual machines and their associated virtual disk configuration will be one of the most common tasks you do. This recipe will show you how to create either a Virtual Hard Disk (VHD) or a virtual hard disk that uses the VHDX format, which was first introduced in Windows Server 2012 Hyper-V for a given VM explaining all the details and options you need to know to ensure the correct configuration for the correct scenario.
Depending on the type of virtual hard disk you create, for example, fixed, dynamically expanding or differencing disk, you may require the same amount of physical disk space as the virtual hard disk that you are creating. So it is important to ensure that there is enough disk space on your host server before you start.
The following steps demonstrate how to create and attach a virtual hard disk to a virtual machine:
- To create a new
VHDXfile, open Hyper-V Manager, click on New in the pane on the right-hand side, and select Hard Disk. - On the Before you Begin page, click on Next.
- Select the disk format from the given formats, choose either VHD or VHDX on the Choose Disk Format page and click on Next. For now, we will ignore VHD Set.
Note
In Windows Server 2012 R2, Microsoft introduced the concept of a shared
VHDXfile. These sharedVHDXfiles could be shared between virtual machines and viewed as shared SAS, and used for the purposes of deploying a Guest cluster. While SharedVHDXfiles haven't gone away in Windows Server 2016, there were a number of constraints to using sharedVHDXfiles. In Windows Server 2016, a new type of VHD is available, a VHD set which is a VHD created with aVHDSextension. VHD Set is a new shared virtual hard disk that can be used for the purposes of deploying a Guest cluster but addresses some of the limitations of sharedVHDXfiles, for example, the lack of ability to resize a VM or the capability to be able to carry out host-based backups. TheVHDSfile is simply a small file that contains the metadata to coordinate disk actions against the nodes in the guest cluster that are accessing the shared VHDX. The shared VHDX in Windows Server 2016 is either a fixed or dynamically expanding automatic VHDX (avhdx) which contains your actual data. - In Choose Disk Type, select the disk you want to create, as shown in the following screenshot and click on Next again:
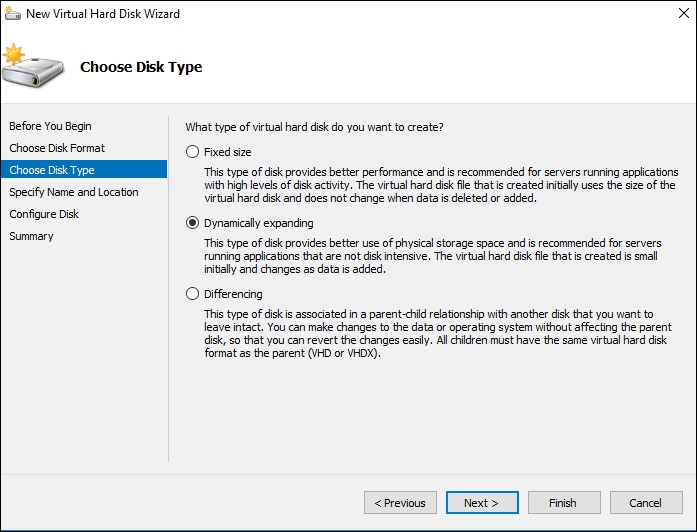
New Virtual Hard Disk Wizard
- On the next page, specify the disk name and location and click on Next.
- In the Configure Disk page, select the option you want when creating your disk, specify a disk size and click on Finish.
- After creating the VHDX file, open the virtual machine settings of the VM you want to add the disk to, select the IDE or SCSI Controller you want, and add the virtual hard disk you created, as shown in the following screenshot:
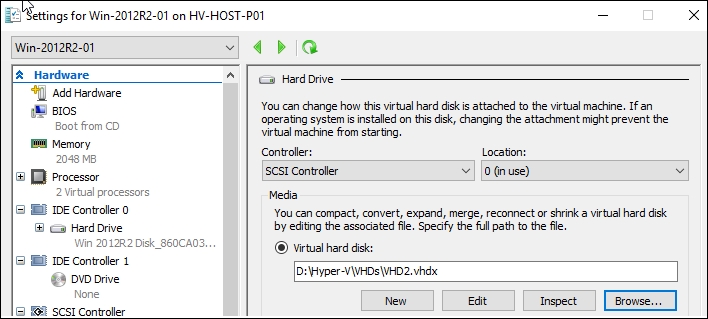
Adding a Virtual Hard Disk
- Now you can open the disk configuration from your virtual machine and the new hard drive will be available to be managed.
The previous process showed how to create a virtual hard disk file, or a VHD file, as we would call it. This format is almost the same as the first virtualization product released by Microsoft back in 2007. Essentially, a VHD contains a file system and partition as you would expect from a normal physical hard drive. However, these VHDs are represented as a file that can be added into the virtual machine for storage. The maximum size of a VHD file is 2 TB. Also, this format can be susceptible to corruption in the event of a power failure, which is why Microsoft moved to using VHDX files.
Windows Server 2012 Hyper-V introduced a new file format named VHDX. This format has an upper limit of 64 TB and has better protection against data corruption in cases of power failure or unplanned shutdown in the host server. It's also efficient in representing data (also known as trim) and improved alignment of the virtual disk format. The method that the virtual machine uses to write the data into a VHDX file has been improved as well by allocating the data in larger block sizes, thus providing more performance. The only downside of VHDX today is that it is not natively supported in Microsoft Azure.
With this new VHDX format, you benefit from an increased size; there aren't many reasons why you should select the older VHD format. However, VHDX files are not available in older versions of Hyper-V, for example, Windows 2008 R2 Hyper-V, but you can still convert to VHD without losing any data, in case you have to. Just don't create a VHDX that is greater than 2 TBs in size.
The most important option when creating a VHD file is the VHD type. The first VHD type is a fixed size; Hyper-V Manager creates a file with the same size as specified during instantiation. That's why it can potentially take a long time, depending what file system the VHD file is being created on, and requires the necessary disk space on the destination location. However, fixed size VHD/VHDX files provide a little better performance compared with other disk types.
The second and the default option, dynamically expanding, creates a file with a couple of MB, no matter the size you specified during the wizard. The disk size will increase based on the data you store on that disk. That's why this disk type requires the physical disk to be monitored. The performance difference between fixed and dynamic disks is quite similar, but dynamic disks have more disk fragmentation when compared with fixed disks.
The last and least used option is the differencing disk. While you create it, the system asks you to specify an existing parent disk to be used as a base disk. All the write operations will be made only in the differencing disk. A common example of this disk is when a read-only parent disk is used with an installed operating system and lots of virtual machines using a differencing disk linked to this parent disk. This saves disk space in the host server. As this option has a single point of failure and a poor performance, the best practice is to use this only for test and development scenarios.
On the Configure Disk page, you have the option to create a blank virtual hard disk, copy the contents of a physical disk, or copy the content of an existing virtual hard disk, which is interesting in case you have an existing VHD/VHDX that can be used as a template.
By clicking on Finish, the system creates the virtual hard drive file in the specified location. You can open the virtual machine you want and then add the created disk to it.
For PowerShell fans, you can create a virtual hard disk with the New-VHD cmdlet and add a virtual hard drive to a virtual machine with the Add-VMHardDiskDrive command, as shown next.
This following example shows how to create a dynamic virtual hard disk with 10 GB on the local D partition:
New-VHD –Path D:Hyper-VVHDsNewDisk.vhdx –SizeBytes 10GB -Dynamic
In this next example, the command adds the NewDisk VHDX file to a virtual machine called Win-2012R2-01:
Add-VMHardDiskDrive –VMName Win-2012R2-01 –Path 'D:Hyper-VVHDs
NewDisk.vhdx'
Online resizing of a VHDX allows you to resize virtual hard disks when the virtual machine is running. The benefit here is that you can resize your storage needs without incurring any downtime. However, there are some restrictions:
- There is no support for the original VHD virtual hard disk format
- You can only resize a VHDX virtual hard disk if it is attached to a SCSI controller
- During the resize operation, writes to the first 128 KB of the disk are not permitted
Following example shows how to resize a VHDX virtual hard disk online to 60 GB on the local D partition:
Resize-VHD -Path D:Hyper-VVHDsNewDisk.vhdx -SizeBytes 60gb
Although VHDX supports up to 64 TB disks, you can still attach a physical disk to your virtual machines. You will also not be able to move your virtual machine to another host, use snapshots, or use host-based backups. It performs better and its limitations do not bog it down. To add a pass-through disk, make sure that the physical disk is seen as offline in the host computer. Open the virtual machine settings, select the controller you want to add the disk, select the physical hard disk option in the drop-down list in the Media section under Settings, and click on OK. After that, the disk will be exclusively used by the VM.
You can also use PowerShell with the Get-VMScsiController and Add-VMHardDiskDrive cmdlets to add a physical disk to a VM, as shown in the following example:
Get-VMScsiController –VMName Win-2012R2-01 –Number 0 | Add-VMHardDiskDrive –DiskNumber 1
Thanks to SMB 3.0, you can now create virtual machines and store their virtual disks on a file server. You can create or copy a VHD file onto a shared folder and by simply using a network path.
In the example in the following image, a VHD has been created and placed on a network share that has been set up with all the control permissions to the user and a computer account of the Hyper-V Server. When creating the virtual machine, all you have to do is specify the Universal Naming Conversion (UNC) path of the VHD on the shared folder.
To store the virtual machines on shared folders using SMB 3.0, you need to make sure that the user account used to create the VM and the host computer account have full access on the share and NTFS permissions:
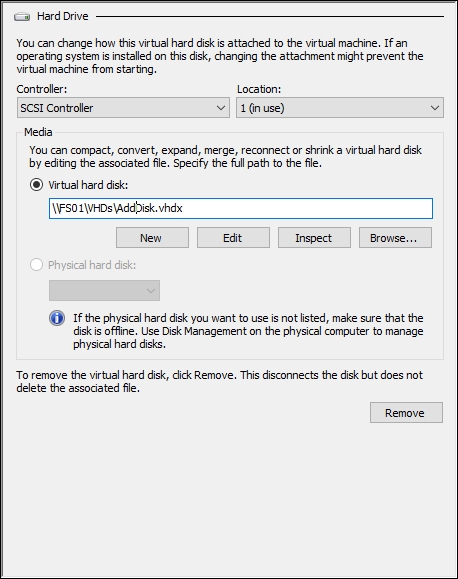
Adding a Virtual Hard Disk via UNC
- The Converting VHD files to VHDX recipe in Chapter 2, Migrating and Upgrading Physical and Virtual Servers
- The Configuring IDE and SCSI controllers recipe in this chapter