
For this whole book I have been discussing things that I assume you already know about, such things as provisioning, deploying, and so on; things that are not part of GameSalad but are an integral part of iOS development. In this appendix, we are going to discuss some of the very basics of iOS development, things such as:
- Becoming a registered developer
- Downloading Xcode
- Code Signing and Provisioning Profiles
- App Loader
Following is a screenshot, which shows the screen after registration:

First off, let's start with becoming a registered developer, go to www.developer.apple.com, scroll down, and find the section that says Join the iOS Developer Program and click on it.

On the next page, you will see a button at the top that says Enroll Now for $99/year, this is the standard rate for individual developers, as shown in the following screenshot:

The important fine print for business owners at the bottom states:
"*Business Requirements: The person enrolling on behalf of the company or organization must have the legal authority to bind his or her company to any legal agreements that may be presented during the enrolment process or membership year. This person may also need to provide business documents including, but not limited to Articles of Incorporation, Business License, etc. as part of our identity verification process. Technical Requirements: You must have an Intel-based Mac running Mac OS X Snow Leopard or later to develop and distribute iOS and Mac OS X apps."
Note
You cannot sign up as a Business with Sole Proprietorship; if you select this, you will be spending about five days e-mailing Apple only to find out that they cannot process your request because you do not meet the Business account requirements. So, for now, we are just going to sign up as an individual.
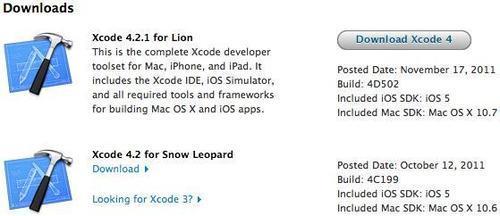
On the next page, you will be asked to either use your previous Apple ID, or to create a new one. If you have one sign in, if you don't, you can create one right now. You will next be asked if you want to create an Individual or a Business account. Let's choose Individual. Now, all you have to do is fill in your information, pay for it, and wait for the e-mail from Apple saying your account is active. After that, go to www.developer.apple.com/iphone and log in, then scroll down and download Xcode, as shown in the following screenshot. You will need this to install the GameSalad Viewer app on to your phone.
If you are still on the iOS Dev Center page, locate the navigation bar on the side, and find the button that says iOS Provisioning Portal. Click on it.
You will now be taken to the Provisioning Portal; from here, you can create development profiles and distribution profiles. The first thing you are going to do is click the Certificates button on the side bar, and create your own Certificate. To do this, follow the following guide:
To request an iOS Development Certificate, you first need to generate a Certificate Signing Request (CSR) utilizing the Keychain Access application in Mac OS X Leopard. The creation of a CSR will prompt Keychain Access to simultaneously generate your public and private key pair, establishing your iOS Developer identity. Your private key is stored in the login Keychain by default, and can be viewed in the Keychain Access application under the 'Keys' category. To generate a CSR:
Tip
This is going to get pretty technical. If you are having a hard time following it then slow down, take your time. Once all this is set up, you won't have to do it again (at least not until your developer certificates expire, which is usually after one year)
- In your
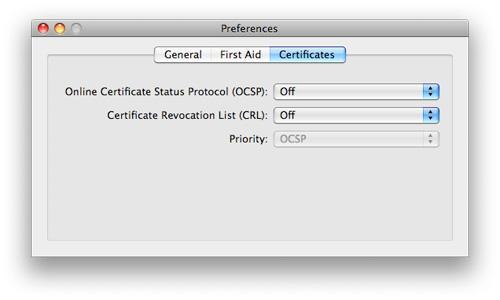
Applicationsfolder, open theUtilitiesfolder and launch Keychain Access. - In the Preferences menu, set Online Certificate Status Protocol (OSCP) and Certificate Revocation List (CRL) to Off, as shown in following screenshot:
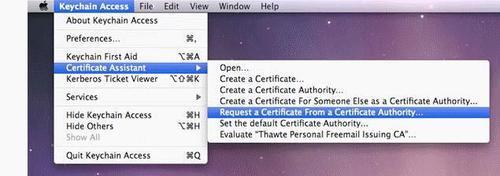
- Choose Keychain Access | Certificate Assistant | Request a Certificate from a Certificate Authority....
- Confirm that you are selecting Request a Certificate From a Certificate Authority... and not selecting Request a Certificate From a Certificate Authority with <Private Key>.... Look at the following screenshot to see what I mean:
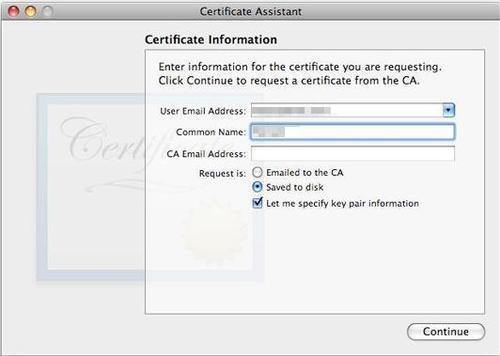
- In the User Email Address field, enter your e-mail address. Please ensure that the e-mail address entered matches the information that was submitted when you registered as an iOS Developer.
- In the Common Name field, enter your name. Please make sure the name you entered matches the information that was submitted when you registered as an iOS Developer.
- Next, you will see that a No CA (Certificate Authority) Email Address is Required. The Required message will be removed after completing the following step.
- Select the Saved to Disk radio button and if prompted, select Let me specify key pair information and click Continue.
- If Let me specify key pair was selected (as shown in the previous screenshot), specify a filename and click Save. In the following screen, select
2048 bitsfor the Key Size andRSAfor the Algorithm. Click Continue. - The Certificate Assistant will create a CSR file on your desktop.
Now, we have to submit the certificate that we just created; from here on everything should be smooth sailing. Following is what we have to do:
- After creating a CSR (Certificate Signing Request), log in to the iOS Provisioning Portal, navigate to Certificates | Development, and click Add Certificate.
- Click the Choose file button, select your CSR and click Submit. If the Key Size was not set to 2048 bits during the CSR creation process, the Portal will reject the CSR.
- Upon submission, Team Admins will be notified via e-mail of the certificate request. (The way that we set up our account, you are the Team Admin. You can have numerous team admins on your account, but we won't worry about this).
- Once your CSR is approved or rejected by a Team Admin (you), you will be notified via e-mail of the change in your certificate status.
- Team Agents and Team Admins have the authority and responsibility to approve or reject all iOS Development Certificate requests. In order to approve/reject Team Members' requests, all Team Admins should first submit their own CSR for approval.
- After submitting a CSR for approval, you will be directed to the Development tab of the Certificates section. Under this tab, the certificates can be approved or rejected by clicking the Approve or Reject buttons next to each request.
- Once a certificate is approved or rejected, the requesting Team Member (which again in this case is you) is notified via e-mail of the change in their certificate status. Each iOS Development Certificate is available to both the Team Member who submitted the CSR for approval and to the Team Admin(s).
Just to clarify everything, in this case, because you are the sole owner of the developer profile, you are the Team Member and Team Admin. You will be the one who is requesting all profiles and certificates, and you will be the only one who will accept or reject any profiles (that is unless you have more than one developer on your profile, then you can set them as a Team Member or Admin).
Now, it's time for us to make use of the certificate we created, we are going to install it on our computer.
- In the Certificates | Distribution section of the Developer Portal, right-click the WWDR Intermediate Certificate link and select Saved Linked File to Downloads to download the certificate.
- On your computer, double-click the WWDR Intermediate certificate to launch Keychain Access program, which will then install the certificate.
- Upon certificate approval, Team Members and Team Admins can download their certificates via the Certificates section of the Provisioning Portal. Click Download next to the certificate name to download your iOS Development Certificate to your local machine.
- On your Mac, double-click the downloaded
.cerfile to launch Keychain Access and install your certificate (the same as done previously, but this is your personal certificate). - Team Members can only download their own iOS Development Certificates. Team Admins have the authority to download the public certificates of all their Team Members. Apple never receives the private key for a Certificate Signing Request. The private keys are not available to anyone except the original creator and are stored in the system keychain of that Team Member.
That's all for that part, it's a bit of a long and technical process but it is required. Now that it's done, we can proceed to adding your device, so click the Device button on the side bar, and do the following:
The Devices section of the iOS Provisioning Portal allows you to enter the Apple devices that you will be using for your iOS development. In order to debug your iOS application on an Apple device, a Team Agent or Team Admin must first enter the Unique Device Identifier (UDID) for each iPhone and iPod Touch into the Provisioning Portal. The UDID is a 40 character string that is tied to a single device, similar to a serial number. These UDIDs are included in the provisioning profiles created later. You can input up to 100 devices for your development team.
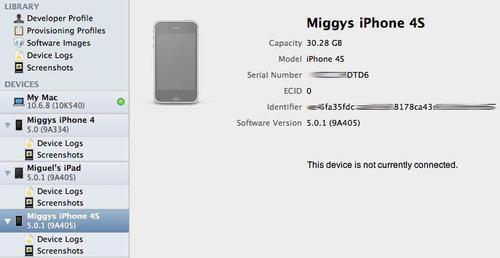
To find out your device's UDID, simply connect your device to your Mac and open Xcode. In Xcode, navigate to the Window drop-down menu and select Organizer. The 40 hex character string in the Identifier field is your device's UDID, as shown in the following screenshot. Team Members should send this string to their Team Admins for input into the Provisioning Portal.
Note
Alternately, you can connect your device and open iTunes, click on your device in the side bar. For the iPhone, click your Phone Number once, it will change to your IMEI, then click it again and it will display your UDID.
- Upon receiving a UDID, go to the Devices section of the Provisioning Portal and click Add Device. Admins will enter a device name as well as the UDID and click 'Submit'.
- Connect your device to your Mac, close iTunes and launch Xcode.
- Once Xcode detects the device, select Use for Development when prompted.
That's it for the devices. As mentioned earlier, you can have up to 100 devices on your account. Beware, there are many websites that you can pay to add your device to their developer profile so you can access all the beta software, this is illegal! As the warning shows in the following screenshot:

YIKES! You may be subject to a criminal and civil liability and I don't think any one would want that to happen.
An App ID is a unique identifier that iOS uses to allow your application to connect to the Apple Push Notification service, share keychain data between applications, and communicate with external hardware accessories you wish to pair your iOS application with. In order to install your application on an iOS-based device, you will need to create an App ID.
Each App ID consists of a unique 10 character "Bundle Seed ID" prefix generated by Apple, and a "Bundle Identifier" suffix that is entered by a Team Admin in the Provisioning Portal. The recommended practice is to use a reversed domain-name-style string for the "Bundle Identifier" portion of the App ID. An example App ID using this approach would be: 8E549T7128.com.apple.AddressBook.
If you are creating a suite of applications that will share the same Keychain access (for example, sharing passwords between applications) or have no Keychain Access requirements, you can create a single App ID for your entire application suite utilizing a trailing asterisk as a wildcard character. The wildcard character must be the last character in the App ID string. Example of an App ID for this situation could be: R2T24EVAEE.com.domainname. or R2T24EVAEE.
For this section, navigate to the App ID section of the Provisioning Portal.
- Click Add ID.
- Enter a common name for your App ID. This is a name for easy reference and identification within the Provisioning Portal.
- Enter a Bundle Identifier in the free-form text field. The recommended usage is a reversed domain-name-style string, for example, com.domainname.applicationname. For a suite of applications sharing the same Keychain access, you should use a wildcard character in the Bundle Identifier (for example, com.domainname.* or *). This Bundle Identifier will need to match whatever CF Bundle Identifier you use for your application in Xcode.
- Click Submit. At this time, the 10 character Bundle Seed ID is generated and concatenated with the Bundle Identifier you entered. This resulting string is your App ID. Note: The Bundle Seed ID does not need to be entered into Xcode.
Ok, so that was a really long and confusing section. Don't worry, it's not something you have to do every time you want to create a new provisioning profile, that's just the initial set up. Now let's finish setting up the provisioning profile.
- In the Provisioning section of the Portal, click Add on the Development tab.
- Enter a name for the provisioning profile.
- Specify which devices will be associated with the provisioning profile. You must specify a device in order for that device to use the provisioning profile. If a device's UDID is not included, the profile and your application cannot be installed on that device.
- Specify which Development Certificates will be associated with the provisioning profile. You must specify an iOS Development Certificate in order for the application code signed with that same certificate to run on the device.
- Choose a single App ID for the Development Provisioning Profile. Each Development Provisioning Profile can specify only one application ID. If you have applications requiring different Keychain access, you will need to create a separate Development Provisioning Profile for each of these applications. If you are installing a suite of applications with the same required Keychain access, or have a set of applications not requiring access to the Keychain, use an App ID containing the wildcard asterisk character to build all of your applications.
- Click Submit to generate your Development Provisioning Profile.
- You can now download a Development Provisioning Profile from the Provisioning section of the Portal after it has been created. Only those developers whose Apple device IDs and iOS Development Certificates are included in the provisioning profile will be able to install and test their application on their device.
- In the Provisioning section of the Provisioning Portal, click the Download button next to the desired provisioning profile.
- Drag the downloaded file onto the Xcode application icon in the dock or into the Organizer window within Xcode. This will automatically copy the
.mobileprovisionfile to the proper directory. Alternatively, you can drag the.mobileprovisionfile onto the iTunes icon in the dock or copy the file to~/Library/MobileDevice/Provisioning Profiles. If the directory does not exist, you will need to create it. Click on the + button in the Provisioning section of the Organizer window to install your.mobileprovisionfile.
Follow the given steps to build and install your app:
- Launch Xcode and open your project; for this, let's open up the GS Viewer app.
- In the Project window, select Device - iPhone OS from the Device | Debug drop-down menu in the upper left-hand corner.
- Highlight the project target and select the Info icon from the top menu bar.
- In the Target Info window, navigate to the Build pane and click the Any iOS Device pop-up menu below the Code Signing Identity field, then select the iOS Development Certificate/Provisioning Profile pair you wish to sign and install your code with. Your iOS Development certificate will be in bold with the Provisioning Profile associated with it in gray above. In this example, iOS Developer: Team Leader is the Development Certificate and My First Development Provisioning Profile is the
.mobileprovisionfile paired with it. - If the private key for your iOS Development certificate is missing, or if your iOS Development certificate is not included in a provisioning profile, you will be unable to select the iOS Development Certificate/Provisioning Profile pair and you will see the following:
Re-installing the private key or downloading a provisioning profile with your iOS Development certificate included in it will correct this.
- In the Properties pane of the Target Info window, enter the Bundle Identifier portion of your App ID. If you have used an explicit App ID, you must enter the Bundle Identifier portion of the App ID in the Identifier field. For example, I would enter
com.wurdindustries.GSviewer. - Click Build and Go to install the application on your Apple device.
That's all you need to do for development profiles. You can do the same with distribution profiles, but an app built with one cannot be installed on your device.
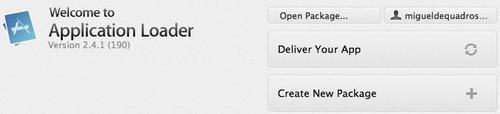
As we mentioned in Chapter 11, Metal Mech Part 4 under the Uploading our App to iTunes Connect heading, if your app is all ready for upload, you went through adding a new application in the iTunes Connect (www.iTunesConnect.Apple.com) page, and you have marked your app Waiting For Upload, you can now upload it using the App Loader application found on your computer (/Developer/Applications/Utilities/Application Loader.app). You will see the icon as in the following screenshot.

- Click the Deliver Your App button and a new window will open up (see the following screenshot). First it will check for available apps that are marked as Waiting for Upload.
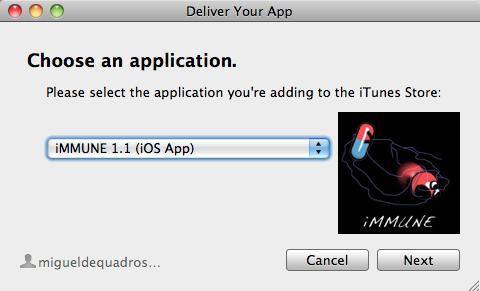
- Once it is finished, it will show you a list of apps (as shown in the following screenshot) that you can upload.
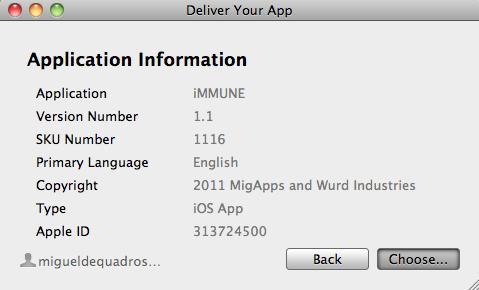
- Click the Next button. On the next screen you will see your app information page (as shown in the following screenshot), this just helps you verify all your information before you upload the app. Click the Choose... button.
Note
You may run into certain errors when trying to upload things such as invalid provisioning profile or invalid version number. These things are simple to fix, usually you selected the wrong provisioning profile, or the version number is different on the App than the one you specified in iTunes Connect.
- Click the ellipsis... button to replace the current file before submitting.
- Click Send; Application Loader will now begin submitting your app to the App Store.
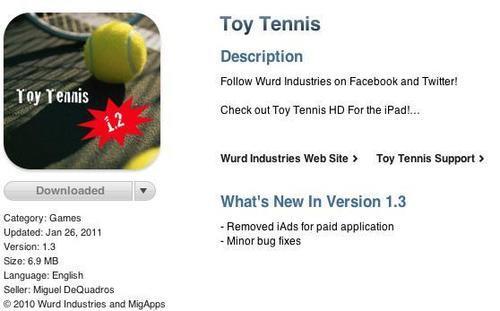
- Your app has now been delivered to Apple, wait for 1-2 weeks and you will see it on the App Store! The following screenshot is an example of an app on the App Store:
If you need any more information the Apple Documentation is always very helpful, and if something didn't work properly you can always contact the Apple Developer Support Hot Line and the people there are very helpful and will help you as much as they can. Go get 'em tiger!