List components in Dynamics CRM 2011 have a powerful feature named Filtering. This is very similar to the column filter feature available in Microsoft Excel, and just as useful when dealing with large segments of data in a list.
Carry out the following steps in order to complete this recipe:
- Select the Dashboards link from the Workplace area.
- Select the Microsoft Dynamics CRM Overview dashboard. There should be a list located near the bottom right of this dashboard with the title My Activities.
- Select that list; you will notice a light blue highlighted box that appears around the entire list component as shown in the following screenshot:
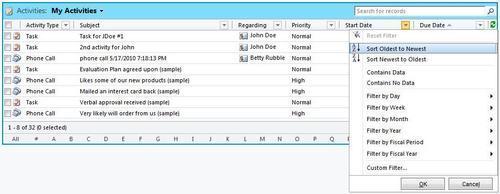
- The ribbon (toolbar) in Dynamics CRM 2011 will change to show commands related to the list you have highlighted (My Activities). Click on the Filter button located in the Current View section of the ribbon as shown in the following screenshot:

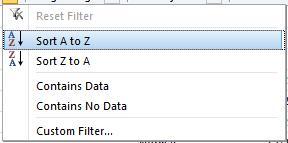
- Once you enable filtering, each of the column headings in the list will get a small drop-down menu icon located to the right of the column heading text. Click on the drop-down menu icon for the Priority field to see the options available as shown in the following screenshot:

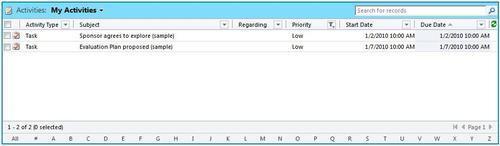
- From the list of available options (Low, Normal, and High), select the item labeled Low and then click on the OK button. The list data will now be filtered to only include activities where the Priority value equals Low, as shown in the following screenshot:
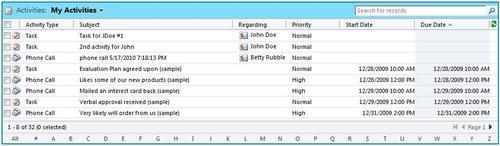
- In order to clear the filter from the Priority column, click on the small filter icon located in the column heading again. The first menu item in the filter menu will be called Reset Filter. Click on the Reset Filter menu item and the Priority equals Low filter will be removed:

In this recipe, we worked with the Activity's Priority field, and as this field was designed as an Option Set field (a field that contains a series of options that are displayed in a pick-list control), the filter menu being displayed included the list of options available to the user when they see this field on a data form. The user can pick from a list of valid items instead of trying to remember what to type in when building the filter condition.
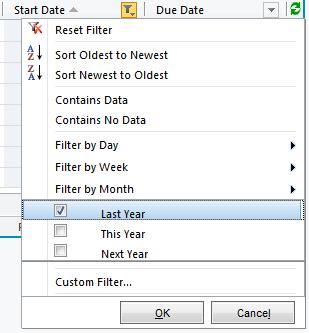
Filters applied to the list component are not stored with the dashboard. If you leave this dashboard and come back, the filters will be cleared. When filtering is enabled on a list, there is a default set of actions that can be executed on each column regardless of the data type. The following screenshot shows the various actions that can be executed on a column:
- Sort A to Z applies an ascending search order to the column data.
- Sort Z to A applies a descending search order to the column data.
- Contains Data only shows records where there is data in this column.
- Contains No Data shows records where there is no data in this column.
- Custom Filter allows the user to build an AND/OR condition for this column. The options available are the same as those seen in the expanded filter menu, but you can specify multiple conditions along with a more complex OR condition when needed:
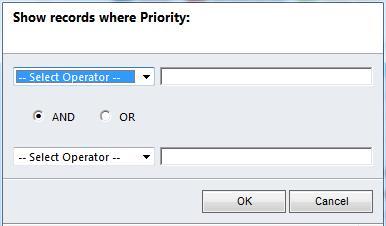
When performing a filter on a text column, you can use the default options (listed earlier in this recipe) or you can use the Custom Filter option.
- Turn on filtering and open the filter options located to the right of the column text for the Subject column.
- Select the Custom Filter option.
- In the first Select Operator pick list, select the Contains option and type the word like in the criteria field.

- Click on the OK button to see your results. They should show all records where the word like was somewhere in the Subject field:
If you are filtering on a Lookup type column (a field that creates a link to another record in the system), you will have the Filter by specific Regarding option, which will let you specify exactly which related records to include in the filter condition.
- Turn on filtering and open the filter options menu for the Regarding column as shown in the following screenshot:
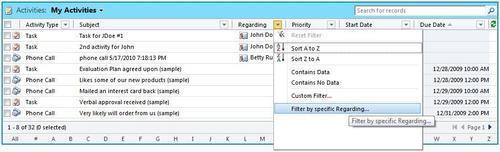
- Click on the Filter by specific Regarding menu item. You will be presented with a Look Up Records dialog. Locate the John Doe contact record and add it to the Selected records list. Click on the OK button as shown in the following screenshot:
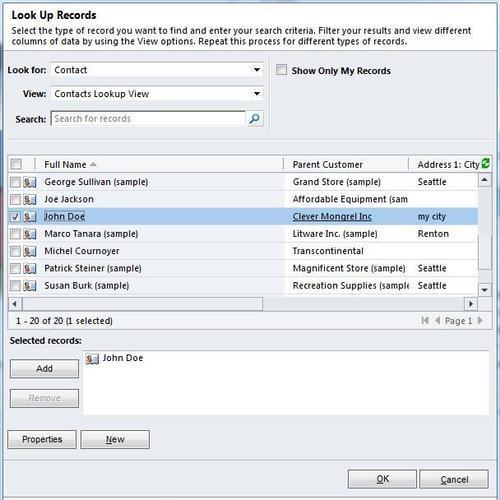
- Your list will only contain Activity records that are regarding John Doe.