
Many of the entities in Dynamics CRM come with predefined System charts. This recipe will show the reader how to create a new System chart that can be used as a visualization in Dynamics CRM.
This recipe is for users with the Administrator and/or System Customizer security roles. You will need to have access to the Settings area of Dynamics CRM.
Carry out the following steps in order to complete this recipe:
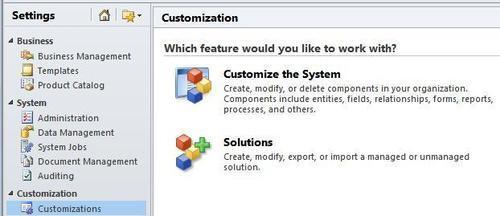
- Navigate to the Customization section in the Settings area of Dynamics CRM. Click on the Customize the System link to open the default solution, as shown in the following screenshot:
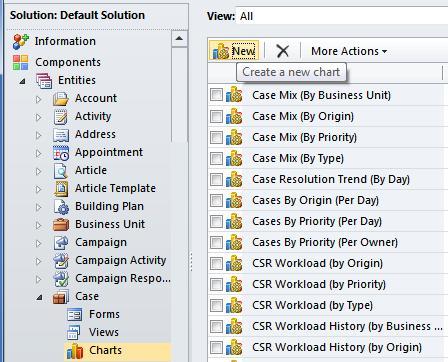
- The Solution Explorer dialog showing the Default Solution for Dynamics CRM will open. Navigate through the Entities list and locate the Case entity. Within that entity, select the Charts link to see a listing of the available charts for the Case entity. Click on the New button in the toolbar to create a new chart:
- When the new chart dialog appears, specify the chart type by selecting the Column chart from the option set in the toolbar:

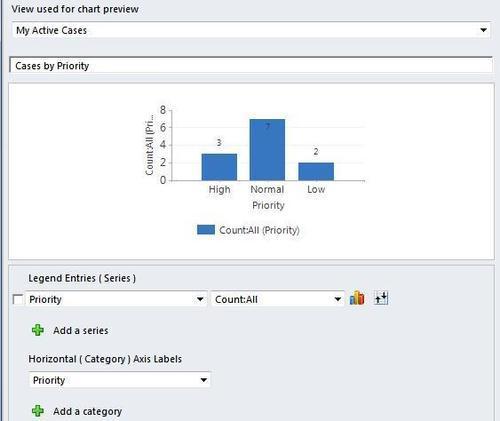
- For the View used for chart preview field, select the My Active Cases view. The next field down is the chart name; type in Cases by Priority:

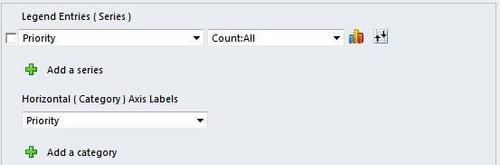
- The preview section of this dialog will be empty until the axis fields are set. In the Legend Entries ( Series ) list, select the Priority field. The aggregate setting should be set to Count:All. For the Horizontal ( Category ) Axis Labels field select the Priority field again, as shown in the following screenshot:
- Once you are finished setting those parameters, the dialog will look similar to the following screenshot. You can provide a description if you want and then click on the Save & Close button to commit the changes:
The chart control being used in Microsoft Dynamics CRM is the same Microsoft Chart Control found in the Microsoft .NET 3.5 Framework. Charts are related to a Dynamics CRM entity and display data based on views related to the same entity. Charts can display data from both system views and user views. However, System charts cannot be rendered with a user view. The view being used for designing the chart can still be changed to another view when the chart is finally displayed on a dashboard or form.
Creating a chart with Dynamics CRM 2011 allows you to report on data that is provided from a view. Further, there are still more options available in the Chart Designer to further refine the data being visualized.
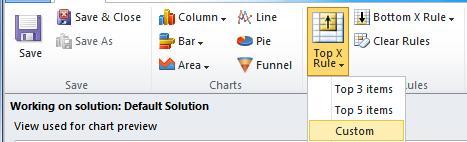
When charting larger amounts of data, or when trying to focus on top or bottom sections of the data, a filter can be applied to the view by using the Top X Rule or Bottom X Rule parameters. Clicking on either of these toolbar buttons will let the designer pick from default filters or set a custom value. In order to turn the filter options off, click on the Clear Rules toolbar button:
The Microsoft Dynamics CRM SDK specifies that all Custom Entities and the following System Entities all support chart visualizations:
|
Account |
Activity Pointer |
Appointment |
Bulk Operation |
Campaign |
Campaign Activity |
Campaign Response |
|
Competitor |
Connection |
Contact |
Contract |
|
Fax |
Goal |
|
Goal Rollup Query |
Incident |
Invoice |
Invoice Detail |
KbArticle |
Lead |
Letter |
|
List |
Metric |
Opportunity |
Opportunity Product |
Phone Call |
Price Level |
Product |
|
Queue Item |
Quote |
Quote Detail |
Recurring Appointment Master |
Report |
Sales Literature |
Sales Order |
|
Sales Order Detail |
Service |
Service Appointment |
System User |
Task |
Team |
Territory |
|
UoM Schedule |