
A stack is an orchestrated set of services, where the user launching the stack shouldn't care too much about what IP addresses were assigned. However, the application stack has been launched to serve a purpose and therefore it is helpful to know how to access it! To access the environment, the user interrogates the "outputs" of the stack, which were defined as part of the template. In this example, we are concerned about how to access the website running behind the HAProxy server. The HAProxy server has been assigned a floating IP from the GATEWAY_NET network, and it is assumed that this is how the application will be accessed.
Ensure that you are logged on to a correctly configured OpenStack client and can access the OpenStack environment. Refer to Chapter 2, The OpenStack Client, for details of setting up your environment to use Heat.
To view the application stack and get information about how to access it, carry out the following steps:
- You can view more details of a stack using the following command:
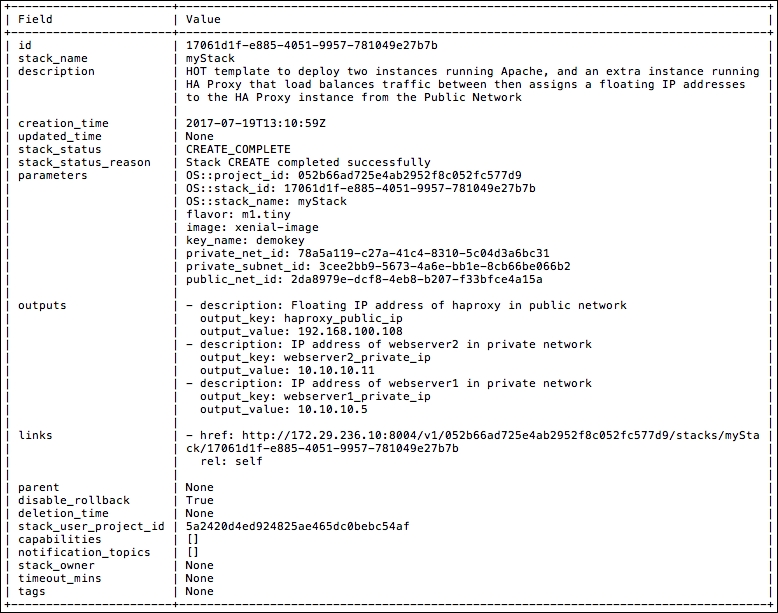
openstack stack show myStackThis will bring back a number of details about the created stack:
- A section in the template references outputs. Outputs allow a user to interrogate these values so that they can access the running stack. Without this, the user would have to do more digging into the running systems to find out what IP addresses were assigned to the instances that make up the stack. To see a list of outputs associated with our running stack, execute the following command:
openstack stack output list myStackThis will bring back the following output:

- To view a particular value, such as the public IP (floating IP) assigned to our HAProxy instance, we can access the websites that are running on private addresses behind the load balancer. To do so, issue the following command:
openstack stack output show myStack haproxy_public_ipThis gives the IP address that we would then use to access this particular service set up as a stack:

- In this example application stack, we can then use the
http://192.168.100.108/address, which will send the request to either of the web servers that are running, configured as part of this HAProxy load balancer demonstration.
A stack is designed to take a number of inputs, performs some actions, and produces a number of instances running an application ready for service. However, this hands-off approach means a lot of decisions are automatically dictated by OpenStack—predominantly because the instances get served from DHCP-enabled subnets. In order to find out the state of the stack and information about how to access the stack, a user would interrogate the outputs, which were described in the template. In the example template, the output section looks like the following:
outputs:
  webserver1_private_ip:
    description: IP address of webserver1 in private network
    value: { get_attr: [ webserver1, first_address ] }
  webserver2_private_ip:
    description: IP address of webserver2 in private network
    value: { get_attr: [ webserver2, first_address ] }
  haproxy_public_ip:
    description: Floating IP address of haproxy in public network
    value: { get_attr: [ haproxy_floating_ip, floating_ip_address ] }
The outputs that have more information are labelled as follows:
webserver1_private_ipwebserver2_private_iphaproxy_public_ip
In this recipe, we specifically targeted haproxy_public_ip, as this is how we would access the web service that we created. We issued the following command to do this:
openstack stack output show myStack haproxy_public_ip