
In an ideal world, each of us would have access to physical servers and the network kit in order to learn, test, and experiment with OpenStack. However, most of the time this isn't the case. By using an orchestrated virtual lab, using Vagrant and VirtualBox, allows you to experience this chapter on OpenStack-Ansible using your laptop.
The following Vagrant lab can be found at http://openstackbook.online/.
This is the architecture of the Vagrant-based OpenStack environment:
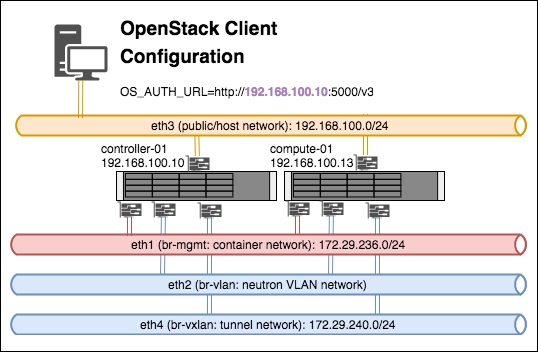
Essentially there are three virtual machines that are created (a controller node, a compute node and a client machine), and each host has four network cards (plus an internal bridged interface used by VirtualBox itself). The four network cards represent the networks described in this chapter:
- Eth1: This is included in the
br-mgmtbridge, and used by the container network - Eth2: This is included in the
br-vlanbridge, and used when a VLAN-based Neutron network is created once OpenStack is up and running - Eth3: This is the client or host network—the network we would be using to interact with OpenStack services (for example, the public/external side of the load balancer)
- Eth4: This is included in the
br-vxlanbridge, and used when a VXLAN-based Neutron overlay network is created once OpenStack is up and running
Note that the virtual machine called openstack-client, which gets created in this lab, provides you with all the command-line tools to conveniently get you started with working with OpenStack.
In order to run a multi-node OpenStack environment, running as a virtual environment on your laptop or designated host, the following set of requirements are needed:
- A Linux, Mac, or Windows desktop, laptop or server. The authors of this book use macOS and Linux, with Windows as the host desktop being the least tested configuration.
- At least 16GB RAM. 24GB is recommended.
- About 50 GB of disk space. The virtual machines that provide the infra and compute nodes in this virtual environment are thin provisioned, so this requirement is just a guide depending on your use.
- An internet connection. The faster the better, as the installation relies on downloading files and packages directly from the internet.
To run the OpenStack environment within the virtual environment, we need a few programs installed, all of which are free to download and use: VirtualBox, Vagrant, and Git. VirtualBox provides the virtual servers representing the servers in a normal OpenStack installation; Vagrant describes the installation in a fully orchestrated way; Git allows us to check out all of the scripts that we provide as part of the book to easily test a virtual OpenStack installation. The following instructions describe an installation of these tools on Ubuntu Linux.
We first need to install VirtualBox if it is not already installed. We recommend downloading the latest available releases of the software. To do so on Ubuntu Linux as root, follow these steps:
- We first add the
virtualbox.orgrepository key with the following command:wget -q https://www.virtualbox.org/download/oracle_vbox_2016.asc -O- | sudo apt-key add – - Next we add the repository file to our
aptconfiguration, by creating a file called/etc/apt/sources.list.d/virtualbox.confwith the following contents:deb http://download.virtualbox.org/virtualbox/debian xenial contrib - We now run an
apt updateto refresh and update theaptcache with the following command:apt update - Now install VirtualBox with the following command:
apt install virtualbox-5.1
Once VirtualBox is installed, we can install Vagrant. Follow these steps to install Vagrant:
- Vagrant is downloaded from https://www.vagrantup.com/downloads.html. The version we want is Debian 64-Bit. At the time of writing, this is version 2.0.1. To download it on our desktop issue the following command:
wget https://releases.hashicorp.com/vagrant/2.0.1/vagrant_2.0.1_x86_64.deb - We can now install the file with the following command
dpkg -i ./vagrant_2.0.1_x86_64.deb
The lab utilizes two vagrant plugins: vagrant-hostmanager and vagrant-triggers. To install these, carry out the following steps:
- Install
vagrant-hostmanagerusing thevagranttool:vagrant plugin install vagrant-hostmanager - Install
vagrant-triggersusing thevagranttool:vagrant plugin install vagrant-triggers
If Git is not currently installed, issue the following command to install git on a Ubuntu machine:
apt update
apt install git
Now that we have the required tools, we can use the OpenStackCookbook Vagrant lab environment to perform a fully orchestrated installation of OpenStack in a VirtualBox environment:
- We will first checkout the lab environment scripts and supporting files with
gitby issuing the following command:git clone https://github.com/OpenStackCookbook/vagrant-openstack - We will change into the
vagrant-openstackdirectory that was just created:cd vagrant-openstack - We can now orchestrate the creation of the virtual machines and installation of OpenStack using one simple command:
vagrant up
Vagrant is an awesome tool for orchestrating many different virtual and cloud environments. It allows us to describe what virtual servers need to be created, and using Vagrant's provisioner allows us to run scripts once a virtual machine has been created.
Vagrant's environment file is called Vagrantfile. You can edit this file to adjust the settings of the virtual machine, for example, to increase the RAM or number of available CPUs.
This allows us to describe a complete OpenStack environment using one command:
vagrant up
The environment consists of the following:
- A controller node,
infra-01 - A compute node,
compute-01 - A client virtual machine,
openstack-client
Once the environment has finished installing, you can use the environment by navigating to http://192.168.100.10/ in your web browser. To retrieve the admin password, follow the steps given here and view the file named openrc.
There is a single controller node that has a utility container configured for use in this environment. Attach to this with the following commands:
vagrant ssh controller-01
sudo -i
lxc-attach -n (lxc-ls | grep utility)
openrc
Once you have retrieved the openrc details, copy these to your openstack-client virtual machine. From here you can operate OpenStack, mimicking a desktop machine accessing an installation of OpenStack utilizing the command line.
vagrant ssh openstack-client
openrc
You should now be able to use OpenStack CLI tools to operate the environment.