
Launching an instance using Ansible doesn't provide a user much beyond consistency, in that a playbook describes the end state of the environment: every time a user runs the task, it will either need to launch that specific instance to ensure that it is present, or it will skip that task because the instance is already running. However, we can achieve a lot more with Ansible beyond just launching a virtual machine. In this recipe, we will launch another instance that will install and start Apache.
Ensure that you are logged on to a correctly configured OpenStack client and can access the OpenStack environment that has Ansible installed.
Ansible executes playbooks of tasks. In this example, we will extend the task that launches a specific instance to allow Ansible to then connect to that instance and install Apache:
- We start off by extending the Ansible playbook introduced in the previous recipe to include the creation of security group rules (this is to ensure that Ansible can access to the instance on port
22, and we are ultimately able to access the running web server on port80). Create the file calledorchestrate-instance.ymlwith the following contents:- name: Launch instances on OpenStack hosts: localhost gather_facts: false tasks: - name: Create ansible security group os_security_group: state: present name: ansible verify: false - name: Create a rule to allow SSH connections os_security_group_rule: security_group: ansible protocol: tcp port_range_min: 22 port_range_max: 22 remote_ip_prefix: 0.0.0.0/0 verify: false - name: Create webserver security group os_security_group: state: present name: webserver verify: false - name: Create rule to allow http connections os_security_group_rule: security_group: webserver protocol: tcp port_range_min: 80 port_range_max: 80 remote_ip_prefix: 0.0.0.0/0 verify: false - Once we have our security groups configured, we can then ensure that these security group rules are included in the task that launches the instance. We also ensure that we include a new entry called
register. This allows us to set a variable associated with this instance that we can then refer to in other tasks. Carry on editing this file with the following tasks:- name: Deploy an instance os_server: state: present name: cookbook1 image: xenial-image key_name: demokey timeout: 200 flavor: m1.tiny network: private-net security_groups: default,ansible,webserver verify: false register: nova_cookbook - Next, we will add in a task that adds this particular instance to an internal in-memory inventory that we can then access later on in the playbook. As part of this inventory, we're telling Ansible that when the particular inventory item is accessed, when Ansible wants to connect to it (via
ssh), it will use a particular IP address (in our case, the public floating IP). Carry on editing the file and add this next entry as shown as follows. As we are using YAML, ensure that the spacing matches for each element. For example, this additional- name: Add instance to Inventoryblock must match the same column as the previous block- name: Deploy an instance, as it is a task that is part of the same play:- name: Add instance to Inventory add_host: name=cookbook1 groups=webservers ansible_ssh_host={{ nova_cookbook.server.accessIPv4 }} - Next, we will add in a new play that tells Ansible to wait for this instance to complete its boot process. As Ansible uses SSH to perform its tasks, it makes sense to only continue when the SSH daemon is running and accepting connections. Ensure that your private key running the Ansible task matches the public key portion described in
key_name:.- name: Wait for port 22 to be ready hosts: webservers gather_facts: False tasks: - local_action: wait_for port=22 host="{{ ansible_ssh_host }}" search_regex=OpenSSH delay=10 - This final set of tasks perform the steps inside the running instance; this next task performs the installation of Apache on this running instance. Ansible knows to operate on this instance because this set of tasks is performed against the
webserversgroup of hosts. We registered this new group, in the in-memory inventory, in the task in step 2.Note
The
pre_tasks:section is optional and may not be needed in all circumstances. The example in this book was created using an Ubuntu 16.04 image. Ubuntu 16.04 doesn't install Python 2 by default, however this particular Ansibleaptmodule, that will ultimately install Apache, expects to execute Python 2 code in order to work. So, we do an initialrawcommand, that doesn't execute any Python, to run some shell script to set some things up for us. This example is also further complicated if you are using the accompanying Vagrant environment, which the instances do not have direct access to the internet. So, as part of thepre_tasks:section, we also configure a proxy server for APT to use.- hosts: webservers remote_user: ubuntu become: yes gather_facts: no pre_tasks: - name: Set APT proxy raw: echo "Acquire::http::Proxy "http://192.168.1.20:3128";" > /etc/apt/apt.conf - name: 'install python2' raw: sudo apt-get -y install python-simplejson tasks: - name: Ensure Apache is installed apt: name=apache2 state=latest - name: Ensure that Apache is started service: name=apache2 state=startedTip
Hint: This playbook can also be found at https://raw.githubusercontent.com/OpenStackCookbook/vagrant-openstack/master/orchestrate-instance.yml.
Once this file has been created, save and exit. Then run the following commands which will launch an instance and install Apache:
source openrc
ansible-playbook orchestrate-instance.yml
This will bring back the familiar Ansible output like the following:
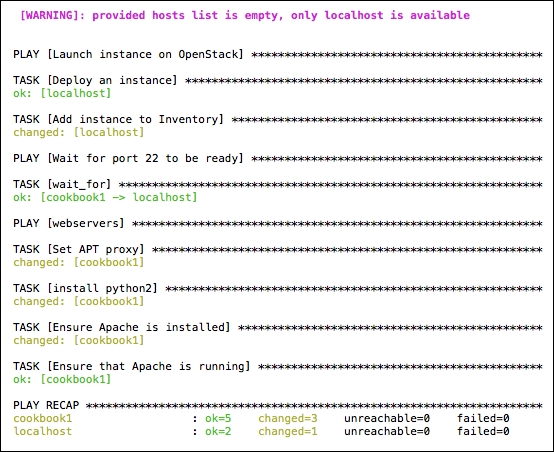
What we did here was extending the original, simple playbook that launched a single instance, and adding in subsequent tasks that allow us to install some software onto that instance once it has completed its boot process. The important details of how this is achieved are described here.
In the first play, named Launch instance on OpenStack, we first configure some tasks to set up our security group rules. By default, there are no incoming connections allowed, and Ansible uses SSH to perform its tasks, so we have to at least ensure that TCP port 22 is open. We also configure rules appropriate for the service that we are installing. In this case, we are running Apache, so we open up TCP port 80. Once the security groups are configured, we then have a task named Deploy an instance. We ensure this instance is launched with the appropriate security groups that we have just configured, and we also register that instance in a variable named nova_cookbook.
Ansible uses an inventory of data to allow subsequent plays and tasks to access details that Ansible have performed in your environment, and so the next task, named Add instance to Inventory places a host named cookbook1 into a host group called webservers. And for this particular host, named cookbook1, in the group webservers, we are setting the variable that Ansible would use to access that instance as the floating IP address assigned: (ansible_ssh_host={{ nova_cookbook.server.accessIPv4 }}. As you can see, we are using our registered variable, nova_cookbook, to access some information that Ansible has stored about that instance. It is important that we use the floating IP because the private tenant network is not routable from our client, and therefore Ansible would not be able to connect to perform the Apache install.
The next play named Wait for port 22 to be ready basically has a task that waits for SSH to be running. This signals that the instance is ready for use, and therefore we are able to SSH into this to run further Ansible commands.
The last one is the play that has tasks that perform the install of Apache. As described earlier, we have placed an optional set of pre_tasks into this section to overcome the fact that Ubuntu 16.04 doesn't come with the necessary prerequisite Python packages needed for Ansible to run. We have also set an optional APT proxy here too, so feel free to remove and adjust this section according to the image and environment you are operating with.
The last set of tasks in this play basically ensure that Apache is installed and runs. Here you could then add in additional tasks to pull in Apache configuration data from GitHub, or install additional packages, thus completing the set up of this instance from a single Ansible command.