
The previous recipes launched instances into an existing environment, including existing networks, images and keys, for example. However, using Ansible for orchestration of OpenStack environments brings a full suite of modules that can be used to operate more than just Nova. For example, we can use Ansible to control Glance, Neutron, Cinder, and so on.
In this recipe, we only assume that a user is able to authenticate into a project. We don't assume that any networks exist, or even any images exist. We can get Ansible's view of the world to ensure that images and networks are present, and if not—create them.
Note that this recipe is intended to introduce you to the wonderful world of Ansible. The example is to show the creation of a stack from start to finish. Optimizing Ansible playbooks is beyond the scope of this book.
Ensure that you are logged on to a correctly configured OpenStack client and can access the OpenStack environment that has Ansible installed.
Carry out the following steps to launch an environment that ensures an image is available for use, sets the correct security groups, creates new networks and routers, and finally installs Apache onto two web servers:
- We can assume a blank OpenStack project, but we want to ensure that we have the appropriate running instances and services. We first include tasks as part of our
Create OpenStack Cloud Environmentplay that first downloads an Ubuntu 16.04 image and then loads into OpenStack. Start off by creating thefull-stack.ymlfile with the following contents:- name: Create OpenStack Cloud Environment hosts: localhost gather_facts: false vars: webserver_count: 2 tasks: - name: Download Ubuntu 16.04 Xenial get_url: url: http://releases.ubuntu.com/16.04/ubuntu-16.04.3-server-amd64.img dest: /tmp/ubuntu-16.04.img - name: Ensure Ubuntu 16.04 Xenial Image Exists os_image: name: xenial-image container_format: bare disk_format: qcow2 state: present filename: /tmp/ubuntu-16.04.img verify: false - Next, we will create the private tenant network and router. We only assume that a shared provider network already exists. In this instance, we assume this provider network—that provides floating IP addresses—is called
GATEWAY_NET. Carry on editing the file to include the following tasks as part of the sameCreate OpenStack Cloud Environmentplay:- name: Create the cookbook network os_network: state: present name: cookbook_network external: false shared: false verify: false register: cookbook_network - name: Create the test subnet os_subnet: state: present network_name: "{{ cookbook_network.id }}" name: cookbook_subnet ip_version: 4 cidr: 192.168.0.0/24 gateway_ip: 192.168.0.1 enable_dhcp: yes dns_nameservers: - 192.168.1.20 verify: false register: cookbook_subnet - name: Create the test router os_router: state: present name: cookbook_router network: GATEWAY_NET external_fixed_ips: - subnet: GATEWAY_SUBNET interfaces: - cookbook_subnet verify: falseNote
Optional (if using the Vagrant environment). Currently, the
os_routermodule is unable to insert static routes into a router, so if you have a requirement to utilize static routes into your Ansible controlled playbooks, a workaround is to execute anopenstackcommand instead as shown as follows. If you are using the Vagrant lab that accompanies this book, you may need to provide static routes to your router in order for traffic to flow from the physical host to the VirtualBox/VMware environment. If you require this, add in the following task (edit to suit your environment). In this instance, the physical host running the Vagrant environment has an IP of 192.168.100.1 and allows traffic to flow from the physical host to the instances that have a floating IP from a192.168.100.0/24provider network. This provider network here is theGATEWAY_NETreferred to in this example:- name: Insert routes into router command: openstack router set --route destination=192.168.1.0/24,gateway=192.168.100.1 cookbook_router register: cookbook_router_route - Next, we configure the security groups. Remember that Ansible uses SSH to connect to servers, and by default, cloud images prevent any incoming connections. So one of the rules should be for allowing incoming SSH connections. We also need to configure security group rules for the intended service that is to run on the instances. In this case, we're running Apache and HAProxy on TCP Port 80, so that also needs to be set up here:
- name: Create ansible security group os_security_group: state: present name: ansible verify: false - name: Create rule to allow SSH connections os_security_group_rule: security_group: ansible protocol: tcp port_range_min: 22 port_range_max: 22 remote_ip_prefix: 0.0.0.0/0 verify: false - name: Create webserver security group os_security_group: state: present name: webserver verify: false - name: Create rule to allow http connections os_security_group_rule: security_group: webserver protocol: tcp port_range_min: 80 port_range_max: 80 remote_ip_prefix: 0.0.0.0/0 verify: false - We can now launch the instances. Carry on editing this file to add in the tasks to launch multiple web servers and a single HAProxy instance as follows. Note that the chosen network, image, and security groups match what we created in the preceding tasks:
- name: Deploy Webserver Instances os_server: state: present name: webserver{{ item }} image: xenial-image key_name: demokey timeout: 200 flavor: m1.tiny network: cookbook_network security_groups: default,ansible,webserver verify: false register: nova_webservers with_sequence: count={{ webserver_count }} - name: Add webservers to Inventory add_host: name="{{ item.server.name }}" groups=webservers ansible_ssh_host="{{ item.server.accessIPv4 }}" with_items: "{{ nova_webservers.results }}" - name: Deploy HAProxy Instance os_server: state: present name: haproxy image: xenial-image key_name: demokey timeout: 200 flavor: m1.tiny network: cookbook_network security_groups: default,ansible,webserver verify: false register: nova_haproxy with_sequence: count=1 - name: Add HAProxy to Inventory add_host: name="{{ item.server.name }}" groups=haproxy ansible_ssh_host="{{ item.server.accessIPv4 }}" with_items: "{{ nova_haproxy.results }}" - As we have seen, we need to wait for SSH to be available before Ansible should continue, so we add in a wait until this is so. Note that we apply this play to both the
webserversandhaproxyhosts groups:- name: Wait for port 22 to be ready hosts: webservers:haproxy gather_facts: False tasks: - local_action: wait_for port=22 host="{{ ansible_ssh_host }}" search_regex=OpenSSH delay=10 - With the instances up and running, the final tasks are concerned with installation and configuration of the services that run on the instances. We will first install Apache on our web servers. This play is applied to our
webservershosts, so these tasks will run for each of them:- name: Configure Web Servers hosts: webservers remote_user: ubuntu become: yes gather_facts: False pre_tasks: - name: Set APT proxy raw: echo "Acquire::http::Proxy "http://192.168.1.20:3128";" > /etc/apt/apt.conf - name: 'install python2' raw: sudo apt-get -y install python-simplejson tasks: - name: Ensure Apache is installed apt: name=apache2 state=latest - name: Ensure that Apache is started service: name=apache2 state=started - As our plays have
gather_factsset toFalse(because the image we're using doesn't have the Python libraries expected to run Ansible out of the box, which would mean that the Ansible task that gathers facts about a running instance would immediately fail), we will launch a separate task in a new play that just populates the Ansible inventory of facts, knowing we installed the prerequisite Python 2 libraries in the preceding play. We need this information to populate the HAProxy configuration file later on:- name: Gathering facts about webservers hosts: webservers remote_user: ubuntu become: yes tasks: - name: Gathering facts setup: - We can now install and configure HAProxy. This gets applied to our haproxy group of hosts (of which there is only one server, named haproxy). As part of this play, we will reference a HAProxy configuration file template. We will create this in the next step.
Note
Ansible provides pre-defined, and extensively tested roles that can be used for the installation of software. The guide below is for example purposes only. In reality, you would utilize roles from https://galaxy.ansible.com/.
Carry on building out this
full-stack.ymlplaybook file with the following contents:- name: Configure HAProxy hosts: haproxy remote_user: ubuntu become: yes gather_facts: False pre_tasks: - name: Set APT proxy raw: echo "Acquire::http::Proxy "http://192.168.1.20:3128";" > /etc/apt/apt.conf - name: 'install python2' raw: sudo apt-get -y install python-simplejson tasks: - name: Update apt cache apt: update_cache=yes cache_valid_time=3600 - name: Install haproxy apt: name=haproxy state=present - name: Enable init script replace: dest='/etc/default/haproxy' regexp='ENABLED=0' replace='ENABLED=1' - name: Update HAProxy config template: src=templates/haproxy.cfg.j2 dest=/etc/haproxy/haproxy.cfg notify: - restart haproxy handlers: - name: restart haproxy service: name=haproxy state=restarted - Before we can continue executing our playbook, we need to create the HAProxy configuration template file as specified in the previous step. The configuration pointed to a template file named
haproxy.cfg.j2in thetemplatesdirectory. Create this directory from the current working directory where you are editing thefull-stack.ymlfile:mkdir templates/ vi templates/haproxy.cfg.j2
- Populate the
haproxy.cfg.j2file with the following contents:global log 127.0.0.1 local0 notice maxconn 2000 user haproxy group haproxy daemon defaults log global mode http option httplog option dontlognull retries 3 option redispatch timeout connect 5000 timeout client 10000 timeout server 10000 listen {{haproxy_app_name}} bind *:80 mode {{haproxy_mode}} stats {{haproxy_enable_stats}} {% if haproxy_enable_stats == 'enable' %} stats uri /haproxy?stats stats realm Strictly Private {% endif %} balance {{haproxy_algorithm}} option httpclose option forwardfor {% for host in groups['webservers'] %} server {{ hostvars[host].inventory_hostname }} {{ hostvars[host]['ansible_all_ipv4_addresses'][0] }} check {% endfor %} - The
templates/haproxy.cfg.j2file also refers to some variables that we have not yet declared to Ansible, such ashaproxy_app_nameandhaproxy_algorithm. These are in agroup_varfile specific to ourhaproxygroup. To create this group variable file, we need to create agroup_vars/haproxydirectory, with a file calledmain.ymlthat lists these variables. From the same directory as ourfull-stack.ymlfile, carry out the following steps:mkdir -p group_vars/haproxy vi group_vars/haproxy/main.yml
- Populate the
group_vars/haproxy/main.ymlfile with the following contents:--- haproxy_app_name: myapp haproxy_mode: http haproxy_enable_stats: enable haproxy_algorithm: roundrobin
- We are now ready to run our
full-stack.ymlplaybook to create our environment similar to the one described by the Heat example. Execute the following commands:source openrc ansible-playbook full-stack.yml
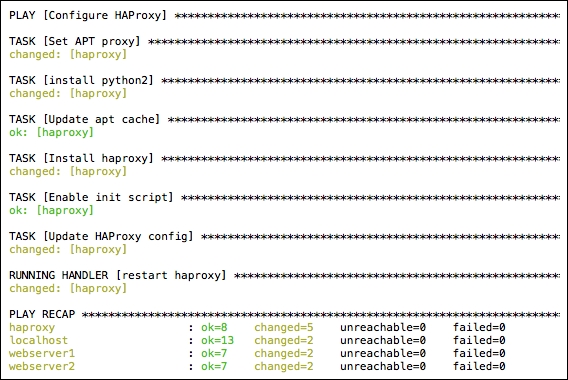
This will produce an output similar to the following. Due to this being a longer playbook, only the last part is shown:
We are also able to verify that these instances are running, and the addresses it has assigned by viewing an
openstack server listoutput:
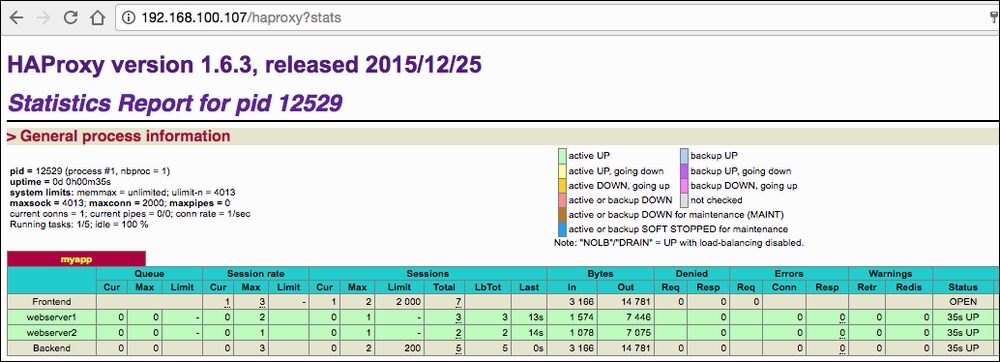
- Finally, we can test our setup by visiting the HAProxy server floating IP address, as shown here. Here we can view the HAProxy stats:
What we did here was to methodically build out a playbook, called full-stack.yml, that carries out the following steps:
- Download and install Ubuntu 16.04 image if necessary
- Create our web server and ansible SSH security groups
- Create a private tenant network, router and configure the router
- Launch two web server instances and one HAProxy instance
- For each web server, install Apache
- For the HAProxy server, install HAProxy and configure the configuration file, auto-populated with information that Ansible knows about from launching the web servers (such as what IP address was assigned to each of them)
In this recipe, we introduced a few notable items: Ansible facts, the Jinja2 configuration template file (the haproxy.cfg.j2 file), and group_vars.
The Ansible facts and HAProxy group_var variables were used to populate the HAProxy configuration file called templates/haproxy.cfg.j2. This file mostly looks like a normal haproxy.cfg file, but has elements that are applicable to Jinja2, which Ansible interprets. Of particular interest is the haproxy.cfg file that has the load balance pool member lines, that ordinarily look like the following basic construct:
server webserver1 192.168.0.6 check server webserver2 192.168.0.3 check
When we launch our instances into OpenStack, we have no idea what IP address they will be assigned, however Ansible does this with its fact gathering. If we take a look at the same line in our template, we get the following:
{% for host in groups['webservers'] %}
server {{ hostvars[host].inventory_hostname }} {{ hostvars[host]['ansible_all_ipv4_addresses'][0] }} check
{% endfor %}This line has some static text at the beginning and end, denoted by server and check. They're the same server and check text, as we can see in our final output.
The magic of the template and Ansible is what we can do with the loop that surrounds this line and hostvars we can access. The loop says:
For each of the hosts in the webservers group (recall that we registered the web server instances into this specific inventory group), get the value of hostvars[host].inventory_hostname and hostvars[host]['ansible_all_ipv4_addresses'][0](from the gathered facts). This last variable takes the first entry in the ansible_all_ipv4_addresses dict, which is our internal IP of our instance.
The result is the output shown on the previous page, which lists the web servers that HAProxy can access in the load balance pool.
We aren't restricted to the variables that Ansible has gathered. We have specified a group_var variable file that specifies the following:
---
haproxy_app_name: myapp
haproxy_mode: http
haproxy_enable_stats: enable
haproxy_algorithm: roundrobin
This is referenced directly in the template file in the following places. This allows us to add some static elements that are user-configurable, but allows us to maintain a flexible, environment agnostic set of playbooks.
listen {{haproxy_app_name}}
   bind *:80
   mode {{haproxy_mode}}
   stats {{haproxy_enable_stats}}
   {% if haproxy_enable_stats == 'enable' %}
   stats uri /haproxy?stats
   stats realm Strictly Private
   {% endif %}
   balance {{haproxy_algorithm}}