
In OpenStack, a security group describes a grouping of ports of similar security requirements. Security group rules are associated with security groups, and provide ingress and egress filtering capabilities to the group. Security group rules can reference other groups or remote networks using CIDR notation. The actual filtering takes place on the compute node at the "port" level, and may be implemented using iptables or as openflow rules depending on the firewall driver that is configured on a given node. Newly created projects each contain a security group named default that allows egress, or outbound, communication only. Ingress, or inbound, communication is denied.
Security groups in OpenStack can be created using the openstack security group create command. Security groups are project-owned objects and cannot be shared or referenced by other projects.
When creating a security group, each port associated with the group will inherit the rules applied to the group. You will need the following details, at a minimum, for the group:
- Security group name
For our example, the following will be used:
- Security group name:
COOKBOOK_SG_WEB
With the OpenStack client installed on our system, we are now able to create a security group with the following command:
openstack security group create COOKBOOK_SG_WEB
The output will resemble the following:

Security groups are created with the following syntax:
openstack security group create SECURITY_GROUP_NAME
When a security group is created, OpenStack applies a default set of rules to the group that allows a port to communicate outbound (egress) over IPv4 and IPv6. By default, all inbound traffic is denied.
Creating a security group is only the first step in providing filtering to instances. The next steps, namely creating security group rules and applying security groups to ports, will be discussed in the following sections.
Security group rules in OpenStack can be created using the openstack security group rule create command. A security group rule provides information on filtering at a layer 3 and layer 4 level, which includes IP addresses and destination ports.
When creating a security group rule, remember that each port associated with the group will inherit the rules applied to the group. Therefore, it is important to limit the rules to only those needed to provide the desired access to the associated group. You will need the following details, at a minimum, for the rule:
- Security group name
For our example, the following will be used:
- Security group name:
COOKBOOK_SG_WEB - Destination port:
80 - Protocol: TCP
- Direction: Ingress
- Source: All Addresses
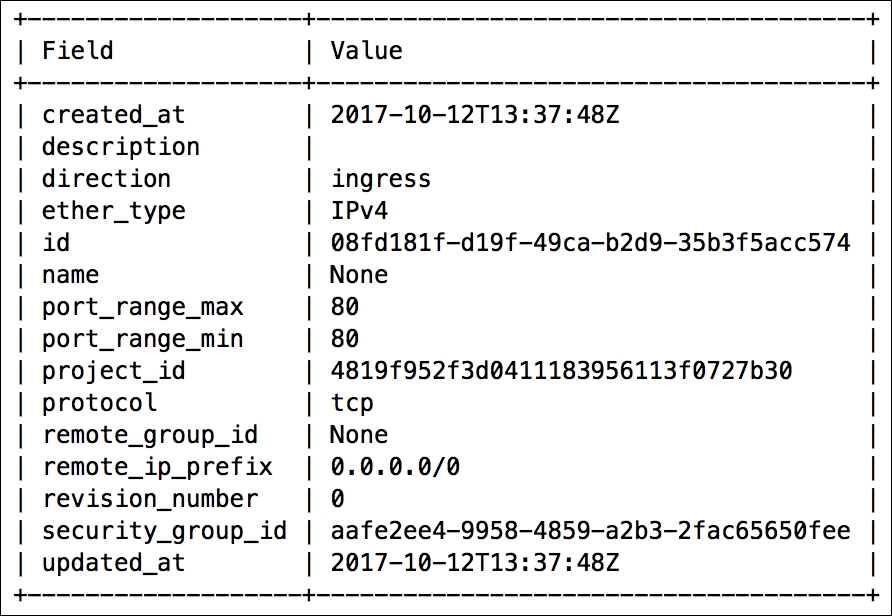
With the OpenStack client installed on our system, we are now able to create a security group rule with the following command:
openstack security group rule create COOKBOOK_SG_WEB
--dst-port 80
--protocol tcp
--ingress
--remote-ip 0.0.0.0/0
The output will resemble the following:
Security groups are created with the following syntax:
openstack security group rule create SECURITY_GROUP_NAME
[--remote-ip <ip-address> | --remote-group <group>]
[--dst-port <port-range>]
[--icmp-type <icmp-type>]
[--icmp-code <icmp-code>]
[--protocol <protocol>]
[--ingress | --egress]
[--ethertype <ethertype>]
Security group rules provide details to OpenStack that are used by Neutron agents to implement traffic filters on individual ports on compute nodes. In our environment, these rules are implemented as iptables rules.
Creating a security group rule without providing any additional filtering information may result in a rule that allows ingress access from all source addresses. OpenStack assumes certain defaults when details are not specified, so it is important to verify the provided output to ensure the proper filtering is in place.
Security groups are typically applied to instances upon boot, using the openstack server create command, but they can also be applied to individual ports, using the openstack network port create or set commands. When applied at boot, each listed security group is applied to each port associated with the instance. As a result, unnecessary rules may be applied to each interface that could result in a security risk or regression in performance of the underlying Neutron agent responsible for applying the rules. When applied to individual ports, users can ensure that if an instance is multihomed, the respective port has only the necessary rules needed to provide access to that interface.
When applying security groups to instances at boot, you will need the following information:
- Security group name or ID
When applying security groups to individual ports, you will need the following information:
- Port name or ID
- Security group name or ID
For our examples, the following will be used:
- Port name:
COOKBOOK_TEST_PORT_1 - Security group name:
COOKBOOK_SG_WEB - Instance name:
COOKBOOK_INSTANCE_WEB - Instance flavor:
COOKBOOK_FLAVOR_TINY - Instance image:
COOKBOOK_IMAGE_CIRROS - Network name:
COOKBOOK_TENANT_NET_1
With the openstack client installed on our system we are able to apply security groups with the following steps:
- Create an instance and supply the security group at boot:
openstack server create COOKBOOK_INSTANCE_WEB
--flavor COOKBOOK_FLAVOR_TINY
--image COOKBOOK_IMAGE_CIRROS
--nic net-id=COOKBOOK_TENANT_NET_1
--security-group COOKBOOK_SG_WEB
Alternatively, security groups can be applied during port creation or to existing ports. With the OpenStack client installed on our system we are able to apply security groups with the following stes.
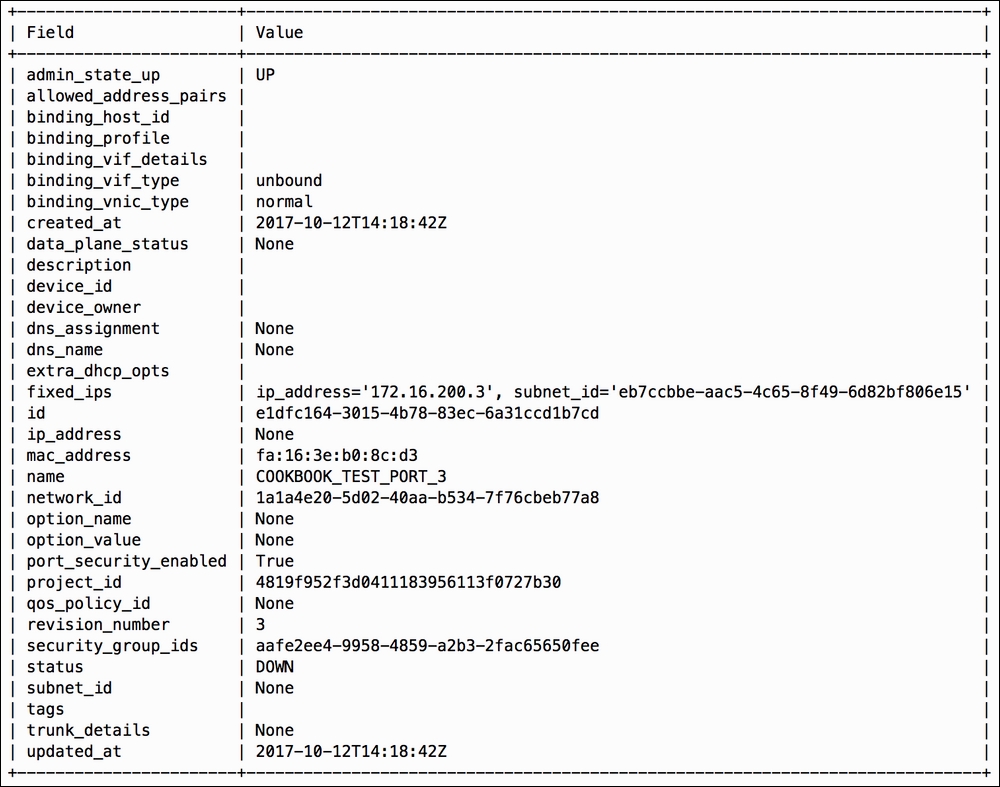
- Apply a security group to a new port:
openstack port create COOKBOOK_TEST_PORT_3
--network COOKBOOK_TENANT_NET_1
--security-group COOKBOOK_SG_WEB
The output will resemble the following:
- Apply the security group to an existing port:
openstack port set COOKBOOK_TEST_PORT_2
--security-group COOKBOOK_SG_WEB
No output is returned. However, the change can be confirmed by querying the security groups applied to the port using the
openstack port showcommand:openstack port show COOKBOOK_TEST_PORT_2 -c security_group_idsThe output will resemble the following:

Security groups can be applied to instances at boot, ports at creation, or to existing ports. Neutron plugin agents on compute nodes are responsible for applying the respective filtering rules to the port on the host. Multiple security groups can be applied to a port in all scenarios.
Security groups can be applied at boot with the following syntax:
openstack server create INSTANCE_NAME
...
--security-group SECURITY_GROUP_NAME
Security groups can also be applied to new ports with the following syntax:
openstack port create PORT_NAME
--network NETWORK_NAME
--security-group SECURITY_GROUP_NAME
Lastly, security groups can be applied to existing ports with the following syntax:
openstack port set PORT_NAME
--security-group SECURITY_GROUP_NAME
Ports are bound to Neutron plugin agents that reside on hosts within the environment. For example, ports belonging to instances are bound to the agent on the respective compute node where the instance lives. This agent is responsible for setting up the virtual networking for the port. When a security group is applied to a port, the Neutron agent where the port is bound implements the filtering rules on the host. Other agents throughout the environment are notified that the group has changed and are updated accordingly.