
If you wish to organize users by their roles, you can create a user group using Keystone groups. Groups are owned by a domain. In this example, we will create one group, reader_group, and set a cloud_admin role to it. We will also add two users to it, reader and reader1. We will also verify that the users belong to the group, as well as remove one of the users afterwards.
Ensure that you are logged on to a correctly configured OpenStack client and can access the OpenStack environment as a user with admin privileges.
Refer to Chapter 2, The OpenStack Client, for details of setting up your environment to use OpenStack command-line client.
In order to create groups and assign users to them, we will need to execute the following steps:
- Start by creating a group:
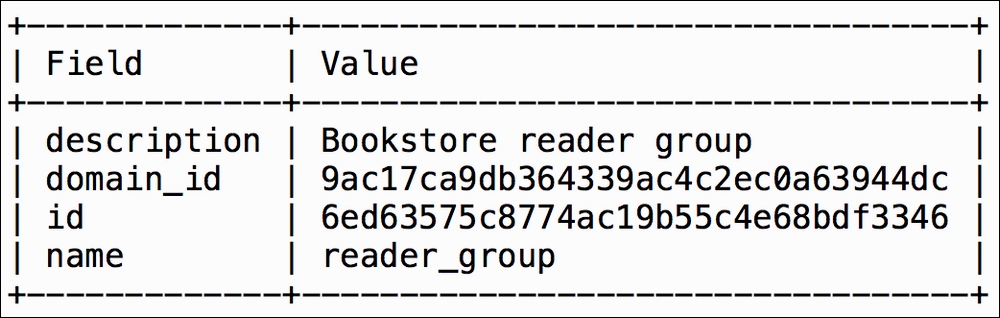
openstack group create --domain bookstore
    --description "Bookstore reader group"
    reader_group
- List existing groups:
openstack group list
- Add group to the role:
openstack role add --group reader_group
    --domain bookstore
    --role-domain bookstore
    cloud_admin
Both the
--domainand--role-domainparameters are needed. There is no output to this command. - Add the
readeruser to the group:openstack group add user --group-domain bookstore --user-domain bookstore reader_group reader
This produces a message like the following:
reader added to group reader_group - Add the
reader1user to the group:openstack group add user --group-domain bookstore --user-domain bookstore reader_group reader1
This should output the following message:
reader1 added to group reader_group - Check that
readeris in thereader_groupgroup:openstack group contains user reader_group readerThis should output the following message:
reader in group reader_group - Check that
reader1is in thereader_groupgroup:openstack group contains user readergroup reader1This produces a message like the following:
reader1 in group readergroup - Remove the
reader1user from thereader_groupgroup:openstack group remove user reader_group reader1This produces a message like the following:
reader1 removed from group reader_group - Check again whether
reader1is in thereader_groupgroup:openstack group contains user reader_group reader1This produces a message like the following:
reader1 not
 in group reader_group
Adding users to identity groups is a good way to grant them specific set of roles without individually assigning each role to a user. If you have to manage users that always get the same set of roles, you can create a user group and add or remove users as needed, rather than setting individual roles to each user. Roles are assigned to the group in a similar fashion that they are assigned to the user. In our example, we first created a custom group, reader_group. The command for creating groups is as follows:
openstack group create --domain <domain-name>
    --description <group-description>
    <group-name>
Since we are using a custom domain in our example, <domain-name> is needed. However, if <domain-name> is omitted, domain for the current user will be used.
openstack role add --group <group>
    --domain <domain>
    --role-domain <role_domain>
    <role>
The role_domain parameter is the name (or ID) of the domain to which the role belongs.
We will also need to have the name of the group, the name of the role, and the name of the project in order to assign roles to users. These names can be found using the following commands:
openstack project list
    openstack group list
    openstack role list
Pass --domain <domain> as an option to the preceding commands if you have custom domains. To obtain a list of domains:
openstack domain list
To add a user to the group, use the following:
openstack group add user --group-domain <group_domain>
    --user-domain <user_domain>
    <group>
    <user>
To remove a user from the group, execute the following command:
openstack group remove user <group> <user>
To verify if the user belongs to the group, use this command:
openstack group contains user <group> <user>
To get a matrix of domain, project, user, group, and role assignments, use the following command:
openstack role assignment list
You can also use IDs instead of names for projects for all of the preceding commands instead of names.