
Image management in an OpenStack environment can be achieved using the openstack command-line tool, the Horizon dashboard, or directly via the Glance REST-based API. Images can be sourced directly from the internet or created and manipulated with tools such as virsh, virt-manager, growpart, and cloud-init. Custom image creation will be covered later in this chapter.
When creating an image in OpenStack, one must provide attributes that describe the image. These attributes include the image name, the disk format, and the container format. Images can be public, private, or shared among multiple projects.
Images for the following examples can be downloaded from the following locations:
When uploading an image, ensure that you have properly sourced your credentials or are otherwise properly authenticated.
You will need the following details, at a minimum, when uploading an image:
- Image name
- Disk format
- Image location
For our first example, the following will be used:
- Image name:
COOKBOOK_CIRROS_IMAGE - Disk format:
qcow2 - Image location:
/tmp/cirros-0.3.5-i386-disk.img
For our second example, the following will be used:
- Image name:
COOKBOOK_UBUNTU_IMAGE - Disk format:
qcow2 - Image location:
/tmp/xenial-server-cloudimg-amd64-disk1.img
With the OpenStack client installed on our system, we are now able to upload an image with the following steps:
- Download the CirrOS image to the
/tmpdirectory:wget https://download.cirros-cloud.net/0.3.5/cirros-0.3.5-i386-disk.img -O /tmp/cirros-0.3.5-i386-disk.img
- Upload the CirrOS image:
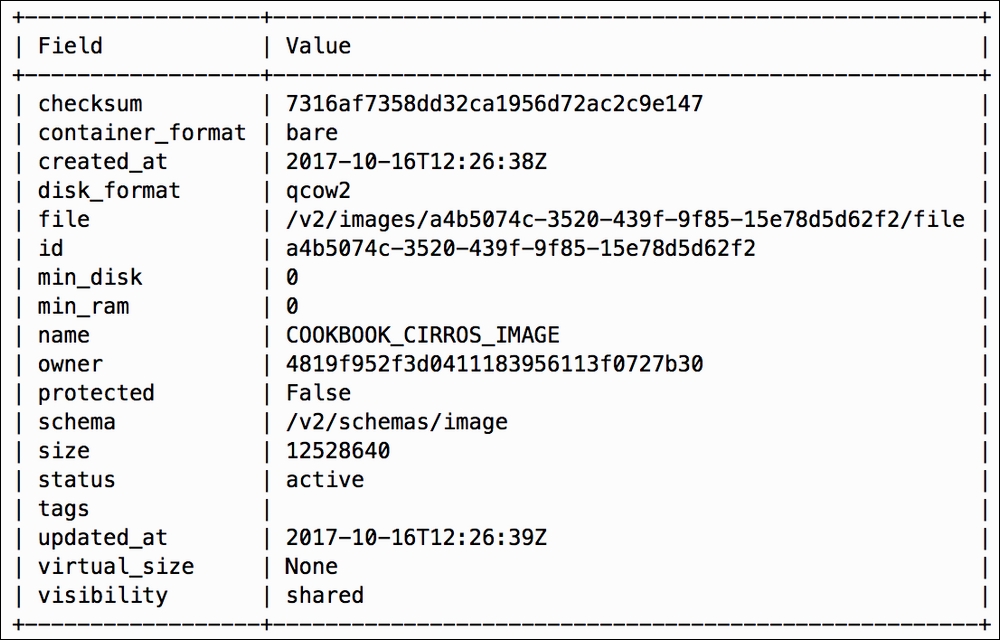
openstack image create COOKBOOK_CIRROS_IMAGE
--disk-format qcow2
--file /tmp/cirros-0.3.5-i386-disk.img
The output will resemble the following:
- Download the Ubuntu image to the
/tmpdirectory:wget https://cloud-images.ubuntu.com/xenial/current/xenial-server-cloudimg-amd64-disk1.img -O /tmp/xenial-server-cloudimg-amd64-disk1.img - Upload the Ubuntu image:
openstack image create COOKBOOK_UBUNTU_IMAGE
--disk-format qcow2
--file /tmp/xenial-server-cloudimg-amd64-disk1.img
Images are created with the following syntax:
openstack image create IMAGE_NAME
--disk-format DISK_FORMAT
--file FILE_LOCATION
[--public | --private | --shared | --community]
Creating an image with the OpenStack client results in the specified file being uploaded to the OpenStack image repository. The repository can be a local directory or volume specified in the Glance configuration file, or even an object store served by Swift, Ceph, Rackspace Cloud Files, or others.
The disk-format parameter defines the format of the virtual disk used by the image. Options include ami, ari, aki, vhd, vmdk, raw, qcow2, vhdx, vdi, iso, and ploop. The qcow2 format is popular among OpenStack-based clouds running QEMU/KVM hypervisors, and it supports smaller image file sizes, copy-on-write support, and various compression and encryption technologies. The default format is raw.
When uploading images to a Glance store backed by Ceph, the images must be in the raw format else they will fail to work properly. The qemu-img command can be used to identify the format of an image, and it can also be used to perform the conversion of an image from one format to another.
An example of converting an image in the qcow2 format to the raw format is shown here:
qemu-img convert -f qcow2 -O raw image.qcow2 image.raw
The file parameter defines the local location of the image file respective to where the OpenStack client is being run. The OpenStack client uploads the image to the OpenStack image repository, where it is stored according to settings within Glance.
When specified, the --public option marks the image as accessible by all projects within the cloud. Alternatively, the --private option marks the image as accessible only by the project that created it. By default, all images created are marked as shared and are eligible to be shared with another project. At the time of creation, however, the image can only be seen by the project that created it. The --shared and --community options are discussed later in this chapter in the Sharing images recipe.
To list the images in the OpenStack Image service repository, use the following OpenStack client command:
openstack image list
The output will resemble the following:

The details of individual images can be queried using the following OpenStack client command:
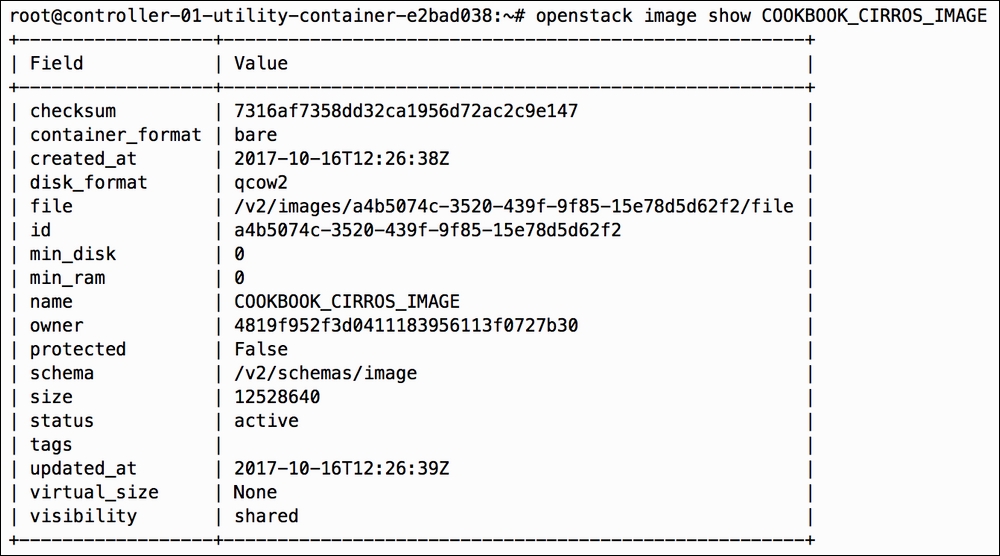
openstack image show IMAGE_NAME_OR_ID
The output will resemble the following:
Images can be deleted from the OpenStack image repository at any time. Keep in mind, however, that depending on the version of OpenStack installed, deleting an image can have an adverse effect on the ability to migrate an instance.
To delete an image in OpenStack, issue the following command:
openstack image delete COOKBOOK_CIRROS_IMAGE
No output is returned if the operation is successful. To verify that the image is no longer available, use the openstack image list or openstack image show command.
Images that exist in the OpenStack image repository can be downloaded at a later time and transferred to other systems.
To download an image from the OpenStack image repository, you must have access to the image. You will need the following details, at a minimum, to download the image:
- Image name or ID
- Destination for downloaded file
For our example, the following will be used:
- Image name:
COOKBOOK_UBUNTU_IMAGE - Download location:
/tmp/my_downloaded_ubuntu_image.qcow2
With the OpenStack client installed on our system, we are now able to download an image from the repository with the following command:
openstack image save COOKBOOK_UBUNTU_IMAGE
--file /tmp/my_downloaded_ubuntu_image.qcow2
No output is returned if the operation is successful. Use the ls command to list the downloaded file:

When an image is private, it is only available to the project from which that image was created or uploaded. On the other hand, when an image is public, it is available to all projects. The OpenStack Image service provides a mechanism whereby these private images can be shared between a subset of projects. This allows greater control over images that need to exist for different projects without making them available to all.
Sharing images among projects requires the following workflow:
- Tenant A updates an image's ability to be shared
- Tenant A shares an image with Tenant B
- Tenant B accepts or rejects the sharing attempt
When sharing an image, ensure that you are authenticated as an administrator or are the owner of the image. You will need the following details, at a minimum, to share the image:
- Image name or ID
- Project name or ID
For our example, the ADMIN project will share an image with the FINANCE project. The following will be used:
- Image name:
COOKBOOK_UBUNTU_IMAGE - Project name:
FINANCE
Note
For instructions on how to create projects within OpenStack, refer to the Chapter 3, Keystone – OpenStack Identity Service, chapter of this book.
With the OpenStack client installed on our system, we are now able to share an image with the following steps:
- Configure the environment with the credentials of a user in the
FINANCEproject:source finance_openrc - As a user in the
FINANCEproject, view all available images:openstack image listThe output will resemble the following if no images are available:

- Now, configure the environment with the credentials of a user in the ADMIN project:
source openrc - Update the Ubuntu image and make it available for sharing:
openstack image set COOKBOOK_UBUNTU_IMAGE --sharedNo output will be returned.
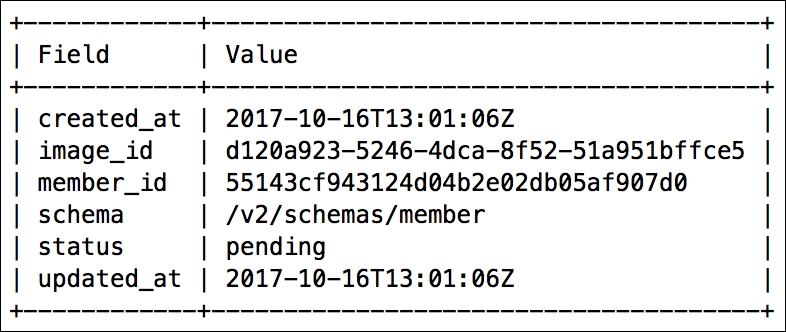
- Share the Ubuntu image with the FINANCE project:
openstack image add project COOKBOOK_UBUNTU_IMAGE FINANCEThe output will resemble the following:
- Reconfigure the environment with the credentials of a user in the
FINANCEproject:source finance_openrc - Accept the sharing attempt:
openstack image set d120a923-5246-4dca-8f52-51a951bffce5 --acceptNo output will be returned.
- View all available images:
openstack image listThe output will resemble the following:

Sharing images requires the use of the openstack image add project command on the part of the producer and the openstack image set command on the part of the consumer. The process involves communication between the producer and the consumer outside of the OpenStack API, as the image ID must be shared between them.
Producers invoke the sharing process using the following command:
openstack image add project <image> <project>
Once shared, the consumer has the ability to accept or reject the attempt using the following:
openstack image set <image> [--accept | --reject | --pending]
The producer can revoke the sharing of an image using the following command:
openstack image remove project <image> <project>
An alternative to marking an image as shared would be to mark its visibility as community using the --community option. This allows a user to share an image with all projects, but still requires the consuming projects to accept the image before it is returned in an image list. This reduces the administrative overhead on the part of the user sharing the image without unnecessarily cluttering the entire image list for all projects.
For additional information regarding the sharing of images, visit https://docs.openstack.org/image-guide/share-images.html.