15.1 PROJECT 15.1 – Countdown Timer

15.1.1 Project Description

This project describes the design of a countdown timer using the MikroMMB board for PIC18FJ (from now onwards, this board will be called the MikroMMB board). The screen consists of a soft keypad with numbers 0 to 9, a START button, a CLR button and a display box. The operation of the project is as follows: the user enters a starting number and clicks the START button. The display counts down in 1 second intervals until the count reaches zero and then it stops. Clicking the CLR button clears the display and the system is ready for the next count.

15.1.2 Block Diagram

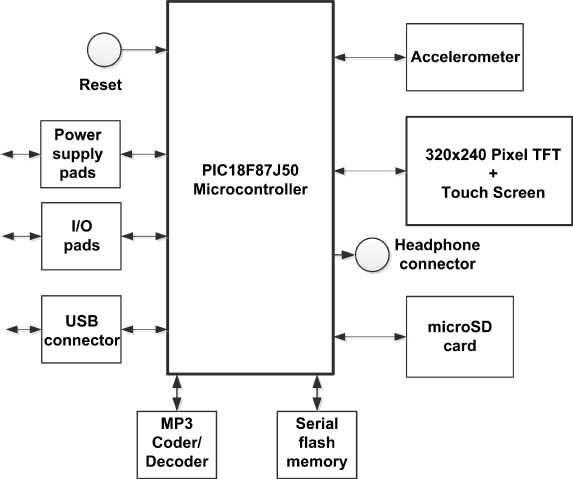
The block diagram of the MikroMMB board is shown in Figure 15.1. A detailed circuit diagram can be obtained from the manufacturer's product guide.

Figure 15.1 Block diagram of the MikroMMB board

img

The steps for creating this project are given below:

1. Create Project File
Start the Visual TFT software. Select Project -> New from the top-down menu. Enter the project name and choose the desired project path. Then click OK. The name STOPWATCH is given to the project.
2. Configure Project
In the Project Settings window, make the following settings:

15.1.2.1 General (see Figure 15.2)

  • Hardware patterns: MikroMMB_for_PIC18FJ_hw_rev_1.05;
  • Target Compiler: mikroC Pro for PIC PRO for PIC;
  • Target Device: PIC18F87J50;
  • Device Clock (Hz): 48 000 000.

Figure 15.2 General settings

img

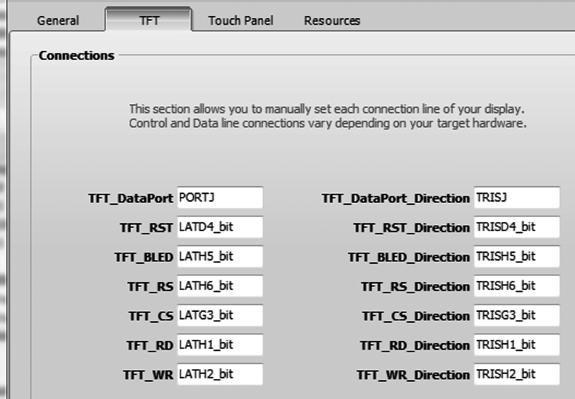
15.1.2.2 TFT (see Figure 15.3)

img

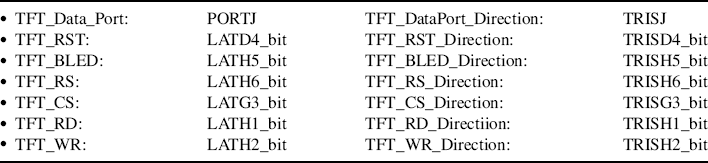
Figure 15.3 TFT settings

img

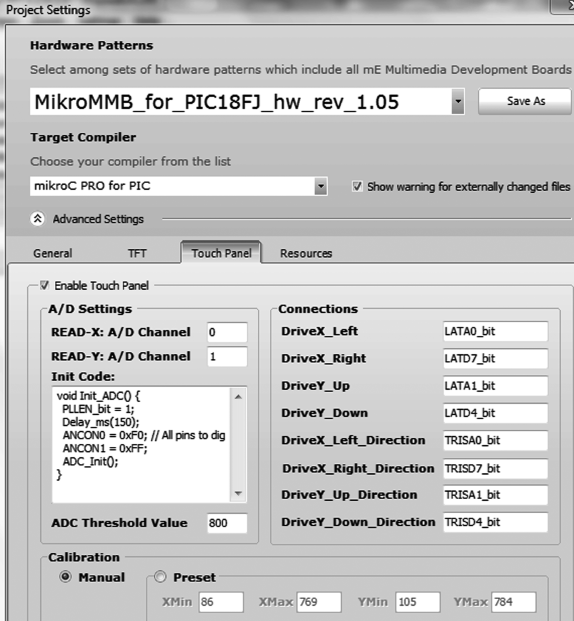
15.1.2.3 Touch Panel (see Figure 15.4)

img

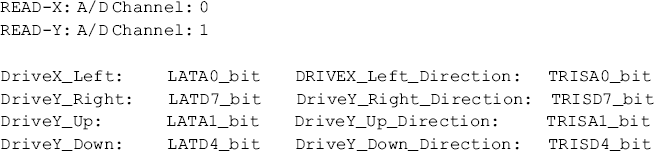
Figure 15.4 Touch Panel settings

img

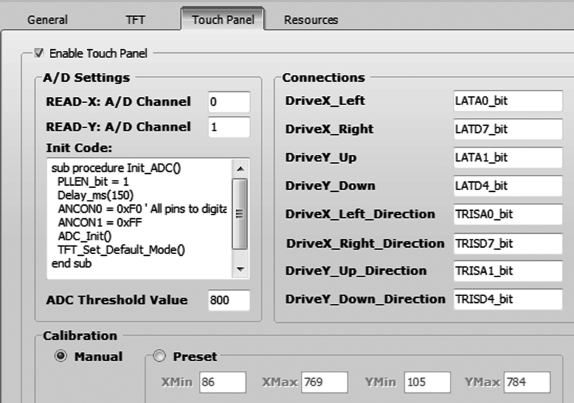
Notice that the screen calibration can either be set as ‘Manual’ or ‘Preset’. In this project, the ‘Manual’ option is chosen so that the screen can be calibrated during the run time.

3. Add Screen and Give it a Name
Give a name to the screen. Let us rename the screen to Screen1. In the Screens Properties on the left, find the Name property and change it to Screen1. Set the colour to white and orientation to portrait.
4. Place components
We can now use the Tools displayed on the right-hand side to place components on our screen. Click ‘Label’, place it on the screen, and change its ‘Caption’ to ‘COUNTDOWN TIMER’ in the ‘Properties’ window in the bottom left-hand side. Then place the display on the screen by clicking ‘Rounded Button’ and position it, as shown in Figure 15.5. Change the name of this button to ‘disp’. Place the keypad on the screen using the ‘Rounded Button’ tools. Change the names of the buttons to reflect the numbers they represent. Thus, name number 0 as ‘no0’, number 1 as ‘no1’, and so on. Place the START and CLR buttons using the ‘Rounded Button’ tool. Change the names of START and CLR buttons to ‘strt’ and ‘clearkey’, respectively. Notice that you can change the colours of the components or the screen background colour as you wish.
Notice that the demo version of the Visual TFT is limited to a maximum of 7 objects on the screen.
5. Assign Actions to Components
We can now add actions to our components. Click on number 1, then double click on ‘OnClick’ in the Properties window. An empty event function corresponding to this key will be displayed. Enter the following code inside the function:

img

Repeat for all the numbers 0 to 9, by changing the number inside the bracket accordingly. Function ‘Update’ is used to find the final value of the number entered by the user. This function is created as follows:

img

The final value of the number is stored in variable ‘sum’. The digits entered by the user are converted into string and are displayed in the display area of the screen.
Click on the CLR button, then double click on ‘OnClick’ in the Properties window and enter the following statements inside the function. This function clears the display area of the screen and also clears variable ‘sum’ to zero:

img

Finally, click on the START button, then double click on ‘OnClick’ in the Properties window and enter the following statements inside the function. This function is executed inside a loop, where variable ‘sum’ is decremented by 1 and a 1 second delay is introduced at each iteration. The value of ‘sum’ is displayed on the display area of the screen as it counts down to zero.

img

img

Figure 15.6 shows the final value of the user code. Notice that variable ‘sum’ is declared as a global variable at the beginning of the code.
6. Generate the Code
We are now ready to generate the code for our project. Just click the ‘Generate Code’ icon in the top menu. You should get a message to say that the code has been generated successfully. The generated code can be seen by clicking the ‘Generated Code’ at the bottom part of the screen.
7. Compile the Code and Load to the Microcontroller

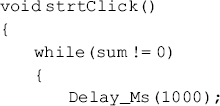
Figure 15.5 Adding Components onto the Screen

img

Figure 15.6 The code associated with the components

img

img

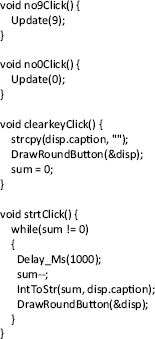
Click the icon ‘Start Compiler’ in the top menu to start the mikroC Pro for PIC compiler. Compile the program as before, by clicking the ‘Build’ icon in the top menu. Make sure that the string library and the conversions libraries are included in the project. You can check this by clicking View -> Library Manager and making sure that the boxes next to ‘C_String’ and ‘Conversions’ are checked.

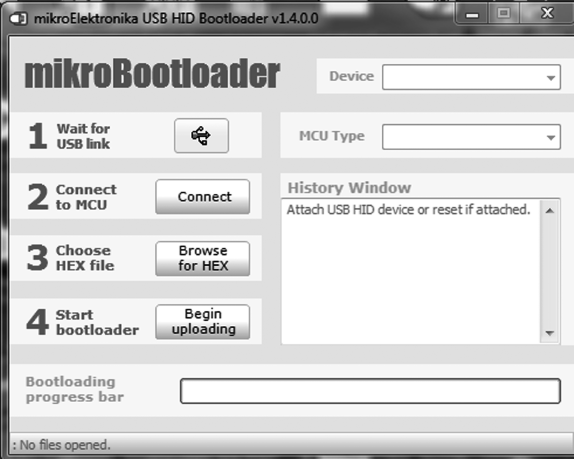
We are now ready to program the microcontroller using the Bootloader software:

  • Connect the MikroMMB board to the PC via the USB port.
  • Start the MikroMMB Bootloader software on the PC (see Figure 15.7).
  • Press the RESET button on the MikroMMB board. Then click the Connect' button within 5 seconds. You should see the message ‘Connected . . . ’. The microcontroller on the MikroMMB board can now be programed.
  • Click ‘Browse for HEX’ and select the ‘.hex’ file of your project.
  • Click ‘Begin Uploading’ to program the microcontroller. You should now see a progress bar as the programming is in progress. When the uploading is finished, click ‘OK’ to exit.
  • Reset the MikroMMB board. The display will start after 5 seconds (if during the first 5 seconds after a RESET there is no communication with a PC, then the microcontroller assumes that this is a normal run and not a programming run).

Figure 15.7 MikroMMB Bootloader software

img

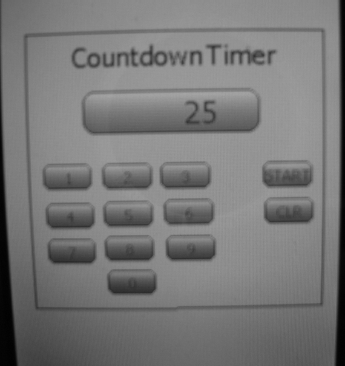
When the program is run, the user is asked initially to calibrate the screen by touching the bottom-left and upper-right points of the screen. Figure 15.8 shows a typical display from the project where the countdown starts from 25 seconds.

Figure 15.8 Typical display from the project

img
..................Content has been hidden....................

You can't read the all page of ebook, please click here login for view all page.
Reset
18.221.46.44