
9.7 PROJECT 9.7 – Connecting more than one LED to a Port Pin
9.7.1 Project Description
There are some applications where we may want to connect many LEDs to a microcontroller, but where only one LED is required to be ON at any time. One such application is the design of a Roulette board, which requires 37 LEDs, and only one LED is ON at any time. In principle, we can use a high-end microcontroller with many I/O pins for such applications. But, as we shall see in this project, for low-cost applications it is preferable to use a cheaper low-end microcontroller and share the I/O pins. This approach requires less wiring and less number of current limiting resistors, resulting in a much lower cost.
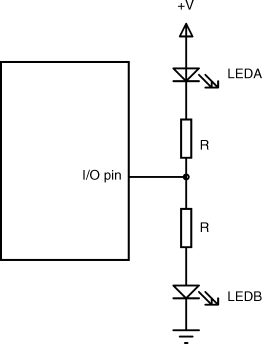
As shown in Figure 9.37, connecting two LEDs to an I/O port is very easy. One LED is connected in current sourcing mode, while the other LED is connected in current sinking mode. When the port pin is at logic LOW, LEDA is turned ON, when it is at logic HIGH, LEDB is turned ON.
Figure 9.37 Connecting 2 LEDs to a port pin
It is possible to connect more than two LEDs to a port pin, where only one LED is ON at any time. Here, we connect two LEDs between each pair of I/O pins, where the LEDs are connected in opposite directions. Thus, with 3 I/O pins, we can have up to 6 LEDs, with 4 I/O pins we can have up to 12 LEDs, and so on. The maximum number of LEDs that can be connected can be calculated from:
(9.1) ![]()
where N is the number of I/O pins used. For example, with a complete port (8 I/O pins) we can connect up to 56 LEDs to the microcontroller. The number of current limiting resistors is equal to the number of I/O pins used. Thus, 56 LEDs can be driven from a port with only 8 current limiting resistors.
Figure 9.38 shows the circuit where 3 I/O pins are used and up to 6 LEDs are connected to the microcontroller. Notice that two LEDs are connected between each pair of I/O lines, where the LEDs are connected in opposite polarities. In general, this circuit can be expanded to any number of I/O pins and any number of LEDs.
Figure 9.38 Connecting 6 LEDs to 3 I/O pins
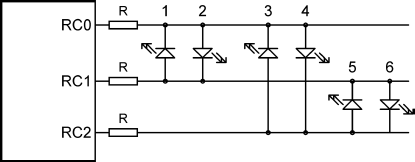
The operation of the circuit in Figure 9.38 is explained below:
As an example, let us assume that line RC1 is disconnected. Now, to turn ON LED 4, RC0 has to be logic 1 and RC2 has to be logic 0, so that the LED is forward biased and current flows from RC0 to RC2. You will also notice that LEDs 2 and 6 will also be forward biased. But because these LEDs are in series, they will require a minimum of 4 V to operate (assuming red LEDs): and considering the voltage drop across the current limiting resistors also, there is not enough current to operate these LEDs and they will both be OFF. But what we have just described will only work if line RC1 is disconnected. If RC1 = 0, then LED 2 will also be ON. On the other hand, if RC1 = 1, then LED 6 will also be ON. The question is now, how can we disconnect line RC1? The easiest way is to make line RC1 an input port. When a port is in input mode, it is in high-impedance state so that no current flows in or out of the port, effectively disconnecting the port pin from the circuit. It is important to notice that when we use this technique and we have different colour LEDs, then the forward voltage drops of each LED should be similar (e.g. we can easily mix red and green LEDs). The reason for this can be explained by looking at Figure 9.38. If we assume that LED 4 has a larger than normal forward voltage (e.g blue or white LED), then the voltage dropped across LEDs 2 and 6 may just be high enough to turn them ON.
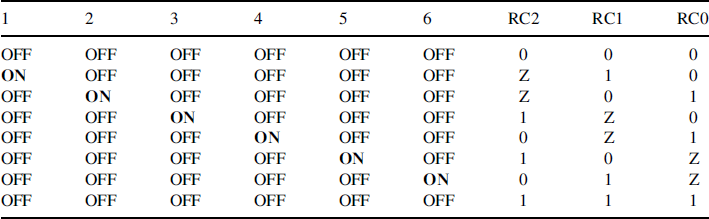
Now, based on this technique, we can turn ON each LED individually. Table 9.2 shows what the state of each port pin should be to turn ON the LEDs in Figure 9.38. Notice here that Z indicates that the port is in input mode. As an example, to turn ON LED 5, the required port settings are: RC0 = input mode, RC1 = 0, RC2 = 1.
Table 9.2 LED control table for Figure 9.38
We shall now create a project to control 6 LEDs connected to only 3 ports of a PIC microcontroller. In this project, the LEDs will rotate flashing with 1 second delay between each output.
9.7.2 Block Diagram
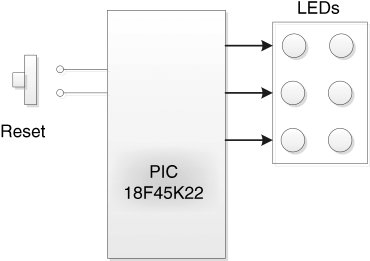
The block diagram of the project is shown in Figure 9.39.
Figure 9.39 Block diagram of the project
9.7.3 Circuit Diagram
The circuit diagram of the project is shown in Figure 9.40. The 6 LEDs are connected to port pins RC0, RC1 and RC2. Notice that when an LED is ON, the current flows through two current limiting resistors. As a result, smaller resistors are required (e.g. 150 ohm or smaller).
Figure 9.40 Circuit diagram of the project
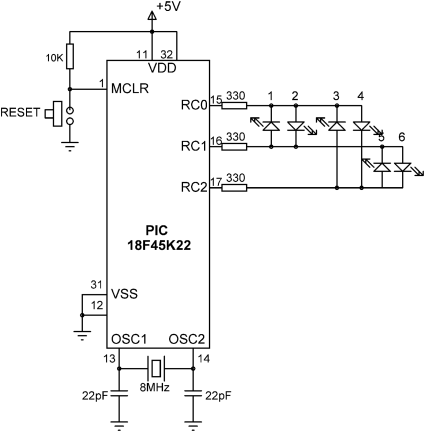
The LEDs are turned ON in the following sequence: 1, 2, 3, 4 5, 6, 1, 2, . . .
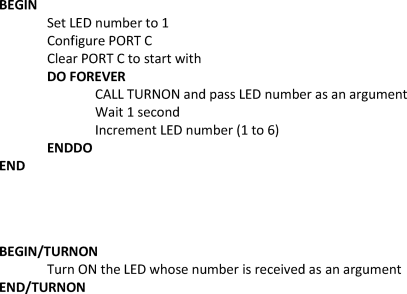
9.7.4 Project PDL
The PDL of this project is given in Figure 9.41.
Figure 9.41 PDL of the project
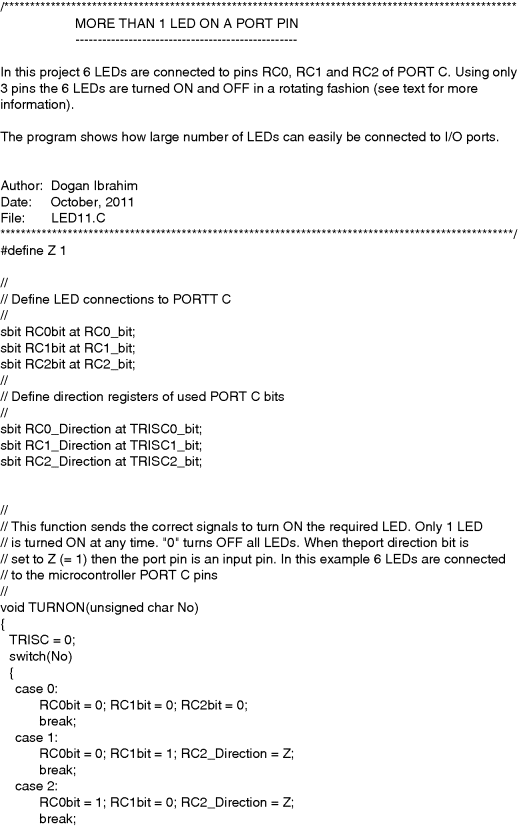
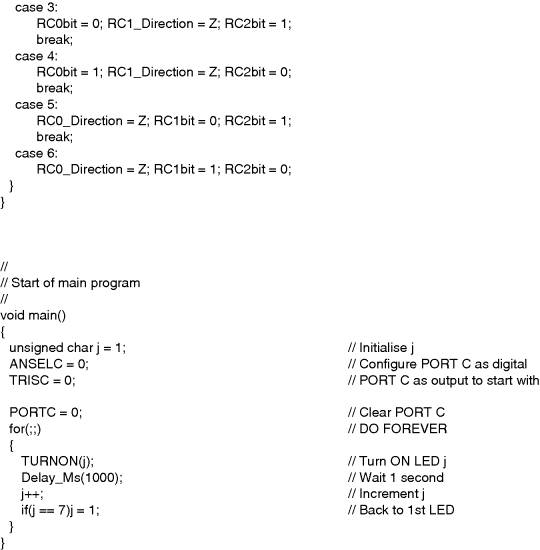
9.7.5 Project Program
The project program listing (LED11.C) is shown in Figure 9.42. All port pins are initially configured as outputs and the LEDs are turned OFF. Function TURNON implements Table 9.2 using a switch statement and turns ON a given LED. Z is defined as 1 and is used to set a port pin into input mode. Variable j stores the LED number turned ON and takes values between 1 and 6. This function is called by passing the number of the LED (1 to 6) to be turned ON at any time. Passing a 0 clears, that is turns OFF all the LEDs.
9.7.6 Suggestions for Further Development
The project given in this section can be developed further, for example by designing an LED based Roulette. This project will require 37 LEDs to be connected to the microcontroller and, using the technique described in this section, 7 I/O pins allow up to 42 LEDs to be connected easily with 7 current limiting resistors.