
12.5 PROJECT 12.5 – Plotting Temperature Variation on the GLCD
12.5.1 Project Description
This project demonstrates how the ambient temperature can be measured and then plotted in real-time on the GLCD. The temperature is measured every second using an LM35DZ type analogue sensor and is then plotted in real-time on the GLCD.
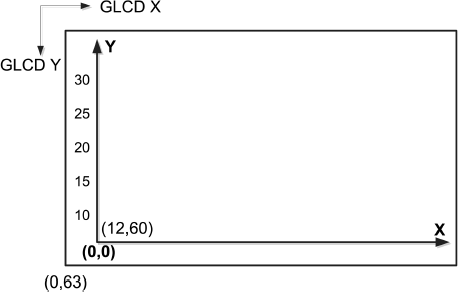
The x and y axes are drawn on the GLCD, the axes ticks are displayed, and the Y axis is labelled, as shown in Figure 12.28. The Y axis is the temperature, and the X axis is the time where every pixel corresponds to 1 second in real-time.
Figure 12.28 Layout of the screen
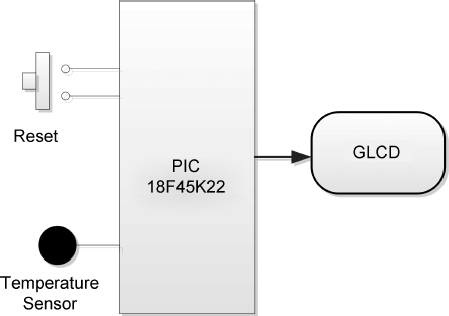
12.5.2 Block Diagram
The block diagram of the project is shown in Figure 12.29.
Figure 12.29 Block diagram of the project
12.5.3 Circuit Diagram
The circuit diagram of the project is as shown in Figure 12.30. The LM35DZ temperature sensor is connected to analogue port RA0 (or AN0) of the microcontroller. This is a 3-pin analogue temperature sensor integrated circuit. Two of the pins are connected to +5 V and ground, where the third pin is the output. This sensor provides an output voltage directly proportional to the measured temperature. The output of the sensor is given by
(12.2) ![]()
Figure 12.30 Circuit diagram of the project

Thus, for example at 10°C the output is 100 mV, at 25°C the output is 250 mV, and so on. PORT B and PORT D are connected to the GLCD as before.
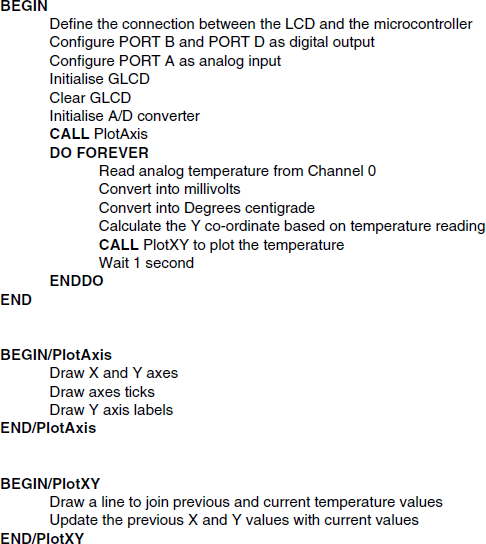
12.5.4 Project PDL
The PDL of this project is given in Figure 12.31.
Figure 12.31 PDL of the project
12.5.5 Project Program
The A/D converter on the PIC18F45K22 microcontroller is 10-bits wide. Thus, with a +5 V reference voltage, the resolution will be 5000/1024 or 4.88 mV, which is accurate enough to measure the temperature to an accuracy of 0.5°C.
Figure 12.32 shows the program listing (GLCD6.C) of the project. At the beginning of the program, the connections between the microcontroller and the GLCD are defined using sbit statements. The GLCD is connected to ports B and D of the microcontroller and thus both of these ports are configured as digital output ports using ANSEL and TRIS statements. PORT A is configured as analogue, with pin RA0 (or AN0) being configured as an input.
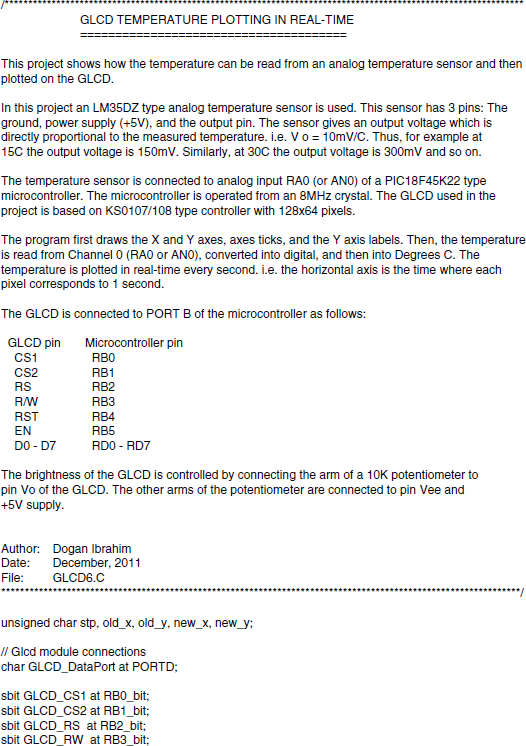
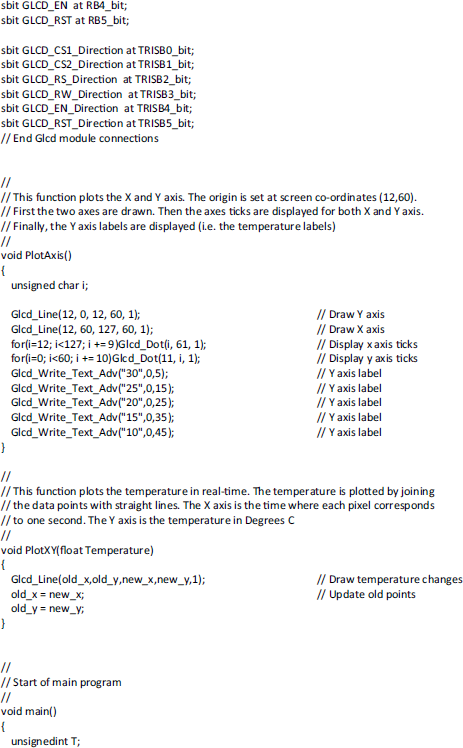
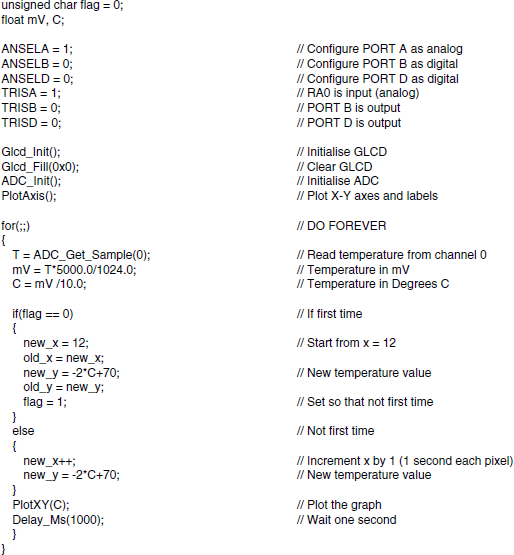
The GLCD library is then initialised using the Glcd_Init function. This function must be called before calling to any other GLCD function. The GLCD screen is then cleared using the Glcd_Fill(0×0), which turns OFF all pixels of the GLCD.
The A/D converter is initialised by calling library function ADC_Init. The background of the display is drawn by calling function PlotAxis. This function draws the X and Y axes. The bottom left part of the screen with co-ordinates (12,60) is taken as the (0,0) co-ordinate of our display. Then, ticks are placed on both the X and the Y axes using Glcd_Dot statements. The Y axis is labelled from 10 to 30°C in steps of 5°C, using the Glcd_Write_Text_Adv statements.
The program then enters an endless loop formed by a for statement. Inside this loop, the analogue temperature is converted into digital and stored in variable T by calling function ADC_Get_Sample with the channel number specified as 0 (RA0 or AN0). This digital value is converted into millivolts by multiplying with 5000 and dividing by 1024. The actual temperature in °C is calculated by dividing the voltage in millivolts by 10 (Vo = 10 mV/°C).
The graph is drawn using the GLCD function Glcd_Line. This function draws a line between the specified starting and ending X and Y co-ordinates. Variables old_x, old_y, new_x, and new_y are used to store the old and the new (current) X and Y values of the temperature, respectively. At the first iteration, the old and the current values are assumed to be the same and this is identified by the variable flag being cleared to 0. In all other iterations, variable flag is 1 and the else part of the if statement is executed. The X value is incremented by 1 to correspond to the next second and the new Y value is updated.
The Y co-ordinate (temperature) is calculated as follows:
The relationship between the Y axis ticks and the Y co-ordinates of data values can be derived from the following:
| Y axis ticks pixel co-ordinates | Y axis data co-ordinate (°C) |
| 10 | 30 |
| 20 | 25 |
| 30 | 20 |
| 40 | 15 |
| 50 | 10 |
The above relationship is linear and is the form of a straight line y = mx + C, where m is the slope of the line and C is the point where the line crosses the Y axis. The equation of this line can be found from
(12.3) ![]()
where m = (y2 − y1)/(x2 − x1)
By taking any two points on the line, we can easily find the equation. Considering the points:
(12.4) ![]()
The relationship is found to be:
(12.5) ![]()
Therefore, given the temperature C in degrees, the y co-ordinate to be used for plotting can be calculated from
(12.6) ![]()
After plotting a point, the new_x and new_y are copied to old_x and old_y, respectively, ready for the next sample to be plotted.
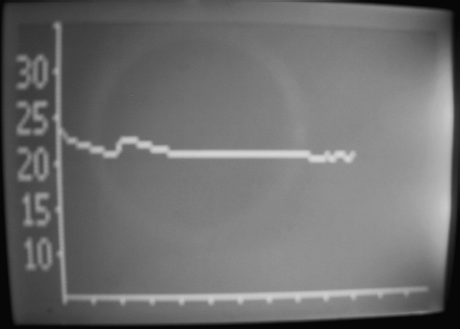
Figure 12.33 shows a typical display of the temperature in real-time.
Figure 12.33 Typical display of the temperature
12.5.6 Suggestion for Modification
The temperature measurement can be made more accurate by using a lower reference voltage for the A/D converter. For example, if a +3 V reference voltage is used instead of the +5 V, then the resolution of the A/D converter will be 3000/1024 = 2.92 mV instead of the 4.88 mV used in the project.