
11.6 PROJECT 11.6 – Digital Voltmeter
This project is about the design of a digital voltmeter device with LCD output. The device can be used to measure voltages from 0 V to +5000 mV.
The voltage is measured and displayed every second. The measured voltage will be displayed in millivolts and in floating point format as follows:
![]()
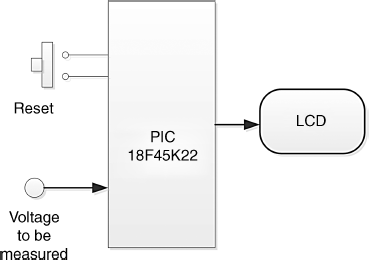
11.6.1 Block Diagram
The block diagram of the project is shown in Figure 11.21.
Figure 11.21 Block diagram of the project
11.6.2 Circuit Diagram
The circuit diagram of the project is shown in Figure 11.22. The LCD is connected to PORT B as before. The analogue voltage to be measured is applied to port pin RA0 of the microcontroller, and this pin is configured as an analogue input pin. The project is based on a PIC18F45K22 type microcontroller with an 8 MHz crystal clock, although most other PIC microcontrollers supporting A/D converters can also be used.
Figure 11.22 Circuit diagram of the project
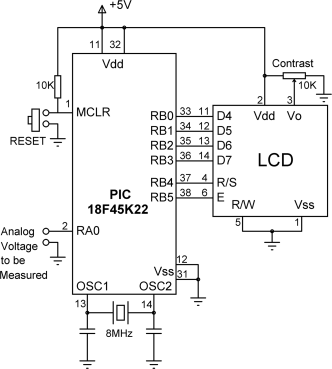
The connections between the microcontroller and the LCD are as follows:
| LCD Pin | Microcontroller Pin |
| D4 | RB0 |
| D5 | RB1 |
| D6 | RB2 |
| D7 | RB3 |
| R/S | RB4 |
| E | RB5 |
The contrast of the LCD is controlled by connecting a 10 KB potentiometer to pin 3 of the LCD. The microcontroller is Reset using an external push-button.
If you are using the EasyPIC 7 development board, then connect jumper J15 across pins RA0, and then you can vary the voltage at this pin for testing, by rotating the arm of the potentiometer located next to the port pins. Also make sure that the jumpers Read-X and Read-Y of SW3 are in the OFF positions.
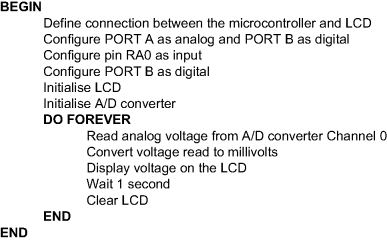
11.6.3 Project PDL
The PDL of this project is very simple and is given in Figure 11.23.
Figure 11.23 PDL of the project
11.6.4 Project Program
The program is named LCD6.C and the program listing of the project is shown in Figure 11.24. At the beginning of the project, the connection between the microcontroller and the LCD are defined using sbit statements. PORT A is configured as an analogue port and pin RA0 is configured as an input pin. Then, PORT B is configured as a digital output port, the LCD is initialised, cleared, and the cursor is turned OFF. The A/D converter module is initialised by calling function ADC_Init. This function sets the A/D converter to default configuration, where the clock is derived from the internal RC circuit, and the reference voltage is set to +5 V.
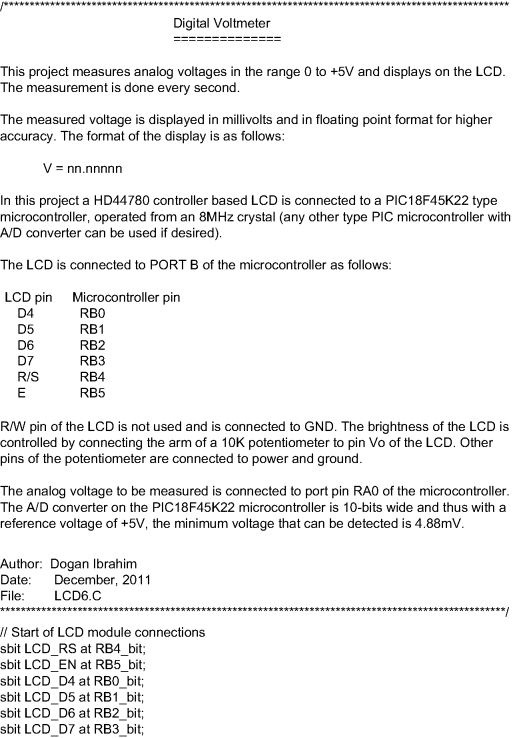
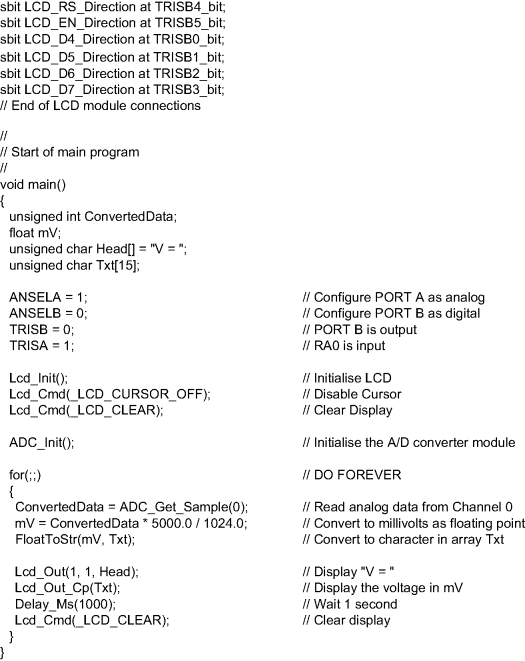
The program is executed in an endless loop formed using a for statement. Inside this loop, the input voltage is converted into digital using the A/D converter of the microcontroller. Function ADC_Get_Sample(0) reads the analogue voltage from Channel 0 (i.e. port pin RA0) of the microcontroller. Here, the converted digital data is stored in variable ConvertedData. The A/D converters on PIC18F45K22 microcontroller are 10-bits wide, providing 1024 steps. Thus, for a reference voltage of +5 V, each step corresponds to 4.88 mV, and this is the minimum voltage change that can be detected by our voltmeter. The digital data is then converted into millivolts and stored in variable mV after multiplying with 5000.0 and dividing by 1024.0. This data is converted into a string using function FloatToStr, so that it can be displayed on the LCD. The text ‘V = ’ is displayed first starting from row 1, column 1 of the LCD. Then, the measured voltage is displayed in floating point format. The program then waits for 1 second, clears the display, and the above process is repeated.