12.8 Acknowledgement
After receiving a command from the microcontroller, the sensor issues an acknowledgement pulse by pulling the DATA line LOW for one clock cycle. This takes place after the falling edge of the 8th clock on the SCK line, and the DATA line is pulled LOW until the end of the 9th clock on the SCK line.
12.8.1 The Status Register
The Status register is an internal 8 bit register that controls some functions of the device, such as selecting the measurement resolution, end of battery detection, and use of the internal heater. In order to write a byte to the Status register, the microcontroller must send the write command (‘00110’), followed by the data byte to be written. Note that the sensor generates acknowledge signals in response to receiving both the command and the data byte. Bit 0 of the Status register controls the resolution, such that when this bit is 1, both the temperature resolution and the relative humidity resolution are 12 bits. When this bit is 0, the temperature resolution is 14 bits and the relative humidity resolution is 12 bits.
The sensor includes an on-chip heating element that can be enabled by setting bit 2 of the Status register. By using the heater, it is possible to increase the sensor temperature by 5 to 10 °C. The heater can be useful for analysing the effects of changing the temperature on humidity. Notice that during temperature measurements, the sensor measures the temperature of the heated sensor element and not the ambient temperature.
The steps for reading the humidity and temperature are summarised below:
12.8.1.1 Humidity (assuming 12-bit operation with no CRC)
- Send Reset_Sequence.
- Send Transmission_start_sequence.
- Send ‘00000101’ to convert relative humidity.
- Receive ACK from sensor on 8th SCK pulse going LOW. The ACK is identified by the sensor lowering the DATA line.
- Wait for the measurement to be complete (up to 320 ms), or until DATA line is LOW.
- Ignore first 4 SCK pulses.
- Get the 4 upper nibble starting with the MSB bit.
- Send ACK to sensor at the end of 8th clock by lowering the DATA line and sending a pulse on SCK.
- Receive low 8 bits.
- Ignore CRC by keeping the DATA line HIGH.
- Next measurement can start by repeating the above steps.
12.8.1.2 Temperature
The steps for reading the temperature are similar, except that the command ‘00000011’ is sent instead of ‘00000101’
Figure 12.38 shows the timing diagram for reading the relative humidity with 12-bit resolution and ignoring the CRC. In this figure, it is assumed that the sensor has already been reset using the Reset_sequence.
Figure 12.38 Reading the relative humidity with 12-bit resolution and no CRC

12.8.2 Conversion of Signal Output
12.8.2.1 Relative Humidity Reading (SORH)
The humidity sensor is non-linear and it is necessary to perform a calculation to obtain the correct reading. The manufacturer's data sheet recommends the following formula for the correction:
(12.7) ![]()
where SORH is the value read from the sensor and the coefficients are as given in Table 12.2.
Table 12.2 Coefficients for the RH non-linearity correction.

For temperatures significantly different from the 25 °C, the manufacturers recommend another correction to be applied to the relative humidity as
(12.8) ![]()
where T is the temperature in °C where the relative humidity reading is taken, and the coefficients are as given in Table 12.3.
Table 12.3 Coefficients for RH temperature correction.
| SORH | t1 | t2 |
| 12 bit | 0.01 | 0.00008 |
| 8 bit | 0.01 | 0.00128 |
12.8.2.2 Temperature Reading (SOT)
The manufacturers recommend that the temperature reading of the SHT11 should be corrected according to the following formula:
(12.9) ![]()
where SOT is the value read from the sensor and the coefficients are as given in Table 12.4.
Table 12.4 Coefficients for temperature correction.
| VDD | d1 (°C) | d1 (°F) |
| 5 | −40.1 | −40.2 |
| 4 | −39.8 | −39.6 |
| 3.5 | −39.7 | −39.5 |
| 3 | −39.6 | −39.3 |
| 2.5 | −39.4 | −38.9 |
| SOT | D2(°C) | D2(°F) |
| 14 bit | 0.01 | 0.018 |
| 12 bit | 0.04 | 0.072 |
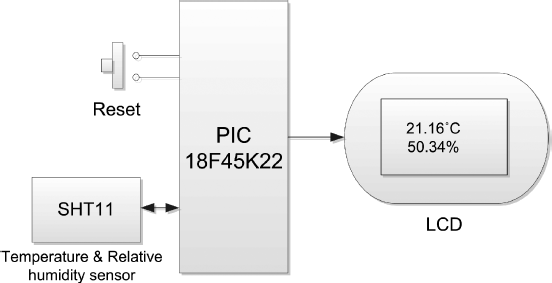
12.8.3 Block Diagram
The block diagram of the project is shown in Figure 12.39. A rectangle will be drawn on the GLCD screen and the temperature and relative humidity will both be displayed, as shown in the figure.
Figure 12.39 Block diagram of the project
12.8.4 Circuit Diagram
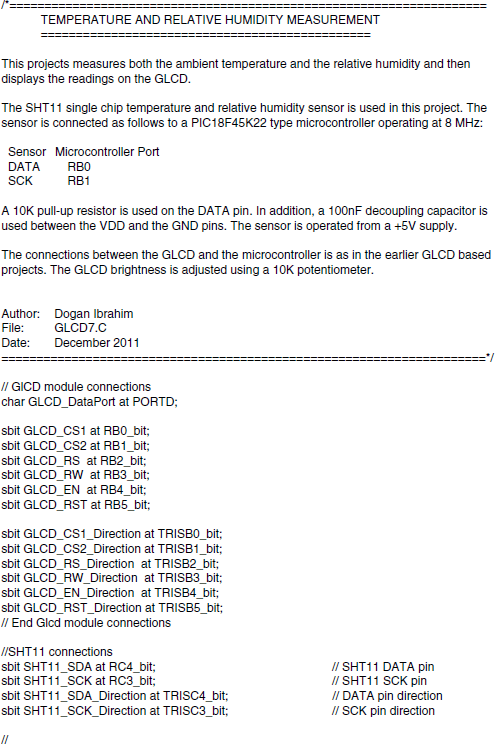
The circuit diagram of the project is as shown in Figure 12.40. The SHT11 sensor is connected to PORT C of a PIC18F45K22 type microcontroller. The DATA pin is connected to RC4 and the SCK pin is connected to RC3. The DATA pin is pulled up using a 10 KB resistor, as recommended by the manufacturers. Also, a 100 nF decoupling capacitor is connected between the VDD pin and the ground.
Figure 12.40 Circuit diagram of the project

The project was tested using a plug-in SHT11 module (manufactured by mikroElektronika) together with the EasyPIC 7 development board, where the module was connected to the PORT C I/O plug located at the edge of the EasyPIC 7 development board (see Figure 12.41).
Figure 12.41 Using the SHT11 module with the EasyPIC 7 development board

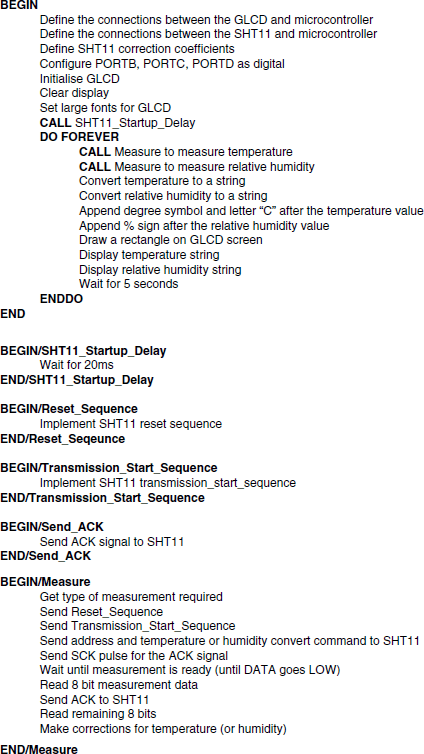
12.8.5 Project PDL
The PDL of this project is given in Figure 12.42.
Figure 12.42 PDL of the project
12.8.6 Project Program
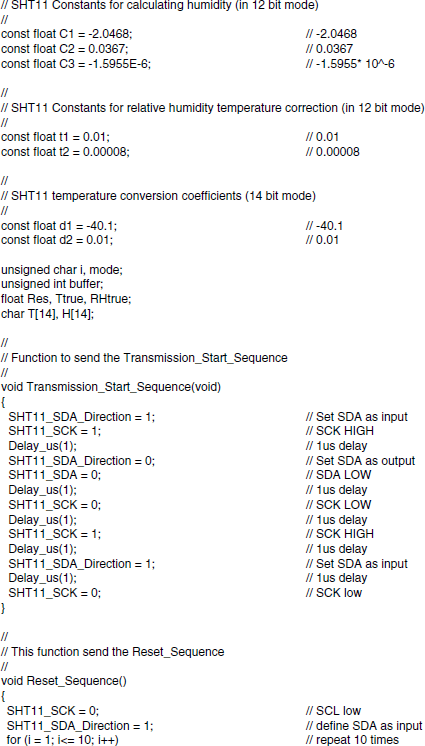
The program listing of the project is shown in Figure 12.43. At the beginning of the program, the connections between the GLCD and the microcontroller are defined. Then, the connections between the SHT11 sensor and the microcontroller are defined. The temperature and relative humidity correction coefficients are then given as floating point numbers.


The main program then configures PORT B, PORT C and PORT D as digital outputs, initialises the GLCD, and clears the display. The GLCD font is set to large. The SHT11 datasheet recommends that no commands should be sent to the device for the first 20 ms after power is applied to the device. This delay is implemented by function SHT11_StartupDelay. The program then enters an endless loop formed with a for statement. Inside this loop, the temperature is measured and corrected by calling function Measure with argument 3, and stored in floating point variable Ttrue. Then, the relative humidity is read, corrected and stored in floating point variable RHtrue. The measured values are converted into strings by using built-in function FloatToStr. Finally, the degree symbol and letter ‘C’ are appended to the temperature reading. Similarly, symbol ‘%’ is appended to the relative humidity reading before it is displayed.
Function Measure is the most complicated function in the program. This function implements the measurement steps described earlier in the project. Argument command specifies the type of measurement required: 3 for temperature measurement and 5 for relative humidity measurement. After calling to functions Reset_Sequence and Transmission_Start_Sequence, the address and command is sent to the SHT11 device. Bits of mode (3 or 5) are sent out through the MSB after shifting the data to the left in a loop. The program then waits until the conversion is ready, which is indicated by the DATA line going LOW. Once the data is ready, a loop is formed to read the two bytes from the sensor. At the end of the 8th clock pulse, an ACK signal is sent to the sensor. In the last part of this function, depending upon the type of conversion required, either the temperature or the relative humidity readings are corrected and returned to the calling program.
The program repeats after a delay of 5 seconds.
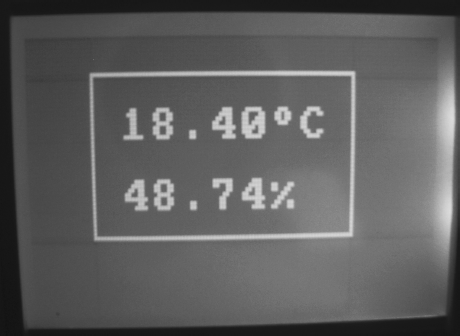
Figure 12.44 shows a typical display.
Figure 12.44 A typical display