
10.2 PROJECT 10.2 – Display a Number on 2-Digit 7-Segment LED Display
10.2.1 Project Description
This project shows how more than one 7-segment display can be multiplexed. In this project, we will display number 45 on a 2-digit display as an example.
10.2.2 Block Diagram
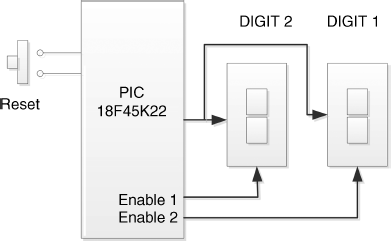
The block diagram of the project is shown in Figure 10.7.
Figure 10.7 Block diagram of the project
10.2.3 Circuit Diagram
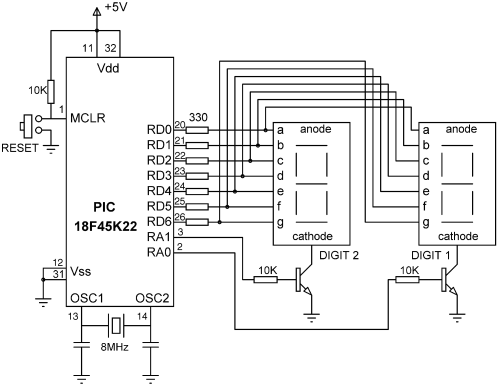
The circuit diagram of the project is shown in Figure 10.8. The displays are connected in parallel to PORT D of the microcontroller. Each digit is enabled separately by connecting a transistor as a switch to its common cathode pin. Setting the base of the transistor to logic HIGH turns the transistor ON and enables the corresponding display digit. PORT A pins RA0 and RA1 are used to control the display enable lines. With multiplexed displays, each display is enabled for several milliseconds and the human eye thinks that all the LEDs are ON at all times. As an example, a two digit 7-segment display is operated as follows:
- send digit 1 number to PORT D;
- enable digit 1;
- wait for a few milliseconds;
- disable digit 1;
- send digit 2 number to PORT D;
- enable digit 2;
- wait for a few milliseconds;
- disable digit 2;
- repeat above steps forever.
If you are using the EasyPIC 7 development board, then make sure you set to ON position switches SW4.1 (i.e. DIS0) and SW4.2 (i.e. DIS1), to enable the rightmost two digits of the 7-segment LEDs on the board.
Figure 10.8 Circuit diagram of the project
10.2.4 Project PDL
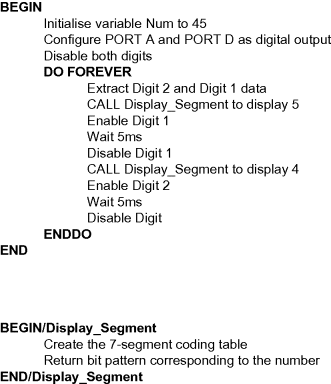
The PDL of the project is given in Figure 10.9.
Figure 10.9 PDL of the project
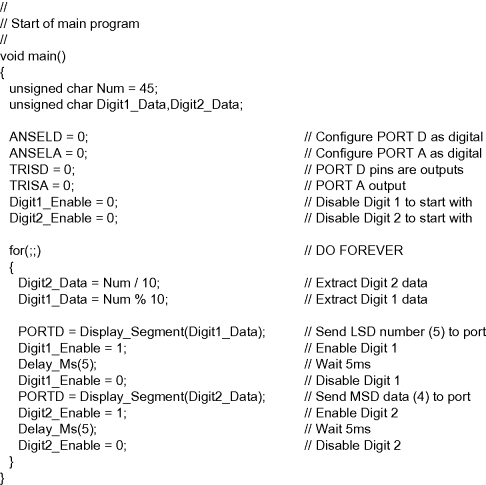
10.2.5 Project Program
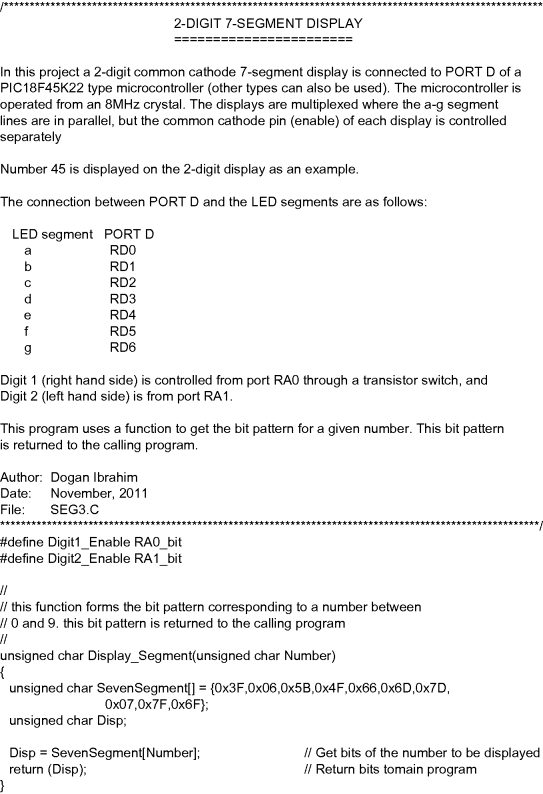
The program is named SEG3.C and the program listing of the project is given in Figure 10.10. The 7-segment display function Display_Segment is also used in this program. At the beginning of the program, display enable signals RA0 and RA1 are assigned to symbols Digit1_Enable and Digit2_Enable, respectively. The number to be displayed (45) is stored in variable Num. PORT D and PORT Apins are configured as digital and output. Both display digits are disabled to start with. The program then enters an endless loop using the for statement. Inside this loop, the two digits of the number are extracted and stored in variables Digit1_Data and Digit2_Data. First, the bit pattern corresponding to Digit1_Data is obtained by calling function Display_Segment and this bit pattern is sent to PORT D to display number 5 on Digit 1. Digit 1 is enabled by sending logic 1 voltage to the base of the transistor connected to RA0. After a 5 ms delay, the number corresponding to Digit 2 is obtained and sent to PORT D. Digit 2 is enabled by setting RA1 to logic 1, and after a 5 ms delay, the digit is disabled. The above process is repeated forever, with a 5 ms delay after displaying each digit. The person looking at the digits thinks that both digits are ON at all times while number 45 is displayed.
It is important to realise that in Figure 10.10 the program is busy continuously refreshing the displays and the processor is not free to carry out any other tasks. We shall see in the next example how the display refreshing action can be implemented in a timer interrupt service routine so that the processor becomes free to do other tasks.