
9.6 PROJECT 9.6 – LED Dice
9.6.1 Project Description
In this project, 7 LEDs are organised in the form of a dice. A push-button switch (START) is used, such that when the switch is pressed, a random number is displayed between 1 and 6 by the LEDs to imitate a real dice. The LEDs are turned OFF after 5 seconds to indicate that the system is ready and the user can press the button for a new dice number.
Figure 9.32 shows the LED organisation and the corresponding dice numbers.
Figure 9.32 Dice numbers

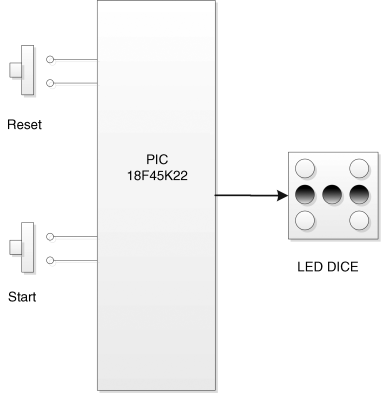
9.6.2 Block Diagram
The block diagram of the project is shown in Figure 9.33.
Figure 9.33 Block diagram of the project.
9.6.3 Circuit Diagram
The circuit diagram of the project is shown in Figure 9.34. The START switch is connected to bit 7 of PORT C. The 7 LED s are connected to bits RC0 to RC6 of PORT C as follows:
| LED | PORT C pin |
| L1 | RC0 |
| L2 | RC1 |
| L3 | RC2 |
| L4 | RC3 |
| L5 | RC4 |
| L6 | RC5 |
| L7 | RC6 |
Figure 9.34 Circuit diagram of the project
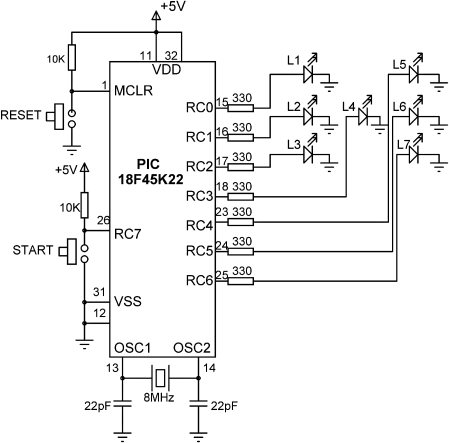
The microcontroller is operated from an 8 MHz crystal. Table 9.1 shows the relationship between a dice number and the corresponding LEDs to be turned ON to show the numbers. For example, to display number 1, we have to turn ON only the middle LED, that is L4. Similarly, to display number 3, we have to turn on LEDs L2, L4 and L6. The last column of Table 9.1 shows the hexadecimal number to be sent to PORT C to display a given dice number. For example, to display number 4, we have to send hexadecimal number 0 × 55 to PORT C. If using the EasyPIC 7 development board, Jumper J7 should be set to the lower position and DIP switch SW7 for pin RC7 should be set to PULL-UP position. In this mode, the microcontroller input pin is normally at logic HIGH. When the button is pressed, the input pin goes to logic LOW.
Table 9.1 Data to be sent to PORT C for a given dice number.
| Required Number | LEDs to be Turned On | PORT C Data (Hex) |
| 1 | L4 | 0 × 08 |
| 2 | L2, L6 | 0 × 22 |
| 3 | L2, L4, L6 | 0 × 2A |
| 4 | L1, L3, L5, L7 | 0 × 55 |
| 5 | L1, L3, L4 L5, L7 | 0 × 5D |
| 6 | L1, L2, L3, L5, L6, L7 | 0 × 77 |
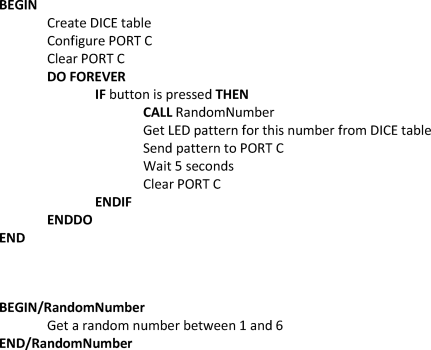
9.6.4 Project PDL
The PDL of this project is given in Figure 9.35. As you can see from the PDL, the dice number is created using a pseudorandom number generator, as in the previous project.
Figure 9.35 PDL of the project
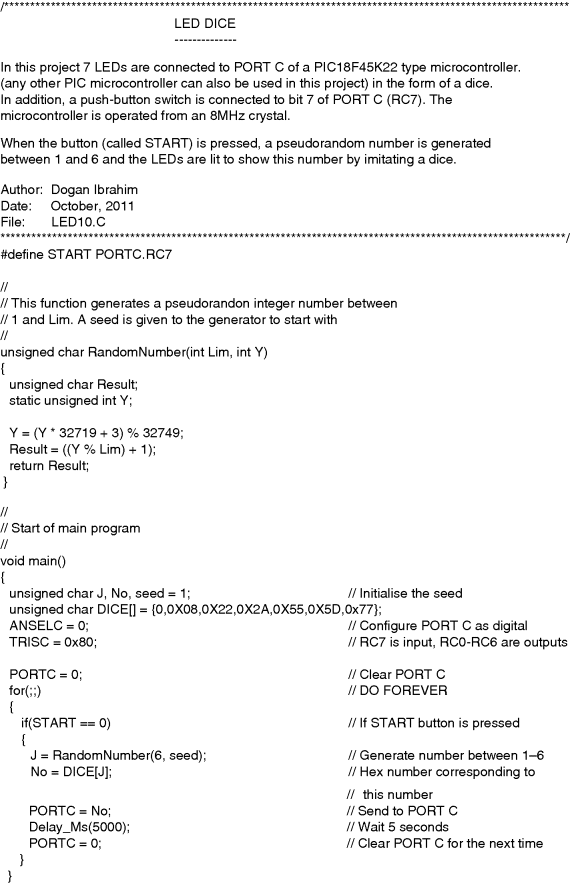
9.6.5 Project Program
The project program listing (LED10.C) is shown in Figure 9.36. PORT C bit 7 (RC7) is configured as a digital input port and bits RC0 to RC6 are configured as output ports. An array called DICE is created and initialised with the dice patterns corresponding to dice numbers. Notice that DICE[0] is not used and is set to 0. When the START button is pressed, function RandomNumber is called to generate an integer pseudorandom number (in variable J) between 1 and 6. The bit pattern corresponding to this number is read from array DICE (in variable No) and sent to PORT C as a hexadecimal number in order to display the imitated dice number on the LEDs. The dice number is displayed for 5 seconds and then the LEDs turn OFF to indicate that the system is ready to generate a new number.
Figure 9.36 Program listing of the project
9.6.6 Suggestions for Further Development
Some of the games (e.g. backgammon) are played with two dices. The design given in this project can be modified by adding another set of 7 LEDs for the second dice. For example, the first dice can be driven from PORT C, the second one from PORT D.