
Troubleshooting Laptops, Printers, and Networking
Now that we’ve taken a whirlwind tour of troubleshooting the inside of a computer, it’s time to change our focus. First, we will cover unique challenges to troubleshooting laptops. They have most of the same components as desktop computers, so a lot of what we’ve already covered still applies. Because of their small size and features, though, they introduce a whole host of new potential problems. After we discuss laptops, we’ll move into troubleshooting two services that most computer users are fond of: printing and networking.
Troubleshooting Common Laptop Issues
Laptops use essentially the same types of devices as desktops, but troubleshooting the two can feel very different. While the general troubleshooting philosophies never change—steps such as gathering information, isolating the problem, and then testing one fix at a time—the space and configuration limitations can make laptop troubleshooting more frustrating.
Before getting into specific laptop-type issues, remember that good troubleshooting means acting in a methodical manner. You need to find out if the device or software ever worked, what happened before the problem occurred, and what changes were made (if any). Then you must try to isolate the problem and test one fix at a time.
There are four typical areas where laptops could have different problems than their desktop counterparts: power, video, input, and wireless networking.
- Document and label screw and cable locations.
- Have a clear organization method for your parts and screws.
- Refer to the manufacturer’s documentation.
- Use the appropriate hand tools.
Power Issues
Is it plugged in? Everyone hates getting asked that question if their computer doesn’t work. But it’s the critical first question to ask. After all, if it’s not plugged in, who knows whether or not it will work? You can’t assume that the battery is working (or is attached) as it’s supposed to. Always check power and connections first!
Most laptop power adapters have a light on them indicating that they’re plugged in. If there’s no light, check to make sure the outlet is working, or switch outlets. Also, most laptops have a power-ready indicator light when plugged into a wall outlet as well. Check to see if it’s lit. If the outlet is fine, try another power adapter. They do fail on occasion.
If you’re working on a DC adapter, the same thing applies. Check for lights, try another adapter if you have one, or try changing plugs if possible. For example, if you’re using a DC outlet in a car, many newer models have secondary power sources, such as ones in the console between the seats.
Another thing to remember when troubleshooting power problems is to remove all external peripherals. Strip your laptop down to the base computer so there isn’t a short or other power drain coming from an external device.

Video Difficulties
Video problems are usually caused by the video card (built into the motherboard on most laptops) or the display unit. Video problems on laptops can also occur if the connection between the motherboard and the LCD screen becomes damaged. This connection typically passes through the hinges of the case, which is the weakest part.
The coverage for video problems follows the section on power problems for a reason: Make sure the computer is on before diagnosing the issue as a video problem!
Here are a few things to try:
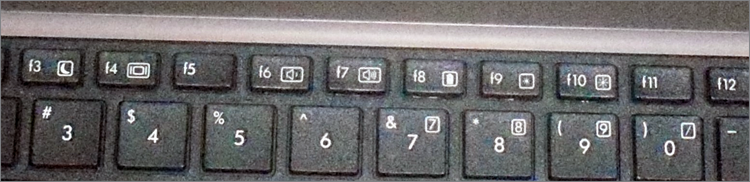
- Plug in an external monitor that you know works. On most laptops, you need to press the function key and another key known as the LCD cutoff switch (often F4 or F8) to direct the video output to an external monitor. This is called toggling the display. You might need to do this a few times. Figure 20-1 shows a laptop keyboard where F4 is the appropriate toggle key. Look for the box with the vertical lines next to it.
Figure 20-1: Video adjustment keys F4 (LCD toggle), F9 (dim), and F10 (brighten)
- Check the LCD cutoff switch. Remember the function+F4 idea? Try toggling it a few times, waiting a few seconds between each press of the toggle key to let the display power up. Most laptops have three display states: LCD only, external only, and both.
- Raise or lower the brightness level. This is usually done with a function key combination as well, such as Fn+F9 or Fn+F10. Check your keyboard for function keys that have a sun on them.
- If you have a handheld computer, try turning the backlight feature on or off. For specifics on how to do this, check your manual.
If the display is not working, you can order a new one from the laptop manufacturer—although it may be cheaper to just buy a new laptop. If the computer won’t output a display to an external monitor, it means one of two things: Either the external VGA port is shot, or the function keys aren’t working. In either case, you likely need to replace the motherboard if you want to display to an external device.
Input Problems
Laptop keyboards aren’t as easy to switch out as desktop keyboards. You can, however, very easily attach an external keyboard to your laptop if the keys on your laptop don’t appear to work. If you have the wrong type of connector, most electronics stores will have USB-to-PS/2 or PS/2-to-USB converters.
If the keyboard doesn’t seem to respond at all, try pressing the NumLock or CapsLock keys, to see if they toggle the NumLock or CapsLock lights on and off. If the lights don’t respond, the keyboard isn’t functioning properly. Try rebooting the system. (You will probably have to press and hold the power button for five seconds, and the system will shut off. Wait 10 seconds, and press the power button again to turn it back on.) If that doesn’t fix the problem, you probably have faulty hardware.
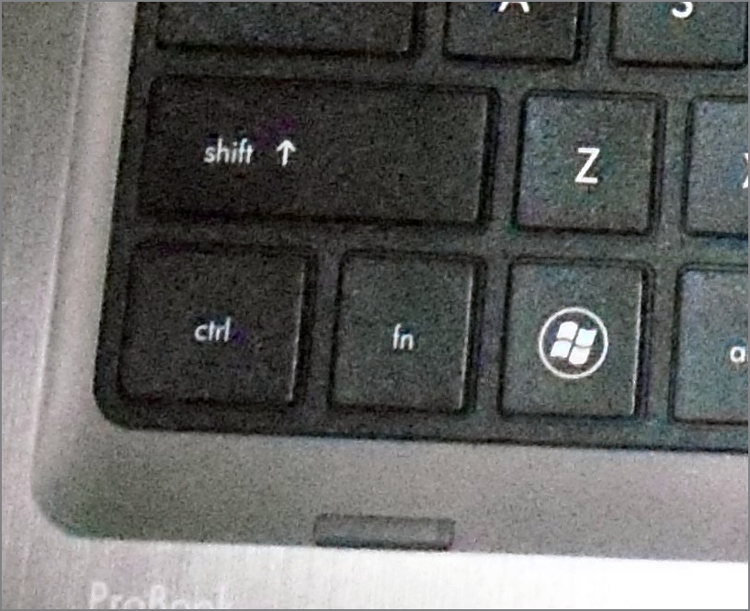
Another problem unique to laptop keyboards is the Fn key. (It can be your friend or your enemy.) You can identify it on your laptop keyboard because it’s in the lower-left corner and has the letters Fn on it (often in blue), as shown in Figure 20-2. If the Fn key is “stuck” on, the only keys that will work are those with functions on them. If you look at other keys on your laptop, several of them will have blue lettering too. Those are the functions the keys may perform if you press and hold the Fn key before pressing the function key you want. If the Fn key is stuck on, try toggling it just as you would a Caps Lock or Num Lock key.
Figure 20-2: The Fn key on a laptop
One of the conveniences that users often take advantage of in laptops is built-in pointing devices. A lot of laptops now have touchpads or point sticks that function much like a mouse. They’re nice because you don’t need to carry an external mouse around with you. While these types of devices are usually considered very handy, some people find them annoying. For example, when you are typing your palm might rest on the touchpad, causing erratic pointer behavior. This is referred to as a ghost cursor because it seems like the cursor just randomly jumps all over the screen. You can turn the touchpad off through Control Panel. While understanding that you can turn it off on purpose, remember that it can be turned off accidentally as well. Check to make sure it’s enabled. Some laptops allow you to disable or change the sensitivity of the touchpoint as well, just as you can adjust the sensitivity of your mouse.
Networking Troubles
Nearly all modern laptops are equipped with wireless networking built into the computer. WiFi is prevalent, and many laptops natively support Bluetooth as well. In many cases, the wireless antenna is run into the LCD panel. This allows the antenna to stand up higher and pick up a better signal.
If your wireless isn’t working, check to make sure that the LEDs on your network card are functioning. If there are no lights, it could indicate a problem with the card itself or, on some cards, that there is no connection or signal. First, make sure the wireless card is enabled through Windows. You generally do this in Windows by right-clicking My Network Places, selecting Properties, right-clicking the wireless network connection, and selecting Properties to look at the network card properties. However, some network cards have their own proprietary configuration software. You can also often check here by clicking a tab (often called Wireless Networks) to see if you’re getting a signal and, if so, the strength of that signal.
A weak signal is the most common cause of intermittent wireless networking connection problems. If you have intermittent connectivity and keep getting dropped, see if you can get closer to the WAP or remove obstructions between you and the WAP. Failing network cards and connectivity devices can also cause intermittent wireless networking connection failures.
A lot of laptops now also come with an external switch on the front, side, or above the keyboard that can toggle the network card on and off. Be sure that this is set to the on position! Figure 20-3 shows a toggle above the keyboard (it’s the one on the left that looks like an antenna).
Figure 20-3: Network card toggle switch above the keyboard
When the wireless connection fails but the network card appears to be working, try plugging it in. Most laptops with wireless cards also have wired RJ-45 network ports. Plug the card in and see if you get lights, and see if the network works.
Troubleshooting Printer Problems
Other than the monitor (which every computer needs), the most popular peripheral purchased for computers today is the printer. Printers are also the most complex peripheral as far as troubleshooting is concerned; this arises from complications in putting ink to paper. There are several different ways that this can be accomplished, but the end result is all pretty much the same.
Different types of printers work in different ways, so you would expect that laser printers might have different issues than impact printers have. Because problems are often dependent upon the type of printer you’re working with, we’ve chosen to break down this discussion by printer type. We’ll start with a quick review of the technology and then get into specific issues. At the end, we’ll look at the process of managing the print spooler, which is the same regardless of the printer type in use.
Dot-Matrix Printer Problems
Dot-matrix printers are impact printers, meaning that they rely upon making a physical impact in order to print. A dot-matrix printer contains a print head, which has a row of short, sturdy pins made of a hard wire. The pins in the print head are wrapped with coils of wire to create a solenoid and are held in the rest position by a combination of a small magnet and a spring. To trigger a particular pin, the printer controller sends a signal to the print head, which energizes the wires around the appropriate print wire. This turns the print wire into an electromagnet, which repels the print pin, forcing it against the ink ribbon and making a dot on the paper.
Although this might sound complex, dot-matrix printers are relatively simple devices. Therefore, only a few problems usually arise. We will cover the most common problems and their solutions here.
Low Print Quality
Problems with print quality are easy to identify. When the printed page comes out of the printer, the characters may be too light or have dots missing from them. Table 20-1 details some of the most common print quality problems, their causes, and their solutions.
Table 20-1: Common dot-matrix print quality problems
| Characteristics | Cause | Solution |
| Consistently faded or light characters | Worn-out printer ribbon | See if you can adjust the print head to be closer to the ribbon. If not (or if it doesn’t help), replace the ribbon with a new, vendor-recommended ribbon. |
| Print lines that go from dark to light as the print head moves across the page | Printer ribbon-advance gear slipping | Replace the ribbon-advance gear or mechanism. |
| A small, blank line running through a line of print (consistently) | Print head pin stuck inside the print head | Replace the print head. |
| A small, blank line running through a line of print (intermittently) | A broken, loose, or shorting print head cable | Secure or replace the print head cable. |
| A small, dark line running through a line of print | Print head pin stuck in the out position | Replace the print head. (Pushing the pin in may damage the print head.) |
| Printer making a printing noise, but no print appears on the page | Worn, missing, or improperly installed ribbon cartridge | Replace the ribbon cartridge correctly. |
| Printer printing garbage | Cable partially unhooked, wrong driver selected, or bad printer control board (PCB) | Hook up the cable correctly, select the correct driver, or replace the PCB (respectively). |
Printout Jams inside the Printer
Printer jams (aka “the printer crinkled my paper”) are very frustrating because they always seem to happen more than halfway through your 50-page print job, requiring you to take time to remove the jam before the rest of your pages can print. A paper jam happens when something prevents the paper from advancing through the printer evenly. There are generally two causes of printer jams: an obstructed paper path and stripped drive gears.
Obstructed paper paths are often difficult to find. Usually it means disassembling the printer to find the bit of crumpled-up paper or other foreign substance that’s blocking the paper path. A common obstruction is a piece of the “perf”—the perforated sides of tractor-feed paper—that has torn off and gotten crumpled up and then lodged in the paper path. It may be necessary to remove the platen roller and feed mechanism to get at the obstruction.
Stepper Motor Problems
Printers use stepper motors to move the print head back and forth as well as to advance the paper. The carriage motor is responsible for the back-and-forth motion while the main motor advances the paper. These motors get damaged when they are forced in any direction while the power is on. This includes moving the print head over to install a printer ribbon as well as moving the paper-feed roller to align paper. These motors are very sensitive to stray voltages. If you are rotating one of these motors by hand, you are essentially turning it into a small generator and thus damaging it.
A damaged stepper motor is easy to detect. Damage to the stepper motor will cause it to lose precision and move farther with each step. If the main motor is damaged (which is more likely to happen), lines of print will be unevenly spaced. If the print head motor goes bad, characters will be scrunched together. If a stepper motor is damaged badly enough, it won’t move at all in any direction; it may even make high-pitched squealing noises. If any of these symptoms appear, it’s time to replace one of these motors.
Stepper motors are usually expensive to replace—about half the cost of a new printer! Damage to them is easy to avoid; the biggest key is to not force them to move when the power is on.
Inkjet Printer Problems
An Inkjet printer has many of the same types of parts that a dot-matrix printer does. In this sense, it’s almost as if the inkjet technology is simply an extension of the technology used in dot-matrix printers. The parts on an inkjet can be divided into four categories:
- Print head/ink cartridge
- Print head carriage, belt, and stepper motor
- Paper-feed mechanism
- Control, interface, and power circuitry
Perhaps the most obvious difference between inkjet and dot-matrix printers is that dot-matrix printers often use tractor-feed paper while inkjets use normal paper. The differences don’t end there, though. Inkjet printers work by spraying ink (often in the form of a bubble, hence their name) onto a page. The pattern of the bubbles forms images on the paper.
Inkjet printers are the most common type of printer found in homes because they are inexpensive and produce good-quality images. For this reason, you need to understand the most common problems with these printers so your company can service them effectively. Let’s take a look at some of the most common problems with inkjet printers and their solutions.
Print Quality
The majority of inkjet printer problems are quality problems. Ninety-nine percent of these can be traced to a faulty ink cartridge. With most inkjet printers, the ink cartridge contains the print head and the ink. The major problem with this assembly can be described by “If you don’t use it, you lose it.” The ink will dry out in the small nozzles and block them if they are not used at least once a week.
An example of a quality problem is when you have thin, blank lines present in every line of text on the page. This is caused by a plugged hole in at least one of the small, pinhole ink nozzles in the print cartridge. Replacing the ink cartridge solves this problem easily.
If an ink cartridge becomes damaged or develops a hole, it can put too much ink on the page and the letters will smear. Again, the solution is to replace the ink cartridge. (You should be aware, however, that a very small amount of smearing is normal if the pages are laid on top of each other immediately after printing.)
One final print quality problem that does not directly involve the ink cartridge occurs when the print quickly goes from dark to light and then prints nothing. As we already mentioned, ink cartridges dry out if not used. That’s why the manufacturers include a small suction pump inside the printer that primes the ink cartridge before each print cycle. If this priming pump is broken or malfunctioning, this problem will manifest itself and the pump will need to be replaced.
After you install a new cartridge into many inkjet printers, the print heads in that cartridge must be aligned. Print head alignment is the process by which the print head is calibrated for use. A special utility that comes with the printer software is used to do this. You run the alignment utility, and the printer prints several vertical and horizontal lines with numbers next to them. It then shows you a screen and asks you to choose the horizontal and vertical lines that are the most “in line.” Once you enter the numbers, the software understands whether the print head(s) are out of alignment, which direction, and by how much. The software then makes slight modifications to the print driver software to tell it how much to offset when printing. Occasionally alignment must be done several times to get the images to align properly.
Color Output Problems
Sometimes when you print a color document, the colors might not be the same colors you expected based on what you saw on the screen. This could be caused by a few different issues. First, ink could be bleeding from adjacent areas of the picture, causing the color to be off. A leaking cartridge can cause this, as can using the wrong type of paper for your printer.
If you know you’re using the right paper, try cleaning the print cartridges using the software utility that should have been included with the printer software. Once you do that, print a test page to confirm that the colors are correct. On most color printers, the test page will print colors in a pattern from left to right that mirrors the way the ink cartridges are installed. That brings us to our second potential problem, which is the ink cartridges are installed in the wrong spot. (This is for printers with multiple color ink cartridges.) That should be easy to check. Obviously, if that’s the problem, put the right color cartridges where they’re supposed to be!
Third, if the ink that comes out of the cartridge doesn’t match the label on the cartridge, try the self-cleaning utility. If that doesn’t help, replace the cartridge. Finally, if one of the colors doesn’t come out at all, and self-cleaning doesn’t help, just replace the cartridge.
Paper Jams
Inkjet printers have pretty simple paper paths. Therefore, paper jams due to obstructions are less likely than they are on dot-matrix printers. They are still possible, however, so an obstruction shouldn’t be overlooked as a possible cause of jamming.
Paper jams in inkjet printers are usually due to one of two things:
- A worn pickup roller
- The wrong type of paper
The pickup roller usually has one or two D-shaped rollers mounted on a rotating shaft. When the shaft rotates, one edge of the D roller rubs against the paper, pushing it into the printer. When the roller gets worn, it gets smooth and doesn’t exert enough friction against the paper to push it into the printer.
If the paper used in the printer is too smooth, it can cause the same problem. Pickup rollers use friction, and smooth paper doesn’t offer much friction. If the paper is too rough, on the other hand, it acts like sandpaper on the rollers, wearing them smooth. Here’s a rule of thumb for paper smoothness: paper slightly smoother than a new dollar bill will work fine.
Paper-Feeding Problems
You will normally see one of two paper-feeding options on an inkjet printer. The first is that the paper is stored in a paper tray on the front of the printer. The second, which is more common on smaller and cheaper models, is for the paper to be fed in vertically from the back of the printer in a paper feeder.
Regardless of the feed style, the printer will have a paper-feed mechanism, which picks up the paper and feeds it into the printer. Inside the paper-feed mechanism are pickup rollers, which are small rubber rollers that rub up against the paper and feed it into the printer. They press up against small rubber or cork patches known as separator pads. These help keep the rest of the paper in the tray so that only one sheet gets picked up at a time. The pickup rollers are turned by a pickup stepper motor.
If your printer fails to pick up paper, it could indicate that the pickup rollers are too worn. If your printer is always picking up multiple sheets of paper, it could be a couple of things, such as problems with the separator pads or your paper being too “sticky,” damp, or rough. Some printers that use vertical paper feeders have a lever with which you can adjust the amount of tension between the pickup rollers and the separator pads. If your printer is consistently pulling multiple sheets of paper, you might want to try to increase the tension using this lever.
The final component is the paper-feed sensor. This sensor is designed to tell the printer when it’s out of paper, and they rarely fail. When they do, the printer will refuse to print because it thinks it is out of paper. Cleaning the sensor might help, but if not, you should replace the printer.
Stepper Motor Problems
Inkjet printers use stepper motors, just as dot-matrix printers do. On an inkjet, the print head carriage is the component containing the print head that moves back and forth. A carriage stepper motor and an attached belt (the carriage belt) are responsible for the movement. To keep the print head carriage horizontally stable, it rests on a metal stabilizer bar. Another stepper motor is responsible for advancing the paper.
Stepper motor problems on an inkjet will look similar to the ones on a dot-matrix printer. That is, if the main motor is damaged, lines of print will be unevenly spaced, and if the print head motor goes bad, characters will be scrunched together. A lot of damage may cause the stepper motor to not move at all and possibly make high-pitched squealing noises. If any of these symptoms appear, it’s time to replace one of these motors. As with dot-matrix printers, stepper motors can be expensive. It may make more economical sense to replace the printer.
Power Problems
Inkjet printers have internal power circuits that convert the electricity from the outlet into voltages that the printer can use, typically 12V and 5V. The specific device that does this is called the transformer. If the transformer fails, the printer will not power up. If this happens, it’s time to get a new printer.
Laser Printer Problems
The process that laser printers use to print, called the electrophotographic (EP) print process, is the most complex process of all commonly used printers. You should have memorized the six-step EP process for the A+ Exam 220-801, but perhaps you’ve forgotten a bit. Table 20-2 gives you the six steps and a short description of what happens in each step.
Table 20-2: The EP printing process
| Step | Action |
| Cleaning | A rubber blade scrapes any remaining toner off of the drum and a fluorescent lamp discharges any remaining charge on the photosensitive drum. |
| Charging | The charging corona gets a high voltage from the high voltage power supply (HVPS). It uses the voltage to apply a strong uniform negative charge (–600VDC) to the photosensitive drum. |
| Writing | The laser scans the drum. Wherever it touches the drum, the charge is reduced from –600VDC to around –100VDC. The pattern formed on the drum will be the image that is printed. |
| Developing | The developing roller acquires a –600VDC charge from the HVPS and picks up toner, which gets the same –600VDC charge. As the developing toner rolls by the photosensitive drum, the toner is attracted to the lesser-charged (–100VDC) areas on the photosensitive drum and sticks to it in those areas. |
| Transferring | The charging corona wire or roller acquires a strong positive charge (+600VDC) and transfers it to the paper. As the photosensitive drum with ink on it rolls by, the ink is attracted to the paper. |
| Fusing | The 350˚ F fuser roller melts the toner paper and the rubberized pressure roller presses the melted toner into the paper, making the image permanent. |
Looking at the steps involved in laser printing, it’s pretty easy to tell that laser printers are the most complex printers that we have discussed. There is good news, though—most laser printer problems are easily identifiable and have specific fixes. Let’s discuss the most common laser and page printer problems and their solutions.
Power Problems
If you turn your laser printer on and it doesn’t respond normally, there could be a problem with the power it’s receiving. Of course, the first thing to do is to ensure that it’s plugged in!
A laser printer’s DC power supply provides three different DC voltages to printer components. This can all be checked at a power interface labeled J210, which is a 20-pin female interface. Pin 1 will be in the lower-left corner, and the pins along the bottom will all be odd numbers, increasing from left to right.
Using the multimeter, you should find the following voltages:
- Pin 1 +5v
- Pin 5 –5v
- Pin 9 +24v
If none of the voltages are reading properly, then you probably need to replace the fuse in the DC power supply. If one or more (but not all) of the voltages aren’t reading properly, then the first thing to do is remove all optional hardware in the printer (including memory) and test again. If the readings are still bad, it’s likely you need to replace the DC power supply.
No Connectivity (IP Issues)
You can connect many laser printers directly to your network by using a network cable (such as Category 5e or 6) or by using a wireless network adapter with the printer. In cases like these, the printer acts as its own print server (typically print server software is built into the printer), and it can speed up printing because you don’t have a separate print server translating and then sending the directions to the printer.
For printers such as these, no connectivity can be a sign of improperly configured IP settings such as the IP address. While each printer is somewhat different, you can manually configure most laser printers’ IP settings a number of ways, such as:
- Through the printer’s LCD control panel. For example, on several HP LaserJet models, you press Menu, navigate to the Network Config menu, select TCP/IP Config, select Manual, and then enter the IP address. You would then also configure the subnet mask and default gateway.
- By using Telnet to connect to the printer’s management software from your computer.
- By using the management software that came with your printer.
You can also configure most IP printers to automatically obtain an IP address from a Dynamic Host Configuration Protocol (DHCP) server. Whenever the printer is powered up, it will contact the server to get its IP configuration information just like any other client on the network. While this may be convenient, it’s usually not a good idea to assign printers random IP addresses. Client computers will have their printer mapped to a specific IP address; if that address is changed, you will have a lot of people complaining about no connectivity. If you are using the DHCP server to manage all of your network’s IP addresses, be sure to reserve a static address for the printers.
Nothing Prints
You tell your computer to print, but nothing comes out of the printer. That problem is probably the most challenging to solve because it could be caused by several different things. Are you the only one affected by the problem or are others having the same issue? Is the printer plugged in, powered on, and online? As with any troubleshooting, check your connections first.
Other times when nothing prints, you get a clue as to what the problem is. The printer may give you an “out of memory” error or something similar. Another possibility is that the printer will say “processing data” (or something similar) on its LCD display and nothing will print. It’s likely that the printer has run out of memory while trying to process the print job. If your printer is exhibiting these symptoms, it’s best to power the printer off and then power it back on.
Paper Jams
Laser printers today run at copier speeds. Because of this, their most common problem is paper jams. Paper can get jammed in a printer for several reasons. First, feed jams happen when the paper-feed rollers get worn (similar to feed jams in inkjet printers). The solution to this problem is easy: Replace the worn rollers.
Another cause of feed jams is related to the drive gear of the pickup roller. The drive gear (or clutch) may be broken or have teeth missing. Again, the solution is to replace it. To determine if the problem is a broken gear or worn rollers, print a test page, but leave the paper tray out. Look into the paper-feed opening with a flashlight and see if the paper pickup roller(s) are turning evenly and don’t skip. If they turn evenly, the problem is probably worn rollers.
Worn exit rollers can also cause paper jams. These rollers guide the paper out of the printer into the paper-receiving tray. If they are worn or damaged, the paper may catch on its way out of the printer. These types of jams are characterized by a paper jam that occurs just as the paper is getting to the exit rollers. If the paper jams, open the rear door and see where the paper is. If the paper is very close to the exit roller, the exit rollers are probably the problem.
The solution is to replace all the exit rollers. You must replace all of them at the same time because even one worn exit roller can cause the paper to jam. Besides, they’re inexpensive. Don’t be cheap and skimp on these parts if you need to have them replaced.
Paper jams can also be the fault of the paper. If your printer consistently tries to feed multiple pages into the printer, the paper isn’t dry enough. If you live in an area with high humidity, this could be a problem. We’ve heard some solutions that are pretty far out but that work (like keeping the paper in a Tupperware-type airtight container or microwaving it to remove moisture). The best all-around solution, however, is humidity control and keeping the paper wrapped until it’s needed. Keep the humidity around 50 percent or lower (but above 25 percent if you can, in order to avoid problems with electrostatic discharge).
Finally, a grounded metal strip called the static-eliminator strip inside the printer drains the transfer corona charge away from the paper after it has been used to transfer toner from the EP cartridge. If that strip is missing, broken, or damaged, the charge will remain on the paper and may cause it to stick to the EP cartridge, causing a jam. If the paper jams after reaching the transfer corona assembly, this may be the cause.
Blank Pages
There’s nothing more annoying than printing a 10-page contract and receiving 10 pages of blank paper from the printer. Blank pages are a somewhat common occurrence in laser printers. Somehow, the toner isn’t being put on the paper. There are three major causes of blank pages:
- The toner cartridge
- The transfer corona assembly
- The high-voltage power supply (HVPS)
Toner Cartridge
The toner cartridge is the source of most quality problems because it contains most of the image-formation pieces for laser printers. Let’s start with the obvious. A blank page will come out of the printer if there is no toner in the toner cartridge. It might sound simple, but some people think these things last forever. Many laser printers give some sort of warning if the toner cartridge is low, but it’s easy to check. Just open the printer, remove the toner cartridge, and shake it. You will be able to hear if there’s toner inside the cartridge. If it’s empty, replace it with a known, good, manufacturer-recommended toner cartridge. If it is not yet empty, shaking it redistributes the toner and may provide better printing for some time.
Another issue that crops up rather often is the problem of using refilled or reconditioned toner cartridges. During their recycling process, these cartridges may be filled with the wrong kind of toner (for example, one with an incorrect composition). This can cause toner to be repelled from the EP drum instead of attracted to it. Thus, there’s no toner on the page because there was no toner on the EP drum to begin with. The solution once again is to replace the toner cartridge with the type recommended by the manufacturer.
A third problem related to toner cartridges happens when someone installs a new toner cartridge and forgets to remove the sealing tape that is present to keep the toner in the cartridge during shipping. The solution to this problem is as easy as it is obvious: Remove the toner cartridge from the printer, remove the sealing tape, and reinstall the cartridge.
Transfer Corona Assembly
The second cause of the blank-page problem is a damaged or missing transfer corona wire or damaged transfer corona roller. If a wire is lost or damaged, the developed image won’t transfer from the EP drum to the paper. Thus, no image appears on the printout. To determine if this is causing your problem, do the first half of the self-test (described later in this chapter in the section “Self-Tests”). If there is an image on the drum but not on the paper, you know that the transfer corona assembly isn’t doing its job.
To check if the transfer corona assembly is causing the problem, open the cover and examine the wire (or roller, if your printer uses one). The corona wire is hard to see, so you may need a flashlight. You will know if it’s broken or missing just by looking (it will either be in pieces or just not be there). If it’s not broken or missing, the problem may be related to the high voltage power supply.
The transfer corona wire (or roller) is a relatively inexpensive part and can be easily replaced with the removal of two screws and some patience.
High-Voltage Power Supply (HVPS)
The HVPS supplies high-voltage, low-current power to both the charging and transfer corona assemblies in laser printers. If it’s broken, neither corona will work properly. If the self-test shows an image on the drum but none on the paper, and the transfer corona assembly is present and not damaged, then the HVPS is at fault.
All-Black Pages
Only slightly more annoying than 10 blank pages are 10 black pages. This happens when the charging unit (the charging corona wire or charging corona roller) in the toner cartridge malfunctions and fails to place a charge on the EP drum. Because the drum is grounded, it has no charge. Anything with a charge (like toner) will stick to it. As the drum rotates, all the toner is transferred to the page and a black page is formed.
This problem wastes quite a bit of toner but can be fixed easily. The solution (again) is to replace the toner cartridge with a known, good, manufacturer-recommended one. If that doesn’t solve the problem, then the HVPS is at fault (it’s not providing the high voltage that the charging corona needs to function).
Repetitive Small Marks or Defects
Repetitive marks occur frequently in heavily used (as well as older) laser printers. The problem may be caused by toner spilled inside the printer. It can also be caused by a crack or chip in the EP drum (this mainly happens with recycled cartridges), which can accumulate toner. In both cases, some of the toner gets stuck onto one of the rollers. Once this happens, every time the roller rotates and touches a piece of paper, it leaves toner smudges spaced a roller circumference apart.
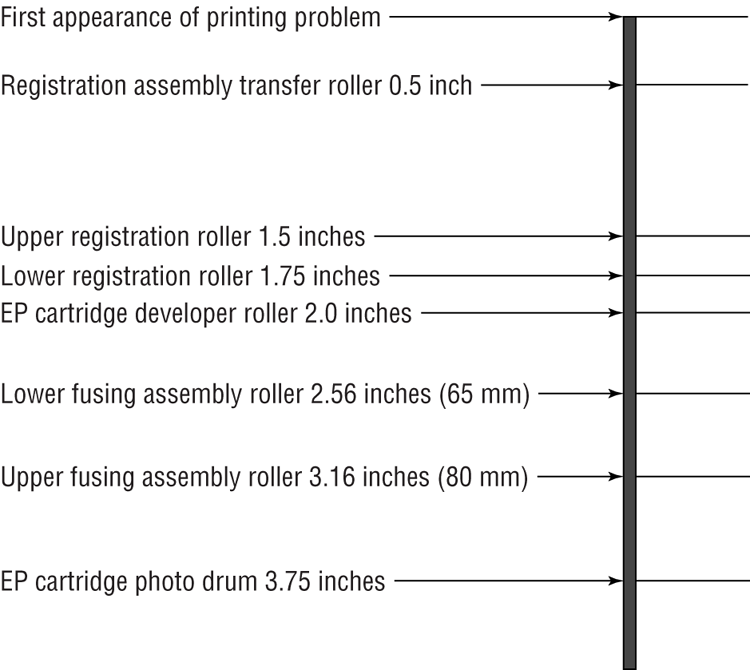
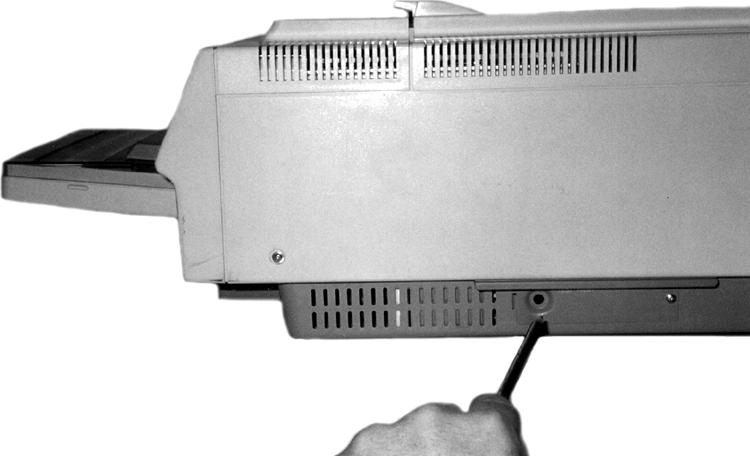
The solution is relatively simple: Clean or replace the offending roller. To help you figure out which roller is causing the problem, the service manuals contain a chart like the one in Figure 20-4. (Some larger printers will also have the roller layout printed inside the service door.) To use the chart, place the printed page next to it. Align the first occurrence of the smudge with the top arrow. The next smudge will line up with one of the other arrows. The arrow it lines up with tells you which roller is causing the problem.
Figure 20-4: Laser printer roller circumference chart
Vertical White Lines on the Page
Vertical white lines running down all or part of the page are a relatively common problem on older printers, especially ones that don’t see much maintenance. They are caused by foreign matter (more than likely toner) caught on the transfer corona wire. The dirty spots keep the toner from being transmitted to the paper (at those locations, that is), with the result that streaks form as the paper progresses past the transfer corona wire.
The solution is to clean the corona wires. LaserJet Series II printers contain a small corona wire brush to help in this procedure. It’s usually a small, green-handled brush located near the transfer corona wire. To use it, remove the toner cartridge and run the brush in the charging corona groove on top of the toner cartridge. Replace the cartridge and use the brush to remove any foreign deposits on the transfer corona. Be sure to put it back in its holder when you’re finished.
Vertical Black Lines on the Page
A groove or scratch in the EP drum can cause the problem of vertical black lines running down all or part of the page. Because a scratch is lower than the surface, it doesn’t receive as much (if any) of a charge as the other areas. The result is that toner sticks to it as though it were discharged. The groove may go around the circumference of the drum, so the line may go all the way down the page.
Another possible cause of vertical black lines is a dirty charging corona wire. A dirty charging corona wire prevents a sufficient charge from being placed on the EP drum. Because the charge on the EP drum is almost zero, toner sticks to the areas that correspond to the dirty areas on the charging corona.
The solution to the first problem is, as always, to replace the toner cartridge (or EP drum, if your printer uses a separate EP drum and toner). You can also solve the second problem with a new toner cartridge, but in this case that would be an extreme solution. It’s easier to clean the charging corona with the brush supplied with the cartridge.
Image Smudging
If you can pick up a sheet from a laser printer, run your thumb across it, and have the image come off on your thumb, you have a fuser problem. The fuser isn’t heating the toner and fusing it into the paper. This could be caused by a number of things—but all of them can be taken care of with a fuser replacement. For example, if the halogen light inside the heating roller has burned out, that would cause the problem. The solution is to replace the fuser. The fuser can be replaced with a rebuilt unit, if you prefer. Rebuilt fusers are almost as good as new ones, and some even come with guarantees. Plus, they cost less.
A similar problem occurs when small areas of smudging repeat themselves down the page. Dents or cold spots in the fuser heat roller cause this problem. The only solution is to replace either the fuser assembly or the heat roller.
Ghosting
Ghosting is what you have when you can see light images of previously printed pages on the current page. This is caused by one of two things: a broken cleaning blade or bad erasure lamps. A broken cleaning blade causes old toner to build up on the EP drum and consequently present itself in the next printed image. If the erasure lamps are bad, then the previous electrostatic discharges aren’t completely wiped away. When the EP drum rotates toward the developing roller, some toner sticks to the slightly discharged areas.
Replacing the toner cartridge solves the first problem. Replacing the erasure lamps in the printer solves the second. Because the toner cartridge is the least expensive cure, you should try that first. Usually, replacing the toner cartridge will solve the problem. If it doesn’t, you will have to replace the erasure lamps.
Printer Prints Pages of Garbage
This has happened to everyone at least once. You print a one-page letter, but instead of the letter you have 10 pages of what looks like garbage or many more pages with one character per page come out of the printer. This problem comes from one of two different sources: the printer driver software or the formatter board.
Printer Driver
The correct printer driver needs to be installed for the printer you have. For example, if you have an HP LaserJet III, then that is the driver you need to install. Once the driver has been installed, it must be configured for the correct page-description language: PCL or PostScript. Most HP LaserJet printers use PCL (but can be configured for PostScript). Determine what page-description language your printer has been configured for and set the printer driver to the same setting. If this is not done, you will get garbage out of the printer.
If the problem is the wrong driver setting, the garbage the printer prints will look like English. That is, the words will be readable, but they won’t make any sense.
Formatter Board
The other cause of several pages of garbage being printed is a bad formatter board. This circuit board takes the information the printer receives from the computer and turns it into commands for the various components in the printer. Usually, problems with the formatter board produce wavy lines of print or random patterns of dots on the page.
It’s relatively easy to replace the formatter board in a laser printer. Usually this board is installed under the printer and can be removed by loosening two screws and pulling it out. Typically, replacing the formatter board also replaces the printer interface, which is another possible source of garbage printouts.
Example Printer Testing: HP LaserJet
Now that we’ve defined some of the possible sources of problems with laser printers, let’s discuss a few of the testing procedures you use with them. We’ll discuss HP LaserJet laser printers because they are the most popular type of laser printer, but the topics covered here apply to other types of laser printers as well.
We’ll look at two ways to troubleshoot laser printers: self-tests and error codes (for laser printers with LCD displays).
Self-Tests
You can perform three tests to narrow down which assembly is causing the problem: the engine self-test, the engine half self-test, or the secret self-test. These tests, which the printer runs on its own when directed by the user, are internal diagnostics for printers and are included with most laser printers.
Figure 20-5: Print engine self-test button location. The location may vary on different printers.
Error Codes
In addition to the self-tests, you have another tool for troubleshooting HP laser printers. Error codes are a way for the LaserJet to tell the user (and a service technician) what’s wrong. Table 20-3 details some of the most common codes displayed on an HP LaserJet.
Table 20-3: HP LaserJet error messages
| Message | Description |
| 00 Ready | The printer is in standby mode and ready to print. |
| 02 Warming Up | The fuser is being warmed up before the 00 Ready state. |
| 05 Self-Test | A full self-test has been initiated from the front panel. |
| 11 Paper Out | The paper tray sensor is reporting that there is no paper in the paper tray. The printer will not print as long as this error exists. |
| 13 Paper Jam | A piece of paper is caught in the paper path. To fix this problem, open the cover and clear the jam (including all pieces of the jam). Close the cover to resume printing. The printer will not print as long as this error exists. |
| 14 No EP Cart | There is no EP cartridge (toner cartridge) installed in the printer. The printer will not print as long as this error exists. |
| 15 Engine Test | An engine self-test is in progress. |
| 16 Toner Low | The toner cartridge is almost out of toner. Replacement will be necessary soon. |
| 50 Service | A fuser error has occurred. This problem is most commonly caused by fuser lamp failure. Power off the printer and replace the fuser to solve the problem. The printer will not print as long as this error exists. |
| 51 Error | There is a laser-scanning assembly problem. Test and replace, if necessary. The printer will not print as long as this error exists. |
| 52 Error | The scanner motor in the laser-scanning assembly is malfunctioning. Test and replace as per the service manual. The printer will not print as long as this error exists. |
| 55 Error | There is a communication problem between the formatter and the DC controller. Test and replace as per the service manual. The printer will not print as long as this error exists. |
Troubleshooting Tips for HP LaserJet Printers
Printer technicians usually use a set of troubleshooting steps to help them solve HP LaserJet printing problems. Let’s detail each of them to bring our discussion of laser printer troubleshooting to a close:
Managing Print Jobs
Most people know how to send a job to the printer. Clicking File, then Print, or pressing Ctrl+P on your keyboard generally does the trick. But once the job gets sent to the printer, what do you do if it doesn’t print?
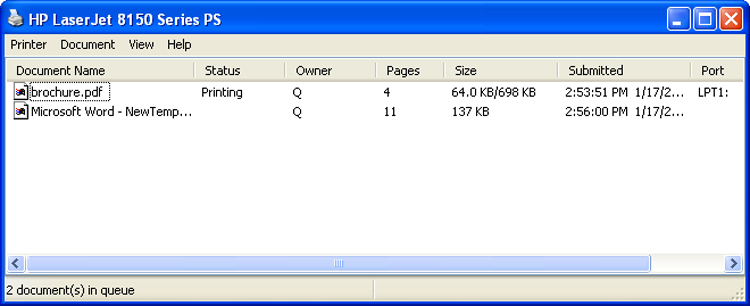
When you send a job to the printer, that print job ends up in a line with all other documents sent to that printer. The line of all print jobs is called the print queue. In most cases, the printer will print jobs on a first-come, first-served basis. (There are exceptions if you’ve enabled printing priorities in Printer Properties.) Once you send the job to the printer, a small printer icon will appear in the system tray in the lower-right corner of your desktop, near the clock. By double-clicking it (or by right-clicking it and selecting the printer name), you will end up looking at the jobs in the print queue, like the one shown in Figure 20-6.
Figure 20-6: Print jobs in the print queue
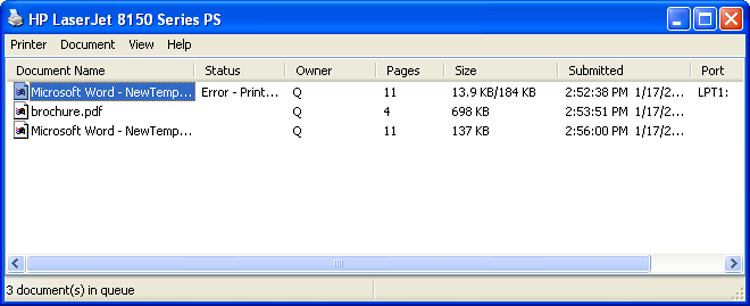
In Figure 20-6 you can see that the first document submitted has an error, which may explain why it hasn’t printed. All of the other documents in the queue are blocked until the job with the error is cleared. You can clear it one of two ways. Either right-click on the document and choose Cancel or select Document > Cancel, as shown in Figure 20-7.
Figure 20-7: Printer documents menu
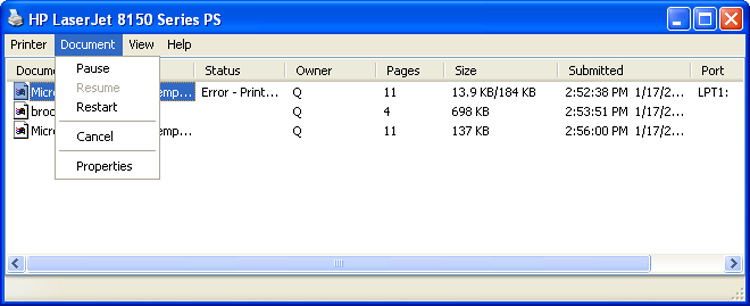
Note that from the menu you see in Figure 20-7, you can pause, resume, restart, and cancel print jobs as well as see properties of the selected print job. If you wanted to pause or cancel all jobs going to a printer, you would do that from the Printer menu, as shown in Figure 20-8.
Once you have cleared the print job causing the problem, the next job will move to the top of the queue. It should show its status as Printing, like the one shown in Figure 20-9. But what if it shows it’s printing but it still isn’t working? (We’re assuming the printer is powered on, connected properly, and online.) It could be a problem with the print spooler.
Figure 20-8: Printer menu
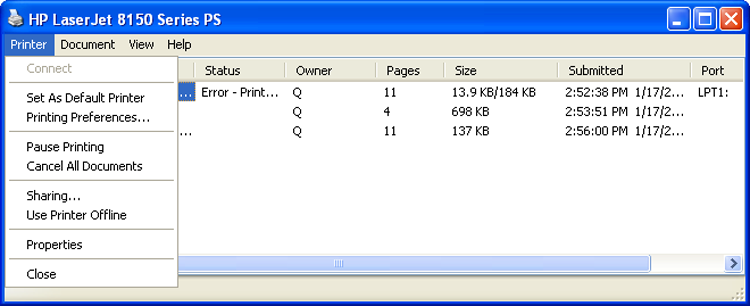
Figure 20-9: Print job printing correctly
Managing the Print Spooler
The print spooler is a service that formats print jobs in the language that the printer needs. Think of it as a holding area where the print jobs are prepared for the printer. In Windows, the spooler is a service that’s started automatically when Windows loads.
If jobs aren’t printing and there’s no apparent reason why, it could be that the print spooler has stalled. To fix the problem, you need to stop and restart the print spooler. Exercise 20.2 walks you through stopping and restarting the spooler in Windows 7.
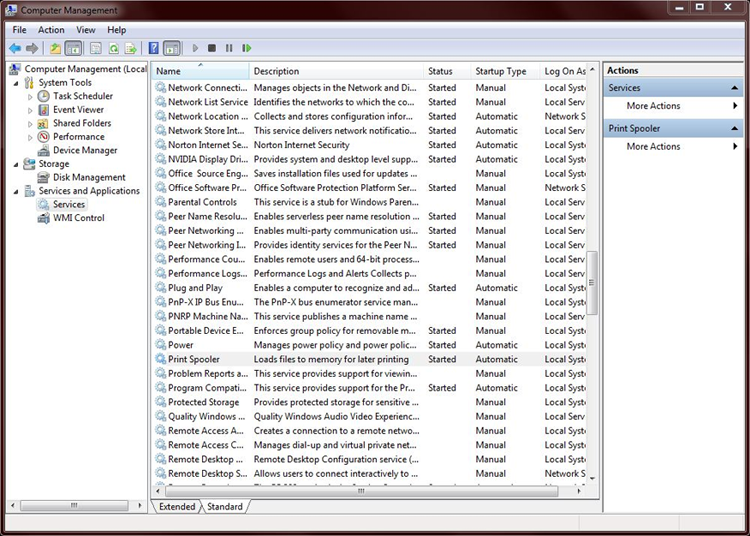
If you have a different version of Windows, the steps to stop and restart the spooler are the same as in Exercise 21.2; the only difference might be in how you get to Computer Management.
Printing a Test Page
If your printer isn’t spitting out print jobs, it may be a good idea to print a test page and see if that works. The test page information is stored in the printer’s memory, so there’s no formatting or translating of jobs required. It’s simply a test to make sure your printer hears your computer.
When you install a printer, one of the last questions it asks you is if you want to print a test page. If there’s any question, go ahead and do it. If the printer is already installed, you can print a test page from the printer’s Properties window (right-click the printer and choose Printer Properties). Just click the Print Test Page button and it should work. If nothing happens, double-check your connections and stop and restart the print spooler. If garbage prints, there is likely a problem with the printer or the print driver.
Troubleshooting Networking Problems
As a technician, you are going to be called on to solve a variety of issues, including hardware, software, and networking problems. Networking problems can sometimes be the most tricky to solve considering that it could be either a software or a hardware problem or a combination of the two causing your connectivity issue.
The first adage for troubleshooting any hardware problem is to check your connections. That holds true for networking as well, but then your troubleshooting will need to go far deeper than that in a hurry. As with troubleshooting anything else, follow a logical procedure when troubleshooting and be sure to document your work.
Nearly all of the issues tested by CompTIA have something to do with connectivity, which makes sense because that’s what networking is all about. Connectivity issues, when not caused by hardware, are generally the result of a messed-up configuration. And because the most common protocol in use today, TCP/IP, has a lot of configuration options, you can imagine how easy it is to configure something incorrectly.
In the following sections, we’ll look at connectivity issues and how to resolve them. We’ll also review several tools that we’ve talked about elsewhere in the book but are handy for network troubleshooting as well.
Resolving Connectivity Issues
The whole purpose of using a network is to connect to other resources, right? So when networks don’t work like they’re supposed to, users tend to get a bit upset. With the explosion of wireless networking over the last 5 to 10 years, our job as technicians has only gotten more complicated. Let’s take a look at some common issues you might run across and how to deal with them.
No Connectivity
Let’s start with the most dire situation: no connectivity. Taking a step back to look at the big picture, think about all of the components that go into networking. On the client side you need a network card and drivers, operating system, protocol, and the right configuration. Then you have a cable of some sort or a wireless connection. At the other end is a switch or wireless router. That device connects to other devices, and so forth. The point is, if someone is complaining of no connectivity, there could be one of several different things causing it. So start with the basics.
The most common issue that prevents network connectivity on a wired network is a bad or unplugged patch cable. Cleaning crews and the rollers on the bottoms of chairs are the most common threats to a patch cable. In most cases, wall jacks are placed 4 to 10 feet away from the desktop. The patch cables are normally lying exposed under the user’s desk, and from time to time damage is done to the cable or it’s inadvertently snagged and unplugged. Tightly cinching the cable, while tying it up out of the way, is no better solution. Slack must be left in the cable to allow for some amount of equipment movement and to avoid altering the electrical characteristics of the cable. When you troubleshoot connectivity, start with the most rudimentary explanations first. Make sure the patch cable is tightly plugged in, and then look at the card and see if any lights are on. If there are lights on, use the NIC’s documentation to help troubleshoot. More often than not, shutting down the machine, unplugging the patch and power cables for a moment, and then reattaching them and rebooting the PC will fix an unresponsive NIC.
If you don’t have any lights, you don’t have a connection. It could be that the cable is bad or it’s not plugged in on the other side, or it could also be a problem with the NIC or the connectivity device on the other side. Is this the only computer having problems? If everyone else in the same area is having the same problem, that points to a central issue.
Most wireless network cards have indicators on them as well that can help you troubleshoot. For example, a wireless card might have a connection light and an activity light, much like a wired network card. On one particular card we’ve used, the lights will alternate blinking if the card isn’t attached to a network. Once it attaches, the connection light will be solid and the link light will blink when it’s busy. Other cards may operate in a slightly different manner, so be sure to consult your documentation.
If you don’t have lights, try reseating your cables and rebooting. It might also help to reseat the card. If you’re using a USB or PC Card wireless adapter, this is pretty easy. If it’s inside your desktop, it will require a little surgery. If it’s integrated into your laptop, you could have serious issues. Try rebooting first. If that doesn’t help, see if you can use an expansion NIC and make that one light up.
So let’s assume that you have lights and that no one else is having a problem. (Yes, it’s just you.) That means the hardware is probably okay, so it’s time to check the configuration. Open a command prompt, type IPCONFIG, and press Enter. You should get an IP address. (If it starts with 169.254.x.x, that’s an APIPA address. We’ll talk about those later.) If you don’t have a valid IP address, that’s the problem.
If you do have a valid IP address, it’s time to see how far your connectivity reaches. With your command prompt open, use the PING command to ping a known, remote working host. If that doesn’t work, start working backward. Can you ping the outside port of your router? The inside port? A local host? (Some technicians recommend pinging your loopback address first with PING 127.0.0.1 and then working your way out to see where the connectivity ends. Either way is fine. The advantage to starting with the loopback is that if it doesn’t work, you know nothing else will either.) Using this methodology, you’ll be able to figure out where your connectivity truly begins and ends.
APIPA Addresses
As we talked about in Chapter 7, “Introduction to TCP/IP,” Automatic Private IP Addressing (APIPA) is a service that auto-configures your network card with an IP address. APIPA kicks in only if your computer is set to receive an IP address from the Dynamic Host Configuration Protocol (DHCP) server and that server doesn’t respond. You can always tell an APIPA address because it will be in the format of 169.254.x.x.
When you have an APIPA address, you will be able to communicate with other computers that also have an APIPA address but not with any other resources. The solution is to figure out why you’re not getting an answer from the DHCP server and fix that problem.
IP Address Conflicts
Every host on a network needs to have a unique IP address. If two or more hosts have the same address, communication problems will occur. The good news is nearly every operating system today will warn you if it detects an IP address conflict with your computer. The bad news is it won’t fix it by itself.
The communication problems will vary. In some cases the computer will seem nearly fine, with intermittent issues. In others, it will appear as if you have no connectivity.
The most common cause of this is if someone configures a computer with a static IP address that’s part of the DHCP server’s range. The DHCP server, not knowing that the address has been statically assigned somewhere, doles out the address and now there’s a conflict. Rebooting the computer won’t help, and neither will releasing the address and getting a new lease from the DHCP server—it’s just going to hand out the same address again because it doesn’t know that there’s a problem.
As the administrator, you need to track down the offending user. A common way to do this is to use a packet sniffer to look at network traffic and determine the computer name or MAC address associated with the IP address in question. Most administrators don’t keep network maps of MAC addresses, but everyone should have a network map with hostnames. If not, it could be a long, tedious process to check everyone’s computer to find the culprit.
Limited or Local Connectivity
In a way, limited connectivity problems are a bit of a blessing. You can immediately rule out client-side hardware issues because they can connect to some resources. You just need to figure out why they can’t connect to others. This is most likely caused by one of two things: a configuration issue or a connectivity device (such as a router) problem.
Check the local configuration first. Use IPCONFIG /ALL to ensure that the computer’s IP address, subnet mask, and default gateway are all configured properly. After that, use the ping utility to see what the range of connectivity is. In situations like this, it’s also good to check with other users in the area. Are they having the same connectivity issues? If so, it’s more likely to be a central problem rather than one with the client computer.
Intermittent Connectivity
Under this heading, we’re going to consider intermittent connectivity, slow transfer speeds, and low radio frequency (RF) signal because they are all pretty similar.
On a wired network, if you run into slow speeds or intermittent connectivity, it’s likely a load issue. There’s too much traffic for the network to handle, and the network is bogging down. (You obviously don’t need to worry about RF signals on a wired network.) Solutions include adding a switch, replacing your hubs with switches, and even creating virtual LANs (VLANs) with switches. If the network infrastructure is old (for example, if it’s running on Cat 3 cable or you only have 10Mbps switches), then it might be time for an upgrade.
Wireless networks can get overloaded too. It’s recommended that no more than 30 or so client computers use one wireless access point (WAP) or wireless router. Any more than that can cause intermittent access problems. The most common reason that users on wireless networks experience any of these issues though is distance. The further away from the WAP the user gets, the weaker the signal becomes. When the signal weakens, the transfer rates drop dramatically. For example, the signal from an 802.11g wireless router has a maximum range of about 300 feet barring any obstructions. At that distance though, 802.11g will support transfer rates of only 6Mbps—far less than the 54Mbps the users think they’re getting! The solutions here are to move closer or install more access points. Depending on the configuration of your working environment, you could also consider adding a directional antenna to the WAP. It will increase the distance the signal travels, but only in a limited direction.
Using Network Troubleshooting Tools
The CompTIA A+ 220-802 will test you on your knowledge of troubleshooting tools for networks. There are two categories of tools that you need to know: hardware devices and software commands. We’ve covered all (but one) of these tools in depth earlier in the book. The hardware tools are in Chapter 6, “Networking Fundamentals,” and the software commands are in Chapter 13. Here we’ll provide a quick review.
Here are the hardware tools you need to know:
- Wire strippers and crimpers. Wire strippers take the protective plastic coating off of wires, and crimpers put ends on cables. Any crimper worth what it cost has a wire stripper built in to it as well.
- Punch-down tools are used to connect individual wires from an unshielded twisted pair (UTP) cable into a wiring harness, such as a 110 block.
- Cable testers are used to make sure cables work.
- A toner probe is great for tracing cables from one end to the other, such as when they are run through a wall. For example, say you have a 25-pair cable and you suspect one of the pairs is bad. You can trace that specific pair to the other end with a toner probe.
- Loopback plugs are for testing network cards. You plug it in, and it tests the card by simulating sending and receiving data.
The one hardware tool we didn’t talk much about earlier is a wireless locator. A wireless locator can be either a handheld hardware device or specialized software that is installed on a laptop and whose purpose is to detect WiFi signals. Anyone interested in wardriving will definitely have one of these, but they’re also handy for locating wireless hot spots.
Here are the software commands you need to know:
- IPCONFIG displays IP configuration information. IPCONFIG /ALL is useful for showing more options. IPCONFIG /release and IPCONFIG /RENEW release and renew the lease from a DHCP server.
- The PING command tests connectivity.
- TRACERT traces the path from the local host to the destination host, showing all of the hops (routers) in between.
- The NET command by itself doesn’t do a lot. NET /? shows you NET options. You can use NET use to establish network connections, NET VIEW to see established connections, and NET STOP to disconnect them. Other options are available as well.
- NETSTAT checks inbound and outbound TCP/IP connections on the local host, and you can use it to view packet statistics.
- NBTSTAT shows NetBIOS over TCP/IP statistics.