
Interacting with Operating Systems
In the following sections, we will look at the Microsoft GUI from the ground up. In Chapter 12, “Operating System Basics,” we took a detailed look at its key components, and we will build on that with an exploration of basic tasks common across Windows 7, Vista, and XP. The following general topics will be covered:
- Control Panel
- The command prompt
- The Windows Registry
- Virtual memory
Control Panel
Although for the most part the Windows system is functional from the time it is installed, Microsoft realized that if someone were going to use computers regularly, they would probably want to be able to customize their environment so it would be better suited to their needs—or at least more fun to use. As a result, the Windows environment has a large number of utilities that are intended to give you control over the look and feel of the operating system.
This is, of course, an excellent idea. It is also a bit more freedom than some less-than-cautious users seem to be capable of handling, and you will undoubtedly serve a number of customers who call you in to restore their configuration after botched attempts at changing one setting or another.
More than likely, you will also have to reinstall Windows yourself a few times because of accidents that occur while you are studying or testing the system’s limits. This is actually a good thing because no competent computer technician can say that they have never had to reinstall because of an error. You can’t really know how to fix Windows until you are experienced at breaking it. So it is extremely important to experiment and find out what can be changed in the Windows environment, what results from those changes, and how to undo any unwanted results. To this end, we will examine the most common configuration utility in Windows: Control Panel. The names of some of the applets, icons, categories, and tasks are different in various versions of Windows; different names are indicated in parentheses. And not all applets are available in all versions. You’ll see some of the more popular applets described in Table 13-1.
Table 13-1: Selected Windows Control Panel applets
| Applet Name | Function |
| Add Hardware | Adds and configures new hardware. |
| Add Or Remove Programs (Add/Remove Programs) | Changes, adds, or deletes software. |
| Administrative Tools | Performs administrative tasks on the computer. |
| Date And Time (Date/Time) | Sets the system time and configures options such as time zone. |
| Display | Configures screensavers, colors, display options, and monitor drivers. |
| Folder Options | Configures the look and feel of how folders are displayed in Windows Explorer. |
| Fonts | Adds and removes fonts. |
| Internet Options | Sets a number of Internet connectivity options. |
| Sounds And Multimedia; Sounds And Audio Devices; also Scanners And Cameras (Multimedia) | Configures audio, video, or audio and video options. |
| Network And Dial-Up Connections; Network Connections (Network) | Sets options for connecting to other computers. |
| Phone And Modem Options (Modems) | Sets options for using phone lines to dial out to a network or the Internet. |
| Power Options | Configures different power schemes to adjust power consumption. |
| Printers And Faxes (Printers) | Configures printer settings and print defaults. |
| System | Allows you to view and configure various system elements. We’ll look at this in more detail later in this chapter. |
In current version of Windows, when you first open Control Panel, it appears in Category view. Control Panel programs have been organized into different categories, and this view provides you with the categories to choose from. Once you choose a category, you can pick a task and the appropriate Control Panel program is opened for you, or you can select one of the Control Panel programs that is part of the category. However, you can change this view to Classic view, which displays all the Control Panel programs in a list, as in older versions of Windows. The specific wording of the CompTIA objective for this exam reads, “Given a scenario, use Control Panel utilities (the items are organized by ‘classic view/large icons’ in Windows).” Because of this, we strongly suggest that administrators change to this view. To do so, click Switch To Classic View in the left pane. Throughout this chapter, when we refer to accessing Control Panel programs, we will assume that you have changed the view to Classic view.
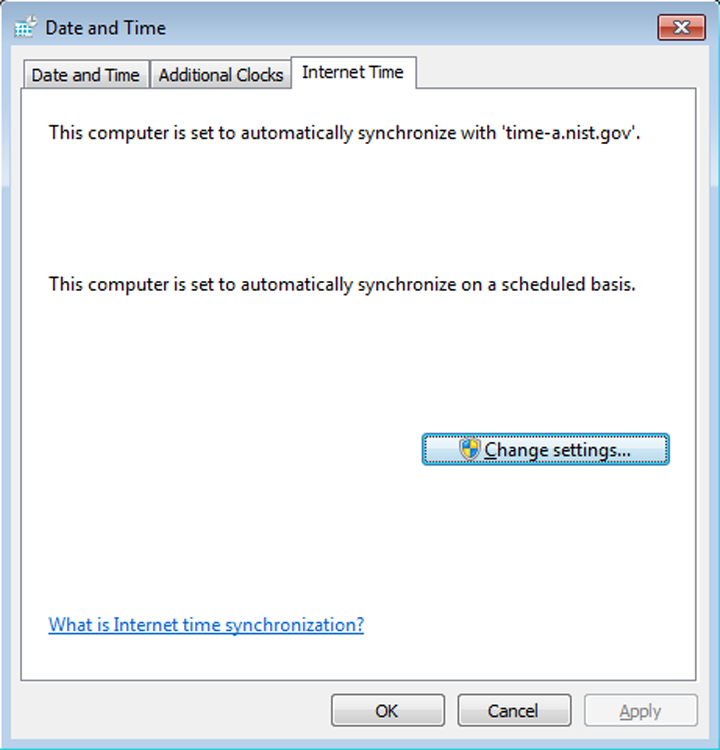
For a quick look at how the Control Panel programs work, in Exercise 13.1 you’ll examine some of the settings in the Date/Time applet (TIMEDATE.CPL). The Date/Time applet is used to configure the system time, date, and time zone settings, which can be important for files that require accurate time stamps or to users who don’t have a watch. Because it is a simple program, it’s a perfect example to use. Current versions of Windows have an Internet Time tab, which enables you to synchronize time on the computer with an Internet time server (the options in Windows 7 are shown in Figure 13-1).
Figure 13-1: System time can be configured to be retrieved from an Internet time server.
The Regional and Language Options
Regional settings are configured through the Control Panel applet called Region And Language (in Windows 7) or Regional And Language Options (in Vista and XP). From this applet (INTL.CPL), you can choose what format is used for numbers (see Figure 13-2), what the layout is of the keyboard you are using, your geographic location, and the language to be used for non-Unicode programs.
The ability to support so many languages is provided through the use of the Unicode standard. In Unicode, and the Unicode Character Set (UCS), each character has a 16-bit value. This allows the same character to be interpreted/represented by 65,536 different entities.
The Internet Options Applet
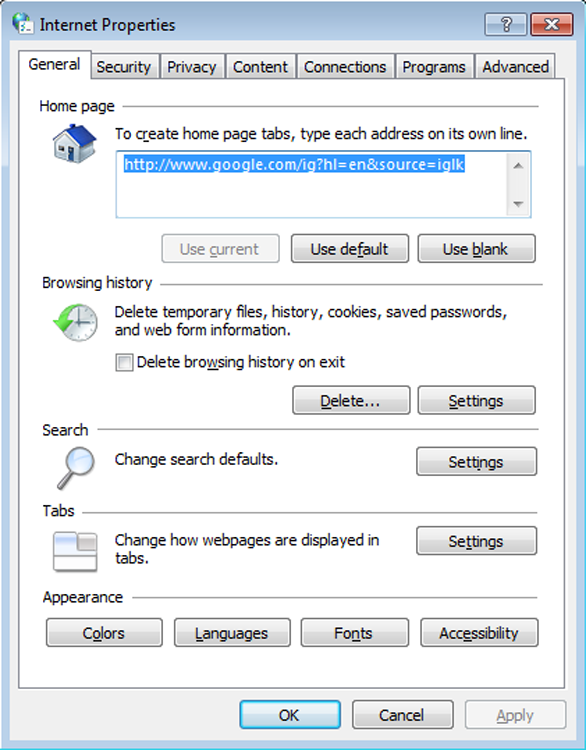
The Internet Options applet (INETCPL.CPL) brings up the Internet properties, shown in Figure 13-3. The tabs here include General, Security, Privacy, Content, Connections, Programs, and Advanced. This applet is used when you want to configure the browser environment and such things as the programs used to work with files found online.
The Folder Options Applet
Some of the more important files you will need to work on are hidden by default as a security precaution. To make certain folders or files visible, you need to change the display properties of Windows Explorer. We will show you how to do this in Exercise 13.2.
Figure 13-2: Set the format used for numbers with the options in the Regional And Language applet.
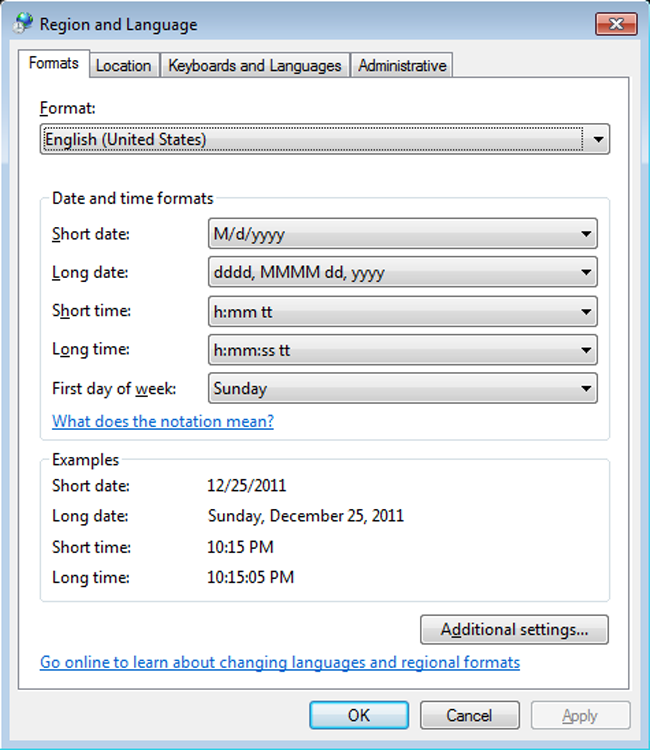
Figure 13-3: The Internet properties are accessed through the Internet Options applet.
The System Control Applet
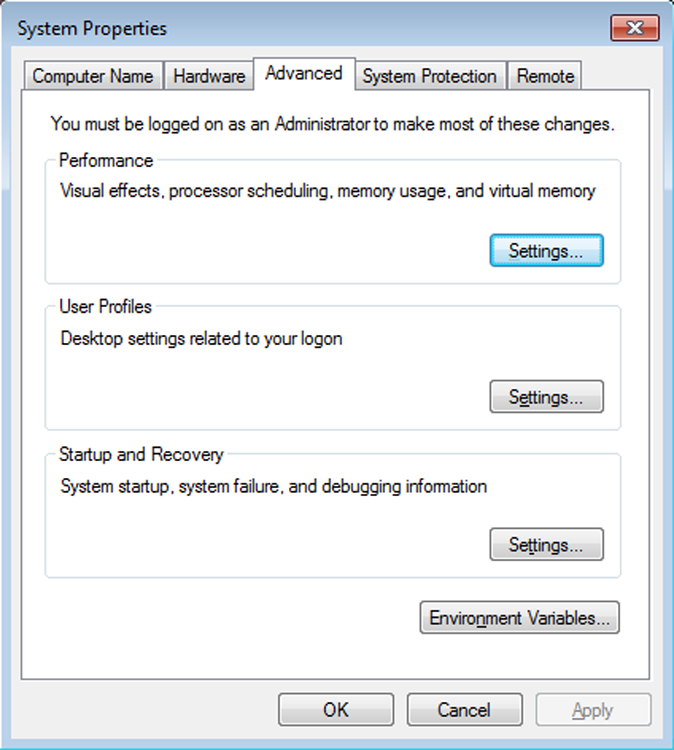
The System Control Panel applet (see Figure 13-4 for the Windows 7 System applet) is one of the most important, and it’s nearly all business. It usually appears with System Properties in the title bar. From within this one relatively innocuous panel (SYSDM.CPL), you can make a large number of configuration changes to a Windows machine. The different versions of Windows have different options available in this applet, but they can include some of the following options:
- General
- Network Identification
- Device Manager
- Hardware
- Hardware Profiles
- User Profiles
- Environment Variables
- Startup and Recovery
- Performance
- System Restore
- Automatic Updates
- Remote
- Computer Name
- Advanced
The General tab (in Windows XP) gives you an overview of the system, such as OS version, registration information, basic hardware levels (processor and RAM), and the service pack level that’s installed, if any. In the following sections, we will look a bit more closely at the functionality of the rest of the tabs (we identify which versions of Windows contain each tab).
Figure 13-4: The System Properties control panel applet on a Windows 7 computer with the Advanced tab selected
Computer Name
This tab is used to define whether the machine is in a workgroup or a domain environment. We will talk more about networking in a separate chapter, but in general terms, here’s the difference between a workgroup and a domain:
Hardware
This tab includes a number of tools, all of which allow you to change how the hardware on your machine is used:
When you purchase a hardware device, odds are it’s been in that box for a while. By the time it gets made, packaged, stored, delivered to the store, stored again at the retailer, and then purchased by you, it’s entirely likely that the company that made the device has updated the driver—even possibly a few times if there have been a lot of reported problems.
When you install a device, always go to the manufacturer’s website to see if a newer driver is available. The old driver might work fine, but the newest driver is the one most likely to be bug-free and have all of the most current bells and whistles for your device.
Advanced
The Advanced tab has three subheadings, each of which can be configured separately. They’re not identical in Windows versions, however, and this could also be called the Etc. tab rather than the Advanced tab. The following options are among those on this tab:
- Performance
- Environment Variables
- User Profiles
- Startup And Recovery

System Protection/System Restore
The System Protection (or System Restore) tab lets you disable/enable and configure the System Restore feature. When it’s enabled on one or more drives, the operating system monitors the changes you make on your drives. From time to time it creates what is called a restore point. Then, if you have a system crash, it can restore your data back to the restore point. You can turn on System Restore for all drives on your system or for individual drives. Note that turning off System Restore on the system drive (the drive on which the OS is installed) automatically turns it off on all drives.
Remote
The Remote tab lets you enable or disable Remote Assistance and Remote Desktop. Remote Assistance permits people to access this system in response to requests issued by the local user using the Windows Remote Assistance tool. Remote Desktop permits people to log into the system at any time using the Remote Desktop Connection tool.This can help an administrator or other support person troubleshoot problems with the machine from a remote location.
Remote Assistance is enabled by default. It is handled at two levels. Having just Remote Assistance turned on allows the person connecting to view the computer’s screen. To let that person take over the computer and be able to control the keyboard and mouse, click Advanced, and then in the Remote Control section, click Allow This Computer To Be Controlled Remotely. You can also configure Remote Desktop here.
Automatic Updates (Windows XP Only)
The Automatic Updates tab in Windows lets you configure how you want to handle updating the OS. You can specify that you want to automatically download updates or notify the user when updates are available (but not automatically install them), or you can turn off the feature. You can also specify that you want the operating system to notify you again of updates you declined to download at an earlier point in time.
The Security Center Applet
The Security Center applet, knows as Action Center in Windows 7 (WSCUI.CPL) is used to manage the firewall, automatic updates, and virus protection. From here, you can manage settings for Internet options as well and see any maintenance or troubleshooting issues that you need to attend to.
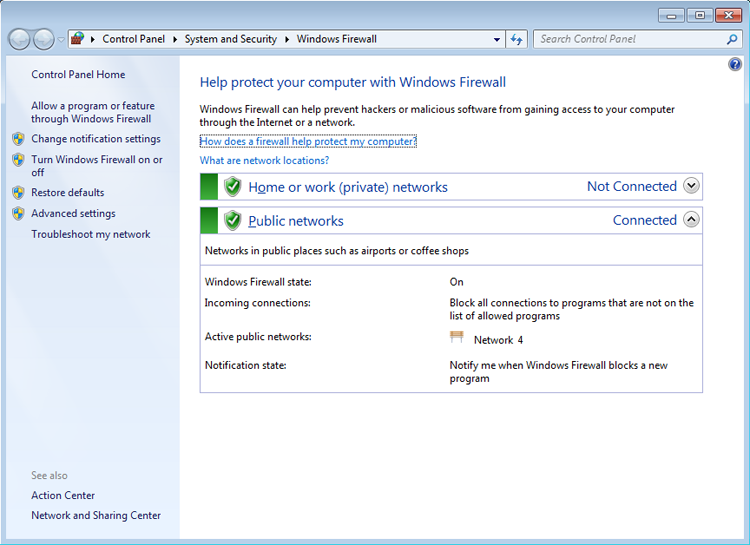
The Windows Firewall Applet
As the name implies, the Windows Firewall applet (FIREWALL.CPL) can be used to manage the firewall included with the operating system. Figure 13-5 shows the interface for Windows 7.
The Power Options Applet
The Power Options applet (POWERCFG.CPL) allows you to configure a power plan dictating when devices, namely the display and the computer, will to turn off or be put to sleep. Through the advanced settings, you can configure the need to enter a password to revive the devices as well as configure wireless adapter settings, Internet options (namely JavaScript), and the system cooling policy.
The Command Prompt
Although the exam focuses on the Windows operating systems, it tests a great deal of concepts that carry over from the Microsoft Disk Operating System (MS-DOS). MS-DOS was never meant to be extremely user friendly. Its roots are in CP/M, which in turn has its roots in UNIX. Both of these older OSs are command line based, and so is MS-DOS. In other words, they all use long strings of commands typed in at the computer keyboard to perform operations. Some people prefer this type of interaction with the computer, including many folks with technical backgrounds. Although Windows has left the full command-line interface behind, it still contains a bit of DOS, and you get to it through the command prompt.
Figure 13-5: The Windows Firewall control panel applet on a Windows 7 computer
Although you can’t tell from looking at it, the Windows command prompt is actually a Windows program that is intentionally designed to have the look and feel of a DOS command line. Because it is, despite its appearance, a Windows program, the command prompt provides all the stability and configurability you expect from Windows. You can access a command prompt by running CMD.EXE.
A number of diagnostic utilities are often run at the command prompt, and they can be broken into two categories: networking and operating system. Because knowledge of each is required for the exam, they are discussed in the order in which they appear in the exam objectives, starting with the networking command-line tools.
Networking Command-Line Tools
The networking command-line tools you are expected to know for this exam are PING, TRACERT, NETSTAT, IPCONFIG, NET, NSLOOKUP, and NBTSTAT.
PING Command
The PING command is one of the most useful commands in the TCP/IP protocol. It sends a series of packets to another system, which in turn sends back a response. This utility can be extremely useful for troubleshooting problems with remote hosts. Pings are also called ICMP echo requests/replies because they use the ICMP protocol.
The PING command indicates whether the host can be reached and how long it took for the host to send a return packet. Across wide area network links, the time value will be much larger than across healthy LAN links.
The syntax for PING is ping hostname or ping IP address. Figure 13-6 shows what a ping should look like.
Figure 13-6: A successful ping
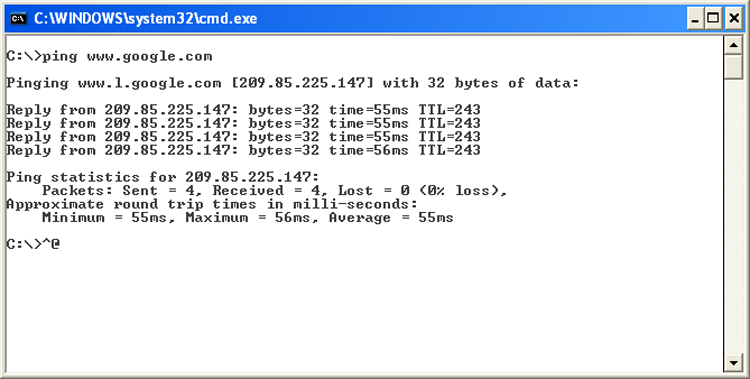
As you can see, by pinging with the hostname, we found the host’s IP address thanks to DNS. The time is how long in milliseconds it took to receive the response. On a LAN, you want this to be 10 milliseconds (ms) or less, but 55ms for an Internet ping isn’t too bad.
There are several options for the PING command, and you can see them all by typing ping /? at the command prompt. Table 13-2 lists some of the more useful ones.
Table 13-2: PING options
| Option | Function |
| -t | Persistent ping. Will ping the remote host until stopped by the client (by using Ctrl+C). |
| -n count | Specifies the number of echo requests to send. |
| -l size | Specifies the packet size to send. |
| ping -4 / ping -6 | Use either the IPv4 or IPv6 network explicitly. |
TRACERT Command
Tracert (trace route) is a command-line utility that enables you to verify the route to a remote host. Execute the command TRACERT hostname, where hostname is the computer name or IP address of the computer whose route you want to trace. Tracert returns the different IP addresses the packet was routed through to reach the final destination. The results also include the number of hops needed to reach the destination. If you execute the TRACERT command without any options, you see a help file that describes all the TRACERT switches.
This utility determines the intermediary steps involved in communicating with another IP host. It provides a road map of all the routing an IP packet takes to get from host A to host B.
Timing information from TRACERT can be useful for detecting a malfunctioning or overloaded router. Figure 13-7 shows what a TRACERT output looks like.
Figure 13-7: TRACERT output

NETSTAT Command
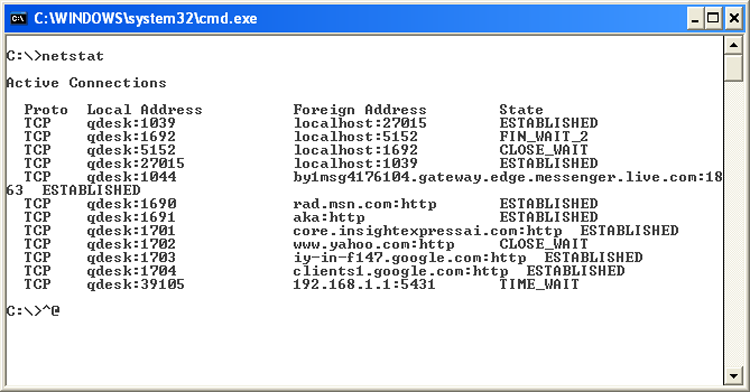
The Netstat utility is used to check out the inbound and outbound TCP/IP connections on your machine. It can also be used to view packet statistics, such as how many packets have been sent and received and the number of errors.
When used without any options, the NETSTAT command produces output similar to what you see in Figure 13-8, which shows all the outbound TCP/IP connections.
Figure 13-8: NETSTAT output
There are several useful command-line options for NETSTAT, as shown in Table 13-3.
Table 13-3: NETSTAT options
| Option | Function |
| -a | Displays all connections and listening ports. |
| -b | Displays the executable involved in creating each connection or listening port. In some cases, well-known executables host multiple independent components, and in these cases the sequence of components involved in creating the connection or listening port is displayed. In this case, the executable name is in brackets, [ ], at the bottom; at the top is the component it called; and so forth until TCP/IP was reached. Note that this option can be time consuming and will fail unless you have sufficient permissions. |
| -e | Displays Ethernet statistics. This may be combined with the -s option. |
| -f | Displays fully qualified domain names (FQDNs) for foreign addresses. |
| -n | Displays addresses and port numbers in numerical form. |
| -o | Displays the owning process ID associated with each connection. |
| -p proto | Shows connections for the protocol specified by proto; proto may be any of the following: TCP, UDP, TCPv6, or UDPv6. If used with the -s option to display per-protocol statistics, proto may be IP, IPv6, ICMP, ICMPv6, TCP, TCPv6, UDP, or UDPv6. |
| -r | Displays the routing table. |
| -s | Displays per-protocol statistics. By default, statistics are shown for IP, IPv6, ICMP, ICMPv6, TCP, TCPv6, UDP, and UDPv6; the -p option may be used to specify a subset of the default. |
IPCONFIG Command
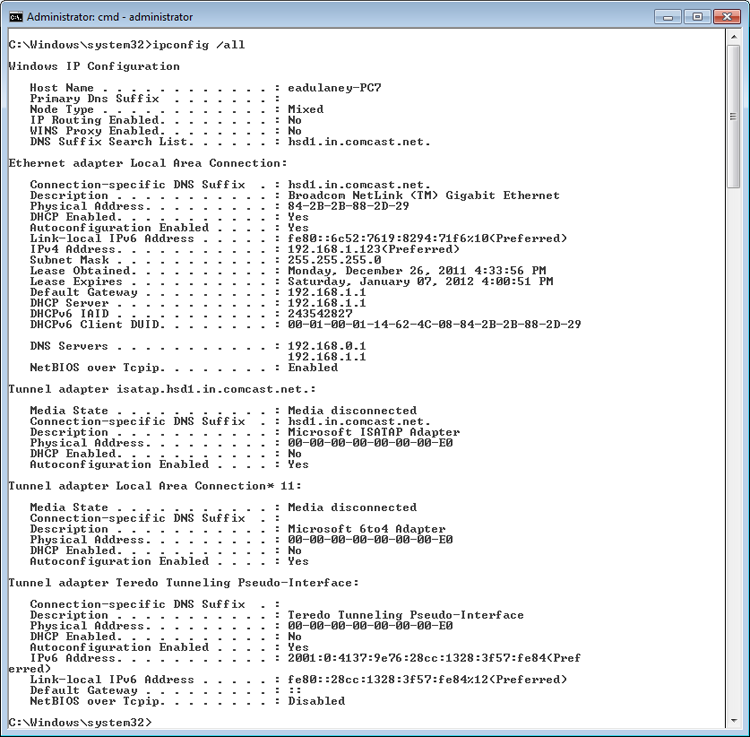
With Windows-based operating systems, you can determine the network settings on the client’s network interface cards, as well as any that a DHCP server has leased to your computer, by typing the following at a command prompt: ipconfig /all.
IPCONFIG /ALL also gives you full details on the duration of your current lease. You can verify whether a DHCP client has connectivity to a DHCP server by releasing the client’s IP address and then attempting to lease an IP address. You can conduct this test by typing the following sequence of commands from the DHCP client at a command prompt:
ipconfig /release
ipconfig /renew
IPCONFIG is one of the first tools to use when experiencing problems accessing resources because it will show you whether an address has been issued to the machine. If the address displayed falls within the 169.254.x.x category, this means the client was unable to reach the DHCP server and has defaulted to Automatic Private IP Addressing (APIPA), which will prevent the network card from communicating outside its subnet, if not altogether. Table 13-4 lists useful switches for IPCONFIG.
Table 13-4: IPCONFIG switches
| Switch | Purpose |
| /ALL | Shows full configuration information |
| /RELEASE | Releases the IP address, if you are getting addresses from a Dynamic Host Configuration Protocol (DHCP) server |
| /RELEASE6 | Releases the IPv6 addresses |
| /RENEW | Obtains a new IP address from a DHCP server |
| /RENEW6 | Obtains a new IPv6 address from a DHCP server |
| /FLUSHDNS | Flushes the domain name server (DNS) name resolver cache |
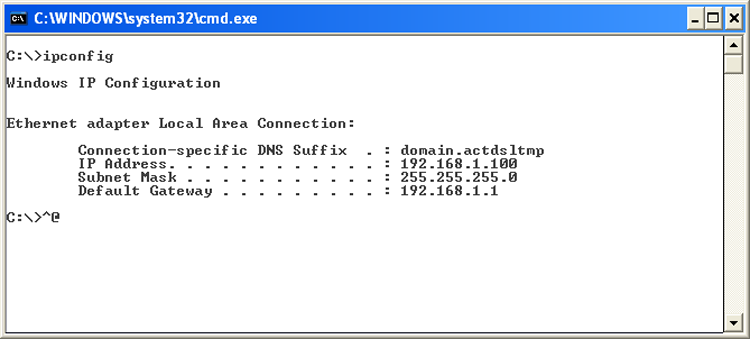
Figure 13-9 shows output from IPCONFIG, and Figure 13-10 shows you the output from IPCONFIG /ALL.
Figure 13-9: IPCONFIG output
In Exercise 13.3, you will renew an IP address on a Windows XP system within the graphical interface. In Exercise 13.4, you will perform this same operation in Windows 7/Vista, and Exercise 13.5 shows you how to renew your lease from the command line.
Figure 13-10: IPCONFIG /ALL output
The interface in Windows XP provides a convenient way to interact with the network components. Exercise 13.4 shows how to perform a similar action in Windows Vista.
While Windows provides this interface to troubleshoot connection problems, some administrators still prefer the reliability of a command-line interface. Exercise 13.5 shows how to perform a similar action, using the command line to do so.
NET Command
Depending on the version of Windows you are using, NET can be one of the most powerful commands at your disposal. While all Windows versions include a NET command, the capabilities of it differ based on whether it is server or workstation based and the version of the operating system.
While always command line based, this tool allows you to do almost anything you want with the operating system.
Table 13-5 shows common NET switches.
Table 13-5: NET switches
| Switch | Purpose |
| NET ACCOUNTS | Set account options (password age, length, etc.). |
| NET COMPUTER | Add and delete computer accounts. |
| NET CONFIG | See network-related configuration. |
| NET CONTINUE, NET PAUSE, NET START, NET STATISTICS, and NET STOP | Control services. |
| NET FILE | Close open files. |
| NET GROUP and NET LOCALGROUP | Create, delete, and change groups. |
| NET HELP | See general help. |
| NET HELPMSG | See specific message help. |
| NET NAME | See the name of the current machine and user. |
| NET PRINT | Interact with print queues and print jobs. |
| NET SEND | Send a message to user(s). |
| NET SESSION | See session statistics. |
| NET SHARE | Create a share. |
| NET TIME | Set the time to that of another computer. |
| NET USE | Connect to a share. |
| NET USER | Add, delete, and see information about a user. |
| NET VIEW | See available resources. |
These commands are invaluable troubleshooting aids when you cannot get the graphical interface to display properly. You can also use them when interacting with hidden ($) and administrative shares that do not appear within the graphical interface.
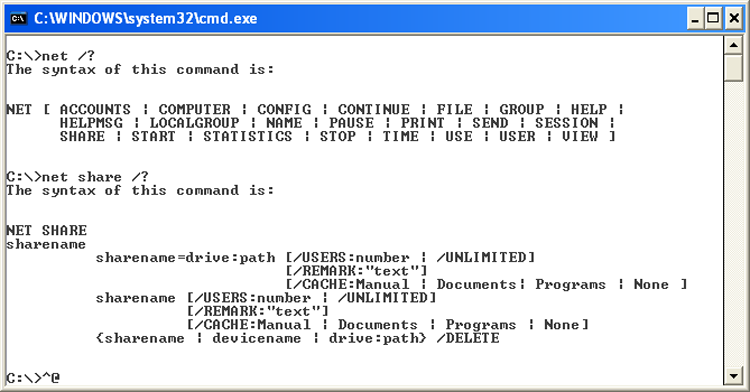
The NET command used with the SHARE parameter enables you to create shares from the command prompt, using this syntax:
NET SHARE <share_name>=<drive_letter>:<path>To share the C:EVAN directory as SALES, you would use the following command:
NET SHARE SALES=C:EVANYou can use other parameters with NET SHARE to set other options. Table 13-6 summarizes the most commonly used parameters.
Table 13-6: NET SHARE parameters
| Parameter | Purpose |
| /DELETE | Stop sharing a folder. |
| /REMARK | Add a comment for browsers. |
| /UNLIMITED | Set the user limit to Maximum Allowed. |
| /USERS | Set a specific user limit. |
The NET /? command is basically a catch-all help request. It will instruct you to use the NET command you are interested in for more information. Sample output from this command is shown in Figure 13-11.
Figure 13-11: NET /? output
NSLOOKUP Command
Nslookup is a command-line utility that enables you to verify entries on a DNS server. You can use the NSLOOKUP command in two modes: interactive and noninteractive. In interactive mode, you start a session with the DNS server in which you can make several requests. In noninteractive mode, you specify a command that makes a single query of the DNS server. If you want to make another query, you must type another noninteractive command.
One of the key things that must take place to effectively use TCP/IP is that a hostname must resolve to an IP address—an action usually performed by a DNS server.
NBTSTAT Command
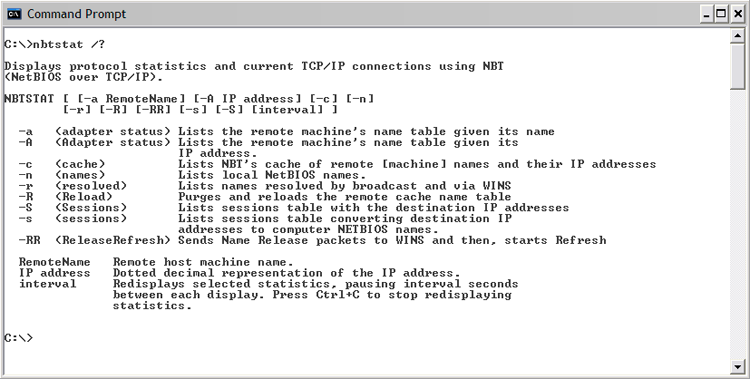
Nbtstat is a command-line utility that shows NetBIOS over TCP/IP information. While not used as often as other entries in this category, it can be useful when trying to diagnose a problem with NetBIOS name resolution. The /? parameter can be used to see the available switches. Sample output from this command is shown in Figure 13-12.
Figure 13-12: NBTSTAT /? output
OS Command-Line Tools
The OS command-line tools you are expected to know for this exam are TASKKILL, BOOTREC, SHUTDOWN, TASKLIST, MD, RD, CD, DEL, FDISK, FORMAT, COPY, XCOPY, ROBOCOPY, DISKPART, SFC, CHKDSK, and /?. They are discussed in the sections that follow.
TASKKILL Command
The TASKKILL.EXE utility is used to terminate processes. Those processes can be identified by either name or process ID number (PID). The process can exist on the machine where the administrator is sitting (the default) or on another machine, in which case you signify the other system by using the /S switch.
The /IM name is used to specify an (image) name of a process to kill and can include the wildcard (*) characters. If the process ID number is used in place of the name, then the /PID switch is needed. The processes in question are the same which can be killed through the Task Manager. There are two signals that can be sent: the default is SIGTERM (a gentle kill, related to code 15) and the /F switch issues a SIGKILL (a terminate at all cost kill, related to code 9).
BOOTREC Command
The BOOTREC.EXE utility can be run in Windows 7 or Windows Vista to interact with the Master Boot Record (MBR), boot sector, or Boot Configuration Data (BCD) store. It cannot be used with Windows XP because it uses a different boot structure.
To run the tool, you must boot from the installation disk, choose the Repair Your Computer option and enter the Recovery Console. Choose Command Prompt from System Recovery Options and then type bootrec.exe.
The options for BOOTREC are /Fixboot (to write a new boot sector), /Fixmbr (to write a new MBR), /RebuildBCD (to rebuild the BCD store), and /ScanOS (to scan all disks for installations the Boot Manager menu is not listing).
SHUTDOWN Command
The SHUTDOWN.EXE utility can be used to schedule a shutdown (complete or a restart) locally or remotely. A variety of reasons can be specified and announced to users for the shutdown.
TASKLIST Command
The TASKLIST.EXE utility is used at the command line to see a list of all the running processes (and their process ID number), similar to what you see in the GUI by using Task Manager. By default, it shows the processes on the current machine, but the /S switch can be used to see the processes on a remote machine. /SVC will show the services hosted in each process and you can use /U if you need to run the command as another user (/P allows you to specify a password associated with that user).
CD/MD/RD Commands
The CD, MD, and RD commands are used to change (or display), make, and remove directories, respectively. They’re shorthand versions of the CHDIR, MKDIR, and RMDIR commands. Table 13-7 lists their usage and switches.
Table 13-7: CD/MD/RD usage and switches
| Command | Purpose |
| CD [path] | Changes to the specified directory. |
| CD /D [drive:][path] | Changes to the specified directory on the drive. |
| CD .. | Changes to the directory that is up one level. |
| CD | Changes to the root directory of the drive. |
| MD [drive:][path] | Makes a directory in the specified path. If you don’t specify a path, the directory will be created in your current directory. |
| RD [drive:][path] | Removes (deletes) the specified directory. |
| RD /S [drive:][path] | Removes all directories and files in the specified directory, including the specified directory itself. |
| RD /Q [drive:][path] | Quiet mode. You won’t be asked whether you’re sure you want to delete the specified directory when you use /S. |
Now that you’ve looked at the available switches, let’s use them in Exercise 13.6.
DEL Command
The DEL command is used to delete files and directories at the command line. Wildcards can be used with it and ERASE performs the same operations.
FDISK Command
The FDISK command used to be included with earlier operating systems to make disk partitioning possible. This command does not exist in Windows 7, Vista, or XP, having been replaced with DISKPART. CompTIA lists it as a command to know, and for the exam you should know that it is not included with the current versions of Windows.
FORMAT Command
The FORMAT command is used to wipe data off disks and prepare them for new use. Before a hard disk can be formatted, it must have partitions created on it. (Partitioning was done in the DOS days with the FDISK command, but that command does not exist in Windows 7, Vista, or XP, having been replaced with DISKPART.) The syntax for FORMAT is as follows:
FORMAT [volume] [switches]The volume parameter describes the drive letter (for example, D:), mount point, or volume name. Table 13-8 lists some common FORMAT switches.
Table 13-8: FORMAT switches
| Switch | Purpose |
| /FS:[filesystem] | Specifies the type of file system to use (FAT, FAT32, or NTFS). |
| /V:[label] | Specifies the new volume label. |
| /Q | Executes a quick format. |
There are other options as well to specify allocation sizes, the number of sectors per track, and the number of tracks per disk size. However, we don’t recommend that you use these unless you have a very specific need. The defaults are just fine.
So, if you wanted to format your D: drive as NTFS, with a name of HDD2, you would type the following:
FORMAT D: /FS:NTFS /V:HDD2COPY Command
The COPY command does what it says: It makes a copy of a file in a second location. (To copy a file and then remove it from its original location, use the MOVE command.) Here’s the syntax for COPY:
COPY [filename] [destination]It’s pretty straightforward. There are several switches for COPY, but in practice they are rarely used. The three most used ones are /A, which indicates an ASCII text file; /V, which verifies that the files are written correctly after the copy; and /Y, which suppresses the prompt asking whether you’re sure you want to overwrite files if they exist in the destination directory.
XCOPY Command
If you are comfortable with the COPY command, learning XCOPY shouldn’t pose too many problems. It’s basically an extension of COPY with one notable exception—it’s designed to copy directories as well as files. The syntax is as follows:
XCOPY [source] [destination][switches]There are 26 XCOPY switches; some of the more commonly used ones are listed in Table 13-9.
Table 13-9: XCOPY switches
| Switch | Purpose |
| /A | Copies only files that have the Archive attribute set and does not clear the attribute. (Useful for making a quick backup of files while not disrupting a normal backup routine.) |
| /E | Copies directories and subdirectories, including empty directories. |
| /F | Displays full source and destination filenames when copying. |
| /G | Allows copying of encrypted files to a destination that does not support encryption. |
| /H | Copies hidden and system files as well. |
| /K | Copies attributes. (By default, XCOPY resets the Read-Only attribute.) |
| /O | Copies file ownership and ACL information (NTFS permissions). |
| /R | Overwrites read-only files. |
| /S | Copies directories and subdirectories but not empty directories. |
| /U | Copies only files that already exist in the destination. |
| /V | Verifies the size of each new file. |
Perhaps the most important switch is /O. If you use XCOPY to copy files from one location to another, the file system creates a new version of the file in the new location without changing the old file. In NTFS, when a new file is created, it inherits permissions from its new parent directory. This could cause problems if you copy files. (Users who didn’t have access to the file before might have access now.) If you want to retain the original permissions, use XCOPY /O.
ROBOCOPY Command
The ROBOCOPY utility (Robust File Copy for Windows) is included with Windows 7 and has the big advantage of being able to accept a plethora of specifications and keep NTFS permissions intact in its operations. The /MIR switch, for example, can be used to mirror a complete directory tree.
An excellent TechNet article on how to use Robocopy can be found at the following location:
http://technet.microsoft.com/en-us/magazine/ec85e01678.aspx.

DISKPART Command
The DISKPART utility shows the partitions and lets you manage them on the computer’s hard drives.
SFC Command
The System File Checker (SFC) is a command-line-based utility that checks and verifies the versions of system files on your computer. If system files are corrupted, the SFC will replace the corrupted files with correct versions.
The syntax for the SFC command is as follows:
SFC [switch]Table 13-10 lists the switches available for SFC.
Table 13-10: SFC switches
| Switch | Purpose |
| /CACHESIZE=X | Sets the Windows File Protection cache size, in megabytes. |
| /PURGECACHE | Purges the Windows File Protection cache and scans all protected system files immediately. |
| /REVERT | Reverts SFC to its default operation. |
| /SCANFILE (Windows 7 and Vista only) | Scans a file that you specify and fixes problems if they are found. |
| /SCANNOW | Immediately scans all protected system files. |
| /SCANONCE | Scans all protected system files once. |
| /SCANBOOT | Scans all protected system files every time the computer is rebooted. |
| /VERIFYONLY | Scans protected system files and does not make any repairs or changes. |
| /VERIFYFILE | Identifies the integrity of the file specified, and does make any repairs or changes. |
| /OFFBOOTDIR | Does a repair of an offline boot directory. |
| /OFFFWINDIR | Does a repair of an offline windows directory. |
To run the SFC, you must be logged in as an administrator or have administrative privileges. If the System File Checker in Windows XP discovers a corrupted system file, it will automatically overwrite the file by using a copy held in the %systemroot%system32dllcache directory. If you believe that the dllcache directory is corrupted, you can use SFC /SCANNOW, SFC /SCANONCE, SFC /SCANBOOT, or SFC /PURGECACHE to repair its contents. Both Windows Vista and Windows 7 store the files in c:windowswinsxsBackup (where they are now protected by the system and only TrustedInstaller is allowed direct access to them—the cache is not rebuildable).
If you attempt to run SFC from a standard command prompt in Windows Vista, for example, you will be told that you must be an administrator running a console session in order to continue. Rather than opening a standard command prompt, choose Start > All Programs > Accessories, then right-click Command Prompt and choose Run as administrator. The UAC will prompt you to continue, and then you can run SFC without a problem.
CHKDSK Command
You can use the Windows Chkdsk utility to create and display status reports for the hard disk. Chkdsk can also correct file system problems (such as cross-linked files) and scan for and attempt to repair disk errors. You can manually start Chkdsk by right-clicking the problem disk and selecting Properties. This will bring up the Properties dialog box for that disk, which shows the current status of the selected disk drive.
By clicking the Tools tab at the top of the dialog box and then clicking the Check Now button in the Error-Checking section, you can start Chkdsk. Exercise 13.7 walks you through starting Chkdsk in the GUI, while Exercise 13.8 does the same from the command line.
/? Command
The HELP command does what it says: it gives you help. Actually, if you just type HELP and press Enter, your computer gives you a list of system commands you can type. To get more information, type the name of a command you want to know about after typing HELP. For example, type HELP RD and press Enter and you will get information about the RD command.
You can also get the same help information by typing /? after the command.
The Windows Registry
Windows configuration information is stored in a special configuration database known as the Registry. This centralized database contains environmental settings for various Windows programs. It also contains registration information that details which types of filename extensions are associated with which applications. So, when you double-click a file in Windows Explorer, the associated application runs and opens the file you double-clicked.
The Registry was introduced with Windows 95. Most OSs up until Windows 95 were configured through text files, which can be edited with almost any text editor. However, the Registry database is contained in a special binary file that can be edited only with the special Registry Editor provided with Windows.
Windows 7, Vista, and XP have what appear to be two applications that can be used to edit the Registry, REGEDIT and REGEDT32 (with no I), but in reality, REGEDT32 opens REGEDIT. They work similarly, but each has slightly different options for navigation and browsing.
The Registry is broken down into a series of separate areas called hives. The keys in each hive are divided into two basic sections—user settings and computer settings. In Windows, a number of files are created corresponding to each of the different hives. The names of most of these files do not have extensions, and their names are SYSTEM, SOFTWARE, SECURITY, SAM, and DEFAULT. One additional file whose name does have an extension is NTUSER.DAT.
The basic hives of the Registry are as follows:
Modifying a Registry Entry
If you need to modify the Registry, you can modify the values in the database or create new entries or keys. You will find the options for adding a new element to the Registry under the Edit menu. To edit an existing value, double-click the entry and modify it as needed. You need administrative-level access to modify the Registry.
Restoring the Registry
Windows stores Registry information in files on the hard drive. You can restore this information using the Last Known Good Configuration option, which restores the Registry from a backup of its last functional state. This can be used if—and only if—you have not logged in again since a change was made (otherwise, the Last Known Good Configuration option is useless).
To use this option, press F8 during startup and then select Last Known Good Configuration from the menu that appears. You can also back up the Registry files to the systemroot epair directory by using the Windows Backup program, or you can save them to tape during a normal backup. To repair the Registry from a backup, overwrite the Registry files in systemrootsystem32config.
Automated System Recovery (ASR), which is accessible through the Backup utility, can be used as a last-resort option for system recovery in Windows XP. Both Windows Vista and Windows 7 use the WinRE recovery environment to do a Complete PC Restore to achieve the same goal.
Virtual Memory
Another thing you may need to configure is virtual memory. Virtual memory uses what’s called a swap file, or paging file. A swap file is actually hard drive space into which idle pieces of programs are placed while other active parts of programs are kept in or swapped into main memory. The programs running in Windows believe that their information is still in RAM, but Windows has moved the data into near-line storage on the hard drive. When the application needs the information again, it is swapped back into RAM so that it can be used by the processor.
Random access memory (RAM) is the computer’s physical memory. The more RAM you put into the machine, the more items it can remember without looking anything up. And the larger the swap file, the fewer times the machine has swapped out the contents of what it is holding in memory. The maximum possible size of your swap file depends on the amount of disk space you have available on the drive where the swap file is placed. Windows configures the minimum and maximum swap file size automatically, but if you want Windows to handle the size of the swap file dynamically, you have to change the default setting by selecting System Managed Size in the Virtual Memory dialog box. We’ll show you how to get there in a moment.
In Windows, the swap file is called PAGEFILE.SYS, and it’s located in the root directory of the drive on which you installed the OS files. The swap file is a hidden file, so to see the file in Windows Explorer you must have the folder options configured to show hidden files. Typically, there’s no reason to view the swap file in the file system because you’ll use Control Panel to configure it. However, you may want to check its size, and in that case you’d use Windows Explorer.
To modify the default Virtual Memory settings, follow these steps: Click Start > Control Panel. Double-click the System icon, and select the Advanced tab in Windows XP (select Advanced System Settings from the left panel in Windows Vista and Windows 7). In the Performance area, click Settings. Next, click the Advanced tab (yes, another Advanced tab), and then, in the Virtual Memory area, click Change. Note that in addition to changing the swap file’s size and how Windows handles it, you can specify the drive on which you want to place the file.