
Understanding Laptop Architecture
Laptops are similar to desktop computers in architecture in that they contain many parts that perform similar functions. However, the parts that make up a laptop are completely different from those in desktop computers. The obvious major difference is size; laptops are space challenged. Another primary concern is heat. Restricted space means less airflow, meaning parts can heat up and overheat faster.
To overcome space limitations, laptop parts are physically much smaller and lighter, and they must fit into the compact space of a laptop’s case. It might not sound like much, but there really is a major difference between a 4.5-pound laptop and a 5.5-pound laptop if you’re hauling it around in its carrying case all day. Also, laptop parts are designed to consume less power and to shut themselves off when not being used, although many desktops also have components that go into a low-power state when not active, such as video circuitry. Finally, most laptop components are proprietary—the motherboard is especially proprietary, and the LCD screen from one laptop will not necessarily fit on another.
A more recent development in the laptop arena has been the netbook computer. A netbook is an extremely small laptop computer that is lighter in weight and more scaled down in features than a standard laptop. Users are attracted to netbooks because of their enhanced portability and affordability. The features that remain are ideal for Internet access and emailing. However, many users would find netbooks insufficient for mainstream usage.
In the following sections, you will learn about the various components that make up laptops and how they differ from desktop computer components. If you don’t remember exactly what each component does, it may help you to refer back to earlier hardware chapters occasionally as you read this chapter.
Laptops vs. Desktops
If you’ve ever shopped for a laptop, you have no doubt noticed that the prices of desktop PCs are often quite a bit lower than those for notebook computers, yet the desktops are faster and more powerful. If you’ve ever wondered what makes a laptop so much different than a PC, here are the primary differences between laptops and desktops:
Now that we’ve illustrated the primary differences between laptops and desktops, let’s examine the parts of the laptop and what they do.
Laptop Case
A typical laptop case is made up of three main parts:
- The display—usually an LCD or LED display
- The case frame, which is the metal reinforcing structure inside the laptop that provides rigidity and strength and that most components mount to
- The case, or the plastic cover that surrounds the components and provides protection from the elements
The cases are typically made of some type of plastic (usually ABS plastic or ABS composite) to provide for light weight as well as strength.
Laptop cases are made in what is known as a clamshell design. In a clamshell design, the laptop has two halves, hinged together at the back. Usually, the display is the top half and everything else is in the bottom half.
Occasionally, part of the laptop’s case will crack and need to be replaced. However, you usually can’t just replace the cracked section. Most often, you must remove every component from inside the laptop’s case and swap the components over to the new case. This is a labor-intensive process because the screws in laptops are often very small and hard to reach. Often, repairing a cracked case may cost several hundred dollars in labor alone. Most times, people who have cracked laptop cases wait until something else needs to be repaired before having the case fixed. Or, they just wait until it’s time to upgrade to a new system. The decision on when to repair or replace the laptop boils down to a few factors. The primary one is if the user can live with the damage. While they can be annoying, most case problems don’t inhibit the operation of the machine. The secondary factor is money. The user (or company) needs to decide if it’s really worth spending the money needed to fix the issue immediately.
Motherboards and Processors
As with desktop computers, the motherboard of a laptop is the backbone structure to which all internal components connect. However, with a laptop, almost all components must be integrated onto the motherboard, including onboard circuitry for the serial, parallel, USB, IEEE 1394, video, expansion, and network ports of the laptop. With desktop systems, the option remains to not integrate such components. Because of the similarities between laptop and desktop components, some material in the next few sections will be familiar to you if you have read Chapter 1, “Motherboards, Processors, and Memory.”
Laptop Motherboards
The primary differences between a laptop motherboard and a desktop motherboard are the lack of standards and the much smaller form factor. As mentioned earlier, most motherboards are designed along with the laptop case so that all the components will fit inside. Therefore, the motherboard is nearly always proprietary, and that’s what we mean by “lack of standards.” They all use the technologies you’re used to such as USB and 802.11, but it’s very unlikely you’re going to be able to swap a motherboard from one laptop into another, even if both laptops are from the same manufacturer. Figure 9-1 shows an example of a laptop motherboard.
Figure 9.1: A laptop motherboard
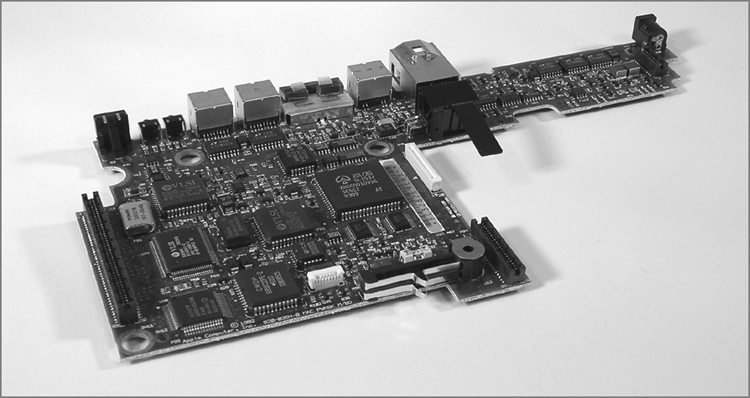
To save space, components of the video circuitry (and possibly other circuits as well) are placed on a thin circuit board that connects directly to the motherboard. This circuit board is often known as a riser card or a daughterboard.
Having components performing different functions (such as video, audio, and networking) integrated on the same board is a mixed bag. On one hand, it saves a lot of space. On the other hand, if one part goes bad, you have to replace the entire board, which is more expensive than just replacing one expansion card.
Laptop Processors
Just as with desktop computers, the processor is the brain of the laptop computer. And just like everything else, compared to desktop hardware devices, laptop hardware devices are smaller and not quite as powerful. The spread between the speed of a laptop CPU and that of a desktop motherboard can be a gigahertz or more.
Laptops have less space, and thus, heat is a major concern. Add to that the fact that processors are the hottest-running component and you can see where cooling can be an issue. To help combat this heat problem, laptop processors are engineered with the following features:
One of the best features of many laptop processors is that they include built-in wireless networking. One of the earliest laptop-specific chipsets that gained a ton of popularity was the Pentium M chip made by Intel. The Pentium M consists of three separate components:
- The Mobile Intel Express chipset (such as the Mobile Intel 915GM Express or the Mobile Intel 910GML), which is the graphics memory controller hub
- The Intel/PRO Wireless Network Connection, providing an integrated wireless LAN connection
- The Intel Centrino chipset, which is the “brain” of the chipset, designed to run on lower power than the desktop processor
Some portable computers will simply use stripped-down versions of desktop processors such an Intel Pentium or Core series processor. While there’s nothing wrong with this, it makes sense that components specifically designed for notebooks fit the application better than components that have been retrofitted for notebook use. Consider an analogy to the automobile industry: It’s better to design a convertible from the ground up than to simply cut the top off an existing coupe or sedan.
Memory
Notebooks don’t use standard desktop computer memory chips, because they’re too big. In fact, for most of the history of laptops, there were no standard types of memory chips. If you wanted to add memory to your laptop, you had to order it from the laptop manufacturer. Of course, because you could get memory from only one supplier, you got the privilege of paying a premium over and above a similar-sized desktop memory chip.

However, there are now two common types of laptop memory package: SODIMM and MicroDIMM. Nevertheless, modern laptop manufacturers may still opt to go the proprietary route due to design considerations that favor a custom solution. To see what kind of memory your laptop uses, check either the manual or the manufacturer’s website. You can also check third-party memory producers’ websites (such as www.crucial.com).
SODIMM
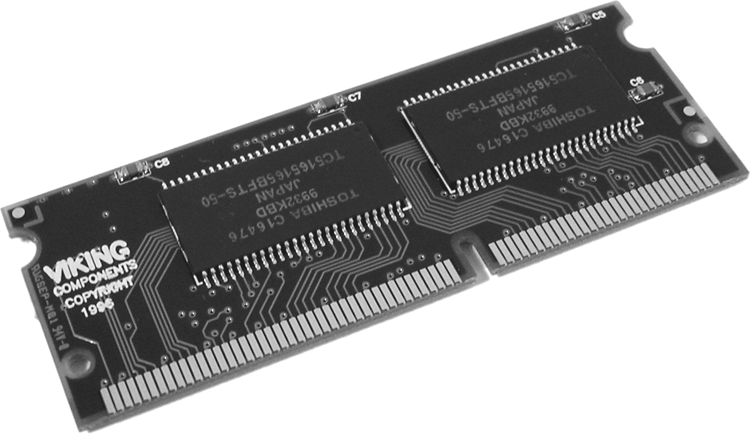
The most common memory form factor for laptops is called a Small Outline DIMM (SODIMM). They’re much smaller than standard DIMMs, measuring about 67 millimeters (2.6″) long and 32 millimeters (1.25″) tall. SODIMMs are available in a variety of configurations, including 32-bit (72-pin) and 64-bit (144-pin SDRAM, 200-pin DDR, 200-pin DDR2, and 204-pin DDR3) options. Figure 9-2 shows an example of the classic 144-pin variety.
Just as with desktop computers, make sure the SODIMM you want to put into the laptop is compatible with the motherboard. The same standards that apply to desktop memory compatibility apply to laptops. This means you can find DDR, DDR2, and DDR3 SODIMMs for laptops. DDR has all but topped out at 1GB per module, while DDR2 and DDR3 SODIMM modules can be purchased in sizes up to 8GB (at the time this book was being written), which lags desktop DIMM capacity by a bit.
Figure 9-2: 144-pin SODIMM
MicroDIMM
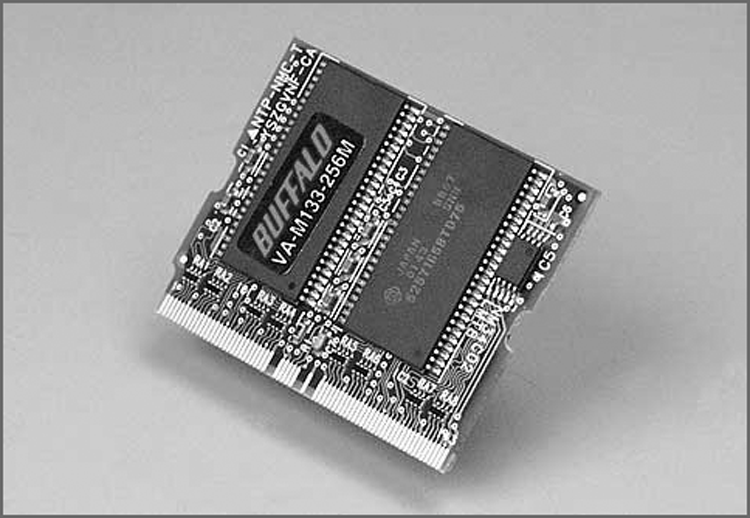
Although no longer new, the MicroDIMM is the most recent form factor for laptop memory modules. The MicroDIMM is an extremely small RAM form factor. In fact, it is over 50 percent smaller than a SODIMM—only about 45.5mm (about 1.75″) long and 30mm (about 1.2″, a bit bigger than a US quarter) wide. Another major difference is that the MicroDIMM does not have any notches on the bottom. Figure 9-3 shows a 172-pin MicroDIMM. It was designed for the ultralight and portable subnotebook style of computer. Popular MicroDIMM form factors include 64-bit modules with 172 or 214 pins for DDR2.
Figure 9-3: 144-pin MicroDIMM
Storage
Nearly all laptops have a hard drive, but not all laptops have both a floppy drive and an optical drive. Many times there just isn’t room for both, and considering floppy drives are practically obsolete, why have one anyway? Often there is a multipurpose bay that can be used to hold either drive or an extra battery. If this drive bay exists, users generally keep the optical drive installed most of the time and leave out the floppy drive. In some cases, the floppy drive is an external device that you connect with a special cable to a proprietary connector. Figure 9-4 shows an example of one of these connectors, and Figure 9-5 shows an example of a laptop floppy drive with a proprietary connector. Notice how thin the floppy drive is and how compact the electronics are. When used at all, floppy drives that attach to the laptop through a USB port are more common today.
Laptops don’t have the room for the full-sized 3½″ hard drives that desktop computers use. Instead, they use a hard drive with a 2½″ form factor that is less than ½″ thick. These drives share the same controller technologies as desktop computers; however, they use smaller connectors. Figure 9-6 shows an example of a standard hard drive compared to a laptop hard drive.
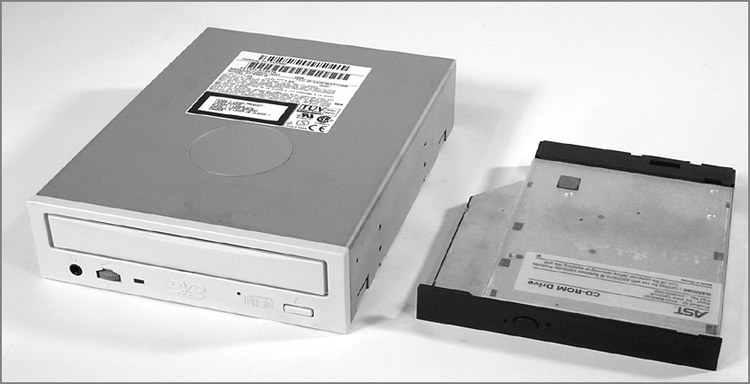
Optical drives on laptops are necessarily smaller than their desktop counterparts as well. Figure 9-7 shows an example of a desktop CD-ROM drive compared to a laptop CD-ROM drive. Note that the laptop drive is very small, but it has all the functionality of a desktop unit. The drive mechanism and circuits have all been miniaturized to save space. As a result, the functionality is basically the same, but the cost is usually higher. Any time a component’s functionality remains the same while its size decreases, you will notice an increase in price over the standard-sized item.
Figure 9-4: A proprietary floppy connector
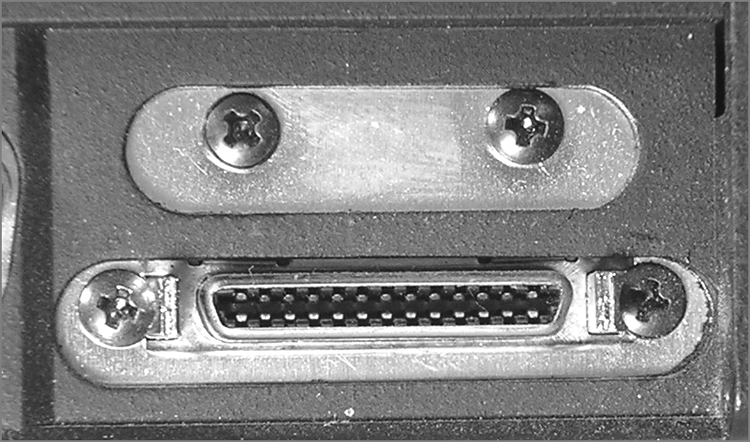
Figure 9-5: A laptop floppy drive
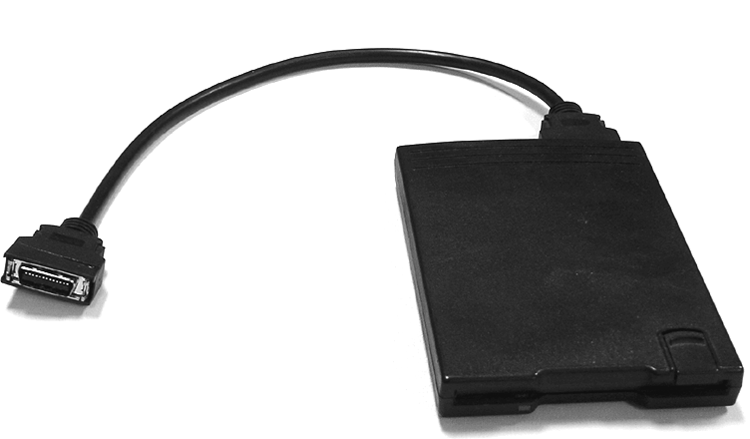
Figure 9-6: A desktop hard drive compared to a laptop hard drive
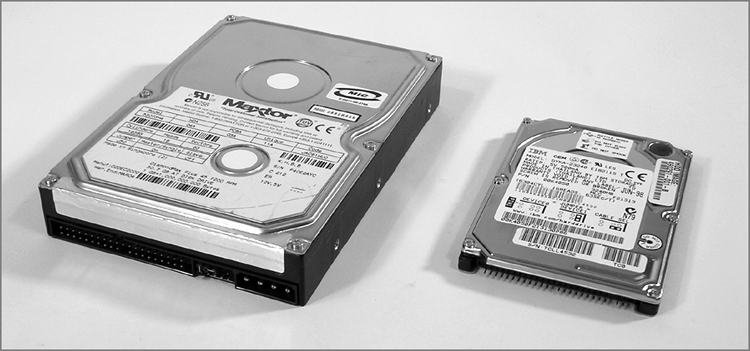

Figure 9-7: A desktop DVD drive compared to a laptop DVD drive
Input Devices
Because of the small size of laptops, getting data into them presents unique challenges to designers. They must design a keyboard that fits within the case of the laptop. They must also design some sort of pointing device that users can use in graphical interfaces like Windows. The primary challenge in both cases is to design these peripherals so they fit within the design constraints of the laptop (low power and small form factor) while remaining usable.
Keyboards
A standard-sized desktop keyboard wasn’t designed to be portable. It wouldn’t fit well with the portable nature of a laptop. That usually means laptop keys are not normal size; they must be smaller and packed together more tightly. People who learned to type on a typewriter or regular computer often have a difficult time adjusting to a laptop keyboard.
Laptop keyboards are built into the lower portion of the clamshell. Sometimes, they can be removed easily to access peripherals below them like memory and hard drives, as in the Lenovo ThinkPad series.
Special Function Keys
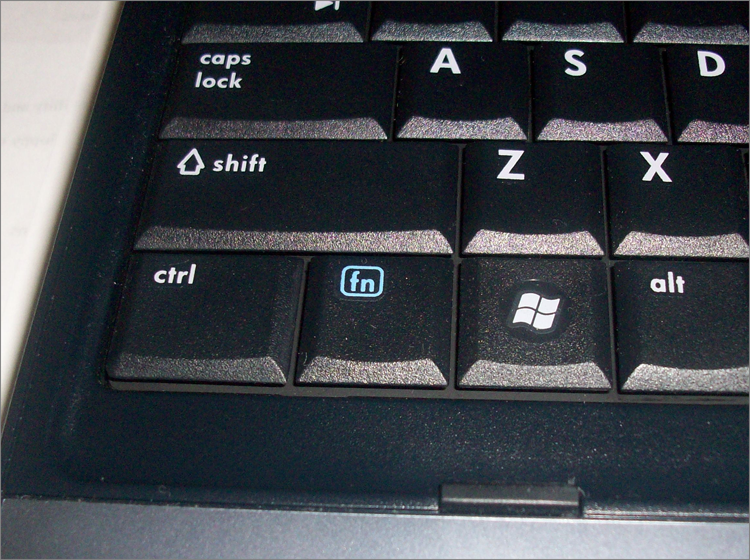
Because of the much smaller space available for keys, some laptop keys (like the number pad, Home, Insert, PgUp, and PgDn keys) are consolidated into special multifunction keys. These keys are accessed through the standard keys by using a special function (Fn) key. It’s typically near the Windows key on the keyboard and labeled in lettering of an alternate color (usually blue) that matches the lettering of the labels for alternate functions on other keys. To use a multifunction key, you press and hold the Fn key (as you would the Shift, Ctrl, and Alt keys) and then tap the key labeled with the function you want, finally releasing the Fn key. Figure 9-8 shows an example of a function key.
The function key combinations can control many laptop functions, but the most common are video, audio, and networking settings. The specific keys used will vary by laptop model, but there are usually icons on the keys that perform the functions to help you out.
Figure 9-8: Function (Fn) key
Video adjustments come in two varieties: changing the video output and dimming or brightening the screen. Dimming and brightening the screen is pretty straightforward, but the video output function can throw people off. Remember that nearly every laptop has a video connector on the back to plug in an external monitor or a projector. You will need to use the video toggle key to get this external port to work. Usually there are three states: laptop only, external output only, and both displays. Figure 9-9 shows examples of the keys that handle video functions.
Figure 9-9: Video adjustment keys F4 (LCD toggle), F7 (dim), and F8 (brighten)
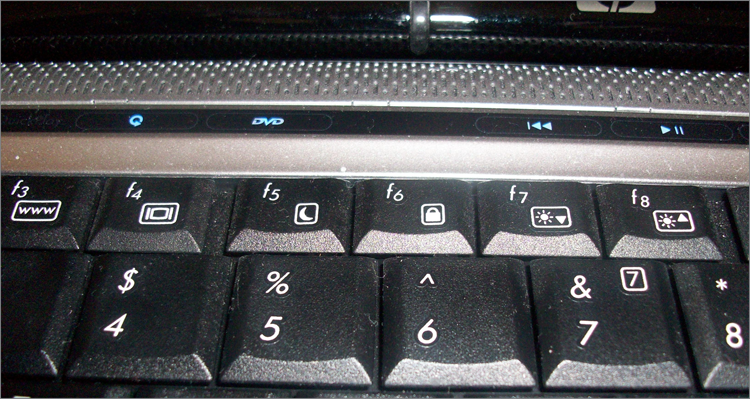
Note that the LCD toggle (the F4 key in Figure 9-9) has the same symbol on it as the external video connector. The dimming key has a sun with an arrow pointing down, and the brightening key has a sun with an arrow pointing up. (Some manufacturers will use a small sun on the dimming key and a large sun on the brightening key.)
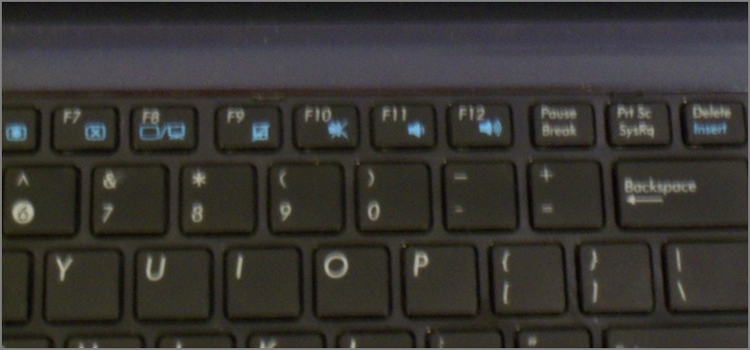
The audio setting can often be adjusted using the function keys too. To lower the volume, look for an icon with a speaker with only one “wave” coming out of it. The volume is increased with the speaker with several waves, and the mute button will have a speaker with an X. Figure 9-10 shows an example.
Figure 9-10: Audio adjustment keys F10 (mute), F11 (quieter), and F12 (louder)
Finally, there are the network settings. There aren’t really a lot of choices here; it’s a matter of turning the network adapter on or off. The symbol for WiFi usually looks like a small antenna. If you’re using Bluetooth, the symbol will be Bluetooth’s trademarked B. Sometimes disabling these options is handled by the Fn keys, and other times they are handled by separate switches near the keyboard. For example, Figure 9-11 shows a WiFi switch on the front of a laptop, and Figure 9-12 shows a WiFi toggle above the keyboard. The switch in Figure 9-12 looks like an indicator light only, but the strip is touch-sensitive.
Figure 9-11: Network card toggle switch on the front of the computer
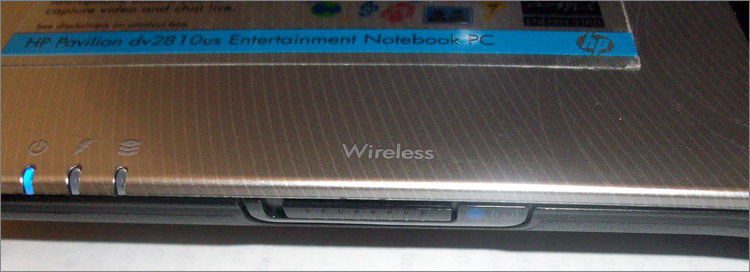
Figure 9-12: Network card toggle switch above the keyboard

The point is, look around if you don’t see the right function key on the keyboard itself. It’s bound to be there somewhere.
Mice and Pointing Devices
In addition to using the keyboard, you must have a method of controlling the onscreen pointer in the Windows interface. There are many methods of doing this, but there are some that are more common:
- Trackball
- Touchpad
- Point stick
- Touchscreen
Most laptops today include a mouse/keyboard port, a USB port, or both. Either of these ports can be used to add an input device like a mouse or a standard-sized keyboard.
Trackball
Many early laptops used trackballs as pointing devices. A trackball is essentially the same as a mouse turned upside down. The onscreen pointer moves in the same direction and at the same speed you move the trackball with your thumb or fingers.
Trackballs are cheap to produce. However, the primary problem with trackballs is that they do not last as long as other types of pointing devices; a trackball picks up dirt and oil from operators’ fingers, and those substances clog the rollers on the trackball and prevent it from functioning properly.
Touchpad
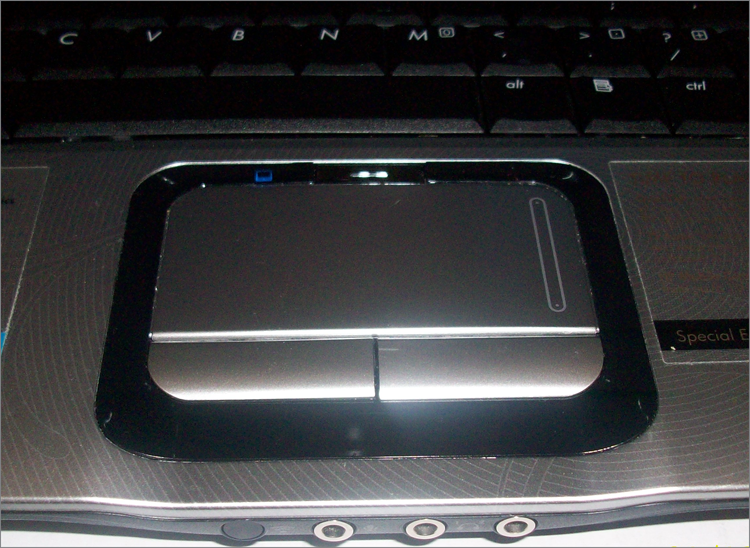
To overcome the problems of trackballs, a newer technology that has become known as the Touchpad was developed. Touchpad is actually the trade name of a product. However, the trade name is now used to describe an entire genre of products that are similar in function.
A Touchpad is a device that has a pad of touch-sensitive material. The user draws with their finger on the Touchpad, and the onscreen pointer follows the finger motions. Included with the Touchpad are two buttons for left- or right-clicking (although with some Touchpads, you can perform the functions of the left-click by tapping on the Touchpad). Figure 9-13 shows a Touchpad.
Figure 9-13: Laptop Touchpad
Point Stick
With the introduction of the ThinkPad series of laptops, IBM introduced a new feature known as the Touchpoint, generically known as a point stick. The point stick is a pointing device that uses a small rubber-tipped stick. When you push the point stick in a particular direction, the onscreen pointer goes in the same direction. The harder you push, the faster the onscreen pointer moves. The point allows fingertip control of the onscreen pointer, without the reliability problems associated with trackballs.
Point sticks have their own problems, however. Often, the stick does not return to center properly, causing the pointer to drift when not in use. You might also notice the rubber cover for the stick becoming a bit gummy with extended use. Most manufacturers supply replacement covers of varying textures with new systems. Some later systems employ a concave version of the cover and updated workings that tend to minimize a lot of these concerns.
Touchscreen
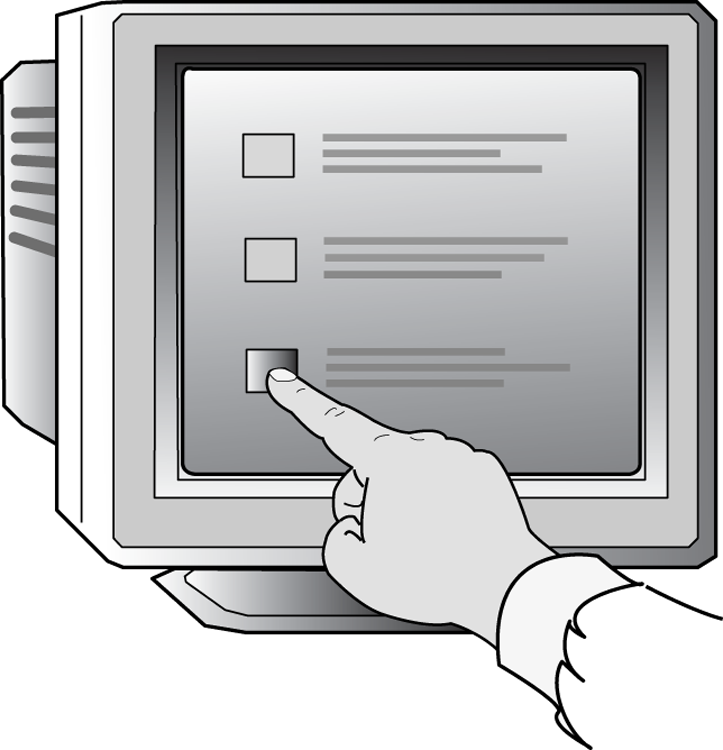
The last type of pointing device we’ll discuss can be found in use at many department stores: the informational kiosks with screens that respond to your touch and give you information about product specials or bridal registries. Instead of a keyboard and mouse, these computer screens have a film over them that is sensitive to touch. This technology is known as a Touchscreen (see Figure 9-14). With most of the interfaces in use on Touchscreens, touching a box drawn on the monitor does the same thing as double-clicking that box with a mouse. These screens are most commonly found on monitors; however, with the advent of the tablet PC (a laptop designed to be held like a pad of paper), the Touchscreen is becoming more popular as an input device for a laptop.
Cleaning a Touchscreen is usually just as easy as cleaning a regular monitor. With optical Touchscreens, the monitor is a regular monitor, so it can be cleaned with glass cleaner. However, if the screen has a capacitive coating, glass cleaner may damage it. Instead, use a cloth dampened with water to clean the dirt, dust, and fingerprints from the screen.
Figure 9-14: A typical Touchscreen
Expansion Buses and Ports
Although laptop computers are less expandable than their desktop counterparts, they can be expanded to some extent. Laptops have expansion ports similar to those found on desktop computers as well as a couple that are found only on laptops.
PCMCIA (PC Card) Expansion Bus
The tongue-twister PCMCIA stands for Personal Computer Memory Card International Association. The PCMCIA was organized to provide a standard way of expanding portable computers. The PCMCIA bus was originally designed to provide a way of expanding the memory in a small, handheld computer, referred to generically as a PCMCIA host. The PCMCIA bus has been renamed PC Card to make it easier to pronounce. PC Card uses a small expansion card (about the size of a credit card). The interface is a thin, 68-pin connector that has remained relatively unchanged from the original specification. Although this form factor is primarily used in portable computers, PC Card adapters (converters) are available for desktop PCs. The PC Card bus now serves as a universal expansion bus that can accommodate nearly any device.
In addition to the card, the PC Card architecture includes two other components:
- Socket Services software is a BIOS-level interface to the PCMCIA bus slot. When loaded, it hides the details of the PC Card hardware from the computer. This software can detect when a card has been inserted and what type of card it is.
- Card Services software is the interface between the application and Socket Services. It tells the applications which interrupts and I/O ports the card is using. Applications that need to access the PC Card don’t access the hardware directly; instead, they tell Card Services that they need access to a particular feature, and Card Services gets the appropriate feature from the PC Card.
This dual-component architecture allows the PCMCIA architecture to be used in different types of computer systems (that is, not just x86/x64-based PCs). For example, Apple laptop computers based on Motorola processors could use PC Cards for modems and for LAN interface cards.
The first release of the PCMCIA standard (PCMCIA 1.0, circa 1990) defined a 16-bit ISA-like bus to be used for memory expansion only. PCMCIA 1.0 supported 5V memory cards. The second major release (PCMCIA 2.x) introduced 3.3V cards and host slots. PCMCIA 2.x was designed to be backward compatible with version 1, so 5V memory cards can be used in version 2 host slots. Cards that are only capable of 3.3V operation are keyed to prevent damage from insertion into older 5V-only host slots. PCMCIA version 2.01 was released in 1992 to specify the use of Card and Socket Services as a standard driver platform.
PCMCIA 5.0 (aka CardBus) increased the bus width to 32 bits and the bus speed from 8MHz to a maximum of 33MHz. In addition, the new CardBus PC Card adapters used PCI-like access methods, and the throughput speeds increased dramatically, up to a maximum of 133MBps (1.06Gbps). These cards are differentiated from the 16-bit cards by a metal grounding strip, often gold in color, along the insertion edge of the card. You can insert 16-bit PC Cards in a CardBus slot, but the converse is not also true.
The bus width of these cards and slots is either 16 or 32 bits, as previously discussed. Also, the original PCMCIA specification supported only one interrupt request, or IRQ (a problem if you needed to install two devices that both need interrupts in the same PC Card bus). Card and Socket Services took care of this deficiency. PC Cards also support bus mastering and Direct Memory Access (DMA), but only as of PC Card 5.0. DMA support was eventually removed in version 7.2. PC Card 8.0, released in 2001, specifies a newer CardBay standard designed to integrate USB functionality into the PC Card format. The benefit would be for devices that have PC Card slots but no USB ports. The reverse is more common, however.
Three major types of PC Cards (and slots) have been specified. Each has different uses and physical characteristics, although each one measures 54mm in width and 85.6mm in length. They are called Type I, Type II, and Type III:
- Type I cards are 3.3mm thick and are most commonly used for memory cards.
- Type II cards are 5mm thick and are mostly used for modems and LAN adapters but for sound cards, SCSI controllers, and other devices as well. This is the most common PC Card type found today, and most systems have at least two Type II slots (or one Type III slot).
- The Type III slot is 10.5mm thick. Its most common application is PC Card hard disks. These slots are all but extinct.
ExpressCard
ExpressCard was launched by PCMCIA as a way to support USB 2.0 and PCI Express (hence the term ExpressCard) connectivity for portable computers. In fact, with support for transfer rates 2.5 times that of CardBus, ExpressCard is capable of transferring data at 2.5Gbps, approximately the rate of a single lane of PCIe. Cards can be created that support either specification or both. The manufacturer chooses the option that matches the application. ExpressCard 1.0 was published in 2003 and updated in 2006 to Release 1.1. Version 2 of the ExpressCard specification is designed to support USB 3.0 and PCIe 2.0.
With ExpressCard technology, portable computers can be adapted to support faster versions of legacy technologies. Standards not supported by CardBus, such as Gigabit Ethernet, IEEE 1394b, and eSATA, are accessible through the use of ExpressCard. Whereas CardBus required additional hardware and software to support nonnative hot swapping through the ISA and PCI buses, ExpressCard takes advantage of hot swapping natively through the USB and PCIe buses. As an added bonus, the ExpressCard adapters are smaller than their CardBus cousins. The smaller size can be attributed to the PCIe-based serial technology on which ExpressCard is based. The PCI-based parallel communications used by CardBus require the larger 68-pin and -socket interface, while ExpressCard is implemented on a 26-contact blade interface.
ExpressCard adapters are 75mm in length and 5mm thick. The standard ExpressCard, known as ExpressCard/34, is only 34mm wide. A 54mm-wide version, known appropriately as ExpressCard/54, is still only 34mm at its insertion point, but 22mm from that end, it expands to 54mm to accommodate more internal electronics. The additional space allows for better heat dissipation and the support of applications such as 1.8″ disk drives, card readers, and CompactFlash readers. While a Universal ExpressCard host slot appears to be able to accept a CardBus adapter, the card inserts not even an inch before stopping on the internal guide that assures correct ExpressCard/34 insertion. ExpressCard shares with CardBus the use of 3.3V to power some cards but swaps the 5V versions for a new, lower 1.5V offering.
Mini PCI and Mini PCIe
Mini PCI is an adaptation of the Peripheral Component Interconnect (PCI) standard used in desktop computers. As its name implies, it’s just a smaller version (about ¼ the size of PCI cards) designed primarily for laptops.
These cards reside internally in the laptop, with their connection ports generally lining up with the edge of the outside of the case.
Mini PCI is functionally identical to the PCI version 2.2, meaning it’s a 32-bit, 33MHz bus with a 3.3V-powered connection. It also supports bus mastering and DMA. There are three different Mini PCI form factors: Type I, Type II, and Type III. The size and connector types are listed in Table 9-1.
Table 9-1: Mini PCI form factors
| Type | Connector | Size |
| IA | 100-pin, stacking | 7.5 x 70 x 45 millimeters |
| IB | 100-pin, stacking | 5.5 x 70 x 45 millimeters |
| IIA | 100-pin, stacking | 17.44 x 78 x 45 millimeters |
| IIB | 100-pin, stacking | 5.5 x 78 x 45 millimeters |
| IIIA | 124-pin, card edge | 2.4 x 59.6 x 50.95 millimeters |
| IIIB | 124-pin, card edge | 2.4 x 59.6 x 44.6 millimeters |
The extra 24 pins on Type III connectors allow for routing information back to the system, which is required for audio, phone line, or network connections.
Common Mini PCI devices include sound cards, modems, networking cards, and SCSI, ATA, and SATA controllers. Adapters are available that allow you to use a Mini PCI adapter in a standard PCI slot.
Mini PCIe cards are physically similar to ExpressCard devices without the external cover, measuring a few millimeters less in length and width as a result. In reality, however, they have a completely different, 52-pin edge connector. Nevertheless, like ExpressCard, Mini PCIe cards support USB 2.0 and PCIe x1 functionality. Additionally, Mini PCIe cards have the 1.5V and 3.3V power options in common with ExpressCard.
USB Ports
Like desktops, laptops use USB ports for expansion. However, because of the lack of internal expansion in laptops, most peripherals for laptops are found as either PC Cards or USB expansion devices.
The USB port is the most common type for portable memory devices known as flash drives. These handy little sticks can hold up to 32GB of data (at the time of this writing) and have basically made floppy drives completely obsolete.
Mouse/Keyboard Port
Just in case you don’t like using your laptop’s built-in keyboard or pointing device, some laptops come with a combination keyboard/mouse port that allows you to connect either an external keyboard or an external mouse. On laptops that don’t have USB ports, this port is most often used for a standard PS/2 mouse. On those laptops that do have USB ports, this port is used for an external keypad or keyboard (because the USB port can accommodate an external mouse).
Communications Ports
Laptops are built to make computing mobile. And in this world where it seems as if you always need to be in touch with others while you’re mobile, it makes sense that laptops have a variety of methods to communicate while you’re on the go. Several communication methods are available; nearly all new laptops come equipped with some version of an 802.11 wireless card. Others may have connections for an analog dial-up modem or an infrared, cellular, Bluetooth, or Ethernet device. Each of these can also be added to laptops through USB or PC Card connection.
Docking Stations
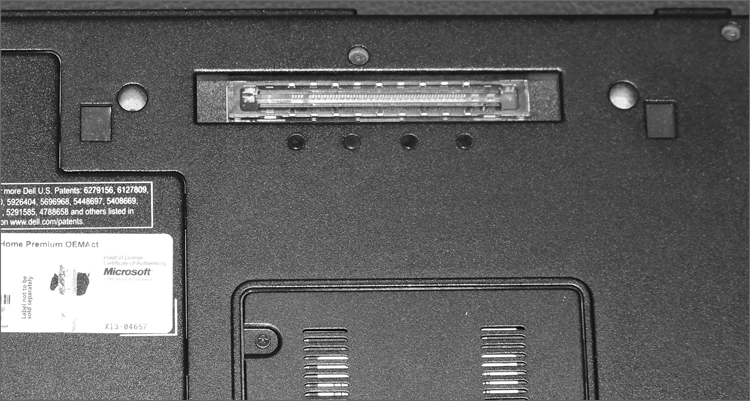
Some laptops are designed to be desktop replacement laptops. That is, they will replace a standard desktop computer for day-to-day use and are thus more full-featured than other laptops. These laptops often have a proprietary docking port. A docking port (as shown in Figure 9-15) is used to connect the laptop to a special laptop-only peripheral known as a docking station. A docking station is basically an extension of the motherboard of a laptop. Because a docking station is designed to stay behind when the laptop is removed, it can contain things like a full-sized drive bay and expansion bus slots. Also, the docking station can function as a port replicator.
Figure 9-15: A docking port
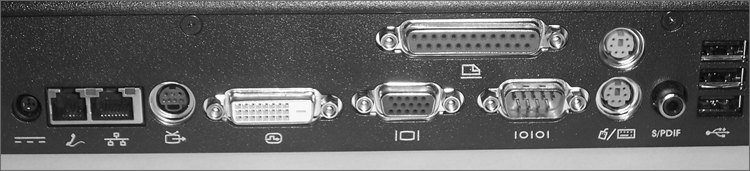
A port replicator reproduces the functions of the ports on the back of a laptop so that peripherals such as monitors, keyboards, printers, and so on that don’t travel with the laptop can remain connected to the dock and don’t have to all be physically unplugged each time the laptop is taken away. Figure 9-16 is a photo of the back of a docking station, showing the replicated ports, some of which are only available on the docking station and not on the laptop. Finally, there are accessory bays (also called media bays). These external bays allow you to plug your full-sized devices into them and take your laptop with you (for example, a full-sized hard drive that connects to an external USB or FireWire port). As a point of clarification (or perhaps confusion), media bays and accessory bays are sometimes used to refer to laptop drive bays.
Figure 9-16: Ports on a docking station
Power Systems
Because portable computers have unique characteristics as a result of their portability, they have unique power systems as well. Portable computers can use either of two power sources: batteries or adapted power from an AC or DC source. Regardless the source of their power, laptops utilize DC power to energize their internal components. Therefore, any AC power source needs to be rectified (converted) to DC. Most laptop display backlights, on the other hand, require high-voltage, low-amperage AC power. To avoid a separate external AC input, an inverter is used to convert the DC power that is supplied for the rest of the system to AC for the backlight. In case it’s not obvious, rectifiers and inverters perform opposite functions, more or less.
Batteries
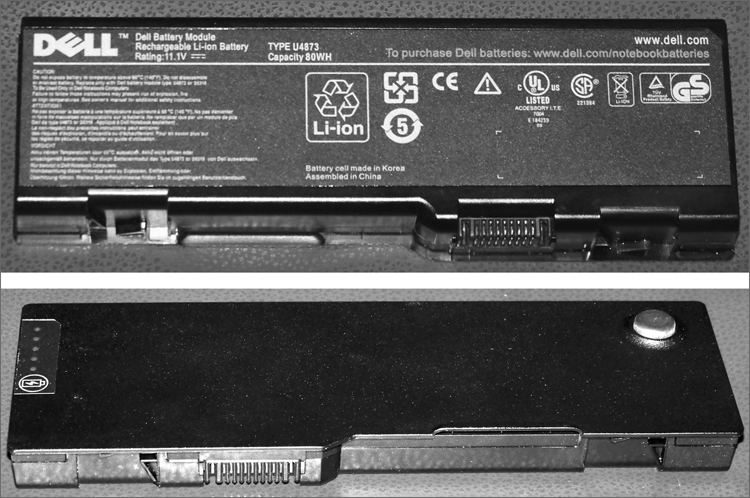
There are many different battery chemistries that come in various sizes and shapes. Nickel cadmium (NiCd), lithium-ion (Li-ion), and nickel-metal hydride (NiMH) have been the most popular chemistries for laptop batteries. A newer battery chemistry, lithium-polymer (Li-poly), has been gaining in prominence over recent years for limited categories of devices, mostly the smaller ones. Li-poly still has issues that need to be worked out before mainstream acceptance for a wider range of applications is seen. Figure 9-17 is a photo of a Li-ion battery for a Dell laptop. Notice the meter on the left side in the bottom view.
Battery chemistries can be compared by energy density and power density. Energy density measures how much energy a battery can hold. Power density measures how quickly the stored energy can be accessed, focusing on access in bursts, not prolonged runtime. An analogy to the storage and distribution of liquids might help solidify these concepts. A gallon bucket has a higher “energy density” and “power density” than a pint bottle; the bucket holds more and can pour its contents more quickly. Another common metric for battery comparison is rate of self-discharge, or how fast an unused battery reduces its stored charge.
Figure 9-17: A laptop Li-ion battery
Power Adapters
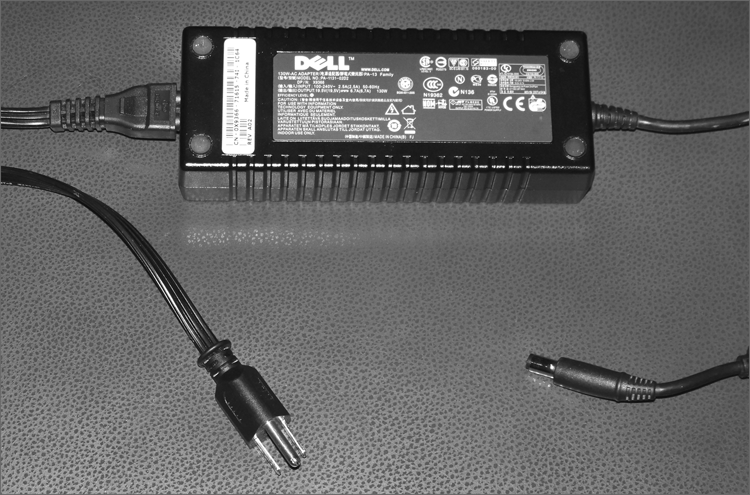
Most notebook computers can also use AC power with a special adapter (called an AC adapter) that converts AC-power input to DC output. The adapter can be integrated into the notebook, but more often it’s a separate “brick” with two cords, one that plugs into the back of the laptop and another that plugs into a wall outlet. Figure 9-18 is a photo of the latter.
Figure 9-18: A laptop AC adapter
Another power accessory that is often used is a DC adapter, which allows a user to plug the laptop into the power source (usually a cigarette lighter) inside a car or on an airplane. These adapters allow people who travel frequently to use their laptops while on the road (literally).
Use caution when selecting a replacement AC adapter for your laptop. You should choose one rated for the same or higher wattage than the original. You must also pay special attention to the polarity of the plug that interfaces with the laptop. If the laptop requires the positive lead to be the center conductor, for instance, then you must take care not to reverse the polarity.
Regarding the input voltage of the adapter, care must also be taken to match the adapter to the power grid of the surrounding region. Some adapters have a fixed AC input requirement. Purchasing the wrong unit can result in lack of functionality or damage to the laptop. Other adapters are autoswitching, meaning they are able to automatically switch the input voltage they expect based on the voltage supplied by the wall outlet. These units are often labeled with voltage-input ranges, such as 100 to 240V, and frequency ranges, such as 50 to 60Hz, and are able to accommodate deployment in practically any country around the world. Nevertheless, you should still ascertain whether some sort of converter is required, even for autoswitching adapters.
Laptop Displays
The display system is the primary component in the top half of the clamshell case. (The wireless antenna often resides here too, and we’ll get to that in just a bit.) Much like all other laptop components, the display is more or less a smaller version of its desktop counterpart. What is unique to laptop displays, though, is that for some time, the technology used in them was actually more advanced than what was commonly used in desktops. This is due to liquid crystal display (LCD) technology.
Before LCD technology, computer displays used cathode-ray tube (CRT) technology (like old-school televisions) and were big, bulky, and hardly mobile. We talked about LCD standards and concepts (in addition to LED, OLED, and plasma) in Chapter 4, “Display Devices,” so there’s not really a need to dive into the technical specs again. Instead, we’ll focus here on the different components that are required to make these types of displays work.
Video Card
The video card in a laptop or desktop with an LCD monitor does the same thing a video card supporting a CRT monitor would do. It’s responsible for generating and managing the image sent to the screen. The big difference is that most LCD monitors are digital, meaning you need a video card that puts out a digital image. Laptop manufacturers put video cards that are compatible with the display in laptops, but with desktops it can get a bit confusing. Figure 9-19 shows an ABIT video card, with a digital video interface (DVI) port on the right and an analog (VGA) port on the left. The port in the middle is an S-video/composite video port.
The video card in Figure 9-19 is obviously for a desktop. Most laptop manufacturers choose to integrate the LCD circuitry on the motherboard to save space.
On the market, you can find digital-to-analog video converters if you need to plug in an older analog monitor to a digital video card.
Figure 9-19: Video card

Backlight
LCD displays do not produce light, so to generate brightness, LCD displays have a backlight. A backlight is a small fluorescent lamp placed behind, above, or to the side of an LCD display. The light from the lamp is diffused across the screen, producing brightness. The typical laptop display uses a cold cathode fluorescent lamp (CCFL) as its backlight. They’re generally about 8 inches long and slimmer than a pencil. Best of all, they generate little heat, which is always a good thing to avoid with laptops.
Inverter
The only problem with fluorescent lighting, and LCD backlights in particular, is that they require fairly high-voltage, high-frequency energy. Another component is needed to provide the right kind of energy, and that’s the inverter.
The inverter is a small circuit board installed behind the LCD panel that takes DC current and inverts it to AC for the backlight. If you are having problems with flickering screens or dimness, it’s more likely that the inverter is the problem and not the backlight itself.
There are two things to keep in mind if you are going to replace an inverter. One, they store and convert energy, so they have the potential to discharge that energy. To an inexperienced technician, they can be dangerous. Two, make sure the replacement inverter was made to work with the LCD backlight you have. If they weren’t made for each other, you might have problems with a dim screen or poor display quality.
Screen
The screen on a laptop does what you might expect—it produces the image that you see. The overall quality of the picture depends a lot on the quality of the screen and the technology your laptop uses. Current options include LCD, LED, OLED, and plasma.
WiFi Antenna
The vast majority of laptops produced today include built-in WiFi capabilities. Considering how popular wireless networking is today, it only makes sense to include 802.11 functionality without needing to use an expansion card. With laptops that include built-in WiFi, the wireless antenna is generally run up through the upper half of the clamshell case. This is to get the antenna higher up and improve signal reception. The wiring will run down the side of the display, through the hinge of the laptop case, and plug in somewhere on the motherboard.
The WiFi antenna won’t affect what you see on the screen, but if you start digging around in the display, know that you’ll likely be messing with your wireless capabilities as well.
Cable Locks
Portability defines what makes laptops truly useful. They’re not as fast or as strong as their desktop cousins, but the fact that we can easily haul them around wherever we go gives them a special status within our hearts. It also presents less-scrupulous types with ample opportunity to quickly make away with our prized possessions and personal data. Laptop theft is a major concern for companies and individual owners alike.
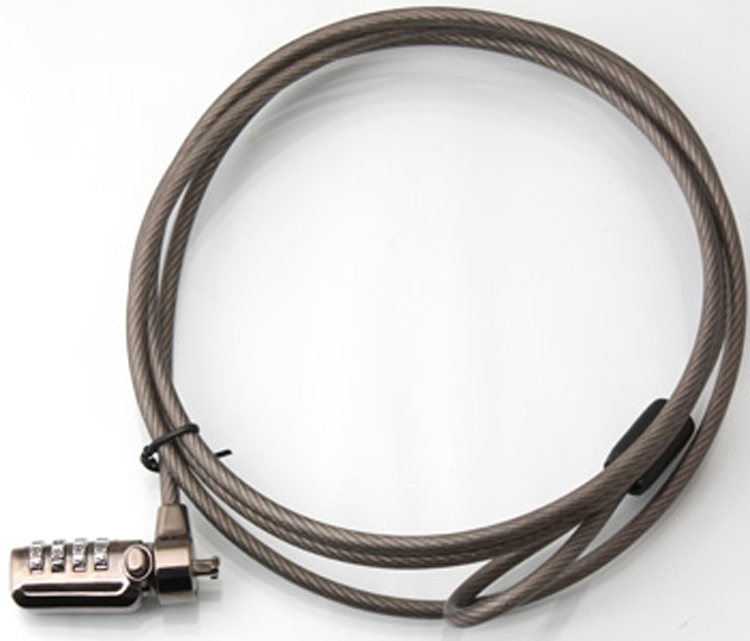
One way you can help physically secure your laptop is through the use of a cable lock. Essentially, a cable lock anchors your device to a physical structure, making it nearly impossible for someone to walk off with it. Figure 9-20 shows a cable lock with a number combination lock. With others, small keys are used to unlock the lock. If you grew up using a bicycle lock, these will look really familiar.
Figure 9-20: Cable lock
Here’s how it works. First, find a secure structure, such as the permanent metal supports of your workstation at work. Then, wrap the lock cord around the structure, putting the lock through the loop at the other end. Finally, secure the lock into your cable lock hole on the back or side of your laptop (Figure 9-21), and you’re secure. If you forget your combination or lose your key, you’re most likely going to have to cut through the cord, which will require a large cable cutter or a hack saw.
If someone wants your laptop bad enough, they can break the case and dislodge your lock. Having the lock in place will deter most people looking to make off with it though.
Figure 9-21: Cable lock insertion point
