
Installing and Configuring Printers
Odds are that if someone owns a computer they own a printer as well. If they don’t, they have easy access to a printer at a library, work, or some other place. Many retailers and computer manufacturers make it incredibly easy to buy a printer because they often bundle a printer with a computer system as an incentive to get you to buy.
The A+ 220-801 exam will test your knowledge of the procedures to install printers. We’re going to break this section into two parts: printer interface components and installing and sharing printers.
Printer Interface Components
A printer’s interface is the collection of hardware and software that allows the printer to communicate with a computer. The hardware interface is commonly called a port. Each printer has at least one interface, but some printers have several to make them more flexible in a multiplatform environment. If a printer has several interfaces, it can usually switch between them on the fly so that several computers can print at the same time.
An interface incorporates several components, including its interface type and the interface software. Each aspect must be matched on both the printer and the computer. For example, if you have an older HP LaserJet 4L, it only has a parallel port. Therefore, you must use a parallel cable as well as the correct software for the platform being used (for example, a Macintosh HP LaserJet 4L driver if you connect it to a Macintosh computer).
Interface Types
When we say interface types, we’re talking about the ports used in getting the printed information from the computer to the printer. There are two major classifications here: wired and wireless. Wired examples are serial, parallel, USB, and Ethernet. Wireless options include 802.11, Bluetooth, and infrared. You’ve learned about these connections in earlier chapters, but now you will learn how they apply to printers.
Serial
When computers send data serially, they send it 1 bit at a time, one after another. The bits stand in line like people at a movie theater, waiting to get in. Just as with modems, you must set the communication parameters (baud, parity, start and stop bits) on both entities—in this case, the computer and its printer(s)—before communication can take place.
Parallel
When a printer uses parallel communication, it is receiving data 8 bits at a time over eight separate wires (one for each bit). Parallel communication was the most popular way of communicating from computer to printer for many years, mainly because it’s faster than serial.
A parallel cable consists of a male DB25 connector that connects to the computer and a male 36-pin Centronics connector that connects to the printer. Most of the cables are less than 10´ long. Parallel cables should be IEEE 1284 compliant.
Universal Serial Bus (USB)
The most popular type of printer interface as this book is being written is the Universal Serial Bus (USB). In fact, it is the most popular interface for just about every peripheral. The convenience for printers is that it has a higher transfer rate than either serial or parallel and it automatically recognizes new devices. And of course, USB is very easy to physically connect.
Ethernet
Many printers sold today have a wired Ethernet interface that allows them to be hooked directly to an Ethernet cable. These printers have an internal network interface card (NIC) and ROM-based software that allow them to communicate on the network with servers and workstations.
As with any other networking device, the type of network interface used on the printer depends on the type of network to which the printer is being attached. It’s likely that the only connection type you will run into is RJ-45 for an Ethernet connection.
Wireless
The latest boom in printer interface technology is wireless. Clearly, people love their WiFi because it enables them to roam around an office and still remain connected to one another and to their network. It logically follows that someone came up with the brilliant idea that it would be nice if printers could be that mobile as well—after all, many are on carts with wheels. Some printers have built-in WiFi interfaces, while others can accept wireless network cards.
The wireless technology that is especially popular among peripheral manufacturers is Bluetooth. Bluetooth is a short-range wireless technology; most devices are specified to work within 10 meters (33 feet). Printers such as the HP Officejet 100 mobile printer have Bluetooth capability.
When printing with a Bluetooth-enabled device (like a PDA or cell phone) and a Bluetooth-enabled printer, all you need to do is get within range of the device (that is, move closer), select the print driver from the device, and choose Print. The information is transmitted wirelessly through the air using radio waves and is received by the device.
Infrared
With the explosion of personal digital assistants (PDAs) and other handheld devices, the need grew for printing under the constraints they provide. The biggest hurdle faced by handheld device owners who need to print is the lack of any kind of universal interface. Most interfaces are too big and bulky to be used on handheld computers such as PDAs. The solution was to incorporate the standardized technology used on some remote controls: infrared transmissions. Infrared transmissions are simply wireless transmissions that use radiation in the infrared range of the electromagnetic spectrum. Some laser printers come with infrared transmitter/receivers (transceivers) so that they can communicate with the infrared ports on handhelds. This allows the user of a PDA, handheld, or laptop to print to that printer by pointing the device at the printer and initiating the print process.
As far as configuring the interface is concerned, very little needs to be done. The infrared interfaces are generally enabled by default on the computers, handhelds, and printers equipped with them. The only additional item that must be configured is the print driver on the PDA, handheld, or computer. The driver must be the correct one for the printer to which you are printing. In order to make infrared work, you need clear line of sight between the two devices and the devices need to be within about 3 feet of each other.
Interface Software
Now that we’ve looked at the ways you can connect your printer, it’s time to face a grim reality: Computers and printers don’t know how to talk to each other. They need help. That help comes in the form of interface software used to translate software commands into commands the printer can understand.
There are two major components of interface software: the page-description language and the driver software. The page-description language (PDL) determines how efficient the printer is at converting the information to be printed into signals the printer can understand. The driver software understands and controls the printer. It is very important that you use the correct interface software for your printer. If you use either the wrong page-description language or the wrong driver software, the printer will print garbage—or possibly nothing at all.
Page-Description Languages
A page-description language works just as its name implies: It describes the whole page being printed by sending commands that describe the text as well as the margins and other settings. The controller in the printer interprets these commands and turns them into laser pulses (or pin strikes). There are several printer communication languages in existence, but the three most common ones are PostScript, Printer Command Language (PCL), and Graphics Device Interface (GDI).
The first page-description language was PostScript. Developed by Adobe, it was first used in the Apple LaserWriter printer. It made printing graphics fast and simple. Here’s how PostScript works: The PostScript printer driver describes the page in terms of “draw” and “position” commands. The page is divided into a very fine grid (as fine as the resolution of the printer). When you want to print a square, a communication like the following takes place:
POSITION 1,42%DRAW 10%POSITION 1,64%DRAW10D% . . .These commands tell the printer to draw a line on the page from line 42 to line 64 (vertically). In other words, a page-description language tells the printer to draw a line on the page, gives it the starting and ending points, and that’s that. Rather than send the printer the location of each and every dot in the line and an instruction at each and every location to print that location’s individual dot, PostScript can get the line drawn with fewer than five instructions. As you can see, PostScript uses commands that are more or less in English. The commands are interpreted by the processor on the printer’s controller and converted into the print-control signals.
PCL was developed by Hewlett-Packard in 1984 and originally intended for use with inkjet printers as a competitor to PostScript. Since then, its role has been expanded to virtually every printer type, and it’s a de facto industry standard.
GDI is actually a Windows component and is not specific to printers. Instead, it’s a series of components that govern how images are presented to both monitors and printers. GDI printers work by using computer processing power instead of their own. The printed image is rendered to a bitmap on the computer and then sent to the printer. This means that the printer hardware doesn’t need to be as powerful, which results in a less expensive printer. Generally speaking, the least expensive laser printers on the market are GDI printers.
The main advantage of page-description languages is that they move some of the processing from the computer to the printer. With text-only documents, they offer little benefit. However, with documents that have large amounts of graphics or that use numerous fonts, page-description languages make the processing of those print jobs happen much faster. This makes them an ideal choice for laser printers, although nearly every type of printer uses them.

Driver Software
The driver software controls how the printer processes the print job. When you install a printer driver for the printer you are using, it allows the computer to print to that printer correctly (assuming you have the correct interface configured between the computer and printer).
When you need to print, you select the printer driver for your printer from a preconfigured list. The driver you select has been configured for the type, brand, and model of printer as well as the computer port to which it is connected. You can also select which paper tray the printer should use as well as any other features the printer has (if applicable). Also, each printer driver is configured to use a particular page-description language.
Installing and Sharing Printers
Although every device is different, there are certain accepted methods used for installing any device. The following procedure works for installing many kinds of devices:
Step 1: Attach the Device Using a Local or Network Port and Connect Power
When installing a printer, you must first take the device out of its packaging and set it up on a flat, stable surface. Then, with it powered off, connect the device to either the host computer (if it is a local printer device) or to the network (if it is a network device).
Once you have connected the device, connect power to it using whatever supplied power adapter comes with it. Some devices have their own built-in power supply and just need an AC power cord connecting the device to the wall outlet, while others rely on an external transformer and power supply. Finally, turn on the device.
Step 2: Install and Update the Device Driver and Calibrate the Device
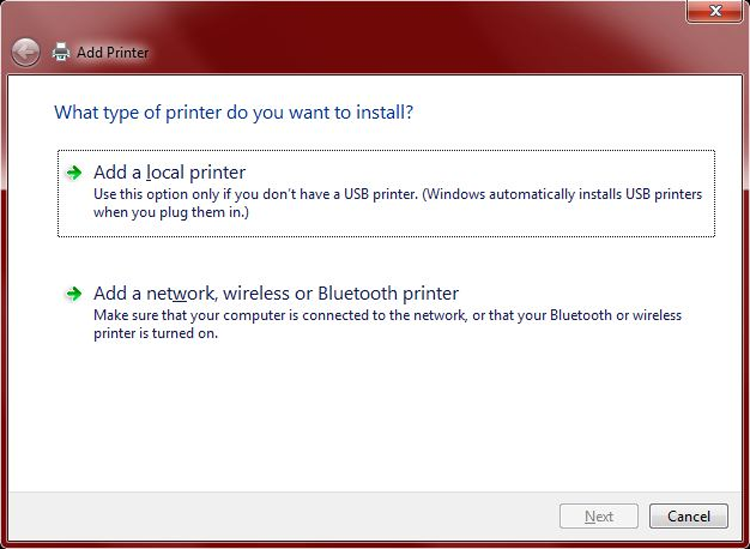
Once you have connected and powered up the device, boot up the computer and wait for Windows to recognize the device. Windows will pop up a screen similar to the one shown in Figure 10-22. This wizard will allow you to configure the driver for the printer (depending on the device). You can insert the driver CD or DVD that comes with the device and the wizard will guide you through the device driver installation. If Windows fails to recognize the device, you can use the Add a Printer (in Windows 7) or the Add Printer Wizard (in older Windows versions) to troubleshoot the installation and to install the device drivers.
Figure 10-22: Adding a printer in Windows 7
Once the driver is installed, the device will function. But some devices, such as inkjet printers, must be calibrated. Calibration is the process by which a device is brought within functional specifications. For example, inkjet printers need their print heads aligned so they print evenly and don’t print funny-looking letters and unevenly spaced lines. The process is part of the installation of all inkjet printers.
Each manufacturer’s process is different, but a typical alignment/calibration works like this:
Step 3: Configure Options and Settings
Once you have installed the software and calibrated the device, you can configure any options you would like for the printer. All of the settings and how to change them can be found online or in your user manual.
Where you configure specific printer properties depends a lot on the printer itself. As a rule of thumb, you’re looking for the Printer Properties or Printing Preferences applet. In Windows 7, if you click Start and then Devices And Printers, you will get a window similar to the one shown in Figure 10-23. At the top there is an option to add a device or a printer. If you double-click the printer icon, you will get another window (like the one in Figure 10-24) that lets you get to the printer’s configuration options.
Figure 10-23: Devices And Printers
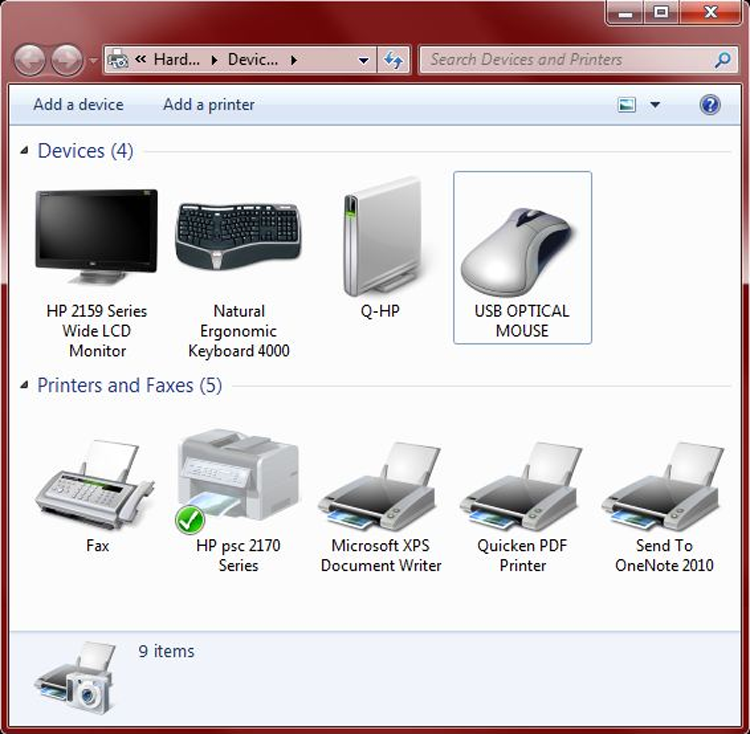
Figure 10-24: Printer information and options
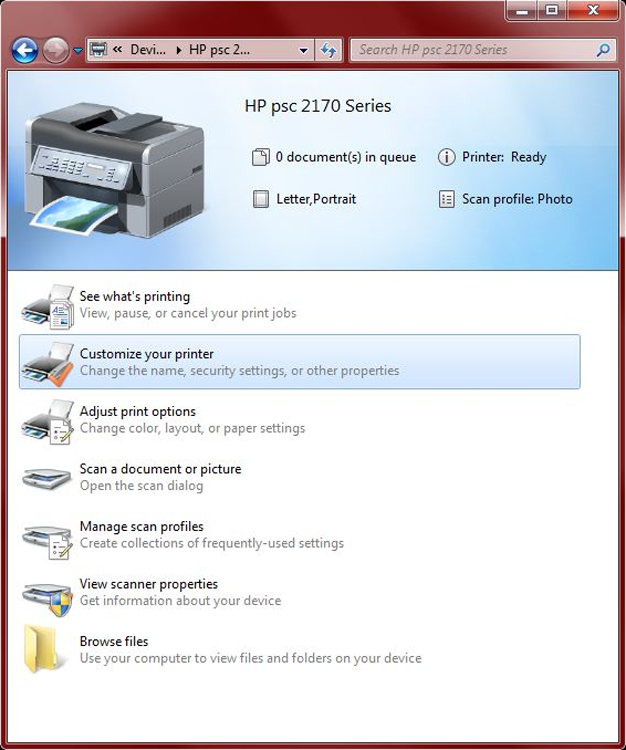
Various configuration features can be set from each menu option. The first two options in this example are the ones you would probably be the most interested in. The first one, See What’s Printing, lets you look at and manage the print queue. This is something we’ll talk more about in Chapter 20. The second one, Customize Your Printer, is where you find the printer’s properties, shown in Figure 10-25.
From this dialog box, you can configure nearly any option you want to for your printer. The Properties dialog box will be pretty much the same for any printer you install, and we’ll cover a few options here in a minute. First though, notice the Preferences button on the General tab. Clicking this will produce a new window like the one in Figure 10-26. That window will have configuration options based on the specific model of printer you’re working with.
Now back to the Properties dialog box. The printer’s Properties dialog box is less about how the printer does its job and more about how people can access the printer. From the Properties dialog box, you can share the printer, set up the port that it’s on, configure when the printer will be available throughout the day, and specify who can use it. Let’s take a look at a few key tabs. We’ve already taken a look at the General tab, which has the Preferences button as well as the all-important Print Test Page button. It’s handy for troubleshooting!
Figure 10-25: Printer Properties dialog box
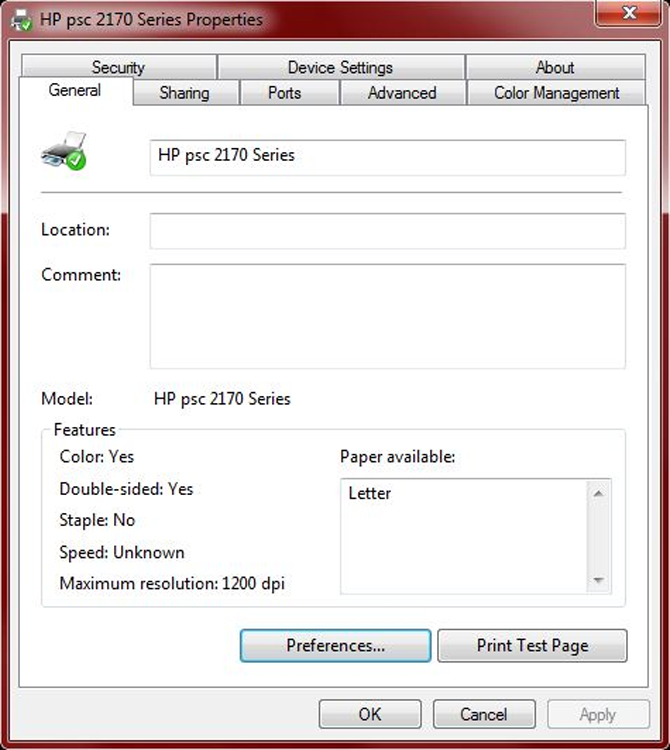
Figure 10-26: Printing Preferences window
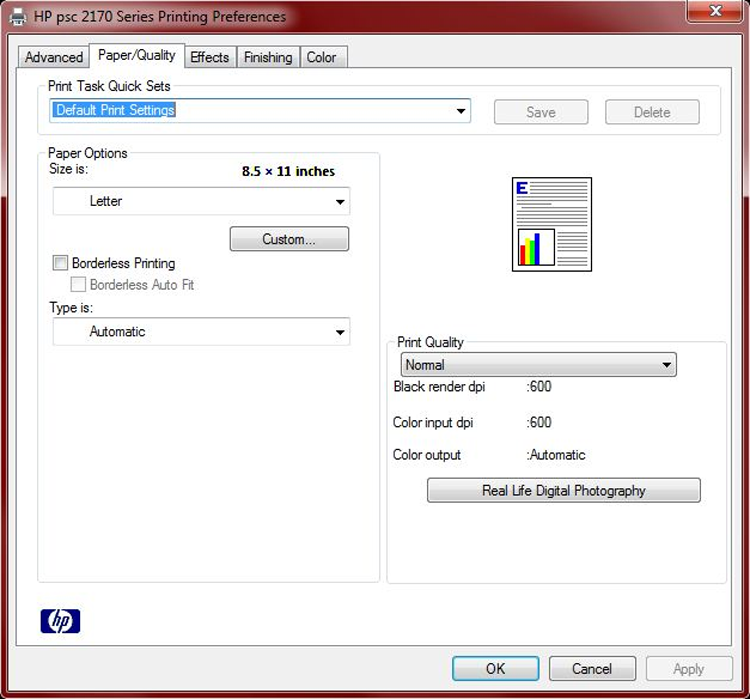
Figure 10-27 shows the Sharing tab. If you want other users to be able to print to this printer, you need to share it. Notice the warnings above the Share This Printer check box. Those are important to remember. When you share the printer, you give it a share name. Network users can map the printer through their own Add Printer Wizard (choosing a networked printer) and by using the standard \computer_nameshare_name convention. User permissions are managed through the Security tab.
Figure 10-27: Printer Properties Sharing tab
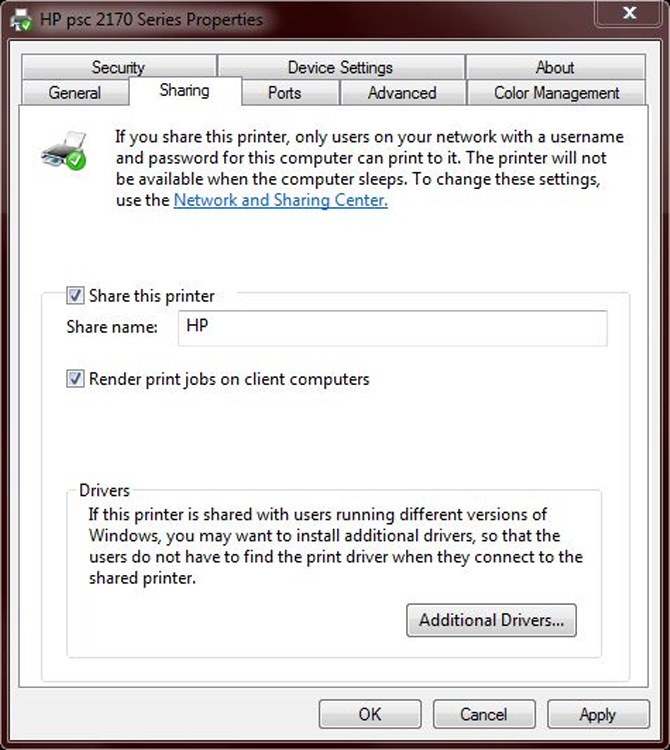
One other important feature to call out on this tab is the Additional Drivers button. This one provides a description that is fairly self-explanatory.
Figure 10-28 shows the Ports tab. Here you can configure your printer port and add and delete ports. There’s also a check box here to enable printer pooling. This would be used if you have multiple physical printers that operate under the same printer name.
Figure 10-29 shows the important Advanced tab of the printer Properties dialog box. On this tab, you can configure the printer to be available during only certain hours of the day. This might be useful if you’re trying to curtail after-hours printing of non-work-related documents, for example. You can also configure the spool settings. For faster printing, you should always spool the jobs instead of printing directly to the printer. However, if the printer is printing garbage, you can try printing directly to it to see if the spooler is causing the problem.
Figure 10-28: Printer Properties Ports tab

Figure 10-29: Printer Properties Advanced tab
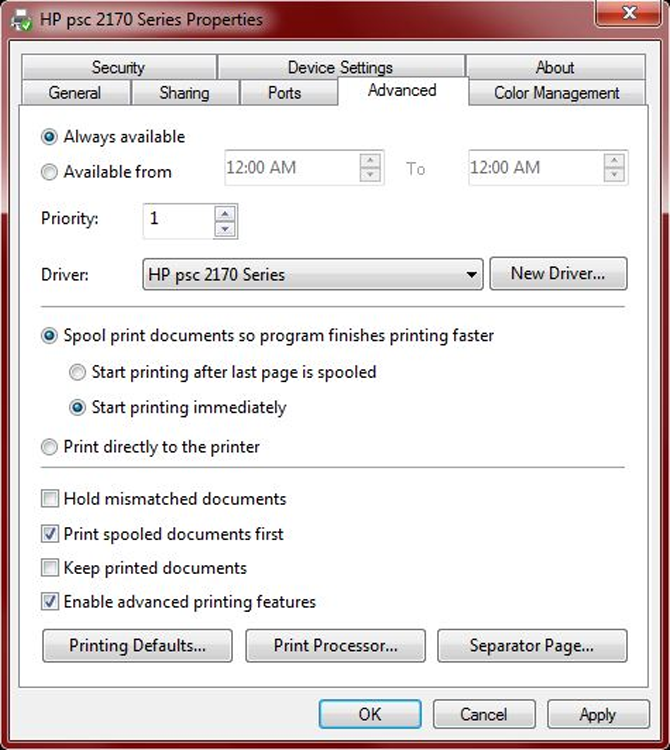
Regarding the check boxes at the bottom, you will want to always print spooled documents first because that speeds up the printing process. If you need to maintain an electronic copy of all printed files, check the Keep Printed Documents check box. Keep in mind that this will eat up a lot of hard disk space.
Finally, the Printing Defaults button takes you to the Printing Preferences window (shown earlier in Figure 10-26). Print Processor lets you select alternate methods of processing print jobs (not usually needed), and Separator Page lets you specify a file to use as a separator page (a document that prints out at the beginning of each separate print job, usually with the user’s name on it), which can be useful if you have several (or several dozen) users sharing one printer.
Step 4: Print a Test Page
Once you have configured your printer, you are finished and can print a test page to test its output. Windows has a built-in function for doing just that. To print a test page, right-click the icon for the printer you installed from within the Devices And Printers window and click Printer properties. On the General tab of the Printer properties (shown in Figure 10-25), there will be a Print Test Page button. Click that button and Windows will send a test page to the printer. If the page prints, your printer is working. If not, double-check all of your connections. If they appear to be in order, then read ahead to Chapter 20 for troubleshooting tips.
Step 5: Verify Compatibility with Operating System and Applications
Once your printer is installed and you have tried out a test page, everything else should work well, right? That’s usually true, but it’s good practice to verify compatibility with applications before you consider the device fully installed.
With printers, this process is rather straightforward. Open the application you wonder about and print something. For example, open up Microsoft Word, type in some gibberish (or open a real document if you want), and print it out. If you are running non-Microsoft applications (such as a computer-aided drafting program or accounting software) and have questions about their compatibility with the printer, try printing from those programs as well.
Step 6: Educate Users About Basic Functionality
Most users today know how to print, but not everyone knows how to install the right printer or print efficiently. This can be a significant issue in work environments.
Say your workplace has 10 different printers, and you just installed number 11. First, your company should use a naming process to identify the printers in a way that makes sense. Calling a printer HPLJ4 on a network does little to help users understand where that printer is in the building. After installing the printer, offer installation assistance to those who might want to use the device. Show users how to install the printer in Windows (or if printer installation is automated, let them know they have a new printer and where it is). Also let the users know the various options available on that printer. Can it print double-sided? If so, you can save a lot of paper. Show users how to configure that. Is it a color printer? Do users really need color for rough drafts of documents or presentations? Show users how to print in black and white on a color printer to save the expensive color ink or toner cartridges.
In Exercise 10.2 we’ll step through the process of installing a USB printer in Windows 7; the process will work in Windows XP or Vista as well.
- A USB printer
- A USB printer cable
- The software driver CD or DVD that came with the printer
- A computer with a free USB port and a CD-ROM drive