BECAUSE Microsoft Project 2010 is such a specialized application, many of the people you work with on a project might not have it. And even if they have installed it, they might not know how to use it.
But no matter. You can easily exchange data in Project 2010 with other applications.
For example, you might want to provide data from your project plan to a stakeholder who doesn’t have access to Project 2010 but does have another compatible application, such as Microsoft Excel 2010 or Microsoft Word 2010.
You might want to send project data to a spreadsheet or database application to manipulate the information in ways in which those applications are especially suited.
In the same way, you can easily bring information into Project 2010 from other applications. If someone has a list of tasks or resources along with associated information that you need in your project plan, copying or importing this information can save you from rekeying the data.
Clearly, the ability to exchange information between applications can save you and other project stakeholders an immense amount of time and effort. More importantly, it also can give you the opportunity to shape data to best present project information for specific purposes.
Several techniques are available for exchanging information between applications. The method you use depends on what you’re trying to accomplish with the information. Table 17-1 provides some basic guidelines.
Note
When referring to the exchange of data between applications, the term source is used to refer to the originating application. The term destination is used to refer to the receiving, or target, application.
Table 17-1. Appropriate Methods for Information Exchange
Use this method | |
|---|---|
Copy static text or numbers between Project 2010 and another application. The information usually appears as though it were created in the destination application. | Copy |
Copy pictures from Project 2010 to another application. | Copy Picture |
Add data along with its source application to another program. When you double-click the embedded information, the source application opens, and you can work with it interactively there. | Embed |
Create a dynamic connection between the information in the source and destination applications. When the information is updated in one, it’s updated in the other, as well. | Link |
Reference a file at its source, whether it’s a website or file location. Clicking the hyperlink finds and launches the website or the document in its native application. | Hyperlink |
Bring information into Project 2010 from another application or in another file format, making the information appear as though it were created in Project 2010 to begin with. Similar to copying, but this method is typically used with entire files or large chunks of data. | Import or Open |
Convert Project 2010 information into a file format that can be used by another application, making the information appear as though it were created in that other application to begin with. Has a similar result as copying, but this method is typically used for entire files or large chunks of data. | Export or Save As |
Save Project 2010 information as a PDF file to make it easily readable in Adobe Reader on any computer. Note that Adobe Acrobat does not need to be installed on the computer for the project file to be saved as a PDF file. | Save Project 2010 data as a PDF file |
Convert Project 2010 information into XML format for use on web pages or in any other application that reads or is based on XML. | Save Project 2010 data as an XML file |
It’s important to keep in mind that some methods of exchanging data move the data and then freeze it, which means that the information transferred cannot be altered after the exchange. Other methods move the data into the other application and allow it to be dynamically updated and manipulated.
Note
Project 2010 has particularly robust methods for exchanging information with Excel 2010, Microsoft Visio 2010, and Microsoft Outlook 2010.
Note
These methods are covered in their own chapters: Chapter 18; Chapter 19; and Chapter 20.
You can copy textual as well as graphical data between Project 2010 and other applications. With one method, you simply use the Copy and Paste commands. With another method, you use a wizard.
You can copy field information, such as from a task sheet or resource sheet, to another application, such as Microsoft Access 2010 or Word 2010. When you need a subset of project information in another application, the best transfer method is usually to copy and paste. To copy and paste data from Project 2010 to another application, follow these steps:
In Project 2010, display the view and table that contains the information you want to copy. If necessary, insert other columns of information by right-clicking a column and then clicking Insert Column.
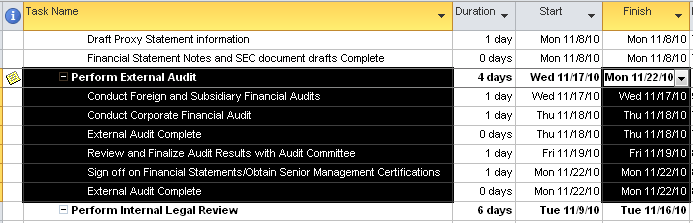
Select the data you want to copy to the other application. (See Figure 17-1.) You can drag across adjacent items (columns, rows, or fields) or hold down Ctrl while clicking nonadjacent items.
On the Task tab, in the Clipboard group, click Copy.
A copy of the selected data is placed on the Clipboard.
Open the application into which you want to paste the project information. Select the area where you want the data to start being inserted.
In the destination application, click the application’s Paste command.
For example, if you are pasting into a Microsoft Office application, on the Home tab, in the Clipboard group, click Paste.
Your copied data is inserted at the selection.
If the workspace of the destination application is laid out in columns and rows like Project 2010 tables, as is the case with spreadsheet applications, the pasted project information flows easily into columns and rows. However, if the workspace is open, like a blank page, the incoming project information is likely to run together and look like a bit of a mess. The information is tab-delimited, so if you’re pasting into a word-processing program, the program might have a function to convert text to tables, which can make life easier for you.
But if you’re pasting the Project table data into an Office application, everything is so much easier. In Project 2010, if you copy Project table data to an Excel spreadsheet, the column headings are automatically pasted as well, even if you don’t select and copy them. This means you no longer need to worry about leaving space for those headings, you don’t need to add them yourself, and there’s no guesswork about what those columns are.
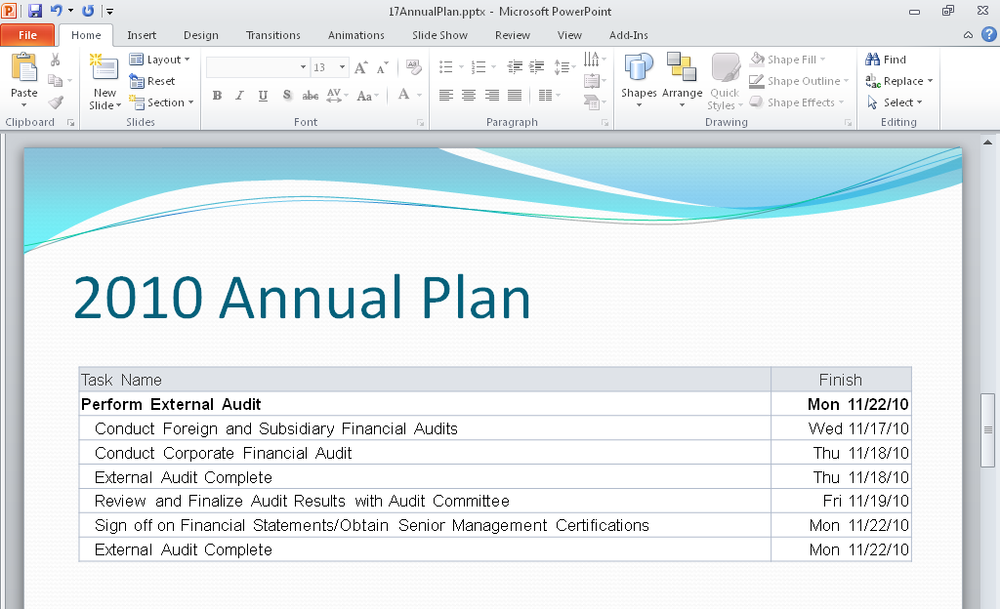
Even better, if you paste Project 2010 table data into Microsoft Word or Microsoft Outlook, it’s automatically pasted as a table, including the table headings. This is a big improvement over previous versions of Microsoft Project, where the data came in as jumbled tab-delimited text, and you had to convert the text to a table or reformat it by hand.
In addition to automatically pasting the column headings, pasting Project 2010 table data into another Office application retains formatting and outline levels. (See Figure 17-2.)
You can copy table-based or listed information from another application—for example, Access 2010 or Word—and insert it into Project 2010. You select and copy the source data, select the cell in Project 2010 where you want the data to start being inserted, and then paste the data. This is a good way to get project-related information that was created by others in another application into your Project 2010 file. For example, suppose that you asked your manufacturing manager to put together a detailed task list of the process that will be used to manufacture your new product. He completes the list, including tasks and resource assignments, using Access.
If you are copying multiple columns or tabs of information, you do need to be mindful of the order in which data is being pasted and inserted into the project table. The type of data you’re pasting must match the field type in which the data is being pasted or you’ll get a series of error messages.
For example, if you copy a column of text and try to paste it in the Task Mode or Predecessors column, you’ll get an error message because those fields do not accept text content. But if you paste it into the Task Name or Resource Names column, either of which accepts text, it’ll work just fine.
As a more complex yet realistic example, imagine you need to copy several columns from another application into Project 2010, such as task names, finish dates, and resource names. To make sure the fields match when you paste the data, you can set up the source information in the proper order (with blank columns in between as necessary) or rearrange columns in a Project 2010 table.
To copy table or list information from another application to Project 2010, follow these steps:
Open the source application and file.
Select the rows or columns you want to copy, and then click the application’s Copy command.
If you are copying data in an Office application, on the Home tab, in the Clipboard group, click Copy.
In Project 2010, open the project plan in which you want to insert the copied information.
Apply the view and table that represent the closest match to the types of information you are pasting.
If you need to add any columns to match the incoming information, click the column to the right of where you want to insert the new field. On the Format menu, in the Columns group, click Insert Column. In the list of fields that appears, click the name of the field you want.
Click the cell in which you want to begin pasting the incoming information.
On the Task tab, in the Clipboard group, click Paste.
The copied information is pasted into the columns you prepared.
Pasting data into Project 2010 overwrites data in the destination cells. If this is not your intention, insert the appropriate number of empty rows in the sheet before selecting the Paste command.
By default, new tasks inserted are considered manually scheduled tasks. If you changed the default so that new tasks are automatically scheduled, or if you insert information that affects existing automatically scheduled tasks, other project data might be automatically populated and calculated. Review the change highlighting in fields on the current and other tables to be sure the changes are appropriate and make any necessary adjustments.
Note
Any information that can be moved to the Clipboard by using a Copy command can be pasted into Project 2010, but not all views accept all types of data. For example, you can paste objects such as pictures only into the chart area of the Gantt Chart or a task or resource note. Nothing can be pasted into the Network Diagram.
Troubleshooting: Data doesn’t paste into the destination file correctly
When you use the Copy and Paste commands to exchange data, it’s important to remember that fields and columns of data stay in the order and format of their source file. Before you paste data from another application into your project file, set up the columns in the source file in the order of the corresponding columns in your project file.
Also be careful that data formats, particularly numbers and dates, are the same in the source file as in your project file. If you want to copy and paste data from another application into a project file that has no project field equivalent, insert columns of generic custom fields (for example, Text1 or Number1) to hold the new data. These extra columns must match the column order in the source file. The matching of compatible columns is called manual data mapping and must take place before you select the Paste command. If you paste incompatible data into Project 2010 fields, an error message alerts you that a mismatch has occurred.
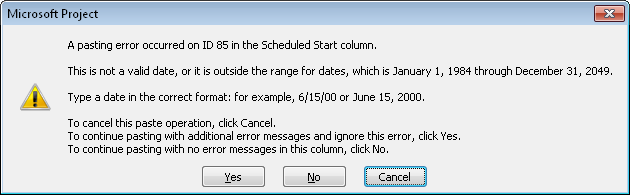
You’ll see a separate pasting error for every mismatched field in the paste operation.
Note
For information about copying information from Excel to Project 2010, see Copying Information from Excel.
Note
For information about copying a graphic such as a logo into the Gantt Chart, see Inserting a Graphic or Other Object in the Gantt Chart.
Suppose you’re creating a formal narrative project status report or preparing a presentation for a high-profile project status meeting. You can take a snapshot of any Project 2010 view and paste it as a graphic into a Word document or a Microsoft PowerPoint presentation slide. You can also copy the project Timeline as a graphic and paste it into another application.
Note
Previous versions of Microsoft Project included the Copy Picture To Office Wizard, which was used to configure and copy information from a Microsoft Project view and paste it into Word, PowerPoint, or Microsoft Visio. Because of the enhanced capabilities of copying and pasting from Project 2010 to Office applications, this wizard is discontinued.
To capture a view and use it as a graphic in an application such as Word, PowerPoint, or Visio, you can use the Copy Picture function. With this function, you take a snapshot of the current view that you can send in an e-mail message, print, or paste into any application you choose. Copying a picture of a view is a good way to create a simple picture of a view to use on a website or in a report. When configuring the picture, Project 2010 provides choices for the image rendering, the rows to be copied, and the timescale as appropriate to the current view.
Note
Project 2010 creates a GIF image as the output of the Copy Picture function. If you need a different graphics format, you can use any graphics processing software, such as Microsoft Paint, to convert the image.
To copy and paste a picture of a Project 2010 view for use in another application, follow these steps:
In your project plan, display the view you want to copy to the other application.
Manipulate the view to show the information the way you want it to appear in the destination application.
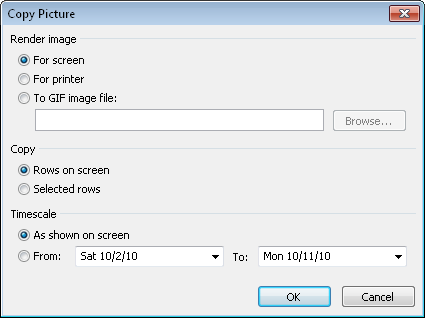
On the Task tab, in the Clipboard group, click the arrow next to Copy, and then click Copy Picture.
In the Copy Picture dialog box, shown in Figure 17-3, select the options you want.
In the Render Image section, clicking the For Screen (the default) or For Printer option is similar to pressing the Print Screen key on your keyboard. The view is saved on the Clipboard. When you go to the application where you want to use the image and choose the Paste command, the image appears there, optimized for viewing on the screen or for printing, depending on your choice.
If you want to save the image as a file rather than paste it as a separate file, click the To GIF Image File option, and then click the Browse button to specify the new file’s location and name.
In the Copy section, click the Rows On Screen option (the default) if you want the rows currently showing on the screen to be included in the image. Click the Selected Rows option if only selected rows should be included.
In the Timescale section, click the As Shown On Screen option (the default) if you want the timescale to be represented as set in the current view. Click the From and To option and enter dates in the boxes if you want to specify the timescale and date range to be included in the image.
When you finish setting the Copy Picture options, click OK.
Open the destination application, and click the location where you want to paste the object.
Select the application’s Paste command.
If you are pasting into an Office application, on the Home tab, in the Clipboard group, click Paste.
A static picture of the Project 2010 view as you set it up and specified is pasted into the destination application. If necessary, you can resize the image by dragging any of the edges.
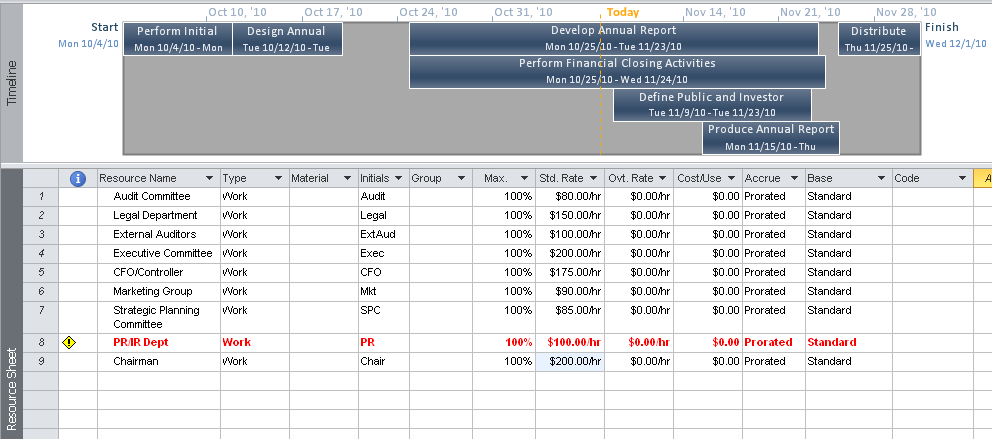
Like the Gantt Chart, Network Diagram, and Calendar views, the Timeline view is another way to look at the tasks in your project in a graphical way. The great advantage of the Timeline is that you can select which tasks to include in the Timeline, making it easy for you to control the content and present the most relevant information for your audience.
The Timeline was designed for sharing task information with others involved with the project who don’t need the nitty-gritty details contained in the Gantt Chart and other views. Because of this, the Timeline is a prime candidate for copying and pasting into other applications like your e-mail client, PowerPoint, or Visio.
To copy the Timeline for use in another application, follow these steps:
In your project plan, be sure the Timeline is showing.
By default, the Timeline appears above every view. (See Figure 17-4.) If the Timeline is not showing, on the View tab, in the Split View group, select the Timeline check box.
Make any adjustments to the Timeline to reflect what you want to show when you copy it.
Note
For more information about working with the Timeline, see Highlighting Tasks with the Timeline.
Click anywhere in the Timeline pane, and then on the Format tab, in the Copy group, click Copy Timeline.
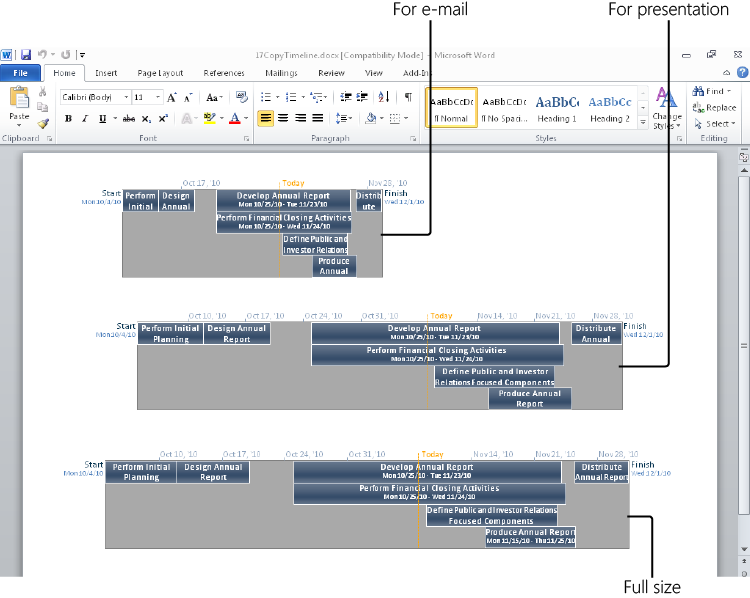
In the drop-down menu that appears, click For E-mail, For Presentation, or Full Size.
Nothing appears to happen, although the view is saved on the Clipboard. These commands are similar to pressing the Print Screen key on your keyboard. The e-mail version is small, the presentation version is medium, and full size is large.
Go to the application where you want to use the image, click the location where you want the image to appear, and then choose the Paste command.
If you’re pasting the Timeline into an Office application, on the Home tab, in the Clipboard group, click Paste.
The image is pasted into the document as a static picture, as shown in Figure 17-5.
Figure 17-5. Selecting the e-mail, presentation, or full-size version specifies the size at which the Timeline should be copied.
If needed, you can resize the image by dragging any of the handles around the edges. A rotate handle appears at the top center of the image.