
With your user account set up and Project Professional connected successfully to the project server, you are ready to get down to business and start creating enterprise projects.
You can create your enterprise projects from within Project Web App or Project Professional. Although there are some differences, many of the basic project management features are available in both places.
You can save a new project to the project server or import an existing local project. Either way, your new enterprise project is associated with the enterprise global template, which sets the project management standards for your organization and the project workflow.
You manage your enterprise project files in specific ways. You check out a project from the project server, work on it, and then check it back in. You can save your project to the project server as often as you like and publish the project only when you are ready to make the information available to assigned resources and other Project Web App users.
Demand Management Helps Evaluate New Projects
Even after you add your project to the project server, you might not be able to start planning the project. Project Server 2010 integrates capabilities for demand management and portfolio management. Demand management is the process of gathering and managing all project proposals, from when a proposal is initiated until a project is closed. Demand management is used to capture organizational demands and give the portfolio manager and executives the option to implement only those projects that bring the most value to the organization in a structured process.
Typically, the portfolio manager defines the approval process that a certain type of project must go through to receive the permission to start. This process is referred to as the project workflow, also known as the project life cycle.
Note
For more information about how project managers work with workflows, see Following a Project Workflow. For more information about how demand management is implemented through Project Server 2010, see Designing Your Demand Management System.
Talk with your portfolio manager to get more information about the project workflows and demand management details being implemented in your organization.
After your enterprise projects are published on the project server and the project has received all the necessary approvals, you can carry out your day-to-day project management tasks. With the project checked out, you can add new tasks, modify existing tasks, work with resources, update progress-tracking information, review and add information in custom enterprise fields, generate reports, and more.
You can choose one of two methods for creating an enterprise project. One way is to start a new project plan in Project Professional or Project Web App, being sure you are connected to the project server, and then save the project plan to the project server. The other way is to open an existing local project and import it to the project server.
As soon as the project is saved to the project server, the enterprise global template is applied to the project, and accordingly, enterprise standards apply.
To create a new enterprise project and save it to the project server using Project Professional, follow these steps:
Start Project Professional 2010 and connect to the project server.
On the File tab, click New.
In the Backstage view that appears, click Blank Project or click the name of the existing project or template you want to use as the basis for the new project, and then click the Create button in the right pane.
Enter tasks or adapt information for your new project.
Note
For more information about creating a project, see Creating a Project File.
On the File tab, click Save As.
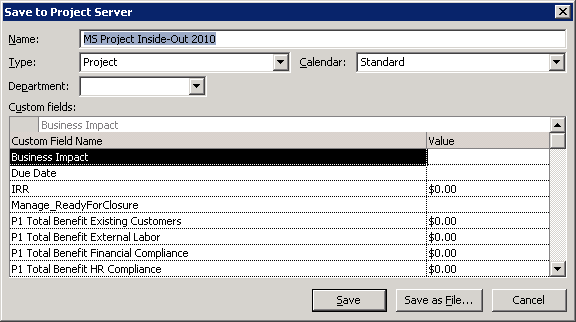
The Save To Project Server dialog box appears. (See Figure 24-10.)
In the Name box, type the project file name.
In the Calendar box, specify the base calendar being used as the project calendar.
This project calendar is the one specified in the Project Information dialog box.
In the Department box, select the department this project pertains to, if applicable.
Enter the value for any of the custom enterprise project fields listed in the Custom Fields table.
These fields have been created for your organization to establish standards and points of comparison among multiple projects.
Your new project is saved as an enterprise project on the project server.
When you close the new enterprise project, a message asks whether you want to check the project into the project server.
When you check the project in, you are publishing it. Click Yes to check the project in (publish it on the project server). Click No to keep the project checked out to you (others cannot see or modify the project).
You can publish projects on the project server from Project Professional by clicking File, Publish.
Note
Learn more details about checking project files in and out in Managing Your Files on the Project Server.
To create a new project and save it to the project server by using Project Web App, follow these steps:
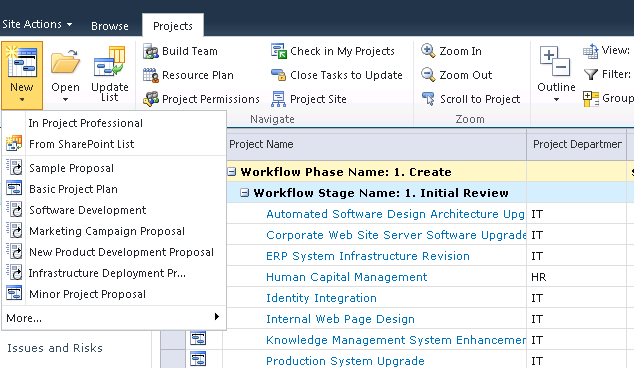
On the Quick Launch, under Projects, click Project Center.
The Project Center appears, showing the list of all enterprise projects.
On the Projects tab, in the Project group, click New, and then select the project template (also known as enterprise project type) you want to use to create the new project. (See Figure 24-11.)
You can also open Project Professional or add a project from a SharePoint list to create the project by selecting one of those commands on the New drop-down menu.
Note
Each project template is associated with a workflow of project phases and approvals. Depending on the project template you select, you manage different checkpoints throughout the project life cycle.
Note
For more information, see Following a Project Workflow.
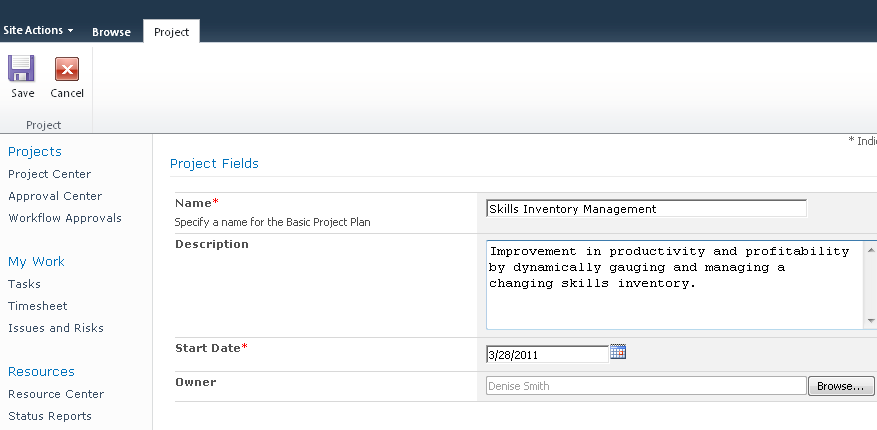
After selecting the project template, enter project information on the project detail page that appears, as shown in Figure 24-12. The information includes details such as the project name, description, and start date.
On the Project tab, in the Project group, click Save.
The new project is created and saved, and then the Schedule project detail page appears. In this page, you can start entering task names and other task information. Many of the project plan controls in the Schedule project detail page are similar to those in Project Professional.
Note
For more information about creating a project, see Creating a Project File. For more information about entering project information, see Chapter 5, and Chapter 6.
Whenever you save an enterprise project, changes are saved to the project server. Until you give the command to publish the project, it is considered a working draft, and no one but you can see it or work with it. You can build your draft project by using the enterprise global template and the enterprise resource pool, but it is all your own business and no one else’s yet. The project is listed in the Project Center, but it does not have any details.
To create a working draft version of a project, simply click the File tab, and then Save to save it to the project server in Project Professional.
When your project is ready for public consumption and analysis by the rest of your organization, it is ready to be published to the project server.
As soon as you publish a new project, it is listed in Project Center. Any task assignments are made available to the assigned resources. By default, a web-based SharePoint workspace is created to view the details of the newly published project.
To publish a project for the first time from Project Professional, follow these steps:
Be sure that Project Professional is connected to the project server.
On the File tab, click Save to save the project to the project server.
On the File tab, click Publish.
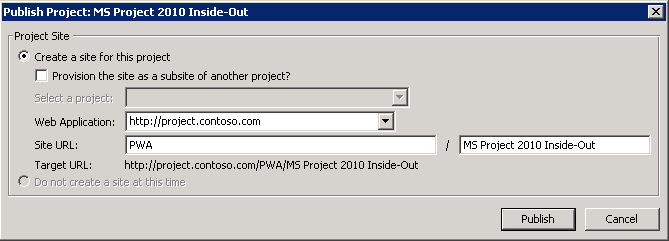
Review the Publish Project dialog box to be sure that all the specifications are as they should be. (See Figure 24-13.)
The project is now published to the project server and is available to other Project Web App users. If you switch over to Project Web App, you’ll see that your published project is now listed in the Project Center.
After you first publish your project to the project server, other users do not automatically see any further changes you make. You always have a choice about whether any new changes are published to the project server. To publish recent changes on an already-published project, click File, Publish. The latest version of your project is made available to others who need to view details about your project in Project Web App.
To publish your project while working in Project Web App, follow these steps.
On the Quick Launch, under Projects, click Project Center.
Click the name of the project.
The project detail page for the project appears.
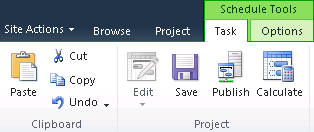
On the Task tab, in the Project group, click Publish, as shown in Figure 24-14.
The project is published and now all users with proper permissions can see the project.
There are three aspects of file management on the project server as you open, close, and save your project files:
Checking project files out and in
Saving changes in a project file
Publishing project information to the project server
You’ve already learned about saving and publishing files on the project server in the previous section. In this section, you’ll learn about checking enterprise project files out and in on the project server.
As soon as you open a project, either in a project detail page in Project Web App, or with Project Professional, the project is checked out to you. When you close the project, you are asked whether you want to check in the project.
It’s good practice to check out a project from the project server when you want to work on it and check it back in when you are done for the day. This is typically done when updating plans, costs, and resource requirements.
To check out an enterprise project in Project Professional, follow these steps:
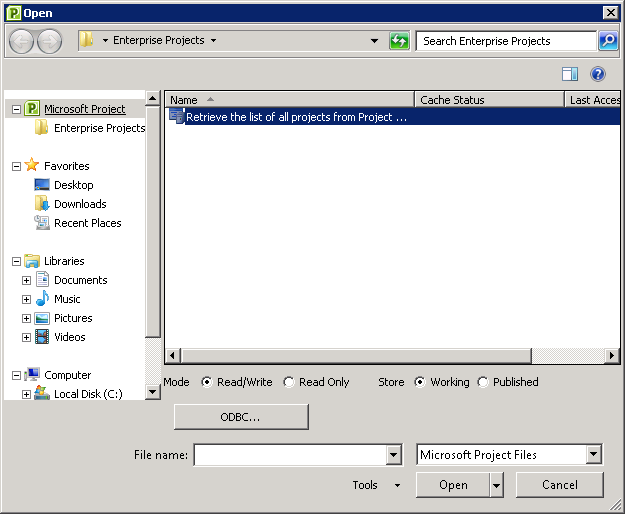
With Project Professional connected to the project server, click File, Open.
The Open dialog box appears, showing the list of enterprise projects that have previously been opened on this computer. (See Figure 24-15.)
Click the name of the project you want to check out.
If the project you are looking for is not listed, double-click Retrieve The List Of All Projects From Project Server at the top of the list of files. The Group By control appears. Click the arrow in the Group By box to choose a property by which to categorize the projects so that you can more quickly find what you are looking for. Any project you open in Project Professional is copied to your active cache.
Be sure that the project you want to check out is not already checked out by someone else.
A project can be checked out by only one user at a time. You can see if the project is checked out in the Cache Status column in the Open dialog box.
Next to Mode, ensure that the Read/Write option is selected, which is the default.
If someone else has checked out the project you want, you can still open it if you select the Read Only option.
To see the list of published projects, next to Store, select the Published option. To see the list of published as well as draft (not published) projects to which you have access, select the Working option.
The Working option is selected by default.
Click Open.
The project opens. The enterprise global template is attached to the project, and the enterprise resource pool is available for use in the project.
When you finish working with your enterprise project for the time being, you check it back in to the project server. Your organization might have specific rules for when you need to check in your projects.
To check in an enterprise project from Project Professional, follow these steps:
Be sure that Project Professional is connected to the project server.
On the File tab, click Save to save your final changes.
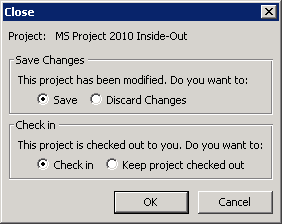
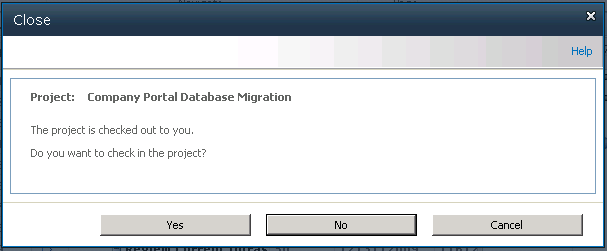
On the File tab, click Close.
If you made additional changes since the last time you saved the file, the Close dialog box appears, as shown in Figure 24-16. In this dialog box, you have the choice not only to save or discard your changes, but also to check in the file or not.
Note
If you have not entered values for any required custom enterprise fields, you see a prompt reminding you to do so. You must complete these fields before you can successfully check in the project.
Note
For more information about custom enterprise fields, see Working with Custom Enterprise Fields.
If you use Project Web App to edit project information, you need to check in your project after you finish making changes to it.
You typically make your changes in one of the project detail pages for the project. Examples of project detail pages include Schedule and Cost And Benefit.
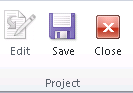
To check in your project, be sure the project is open in one of its project detail pages. On the Project tab, in the Project group, click Close, as shown in Figure 24-17.
The project server prompts you to confirm whether you want to check in the project or cancel the action, as shown in Figure 24-18. Click Yes, and the project is checked in.
The status of the check-in action appears in the top-right corner of the screen until the check-in is complete.
After you check in your project, if it is published, other project server users with the proper permissions can view your changes and edit the project.
You do not always need to be connected to the project server to work with projects. Moreover, you do not always need to work with enterprise projects when you are connected to the project server. Working offline is particularly helpful if you are traveling or in some other situation without easy Internet access and need to continue to work on your project files. Working offline can also be handy if you want to try some contingency scenarios with an enterprise project.
To work offline with an enterprise project, in Project Professional, check out the enterprise project. On the File tab, click Info, Manage Accounts, Work Offline.

When you are ready to connect to the project server again, on the File tab, click Info. Under Project Server Accounts, click Connect To Server.
Now that your projects are stored on the project server, you can work with them as enterprise projects. What does that mean to you?
Essentially, it means that you are now using the enterprise global template, which contains any standard project elements that have been defined for your organization, including macros, views, toolbars, and so on. You also have access to enterprise resources and tools for working efficiently with those resources. In the wider view, your enterprise projects can be reviewed and analyzed by others so that they can see the full portfolio of projects taking place throughout the organization.
When you start Project Professional and connect to your project server, the latest update of the enterprise global template is automatically attached. The enterprise global template is akin to a global template or the “global global” over the standard project global template. The enterprise global template dictates standards being enforced and customizations made available to Project 2010 interface elements in projects throughout the enterprise. These standards provide for customization and consistency across all projects in an organization. The standards propagated through the enterprise global template also make it possible for project information throughout the enterprise to be compared and analyzed in meaningful ways.
By default, the portfolio manager and project server administrator are the only users with permission to modify the enterprise global template. However, as a project manager, you have permission to view the enterprise global template so that you can see the controls behind your individual enterprise projects. The following list details the project elements that can be modified and propagated as standards via the enterprise global template:
Views
Reports
Visual Basic modules
Tables
Filters
Calendars
Import and export maps
Fields
Groups
To review the enterprise global template and see the specific elements that are set up for your organization, follow these steps:
Be sure that Project Professional is connected to the project server. As soon as it is connected, the enterprise global template is loaded for use with your enterprise projects.
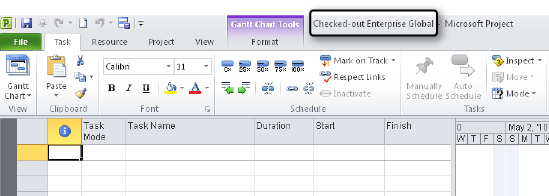
On the File tab, click Info. In the Organize Global Template section, click Manage Global Templates, and then click Open Enterprise Global.
An enterprise project plan, which appears to be empty, is displayed. The title bar shows “Checked-out Enterprise Global.” (See Figure 24-19.)
Figure 24-19. Review features in the enterprise global template to see your organization’s standards.
The enterprise global template is not checked out to you in the sense that you can make changes to it, but rather that you are using it as the structure for your own checked-out enterprise projects.
You can browse around the various interface features—such as the view definitions, filter definitions, custom toolbars, and so on—to see how the enterprise global template has been customized.
When you have finished reviewing the enterprise global template, close it.
Although you can inadvertently enter data in the enterprise global template, the data is not saved when you close it. Only specific elements (views, groups, macros, currency formats, and so on) can be saved to the enterprise global template, and only by those who have the proper permissions. Tasks or assignments are never saved with the enterprise global template.
The global standards are present in any enterprise projects you currently have checked out. In fact, if you browse the interface elements in your own enterprise project, you’ll see the same customizations present there that are in the enterprise global template.
If the enterprise global template changes after you connect to the project server, you see those changes only after you close Project Professional and reconnect.
It is likely that your organization has a system—whether formal or informal—for project managers to suggest changes to the enterprise global template. Find out from the project server administrator or portfolio manager how you can suggest changes you want to see implemented. When the enterprise global template is updated, you see the changes take effect the next time you check out an enterprise project.
Even though the enterprise global template affects all your enterprise projects, you can still use your own project global template on projects on your own computer. As long as elements in the project global template do not conflict with elements in the enterprise global template, you can create your own sets of standards for all your own projects.
Note
For more information, see Working with the Project Global Template.
Note
You can view template elements and move elements from the enterprise project to a local project and vice versa (if your security settings allow it). To do this, on the File tab, click Info. In the Organize Global Template section, click Manage Global Template, and then click Organizer.
Remember that you can change interface elements to apply only to an individual project without them being a part of the enterprise global template or your own project global template.
Custom enterprise fields often constitute a major area of customization and standardization implemented via the enterprise global template. Custom fields can be designed to store a specific category of numbers, durations, or text not provided by built-in Project 2010 fields. Custom fields of different data types are available for assignments, tasks, and entire projects. The portfolio manager or project server administrator defines these fields as part of the enterprise global template, and then the fields become part of your project. These fields can also be used, for reporting purposes.
Local custom fields are available on your local computer, while enterprise custom fields are available on your project server. Examples of local custom fields include Text1 or Cost5. Examples of enterprise custom fields include Enterprise Text7 or Enterprise Cost3.
There are three categories of custom enterprise fields:
Custom enterprise project fields, such as Enterprise Project Cost or Enterprise Project Duration
Custom enterprise task fields, such as Enterprise Date or Enterprise Flag
Custom enterprise resource fields, such as Enterprise Text or Enterprise Number
Although local, non-enterprise projects impose a limit on the number of custom fields you can create, in Project Server 2010, an unlimited number of custom fields can be created for each field type (Cost, Date, Text, and so on).
Another major fields improvement in Project Server 2010 is that custom fields can be associated with departments. Permission to use department-level custom fields is also restricted only to the users in that department.
Generally, the responsibility for adding custom fields to the enterprise global template falls to the project server administrator or the portfolio manager. After custom fields have been defined, you can add them to tables in Project Professional and in Project Web App. They’re also available in certain project detail pages in Project Web App.
Note
For more information about custom fields, see Customizing Enterprise Project Fields and Customizing Fields.
You can insert one enterprise project into another to create a master project/subproject relationship. Using this technique, you can model a program that reflects all projects being implemented under a specific program in your organization. The overarching program can be represented as the master project, with all the projects within that program set up as subprojects of the master project. As implemented through Project Server, a program is a set of related projects that is often set up in a hierarchical relationship.
Note
For more information about inserting one project into another, see Structuring Master Projects with Subprojects.
By contrast, a portfolio is a collection of enterprise projects being implemented by an organization as reflected in the project server. They might or might not be related to one another, and they might or might not be set up in a hierarchical relationship.
All enterprise projects are listed in the Project Center in Project Web App, whether they are part of a program, whether they are a master project or a subproject, or whether they are projects unrelated to any others except that they’re being implemented within the same organization.
Setting up programs in Project Server by using master projects and subprojects supports large organizations that need to implement a number of large projects and subprojects that often take place at various locations around the world.
When you open a master project, all the subprojects are listed (and checked out) as tasks in any task view. You can then drill down by clicking one of the subprojects to see the tasks within that project.
If you want to distinguish between master projects and subprojects on the Project Center page, work with your project server administrator or portfolio manager to create and add a custom field to the table in the Project Center. For example, a text field called Master-Subproject could be created in which project managers would indicate whether a project is a master project, a subproject, or neither. That field could then be added to a Project Center view. Another field for subprojects could specify the name of the master project.
You can set up dependencies and deliverables (or commitments) between the projects within a program, providing visibility to when a key deliverable that affects related projects is coming due.
The program hierarchy can be maintained and its status summarized in reports that are generated in the Business Intelligence Center.
Through Microsoft enterprise project management features, you can manage dependencies on deliverables among projects in your organization. By managing these dependencies, you can keep an eye on commitments in other projects without necessarily affecting the scheduling of your project.
Of course, you can still create links—task dependencies—from one project to another. Doing so is still necessary when there is a true relationship between tasks, such as the common finish-to-start task relationship in which a task in one project cannot begin until a task in another project has been completed. This type of structure does affect scheduling because if the predecessor task slips, the successor task slips as well.
Note
For information about linking tasks between projects, see Linking Information Between Project Plans.
However, if you’re working in an enterprise project management environment and you want to be alerted to the status of deliverables in one enterprise project that affect the outcome but not necessarily the scheduling of another enterprise project, you might consider setting up deliverable dependencies.
To set up a dependency on a deliverable, follow these steps:
Be sure that Project Professional is connected to your project server.
In Project Professional, open the enterprise project that is dependent on a deliverable in another enterprise project.
If you want to link a task to the deliverable in the other project, select the task.
On the Task tab, in the Insert group, click Deliverable, and then click Manage Dependencies.
The Dependency task pane appears on the left side of the project window.
In the Dependency task pane, click Add New Dependency.
In the Select Project box, click the name of the project that contains the deliverable.
The Select Deliverable pane appears. As you roll your mouse over each deliverable task, a pop-up shows the full name of the deliverable and its start and finish dates.
Click the name of the deliverable you want to include as a dependency with the current project.
If you want to create a link (task dependency) with the deliverable, select the Link To Selected Task check box.
Click Done.
To see an update about a deliverable, follow these steps:
Be sure that Project Professional is connected to your project server.
Open the enterprise project that is dependent on a deliverable in another enterprise project.
On the Task tab, in the Insert group, click Deliverable, and then click Manage Dependencies.
The Dependency task pane appears, showing the names of the deliverables in other projects you have set up.
At the bottom of the Dependency task pane, click Accept All Server Changes if that option is present. Also click Get Updates.
Information about the deliverable’s finish date is updated in the task pane.
In addition to creating dependencies to deliverables in other projects, you can create deliverables in your own projects. To do this, follow these steps.
Be sure that Project Professional is connected to your project server, and then open the enterprise project that is to contain the deliverable.
If the deliverable is a particular task, or if you want to associate a deliverable with a task in your project, select that task. However, the deliverable can be independent of any task in the project and be associated only with the project as a whole.
On the Task tab, in the Insert group, click Deliverable, and then click Add New Deliverable.
Complete the fields in the Add Deliverable task pane.
If you are associating the deliverable with a selected task, select the Link To Selected Task check box.
The fields under Deliverable Details are filled in with information from the selected task.
If the deliverable is to be associated with the project but not a particular task, enter a title for the deliverable as well as start and finish dates.
Click Done.