
With the Gantt Chart in your project file now full of tasks, it’s time to put these tasks in a logical order. It’s also time to add any forgotten tasks or delete duplicate ones.
To move a task from one row to another, follow these steps:
In the table area of the Gantt Chart, select the entire task row by clicking the gray row heading, which includes the task number.
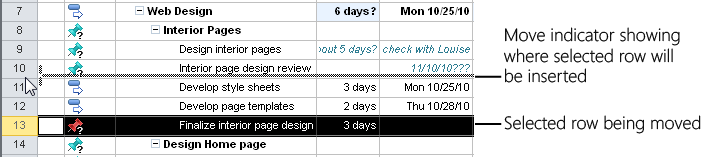
With your mouse pointer still over the row heading (the pointer should appear as a black crosshair), drag the task to the location in the Gantt Chart where you want to place it.
A gray line along the row border follows your mouse movements, indicating where the task will be inserted when you release the mouse button. (See Figure 3-19.)
Inside Out: Recurring tasks are automatically scheduled, however...
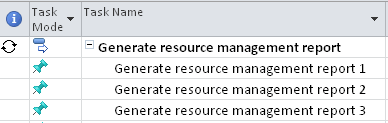
The summary task for a recurring task (or for any set of subtasks, for that matter) is always set as an automatically scheduled task, regardless of the default task mode of your project plan. This scheduling mechanism is used because summary task information is calculated from the aggregate of the subtasks, so by its nature it cannot be manually scheduled.
Note, however, that the subtasks of the recurring task adopt the default task mode, whether it’s manual or automatic scheduling.
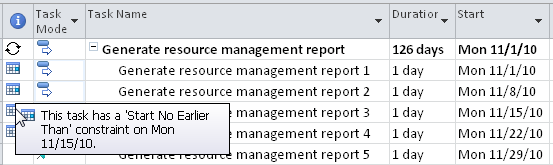
By their nature, recurring tasks are automatically scheduled according to your specifications. But whether a recurring subtask is set to be automatically or manually scheduled, you can easily change its date without adverse impact on the other recurrences of the task.
Recurring tasks that are set as automatically scheduled are marked with a Start No Earlier Than date constraint set to the date of the recurrence.
Release the mouse button to insert the task in the new location.
Note
Dragging tasks is the best method for reordering tasks in your project plan. If you use the Cut and Paste commands (on the Task tab in the Clipboard group), the Task Unique ID field for a task is renumbered, and this can cause problems if you integrate the project with other applications, including third-party timesheet systems.
To add a new task between other existing tasks, follow these steps:
In the table area of the Gantt Chart, click anywhere in the row above which you want the new task to be inserted.
On the Task tab, in the Insert group, click Task. (You can also simply press the Insert key.)
A new row is added above the selected row.
Click in the Task Name field for the new row, type the name of the new task, and then press Enter.
You can copy one or more tasks to use as the basis for other tasks. The following list describes the various copying techniques:
Copy a single task name. Click in the Task Name field, and then on the Task tab, in the Clipboard group, click Copy. Click the Task Name field in a blank row, and then on the Task tab, in the Clipboard group, click Paste.
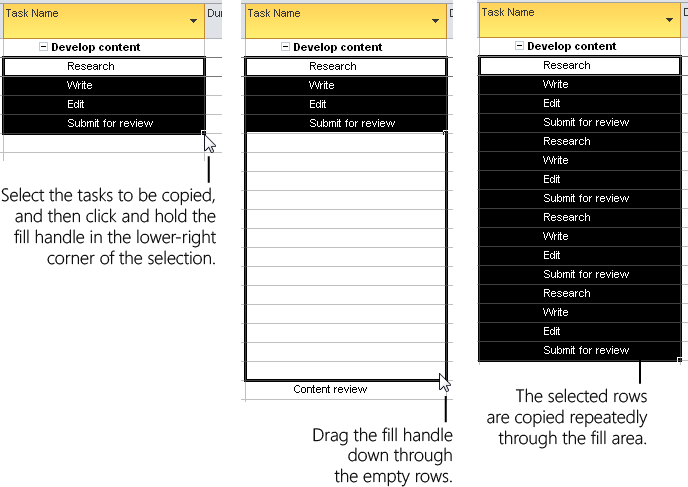
Copy multiple adjacent task names. Click the first task name you want to select, hold down the Shift key, and then click the last task name. All task names between the first and last are selected. On the Task tab, in the Clipboard group, click Copy. Click the first Task Name field where you want the selected tasks to begin. On the Task tab, in the Clipboard group, click Paste. You can also simply drag to select the tasks. If you want to copy a series of selected tasks to empty rows directly under a particular task, drag the fill handle in the lower-right corner of the cell into those empty rows. (See Figure 3-20.)
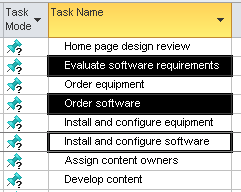
Copy multiple nonadjacent task names. Click the first task name you want to select, hold down the Ctrl key, and then click any additional task names you want to add to the selection. (See Figure 3-21.) On the Task tab, in the Clipboard group, click Copy. Select the Task Name field where you want to add the selected tasks. On the Task tab, in the Clipboard group, click Paste. The tasks are added in the order that you selected them.
Copy a single task and its task information. Click the row heading of the task you want to copy, which selects the entire task and its associated information. On the Task tab, in the Clipboard group, click Copy. To add the task to an empty row, select the row and then on the Task tab, in the Clipboard group, click Paste. To insert the task between two existing tasks, select the lower task and then on the Task tab, in the Clipboard group, click Paste. The copied task is pasted into a new row above the selected task.
Copy multiple adjacent tasks and their task information. Click the row heading of the first task you want to copy. Hold down the Shift key, and then click the row heading of the last task. (See Figure 3-22.) On the Task tab, in the Clipboard group, click Copy. Select the task above which you want to add the copied tasks. On the Task tab, in the Clipboard group, click Paste.
Copy multiple nonadjacent tasks and their task information. Click the row heading of the first task you want to copy. Hold down the Ctrl key, and then click the row headings of all the tasks you want to copy. On the Task tab, in the Clipboard group, click Copy. Select the task above which you want to add the copied tasks. On the Task tab, in the Clipboard group, click Paste. The tasks are added in the order that you selected them.
If you’re doing a lot of copying and pasting, you might find it quicker to right-click the selection and then click Copy Cell or Paste from the drop-down menu. You can also press Ctrl+C to copy and Ctrl+V to paste.
To delete a task you don’t need, select the row heading and then press Delete.
When you click a manually scheduled task name (rather than the row heading) and the press Delete, the task name is cleared.
When you click an automatically scheduled task name and then press Delete, the Delete indicator appears in the Indicators column. Choose whether to delete the entire task or just the task name. (See Figure 3-23.)
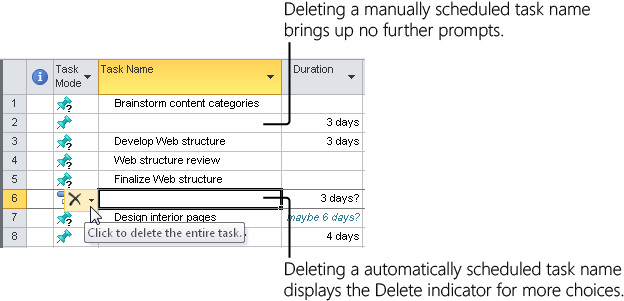
If you want to delete the entire task, click the indicator. If you simply want to clear the task name, press Enter or click elsewhere in the view.
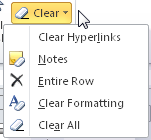
If you want to clear certain items from a task, you can use the Clear commands. On the Task tab, in the Editing group, click the arrow next to the Clear button. You can clear hyperlinks, notes, or formatting from the selected task(s). You can clear all three elements from the selected task(s) by clicking Clear All. To delete the task altogether, click Entire Row.
In Project 2010, you can undo multiple edits. To undo recent edits, click the Undo button on the Quick Access Toolbar at the upper-left corner. Each time you click Undo, the previous edit is undone in the reverse order from which you made them.
Other ways to work with the Undo command are as follows:
You can press Ctrl+Z to reverse the last edit.
To undo a series of edits all at once, click the arrow next to the Undo button on the Quick Access Toolbar. In the drop-down menu that appears, select the point at which you want to undo. All edits between the current state and the selected edit are undone.
To redo an edit that you’ve undone, click the Redo button on the Quick Access Toolbar.
You can also press Ctrl+Y to redo undone edits.
To redo a series of undone edits all at once, click the arrow next to the Redo button on the Quick Access Toolbar. Select the point at which you want to redo the edits. All edits between the current state and the selected edit are redone.
You can redo only those edits that you have previously undone. The Redo command does not repeat commands or edits.
You can set the maximum number of undo operations. On the File tab, click Options, and then in the left pane click Advanced. Under General, enter the maximum number of undo operations you want in the Undo Levels box. The default is 20, and the maximum is 99.