MICROSOFT Project 2010 can help you plan, forecast, and track costs associated with the performance of the project. The bulk of your costs is likely to be generated by the resources assigned to tasks. Costs are often also directly related to the tasks themselves, independent of the assigned resources.
To set up your project plan so that it reflects costs, you can:
Enter unit costs for work and material resources and assign those resources to their tasks.
Assign and quantify cost resources such as travel costs, facility rentals, permit fees, and equipment or software purchases.
Specify any fixed costs for tasks.
When you have entered all applicable cost items and associated them with your project tasks, Project 2010 calculates the cost forecast for each assignment, each resource, each task, and the project as a whole. You can therefore see costs in detail or at a high-level as you need to for various purposes.
While you’re in the planning stage of the project, you can use this cost forecast to develop your project’s budget. If a budget has been imposed on you, your forecast can help you clearly see whether the project plan is in line with the realities of the budget. You can use the budget resource feature to help you compare your project’s planned costs against your allocated budget.
If your planned costs go beyond your budget, use the data you have in Project 2010 to lobby for additional funding or adjust project scope, schedule, or resources to match the cost forecast to the allocated budget.
As soon as you start executing the project, you start tracking and managing costs. At that point, you can compare actual costs to your original planned costs and analyze any variances between the two.
Note
For more information about adjusting the project plan to conform to the budget, see Reducing Project Costs. For information about tracking costs, including setting cost baselines and entering actual costs, see Chapter 11. For information about managing costs, see Monitoring and Adjusting Costs.
The key to planning project costs is entering resource costs to begin with. Typically, the majority of your costs comes from resources carrying out their assignments. When you enter resource cost rates and assign resources to tasks, those resource cost rates are multiplied by the amount of work on assignments. The result is the cost of the assignment.
You can set costs for work resources as well as for material resources. Cost rates might be variable, such as $40/hour or $200/ton, or the rates might be a fixed per-use cost, such as $300 per use.
You can also use cost resources to assign frequently used cost items—for example, facility rentals, permit fees, or travel costs—to certain tasks and then specify the amount for that cost resource on that assigned task.
You can set pay rates for work resources: people and equipment. When these resources are assigned to tasks, Project 2010 multiplies the pay rates by the amount of assigned work to estimate the planned cost for the assignment. You can also set per-use costs for work resources. If a resource has different costs for different types of assignments or during different periods of time, you can enter multiple costs for one resource.
Note
You can enter cost information for resources at the same time you add resources to the project. Simply complete all the fields in the Resource Sheet at the same time.
To set pay rates for work resources, follow these steps:
On the View tab, in the Resource Views group, click Resource Sheet.
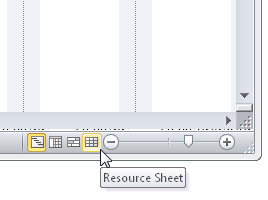
You can also click the Resource Sheet icon in the view shortcuts in the lower-right corner of the Project status bar, next to the Zoom slider.
Make sure the Entry table is applied to the Resource Sheet.
You can see the name of the applied table by resting your mouse pointer over the All Cells box where the row and column headings intersect at the upper-left corner of the sheet.
If needed, on the View tab, in the Data group, click Tables, and then click Entry.
Make sure the work resource is set up.
Work resources are designated with Work selected in the Type field.
Note
For more information about setting up work resources, see Adding Work Resources to the Project.
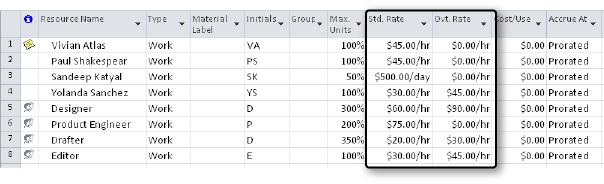
In the Std. Rate field for the first work resource, enter the resource’s standard pay rate—for example, $30/hour or $400/day.
If the resource is eligible for overtime, and if you plan to apply and track overtime in your project plan, enter the resource’s overtime pay rate in the Ovt. Rate field. (See Figure 9-1.)
Some work resources incur a cost each time you use them. This per-use cost might be instead of or in addition to a cost rate and is often associated with equipment. It’s a set, one-time fee for the use of the resource. For example, rental equipment might have a delivery or setup charge every time it’s used, in addition to its day rate.
Per-use costs never depend on the amount of work to be done. They’re simply one-time costs that are incurred each time the resource is used.
To specify a per-use cost, follow these steps:
Be sure the Entry table is applied to the Resource Sheet. If it is not, on the View tab, in the Data group, click Tables, and then click Entry.
In the Cost/Use field for the work resource, enter the resource’s per-use cost; for example, $100.
To set resource costs for consumable materials, follow these steps:
Be sure the Entry table is applied to the Resource Sheet. If it is not, on the View tab, in the Data group, click Tables, and then click Entry.
Make sure the material resource is set up in your Resource Sheet.
Material resources are designated with Material selected in the Type field. Each material resource should also have a unit of measurement—such as yards, tons, or feet—in the Material Label field.
Note
For more information about setting up material resources, see Adding Material Resources to the Project.
In the Std. Rate field for the material resource, enter the cost per unit.
For example, if you have a material resource that is measured in tons, and each ton of this material costs $300, enter $300 in the Std. Rate field.
If there’s a per-use cost for the material, such as a setup fee or equipment rental fee associated with using the material, enter it in the Cost/Use field.
You can have a per-unit cost in the Std. Rate field as well as a per-use cost for the same resource.
Suppose you know that certain work resources will get a 5 percent raise on September 1. Maybe the contract for an equipment resource stipulates a discount for the first month of use and then the cost returns to normal for the second month and beyond. Or perhaps a consultant has one rate for one type of work and another rate for another type of work. You can specify different costs at different times by using cost rate tables. To specify different costs on a single resource, follow these steps:
In the Resource Sheet, click the work or material resource for which you want to specify multiple cost rates.
On the Resource tab, in the Properties group, click Information.
You can also double-click the resource name to open the Resource Information dialog box.
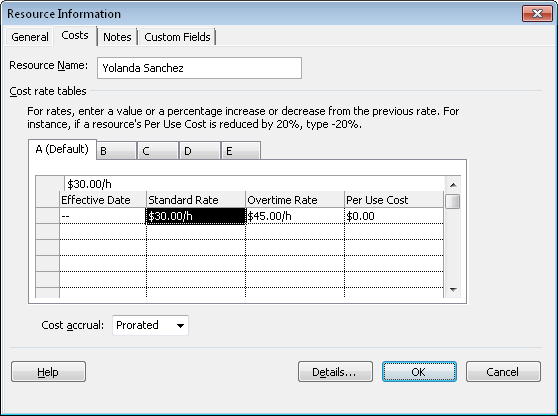
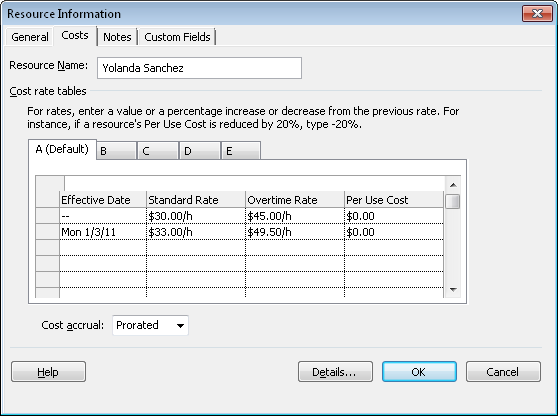
Click the Costs tab, shown in Figure 9-2.
On the A (Default) tab, in the first row, you see the standard rate, overtime rate, and per-use cost you might have already entered in the Resource Sheet.
To specify a change in rate after a certain period of time, still on the A (Default) tab, click in the next blank Effective Date field and enter the date the change is to take effect. Enter the cost changes as applicable in the Standard Rate, Overtime Rate, and Per Use Cost fields, as shown in Figure 9-3.
To specify different costs based on different types of activities, enter the different costs in a different tab, such as B or C.
Click the B tab, for example, and enter the standard rate, overtime rate, and per-use cost for the other activity as applicable. When you assign this resource to a task that uses the different rates, you can specify which cost table to use.
Note
If a percentage rate change goes into effect on a certain date, you can have Project 2010 calculate the new rate for you. Enter the date in the Effective Date field. Then, in the Standard Rate, Overtime Rate, or Per Use Cost fields, enter the percentage change; for example, +10% or -15%. The actual rate representing that change is immediately calculated and entered in the field.
Cost Rate Table A for resources is applied to the resource’s assignments by default and is what shows on the Resource Sheet. If you define a different cost rate table on the B or C tab for another category of work, you can specify which cost rate table to use at the assignment level. To do this, follow these steps:
In a task view such as the Gantt Chart, use the Assign Resources dialog box to assign the resource to the task.
On the View tab, in the Task Views group, click Task Usage.
Or, on the View tab, in the Resource Views group, click Resource Usage.
Either of these options presents an assignment view.
Click the assignment that needs a different cost rate table applied.
On the Format tab, in the Assignment group, click Information.
In the Assignment Information dialog box, make sure that either the General or Tracking tab is active.
In the Cost Rate Table list, click the cost rate table you want to apply to this assignment, as shown in Figure 9-4.
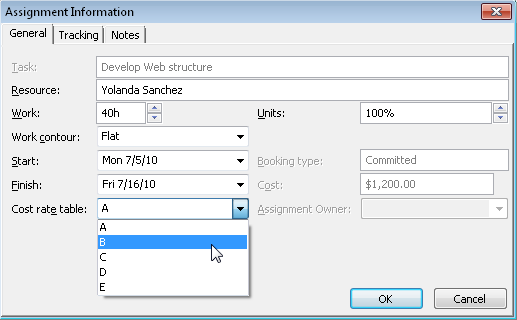
Figure 9-4. In the Assignment Information dialog box, select which cost rate table should be used for this assignment.
You cannot enter a description for the different cost rate tables to explain what each should be used for. Because of this limitation, it’s a good idea to enter a resource note for any resource that uses multiple cost rate tables. Simply click the Notes tab in the Resource Information dialog box and enter the note.
Cost accrual indicates the point in time when costs are incurred, or charged. You can specify that costs are incurred at the beginning of the assignment or at the end of the assignment. Another option is to prorate costs across the time span of the assignment, which is the default method. Specifying the cost accrual method is important for budget cash flow planning.
To specify the cost accrual method, follow these steps:
Be sure that the Entry table is applied to the Resource Sheet.
In the Accrue At field for the work or material resource, click the method: Start, Prorated, or End.
You can also specify the cost accrual method for a resource on the Costs tab of the Resource Information dialog box.
A cost resource is a cost item that contributes to the completion of a task but does not affect the schedule when assigned to that task. A cost resource represents a cost item other than a person, a piece of equipment, or a quantity of materials, and the cost item is incurred in the performance of the task. Examples of cost resources are airfare, lodging, and rentals.
When you create a cost resource, you do not enter the cost amount in the Resource Sheet as you do with work or material resources. The cost amount for that resource changes depending on the task to which it is assigned.
For example, suppose you have a cost resource named “Trade Show Registration.” Your project plan includes participation in five different trade shows that each have differing registration fees. For the “Plan for Portland trade show” task, you can assign the “Trade Show Registration” cost resource and enter $975. For the “Plan for Las Vegas trade show” task, you can assign the same “Trade Show Registration” cost resource and enter $1,595 for the cost.
The advantage of using the same cost resource for different tasks is that you can summarize your total costs for a particular cost category, such as trade show registration, airfare, or permits.
Note
For more information about setting up cost resources, see Adding Cost Resources to the Project.
To assign a cost resource to a task, follow these steps:
Make sure the cost resource is set up in your Resource Sheet.
Cost resources are designated with Cost selected in the Type field.
In the Gantt Chart or other task sheet, click the task to which you want to assign the cost resource.
On the Resource tab, in the Assignments group, click Assign Resources.
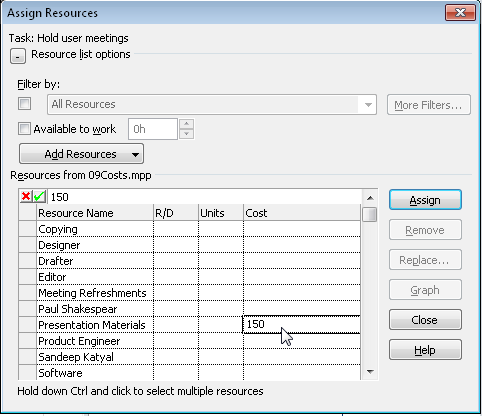
In the Assign Resources dialog box, click the name of the cost resource you want to assign to the task.
Click in the Cost field for the cost resource, and then type the cost amount for this resource on this task. (See Figure 9-5.)
Click the Assign button.
To assign the same cost resource to a different task, click that task. Enter the cost for that cost resource for the newly selected task, and then click the Assign button.
When you finish assigning resources to tasks, click the Close button.
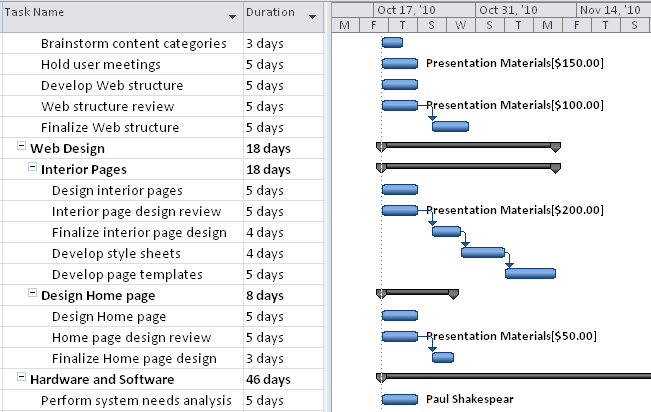
By default, the name of the cost resource as well as the cost amount for the assignment is shown next to the Gantt bar for the task, as you can see in Figure 9-6.
If you need to change the cost you entered on a cost resource assignment, double-click the task to open the Task Information dialog box. Click the Resources tab. In the Cost field for the cost resource, change the amount.
You can also assign cost resources on a timephased basis. Assign the cost resource by using the Assign Resources dialog box as described above. Then go to the Task Usage or Resource Usage view. Add the Cost field to the timesheet area of the view for the assignment, enter an amount for one time period, enter an amount for another time period, and so on. This approach can be useful if you want to show when the costs are incurred. For example, if you want to break down the daily costs on a Catering cost resource at a trade show, you can enter $200 on one day, $150 on the second day, and $225 on the third day.