Linking is another method of exchanging data between applications. By linking information, you maintain a connection to the source application. When a change is made to the information, it’s reflected in the destination application.
A major advantage of linking is that the file size is much smaller than it would be if the information in the linked file were embedded. A potential difficulty with linking is that you always need to know the current location of the linked file and its update status. If the linked file is moved, the link is broken. If the information in the linked file becomes obsolete, the linked information also becomes out of date.
You can create a link from Project 2010 information to another application by using the Copy and Paste Special commands. To create a link, follow these steps:
In Project 2010, display the view that contains the information you want to copy and link to another application.
If the information is text-based—such as tasks, resources, or assignment fields—select the information. If the information is graphical—such as a Gantt chart, Resource Graph, or Network Diagram—arrange the view to contain the information you want to represent in the other application.
On the Task tab, in the Clipboard group, click Copy.
Open the destination application, for example, Word or PowerPoint. Place the cursor where you want to insert the information.
In the destination application, find and click the Paste Special command.
If you’re linking to an Office application, on the Home tab, in the Clipboard group, click the arrow under Paste. In the menu that appears, click Paste Special.
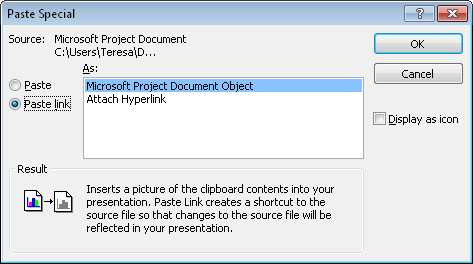
In the Paste Special dialog box, select the Paste Link option, as shown in Figure 17-14.
Review the choices available in the As box. Click each one to read its description in the Result box, and then select the one that meets your needs.
The choices vary depending on the type of information copied in Project 2010. One of the choices is always Microsoft Project Document Object, which creates an embedded object that’s linked.
It’s a good idea to experiment with the different choices in the Paste Special dialog box. You’ll get different results depending on the type of data you copy and the nature of the destination application.
Click OK.
The linked information appears in the destination application. (See Figure 17-15.) When changes are made to the information in Project 2010, those changes are reflected in the destination application.

Note
If you copy from a Gantt Chart, and you want the bars to show, arrange the view to show as much or as little of the sheet area as you want, then select and copy the rows whose Gantt bars you want to link to the other application. When you paste link as a Microsoft Project Object in the other application, the sheet and Gantt bars of the selected rows are displayed and linked.
Note
For information about linking information from Project 2010 to Excel, see Linking Between Project 2010 and Excel.
You can link an object from another application to specific destination areas in Project 2010. When the information changes in the source file, it changes in its linked area in Project 2010 as well.
You can link alphanumeric information from another application to any table in Project 2010. To do this, follow these steps:
In the source application, select the text or numbers to be linked to Project 2010, and then choose the application’s copy command.
If you want to copy and link information from an Office application, on the Home tab, in the Clipboard group, click Copy.
In Project 2010, display the view and select the sheet view, table, and cell to contain the linked information.
Be sure that the cell’s field type is compatible with the type of information you’re linking, whether text or numbers.
If you’re pasting multiple cells of tabular data from the other application, select the cell where you want the paste operation to start flowing in the data. Again, be sure that the incoming data is compatible with the field types in the destination table.
On the Task tab, in the Clipboard group, click the arrow under Paste. In the menu that appears, click Paste Special.
In the Paste Special dialog box, click the Paste Link option.
The As box changes to present the options for linking the copied information to the project file.
Review the choices available in the As box. Click each one to read its description in the Result box, and then select the one that meets your needs.
Experiment with the different choices in the Paste Special dialog box. You’ll get different results depending on the type of data you’re linking and the nature of the source application.
Click OK.
The linked information appears in the selected cell. When changes are made to the information in the source application, those changes are reflected in this cell.
Troubleshooting: You get an error when you try to link pasted information to your project
If you try to paste information in a cell whose field is not compatible with the type of information you’re pasting, you’ll see the following error message:
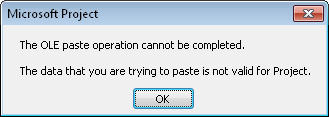
For example, you can paste any text into a Task Name or Resource Name field. However, you can paste numbers only into a number field. And while you can paste any text or numbers into the Duration, Start, or Finish fields of a manually scheduled task, you cannot paste such information into the same fields for an automatically scheduled task.
The error message is misleading, though. While the data might not work in the particular cell that’s selected, it doesn’t mean it can’t be linked anywhere in Project 2010. The data can likely be pasted successfully in another cell with a more open format, such as a Task Name, Resource Name, or custom Text field.
Note
For information about linking information from Excel to Project 2010, see Linking Between Project 2010 and Excel in Chapter 18.
You can link a graphic or other object, such as text or a multimedia file, from another application to specific locations in Project 2010, such as the Notes areas and the Task and Resource Forms. The information needs to exist as its own file, rather than as information copied from a file.
To link a graphic or other object to a note in your project, follow these steps:
Display a view that contains the task, resource, or assignment you want to associate with the linked object.
For example, for tasks, display the Gantt Chart. For resources, display the Resource Sheet. For assignments, display the Task Usage or Resource Usage view. For the entire project, show the project summary task.
Double-click the task, resource, assignment, or project summary task with which you want to associate the linked object.
The Task Information, Resource Information, Assignment Information, or Summary Task Information dialog box appears.
In the dialog box, click the Notes tab.
Click the Insert Object button on the tab’s toolbar.
In the Insert Object dialog box, select the Create From File option.
Click the Browse button, find the file you want to link in the note, and then double-click its name.
Select the Link check box.
If you’re embedding a graphics object, BMP is the only graphics format that displays the graphic rather than a generic icon.
Click OK.
The object appears in the upper-left corner of the notes area. It’s linked, so when the source file is updated, the changes appear in the object here in your project plan. It’s also embedded, so if you double-click the object, the source application opens and is available for editing and viewing.
In the same way, you can link embedded objects in the Task Form and Resource Form. When inserting the object into the form, select the Link check box, and the object will be dynamically linked. For more information, see Inside Out: Bury an object in a form.
By default, whenever you open the project file containing the link, a message appears, asking whether you want to re-establish the link between the files, as shown in Figure 17-16. Clicking Yes re-establishes the link and updates any changed information.

If you do not want to see this alert each time you open the project, on the File tab, click Options, and then click Advanced in the left pane. Under Display, clear the check box labeled Show OLE Links Indicators.
If you want to remove linked information, you can simply select it and delete it. You can update the content of the information by editing the source information.
However, if you need to manipulate the links in other ways, such as breaking the link but keeping the information intact, changing the source of the information, or controlling when updates happen, you need to use the Links dialog box.
Unfortunately, the Edit Links command is not available in the Project 2010 ribbon, so you need to make it available before you can use it. The easiest way to do this is to add the command to your Quick Access Toolbar. To do this, follow these steps:
On the File tab, click Options, and then click Quick Access Toolbar in the left pane.
In the Choose Commands From box, click Commands Not In The Ribbon.
Scroll to and click Edit Links, and then click the Add button.
Click OK; the Edit Links button is added to the Quick Access Toolbar.
Note
You can also add the Edit Links button to a custom group in the ribbon. For information on how to do this, see Customizing the Project 2010 Ribbon.
Now you’re ready to work with the information linked from other applications. To review and work with links in your project, follow these steps:
On the Quick Access Toolbar, click Edit Links.
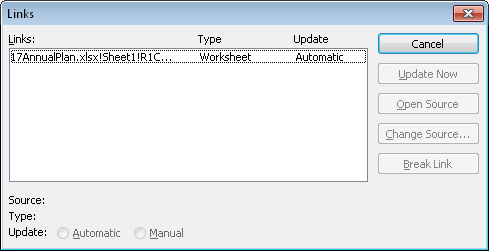
The Links dialog box appears, showing all links in your project file. (See Figure 17-17.)
If you specified not to update a link when you open the project file, or if you’re not prompted, you can select a link and click Update Now.
If the linked document location has changed, you can update the information in the project by clicking Change Source.
To break the link with the source application, click Break Link.