
You can use strategic planning and portfolio analysis tools in Project Web App to develop business drivers and prioritize projects to select the right mix of projects for your organization.
It is the responsibility of the executive leadership team to define the organization’s business strategy in terms of its vision, mission, and goals.
The portfolio manager, working with the leadership team, can then translate those strategic elements into specific business drivers entered into Project Web App. These business drivers are measurable objectives that can also be prioritized. Proposed projects are then assessed as to their alignment with one or more of the business drivers, and that assessment feeds the decision as to whether the project is a good candidate for the organization’s project portfolio.
With the business driver tools in Project Web App, you can do the following:
Translate the organizational strategy. You can break down the organization strategy into defined, measurable, and actionable objectives.
Reflect the consensus on organizational priorities. Ensure that the executives from different departments or teams—who might have different priorities—are on the same page regarding the most important business drivers for the entire organization.
Prioritize competing projects. Use the business drivers to prioritize projects that may compete for budget or resources based on criteria such as business value, risk, cost, and more.
Shape the portfolio of projects. Identify the right portfolio on varying conditions. As your budget and resources constraints might vary throughout the year, in Project Web App you have the ability to create what-if scenarios. Through the use of such scenarios, you can predict conditions if you need to cut or add certain projects.
You might have a sample set of business drivers in Project Web App. This gives you a good place to start.
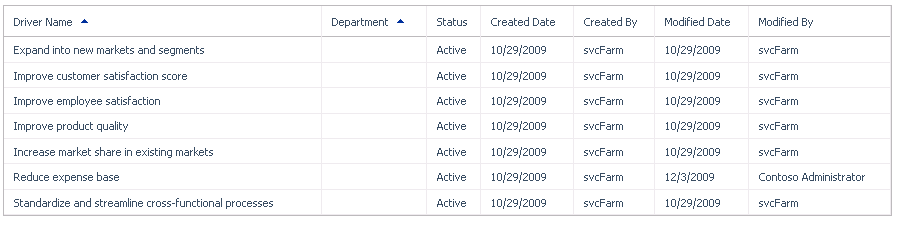
To review the existing business drivers library, on the Quick Launch, under Strategy, click Driver Library. The Driver Library page appears, as shown in Figure 27-5. Note that these might be a sample set, or they might reflect your organization’s actual business drivers, based on its strategic plan.
It’s often helpful to share the list of drivers with others, especially the executive leadership team.
To print the list, on the Driver tab, in the Share group, click Print.
To export the list to Microsoft Excel, on the Driver tab, in the Share group, click Export To Excel.
For demand management to work appropriately, it’s vital that you create business drivers that correspond with your organization’s strategic goals.
To add a new business driver, follow the steps below:
On the Quick Launch, under Strategy, click Driver Library.
On the Driver tab, in the Driver group, click New.
The New Business Driver page appears, as shown in Figure 27-6.
In the Name box, enter the driver name.
The driver name should reflect a high-level strategic objective for the organization.
In the Description box, be specific with an explanation of the new business driver.
In the Department(s) box, select the department(s) to which the new business driver is relevant.
In the Status box, select whether the driver is active or inactive.
Active drivers appear on appropriate pages and are required. Inactive drivers do not appear. If you are drafting the driver and are not ready for it to go “live,” make it inactive for now. If you are ready, make it active.
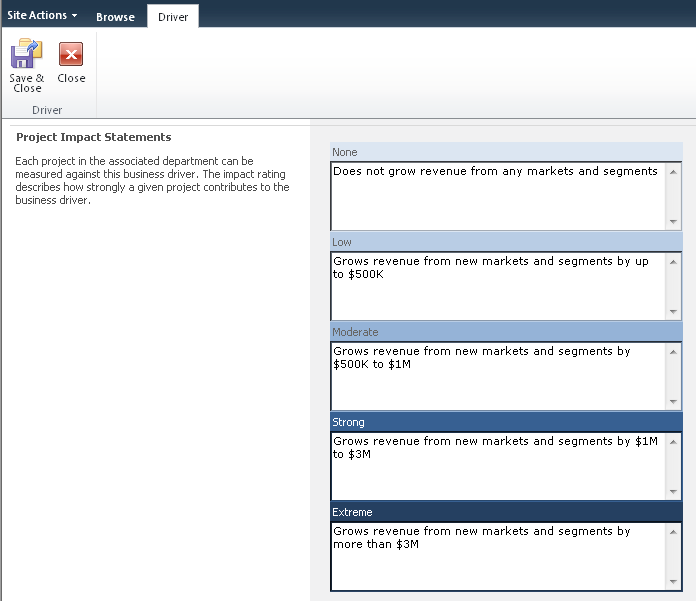
In the Project Impact Statement boxes, enter an impact statement for the new business driver in each of the five boxes, as shown in Figure 27-7. The impact ratings describe how strongly a project contributes to the business driver; they are used by the project manager when creating the business case for a proposed project.
Figure 27-7. The Project Impact Statements help the project manager gauge how well the proposed project aligns with this business driver.
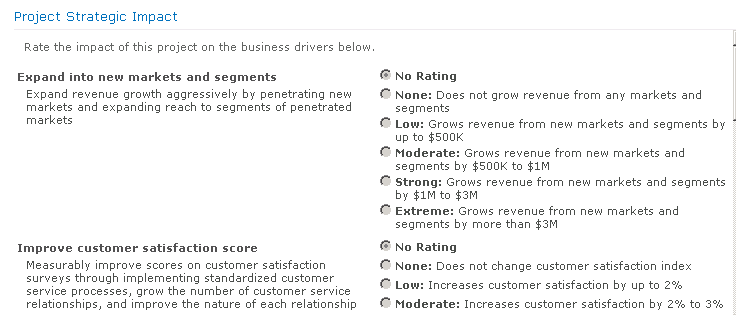
After the business drivers and their project impact statements are established, anyone proposing a new project needs to rate the project against the business drivers, as shown in Figure 27-8.
On the Driver tab, in the Driver group, click Save & Close.
The new driver is added to the driver library. Repeat this process for all additional business drivers until they are all present.

To modify existing business driver information, click the driver name. The Edit Business Driver page appears. Change any of the fields as needed. When you are finished, click Driver, Driver, Save & Close.
You can deactivate a business driver (rather than delete it). When a driver is deactivated, it is no longer considered in project prioritizations. For historical purposes, it’s preferable to deactivate a driver rather than delete it if you have used it in prioritizations. To deactivate a business driver, click the driver name. In the Edit Business Driver page, in the Status field, select the Inactive option. Click Driver, Driver, Save & Close.
To delete a business driver, select the row containing the driver information. Just don’t click the driver name itself; otherwise, you’ll open the Edit Business Driver page. When the driver row is selected, click Driver, Driver, Delete.
After business drivers are developed and agreed upon by the leadership team, the next step is to prioritize them. The best approach is to work with the leadership team, perhaps in a workshop setting, during which you can come to consensus about the priorities.
You can perform the prioritization in Project Web App. The Driver Prioritization function walks you through prioritization by using the pairwise comparison method. The outcome is a relative priority for all drivers, along with a consistency ratio score.
Creating a prioritization is a three-step process in which you define the details of the prioritization, prioritize the drivers, and then review the priorities.
To create a new prioritization, follow these steps:
On the Quick Launch, under Strategy, click Driver Prioritization.
The Driver Prioritization page appears, as shown in Figure 27-9.
On the Prioritizations tab, in the Prioritizations group, click New.
The New Prioritization page appears.
Complete the Name and Description fields.
In the Department field, select the departments to which this driver prioritization applies.
In the Prioritization Type field, specify whether the prioritization should be calculated or manually entered.
Select the drivers that you would like to include in this prioritization.
You must select at least two drivers, and it’s best to include from five to twelve drivers in the prioritization.
In the lower-left corner of the page, click the Next: Prioritize Drivers button.
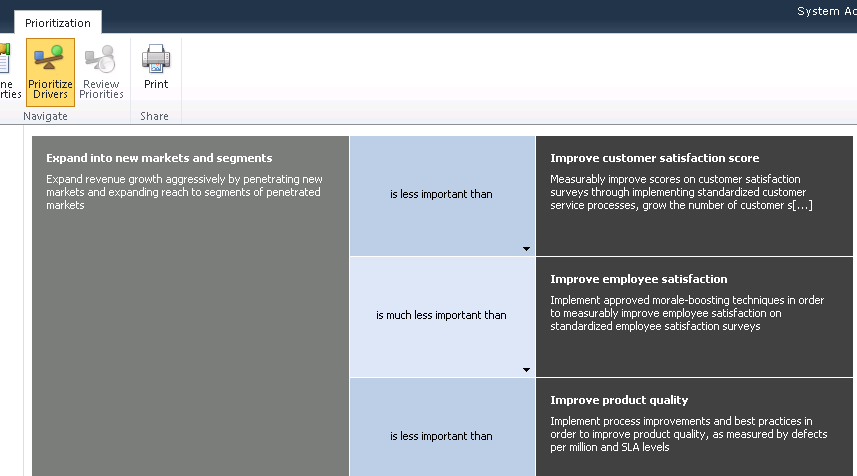
Project Web App takes you through multiple screens in which you can prioritize each driver against all the rest, as shown in Figure 27-10. Each driver is rated from Is Extremely Less Important Than to Is Extremely More Important Than.
In the lower-right corner of the page, click the Next: Review Priorities button.
Project Web App generates the relative priority score for each of the driver. This is automatically calculated based on an algorithm.
Review the priorities and score.
If you want, review the consistency ratio by clicking the plus sign next to Consistency Ratio at the bottom of the screen.
The consistency ratio indicates the consistency of your ranking and prioritization of the business drivers. It is recommended that the consistency ratio be above 70 percent.
On the Prioritization tab, in the Prioritization group, click Close.
The Driver Prioritization page appears, with your new prioritization listed with the others.

You can create multiple prioritizations that you can later apply in different situations, depending on the department or role.
Inside Out: Driver prioritization logic
When you choose the calculated prioritization type, Project Web App puts you through the built-in pairwise comparison method for your selected business drivers.
The logic used is based on a method for making complex decisions called Analytical Hierarchy Process (AHP). As in this case, AHP applies to prioritization situations when the priority of an individual item is compared to the rest and no item is ignored.
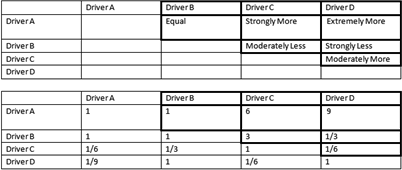
Each one of the drivers is associated with a weight or a numeric value that substitutes the analytical prioritization (Extremely More, Strongly More, Equal, Moderately More, and so on) as shown in Figure 27-11.
This is the process for the algorithm:
The business drivers are placed in a matrix according to the values entered by the user.
Each of the prioritizations is given a numeric weight. For example, Equal is 1, Extremely More equals 9, while Extremely Less equals 1/9. Strongly More equals 6, while Strongly Less equals 1/6.
The diagonal is allocated the value of 1 as each driver equals itself.
After the matrix above the diagonal is filled in, the matrix below the diagonal is calculated, with the opposite values filled in. For example, if Driver A compared to Driver C equals 6, than Driver C compared to Driver A equals 1/6.
After the matrix is calculated, the icon value for the matrix is calculated, and the values are displayed.
At this point, you and the executive leadership team have translated the organization’s strategy into the business drivers in Project Web App, and those business drivers are also prioritized against one another. The workflow ensures that those creating proposals and project plans establish the business case for those projects by scoring them against each of the business drivers.
You can now analyze those proposals and plans to determine which ones are the most necessary and appropriate projects to become part of your project portfolio mix. These will be the projects that further the most progress toward your organization’s strategic goals.
You can use the Portfolio Analysis engine in Project Web App to rate selected projects and help you make your decisions about the portfolio. To do this, follow these steps.
On the Quick Launch, under Strategy, click Portfolio Analyses.
The Driver Prioritization page appears.
On the Analyses tab, in the Analysis group, click New.
The New Portfolio Analysis Wizard launches.
In the Define Properties page that appears, enter the name and description you want for the analysis in the Name and Description fields.
In the Department field, select the department(s) to which this analysis should pertain.
In the Prioritization Type area, select whether you want to prioritize based on your business drivers or based on custom fields.
If you have entered and prioritized your business drivers, select the option labeled Prioritize Projects Using Business Drivers, and then click the name of the prioritization you did on your business drivers.
If you have not entered or prioritized your business drivers, or if you want to analyze the project portfolio based on entries in custom fields, select the option labeled Prioritize Projects Using Custom Fields.
In the Prioritize These Projects area, click the Selected Projects button.
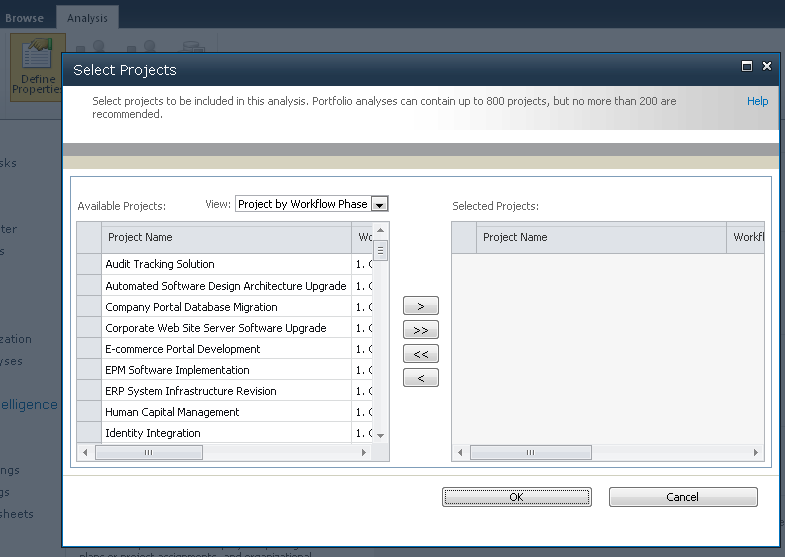
A list of all projects and proposals entered in your project server appears, as shown in Figure 27-12.
Select the projects you want to be part of the portfolio analysis.
To add all the projects, click the Move All Items button.
To add selected projects, select the projects you want to add, and then click the Move Selected Items button. Drag across the rows or hold down the Shift key while clicking the first and last items to select adjacent items. Hold down the Ctrl key while clicking to select nonadjacent items.
When you finish adding projects for the analysis, click OK in the Select Projects dialog box.
In the Analysis Primary Cost Constraint box, select the primary budget constraint to be used in this analysis.
In the Time-Phased Resource Planning section, select the check box if you want the analysis to consider resource requirements.
Only select this check box if all the projects selected for analysis have had resources assigned or a resource plan developed. Note that once you have selected and saved the analysis with this check box selected, it cannot be changed.
In the lower-right corner of the page, click the Next: Prioritize Projects button.
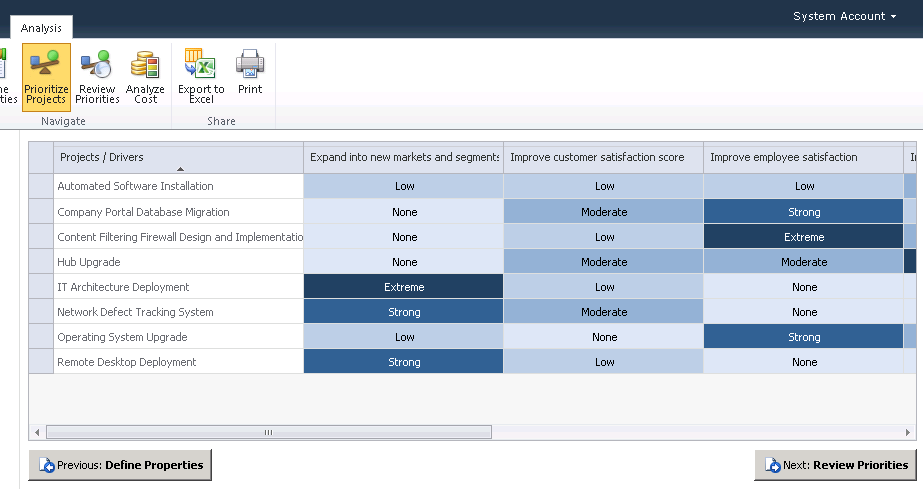
The Prioritize Projects page appears, showing your selected projects in a matrix against your business drivers. As shown in Figure 27-13, this reflects how the generator of each project scored the project against your business drivers.
In the lower-right corner, click Next: Review Priorities.
The Review Priorities page shows the overall score of each of the selected projects. The score indicates an overall rating of how closely the project maps to your overall business strategy based on your prioritized business drivers. The projects are listed in order from highest to lowest score.
In the lower-right corner, click Next: Analyze Cost.
The Analyze Cost page shows the cost analysis for each of the projects based on the primary budget constraint you selected in the Define Properties page. (See Figure 27-14.)
Figure 27-14. The Analyze Cost page shows the cost information together with the priority scores for each of the selected projects.
You can modify the Metrics section to see the analysis based on different criteria. Under Metrics, click Modify. In the Modify Constraints dialog box that appears, select a constraint, click Add, and then click OK. The Analyze Cost page is recalculated to show results with the new constraint.
On this page, you can force a project in or out of the portfolio mix regardless of its score or performance against other constraints. You might want to do this if a project has too low a score with too high a cost and is being recommended to be removed from the portfolio but you know that you need to include it because of a compliance or legal mandate or another compelling reason. Click in the Force In/Out cell, then click the button that appears. Click Forced-In. In the same way, you can force a project out of the portfolio mix if needed, perhaps as a tradeoff for including a forced-in project.
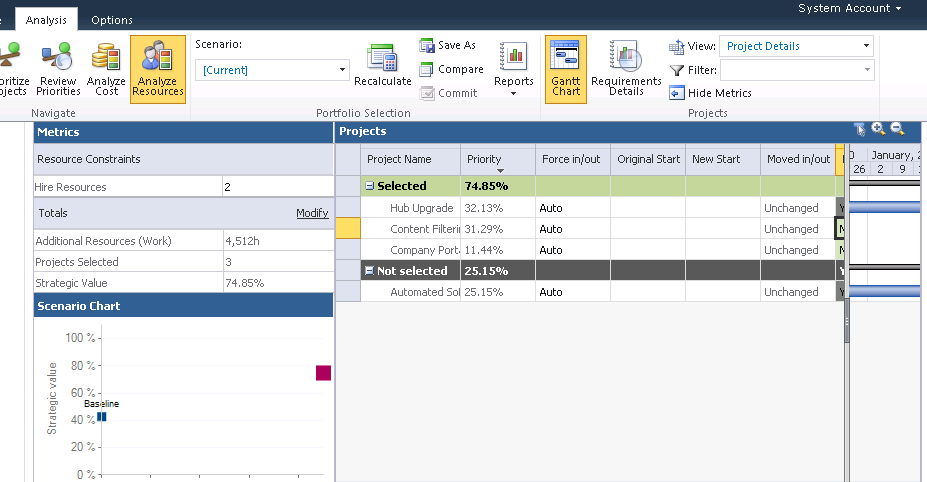
If you chose to include resource analysis, a fifth page of the wizard appears: Analyze Resources, as shown in Figure 27-15.
The Analyze Resources page shows which of the selected projects can be done based on current resources. On this page, you can also perform what-if analyses by adding new resources.
When you are finished, on the Analysis tab, in the Analysis group, click Close.
This saved analysis is added to any other analyses listed on the Portfolio Analysis page. You can return to it as needed, compare it with others, and make other changes.

After working through the Portfolio Analysis Wizard, you see clearly where the selected projects stand against different criteria, including business drivers, cost, resources, and other criteria you might choose. You can force projects in or out of the portfolio mix as needed, so you have the flexibility you need to ensure that your portfolio includes the proper projects.
Once your decisions have been made about which projects are in and out, communicate this information to all stakeholders. The projects that have received the green light can now move forward with planning and execution.