Although most projects are focused primarily on the finish date or the budget, sometimes a project is defined by its resource limitations, and the use of resources becomes the most important priority in the management of that project. In a resource-constrained project, you need to ensure that all the resources are used well, are doing the right tasks, and are cations and then fix any problems you find. You still need to keep your eye on the schedule and your costs, but schedule and costs are secondary to resource utilization in this type of project.
Balancing resource workloads isn’t really part of the project triangle. However, you can adjust scope—add or remove tasks—to balance workload. You can also adjust the schedule—split or delay tasks—until resources have time to work on them. You can adjust costs—add more money—to pay for additional resources to help balance the workload.
When you analyze resource workloads, you’re actually reviewing the way resources are assigned. The optimum situation is when all resources in your project are assigned at their full availability, no more and no less, throughout their time on the project.
However, there might be resources for whom you are not able to fill every hour. These resources are said to be underallocated. You might have to pay for these resources’ time even when they’re not directly carrying out project tasks, and this can adversely affect your project budget.
Other resources might consistently have more work than time. These resources are overallocated. Such a situation represents risk to the project. If there’s more work than available time, it’s highly probable that deadlines will be missed, quality will suffer, costs will increase, or scope will have to be cut.
At this point in the project, just before work actually begins, you can look at scheduled underallocations and overallocations, make the necessary changes to maximize your resource contributions, and reduce your risk from overallocation. The goal is to balance the workload as much as possible so that you’re not wasting resource dollars and burning out your most valuable resources.
You can use one of several Project 2010 views to review how much work is assigned to a resource in any selected time period, as follows:
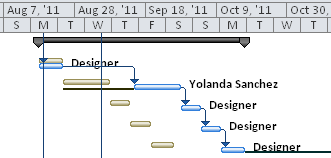
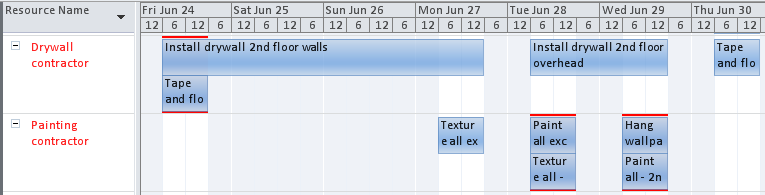
Team Planner. On the View tab, in the Resource Views group, click Team Planner, a new view available in Microsoft Project Professional 2010. This view shows the tasks assigned to resources along a timescale grid, making it easy to spot any over-allocations, as shown in Figure 10-20.
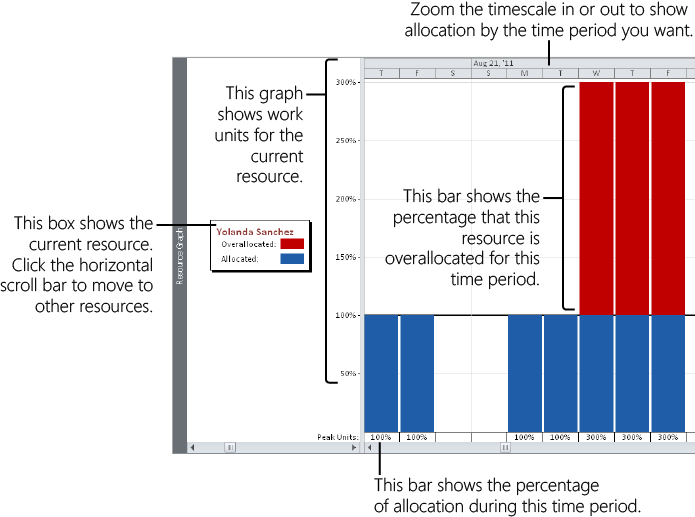
Resource Graph. On the View tab, in the Resource Views group, click Other Views, and then click Resource Graph. In the default Peak Units format, the Resource Graph displays how much the resource is being utilized, in terms of maximum units, for the time period specified in the timescale. This is shown in Figure 10-21.
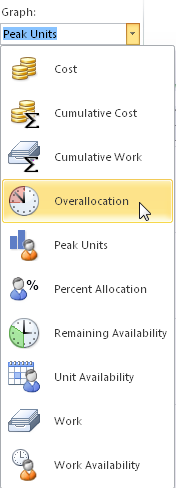
You can see the resource allocation information by different measures in the Resource Graph. On the Format tab, in the Data group, click the arrow in the Graph box, and then pick a different format, such as Overallocation or Percent Allocation.
To change the timescale used in the Resource Graph, on the View tab, in the Zoom group, click the Zoom button, and then click Zoom Out or Zoom In. You can also use the Zoom slider in the lower-right corner of the Project 2010 window.
To see information for a different resource, on the Format tab, in the Navigate group, click Previous Resource or Next Resource. Another method is to simply press the Page Up or Page Down buttons on the keyboard.
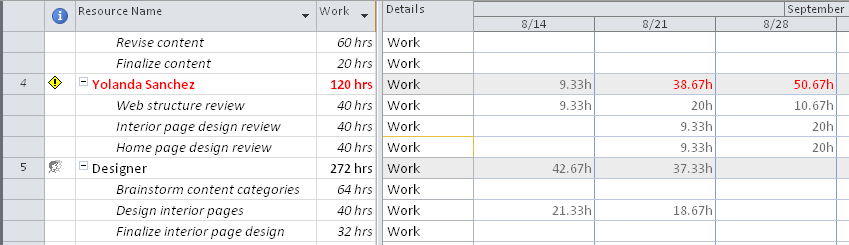
Resource Usage view. On the View tab, in the Resource Views group, click Resource Usage. Each resource is listed with all assigned tasks, as shown in Figure 10-22. The timesheet area of the view shows how work is allocated over the selected time period. As in all resource views, overallocated resources are shown in red. In the timesheet area, any work that exceeds the resource availability for the time period is also shown in red.
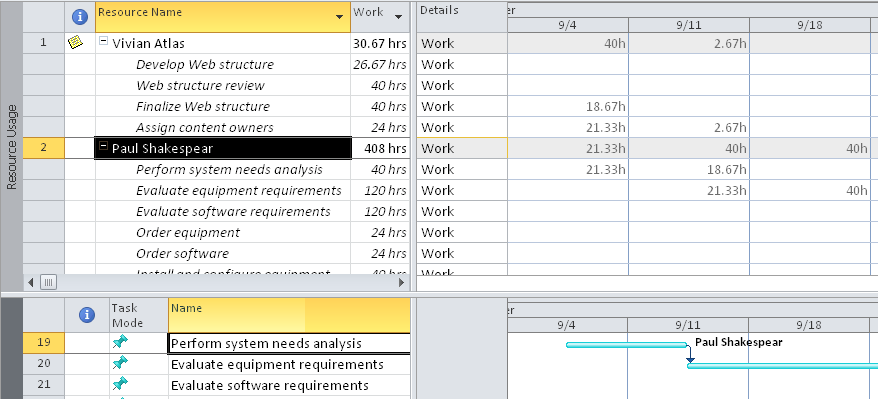
Resource Allocation view. On the View tab, in the Resource Views group, click Other Views, and then click More Views. In the dialog box, double-click Resource Allocation. This is a combination view, with the Resource Usage view in the upper portion of the view and the Leveling Gantt in the lower portion, as shown in Figure 10-23.

Note
When you want to switch to another view from a combination view, remember to first remove the split in the window. Right-click in the timesheet area of the combination view, and then click Show Split to remove the split. You can also simply double-click the split bar. When you switch to the view you want, it appears in the full screen the way you expect.
Find Overallocations Throughout a Task or Resource View
Resource views always show overallocated resources in red, making it easy to find them. If you have a long list of resources and you want to examine the overallocations quickly, go to the resource view where you want to review resource or assignment information for overallocated resources. On the Resource tab, in the Level group, click Next Overallocation. Continue to click Next Overallocation to move to the next overallocated resource in turn.
You can even use the Next Overallocation tool in a task view. In the task view, do the same thing: Click Resource, Level, Next Overallocation. You can review each task that has overallocated resources assigned.
Resource Form. You get the most information in context when reviewing the Resource Form in a combination view. First display a resource sheet, such as the Resource Sheet or Resource Usage view. If the view includes a timesheet area, such as in the Resource Usage view, right-click in the timesheet area, and then click Show Split. Or, drag the split bar from the lower-right corner of the Project 2010 window, just below the down arrow in the vertical scroll bar. When you split a resource view, the Resource Form appears in the lower portion of the view, with the resource sheet in the upper portion as shown in Figure 10-24.
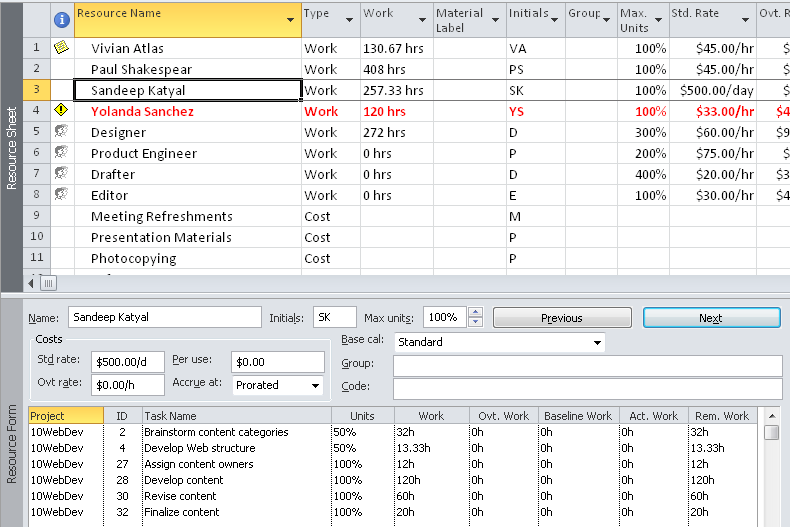
Figure 10-24. The Resource Form displays details about the resource selected in the upper portion of the view.
Another means of seeing how your resources are allocated is to run assignment-related reports, as follows:
Who Does What When report. On the Project tab, in the Reports group, click Reports. Double-click Assignments, and then double-click Who Does What When. This report displays the amount of work for each resource by day and by assignment.
Overallocated Resources report. On the Project tab, in the Reports group, click Reports. Double-click Assignments, and then double-click Overallocated Resources. This report displays only overallocated resource information. If no resources are overallocated, no report is generated.
Resource Usage report. On the Project tab, in the Reports group, click Reports. Double-click Workload, and then double-click Resource Usage. This report displays the amount of work each week by resource and assignment. Totals are included for the resource, assignment, and week.
Resource Availability visual report. On the Project tab, in the Reports group, click Visual Reports. Click the Resource Usage tab, and then double-click the Resource Availability Report (Metric) or Resource Availability Report (US). As shown in Figure 10-25, Visio opens to show how much time each resource is working throughout the project and how much time the resource has available.
Inside Out: Task views give mixed messages about overallocated resources
New in Project 2010 is the Overallocated Resource indicator for task sheets. This indicator appears for any task that has overallocated resources assigned to it. This indicator shows in any task sheet, such as the Gantt Chart or the Task Sheet, that includes the Indicators column (of course, you can add it to any other task table).
If you right-click the Overallocated Resource indicator, you can resolve the overallocation by clicking Fix In Task Inspector or Reschedule To Available Date.
Another way to see if your tasks are assigned to overallocated resources is to add the Overallocated column to a task sheet. To do this, click the column heading to the right of where you want to insert the Overallocated column. On the Format tab, in the Columns group, click Insert Column. In the newly inserted column, type ov to quickly scroll through the drop-down menu, and then click Overallocated.
The Overallocated field is a Yes/No field. Yes appears for any tasks to which overallocated resources are assigned. You can sort by the Overallocated field to better focus on balancing the assignments for those tasks. Note that by default, even resources overallocated by a couple of hours in just one week are marked as overallocated.
The problem is that you might see overallocated resource indicators on tasks for which the Overallocated field says No. This occurs because the indicator is looking strictly at the time period for the assigned task and might be showing an overallocation even if the resource is overallocated by just one minute or one hour. By contrast, the Overallocated field might show Yes only for resources that are overallocated across the entire project by as much as a day or even a week. You can just be aware of this, or experiment with how this field reacts to different time settings in the Resource Leveling dialog box (click Resource, Level, Leveling Options). The box labeled Look For Overallocations On A X Basis contains the time settings. The default setting is Day By Day, but you might try Week By Week to get more realistic results.
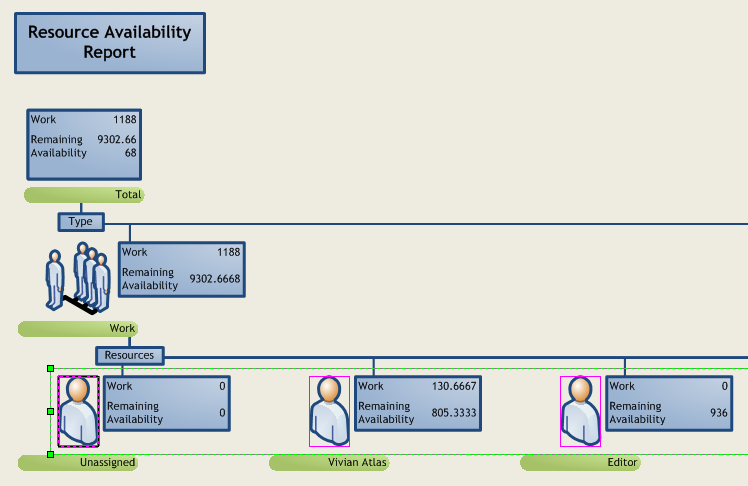
Figure 10-25. The Resource Availability Report diagrams resource usage and remaining availability in a Visio PivotDiagram.
Resource Work Availability visual report. On the Project tab, in the Reports group, click Visual Reports. Click the Resource Usage tab, and then double-click the Resource Work Availability Report. Excel opens to show a column chart of collective resource work, availability, and remaining availability in your project.
Resource Work Summary visual report. On the Project tab, in the Reports group, click Visual Reports. Click the Resource Usage tab, and then double-click the Resource Work Summary Report. Excel opens to show work, work availability, and remaining availability for each resource in the project.
Reports are particularly useful for resource management meetings or team status meetings.
You can filter a view to examine task allocation, as follows:
Filter for overallocated resources in a resource sheet such as the Resource Usage view. On the View tab, in the Data group, click the arrow in the Filter box, and then click Overallocated Resources.
Filter for a specific resource in a task sheet like the Gantt Chart. On the View tab, in the Data group, click the arrow in the Filter box, click Using Resource, and then enter the name of the resource whose assigned tasks you want to see.
When you want to see all resources or tasks again, on the View tab, in the Data group, click the arrow in the Filter box, and then click No Filter.
If you find that resources are overallocated or underallocated, check with the resources to see whether their availability can be modified to reflect how they’re needed on the project. For example, if a full-time resource is consistently 50 percent underallocated throughout the life of the project, you might consider changing his units to 50 percent and making him available as a 50-percent resource on another project. Or if a part-time resource is consistently 20 percent overallocated, ask her if she can add more time to her availability on the project.
To change resource units, in a resource sheet, double-click the resource name to open the Resource Information dialog box. Click the General tab. In the Resource Availability table, specify the units in the Units field. If necessary, enter the starting and ending dates of the new levels of availability.
To change a resource’s working time calendar, click the Working Time tab in the Resource Information dialog box. Make the necessary changes to increase or decrease the resource’s working time on the project.
You can shift assignments around to fix overallocations and underallocations. This shifting assumes, however, that you have resources with similar skills and availability who can fulfill the necessary tasks.
If you can’t add or replace resources to take the burden off overallocated resources, you might be able to delay tasks or assignments until the resources have time to work on them. Or you can simply add overtime work to account for the overallocation.
You can add underallocated resources to tasks to assist overallocated resources. Depending on the task type, you can distribute the work or the assignment units among the assigned resources, thereby better balancing the workload.
Note
For more information about adding resources to tasks, including the impact of effort-driven scheduling and the different task types, see Adjusting Resource Settings to Bring in the Finish Date.
A great way you can use the new Team Planner (available in Project Professional 2010) is to shift assignments around to resolve overallocations. Not only can you easily see when and why overallocations occur, but you can move the assignment from an overallocated resource to another resource or to another time period.
Simply drag the task bar in the timesheet area of the Team Planner to assign it to another resource or to move it to another, less busy time period for the original resource. Dragging the task bar adds a leveling delay value to all tasks, whether they’re manually or automatically scheduled.
Note
For more information, see Using the Team Planner to Assign Resources.
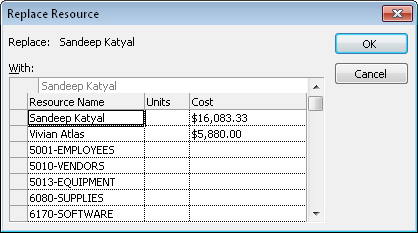
Another way to move assignments from an overallocated resource to one who has more time is to replace the overallocated resource on the task with another resource by using the Assign Resources dialog box. On an assignment, you can replace overallocated resources with underallocated ones as long as they have the same skills and availability. To replace a resource on a task using the Assign Resources dialog box, do the following:
In a task sheet such as the Gantt Chart, select the task for which you want to replace resources.
On the Resource tab, in the Assignments group, click Assign Resources.
In the Assign Resources dialog box, click the resource you want to replace.
The currently assigned resources are at the top of the list and have check marks next to their names.
The Replace Resource dialog box appears, as shown in Figure 10-26.
Click the resource you want to add to the task, and then click OK.
The old resource is replaced with the new one.
For an automatically scheduled task, you can delay a task or an assignment until the assigned resource has time to work on it, as follows:
Leveling delay. This is a task delay—the amount of time that should pass from the task’s automatically scheduled start date until work on the task should actually begin. It delays all assignments for the task. Leveling delay can also be automatically calculated and added by the Project 2010 leveling feature.
Note
For more information about leveling, see Leveling Assignments.
Note
Don’t confuse lag time with task delay. Lag time is the amount of time to wait after the predecessor is finished (or has started, depending on the link type) before a successor task should start. For more information about lag time, see Delaying Linked Tasks by Adding Lag Time.
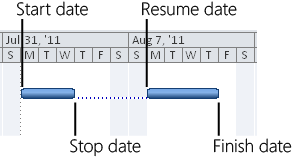
Assignment delay. This is the amount of time that should pass from the automatically scheduled task’s scheduled start date until the assignment’s scheduled start date. (See Figure 10-27.)

Figure 10-27. Assignment delay is the amount of time from the start date of the task to the start date of the assignment.
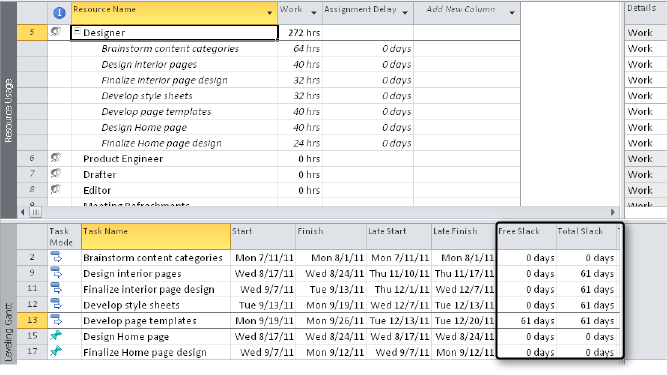
Because it’s best to delay within available slack time, review the tasks or assignments in context of their slack time and then add delay as time is available. Otherwise, you could push out the finish date of the task (or even of the project) if it’s a critical task. To check available slack, do the following:
On the View tab, in the Resource Views group, click Other Views, and then click More Views. In the More Views dialog box, click Resource Allocation, and then click Apply.
In the Resource Usage view pane, click the resource or assignment for which you want to examine slack and possibly delay.
Click the Leveling Gantt view pane.
On the View tab, in the Data group, click Tables, and then click Schedule.
Review the Free Slack and Total Slack fields to find tasks that have slack. (See Figure 10-28.)
You probably will need to drag the vertical split bar to the right to see these fields.
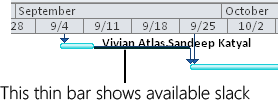
Also review the timesheet area of the Leveling Gantt. The thin bars to the right of the regular Gantt bars show any available slack, as shown in Figure 10-29.
After you find tasks with slack you can use, add leveling delay as follows:
With the Resource Allocation view displayed, click the Leveling Gantt view pane.
On the View tab, in the Data group, click Tables, and then click More Tables. In the More Tables dialog box, click Delay, and then click Apply.
In the Resource Usage view pane, click the assignment whose task you want to delay.
In the Leveling Gantt view pane, in the Leveling Delay field, enter the amount of time you want to delay the task.
If you want to delay an individual assignment for a task that has multiple resources assigned, add assignment delay instead of leveling delay, as follows:
With the Resource Allocation view displayed, click the Resource Usage view pane.
Click the column heading to the right of where you want to insert the Assignment Delay column.
On the Format tab, in the Columns group, click Insert Column.
In the newly inserted column, click Assignment Delay.
In the Assignment Delay field of the assignment you want to delay, enter the length of the delay.
This entry indicates how much time after the task’s start date the resource is to wait before starting work on this assignment.
Often, you can’t reassign overallocated work to other resources or delay a task until later. In this case, overtime might be the answer.
Project 2010 does not automatically assign overtime or the associated overtime pay rate when a resource’s work exceeds your definition of a normal workday (for example, 8 hours) or a normal workweek (for example, 40 hours). You need to specify overtime work, in addition to total work, for the resource.
For example, suppose a resource is assigned to 10 hours of work in a day. You can specify 2 of those hours as overtime work. The work still totals 10 hours, but 8 hours are regular work and 2 hours are overtime.
Note that overtime can only be entered for automatically scheduled tasks.
To specify overtime work for overallocated resources on automatically scheduled tasks, first set up a view containing overtime work fields, as follows:
On the View tab, in the Resource Views group, click Resource Usage.
Be sure the default Usage table is applied. To quickly see which table is applied, rest the mouse pointer in the All Cells box at the upper-left intersection of the table. The pop-up message indicates the name of the table. To change the table, right-click the All Cells box, and then click Usage.
Right-click the column heading for the Work field, and then click Insert Column.
In the drop-down menu that appears in the new column, type ov to quickly move to the Overtime fields. Click Overtime Work.
The Overtime Work field is added to the Resource Usage view.
On the Format tab, in the Details group, click Add Details.
The Detail Styles dialog box appears.
In the Available Fields box, click Overtime Work, and then click Show. (See Figure 10-30.)
Figure 10-30. Use the Detail Styles dialog box to add another row of timephased information to the timesheet area of the Resource Usage or Task Usage view.
The Overtime Work field appears in the Show These Fields box.
Click OK.
The Overtime Work field is added to the timesheet area of the view, as shown in Figure 10-31.


Figure 10-31. Add the Overtime Work field to the sheet and timesheet area of the Resource Usage view.
Note
You might also find it helpful to add the Regular Work field to the sheet area of the Resource Usage view. Right-click the Work field, and then click Insert Column. Type re, click Regular Work, and then click OK.
To specify overtime work for overallocated resources, follow these steps:
In the Resource Usage view containing the Overtime Work field, find the first overallocated resource (highlighted in red) for whom you want to add overtime work.
Under the overallocated resource, review the assignments and the hours in the timesheet area of the view. Find the assignments that are contributing to the overallocated work amounts.
In the sheet area of the view, in the Overtime Work field for the assignment, enter the amount of overtime you want to designate.
Don’t change the work amount because as the overtime work amount is a portion of the total work. The amount you enter in the Overtime Work field is distributed across the time span of the assignment, which you can see in the timesheet area of the view. For example, if an assignment spans 3 days, and you enter 6 hours of overtime, an amount of overtime is added to each day for the assignment.
In the timesheet area of the view, you can view how the overtime work you enter is distributed across the assignment’s time span. However, you cannot edit the amount of overtime in the individual time periods.
Repeat this process for any other assignments to automatically scheduled tasks causing the resource to be overallocated.
When you enter overtime work, the duration of the task is shortened. Overtime work is charged at an overtime rate you enter for the resource in the Resource Sheet or the Resource Information dialog box. The resource name is still shown in red as overallocated, but now you’ve accounted for the overallocation by using overtime.
Sometimes a resource needs to stop working on one task, start work on a second task, and then return to the first task. This can happen, for example, when an overallocated resource needs to work on a task with a date constraint. In this situation, you can split a task. With a split task, you can schedule when the task is to start, stop, and then resume again. As with delay, splitting a task can ensure that resources are working on tasks when they actually have time for them.
Note
In a split task, the task duration is calculated as the value of both portions of the task, not counting the time when the resource is working on something else. However, if you split a task with an elapsed duration, the duration is recalculated to include the start of the first part of the task through the finish of the last part of the task.
To split a task, follow these steps:
Display the Gantt Chart.
On the Task tab, in the Schedule group, click Split Task. Your mouse pointer changes to the split task pointer, and a small pop-up window explains how to create the split.
In the timesheet area of the view, position your mouse pointer on the Gantt bar of the task you want to split; point to the date when you want the split to occur. The date the pointer is resting on shows in the Split Task pop-up window.
Drag the Gantt bar to the date when you want the task to resume. The date the split pointer is dragged to also appears in the Split Task pop-up window.
When you release the mouse, the task is split at your specified dates, as shown in Figure 10-32.
You can split a longer task multiple times if necessary. Click Task, Schedule, Split Task to activate each new split.
To remove the split in a split task, drag the right portion of the split Gantt bar toward the left portion until both sides of the bar touch and join.
Note
After you begin the execution and tracking phase of the project, you can also split a task on which a resource has started working. For more information on rescheduling, see Rescheduling the Project.
Note
You can also adjust scope to balance the workload. For more information about cutting scope, see Changing Project Scope.
You’ve already seen how you can use the new Team Planner in Project Professional 2010 to review overallocations and move assignments to other resources or other time periods. You can also use the Team Planner to prevent overallocations. In the prevent overallocations mode, the Team Planner moves assignments causing an overallocation to a later time when the assigned resource has time for it. You can think of this as “leveling lite,” because Project 2010 uses the same priorities when preventing overallocations as it does when leveling.
Note
For more information, see Leveling Assignments in the next section.
To use the Team Planner to prevent overallocations, follow these steps:
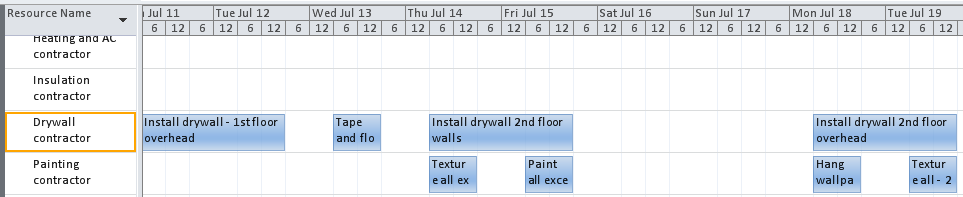
Display the Team Planner. Any overallocations are highlighted in red, as shown in Figure 10-33.
On the Format tab, in the Schedule group, click Prevent Overallocations.
The button changes color to indicate that Team Planner is in the prevent overallocations mode. As shown in Figure 10-34, any tasks causing overallocations are rescheduled for later times when the assigned resource has time for them.
Review the rescheduling of the assignments to be sure you approve of the changes. If you want to move assignments, click Prevent Overallocations again to turn it off.
Before leaving the Team Planner, be sure to turn Prevent Overallocations off: click Format, Schedule, Prevent Overallocations.
Note
The prevent overallocations mode in Team Planner reschedules manually scheduled tasks and automatically scheduled tasks and adds leveling delay to both task types.
Note
For more information about the Team Planner, see Using the Team Planner to Assign Resources.
The previous sections described how you can delay and split tasks to balance or level resource assignments based on your own observations, preferences, or date calculations. If you find it tedious or troublesome to do it yourself, Project 2010 can balance the workload for you with the leveling feature, which calculates and implements delay and splits in your project plan according to general specifications that you set.
You can have Project 2010 level assignments whenever you give the command. Although it’s often not advisable, you also have the option to keep the leveling feature on all the time. If you leave leveling on all the time, whenever you change the schedule in some way, Project 2010 levels assignments immediately.
Here’s a summary of what Project 2010 leveling does and does not do. Leveling:
Adds delay or splits a task so that the task can be done later when the assigned resources have available time.
Can balance the workload of resources assigned to manually as well as automatically scheduled tasks.
Balances the workload of human, equipment, and generic resources.
Does not reassign tasks or assignment units.
Does not change work amounts.
Does not operate on material resources or cost resources.
When you level resources, you carry out some or all of these major process steps, which are detailed in the following sections.
You can set a priority for each task if you like. Priorities range from 0 (the lowest priority) to 1,000 (the highest). All tasks start with a default priority of 500; that is, they are all equal in priority. Project 2010 uses the task priority setting as a leveling criterion. If you have certain tasks that are so important that you never want the leveling feature to split or delay them, you should set them at a priority of 1,000, which ensures that Project 2010 will never use that task to level resources. You might have other tasks that, although important, have more potential flexibility as to when they can be completed. Those tasks can be set at a lower priority, such as 100. Having tasks set at lower priorities gives Project 2010 the flexibility it needs to effectively level resource assignments.
To change the priority of an individual task, do the following:
In the Gantt Chart or other task sheet, double-click the task whose priority you want to change from the default of 500.
In the Task Information dialog box, click the General tab.
In the Priority box, enter the number representing the priority you want for this task.
Suppose there are ten tasks throughout your project that you want to set at a higher priority than the average. You can select those tasks and then change their priority in one operation, as follows:
In the Gantt Chart or other task sheet, select all the tasks whose priority you want to change to the same number.
On the Task tab, in the Properties group, click Information.
In the Multiple Task Information dialog box, click the General tab.
In the Priority box, enter the number representing the priority you want for all selected tasks.
You can add the Priority field to a task sheet and change the priority for tasks individually throughout the sheet view. To do this, follow these steps:
In the Gantt Chart or other task sheet, click the column to the right of where you want the new Priority column to be inserted.
On the Format tab, in the Columns group, click Insert Column.
In the new column, type pr to scroll quickly through the drop-down menu, and then click Priority.
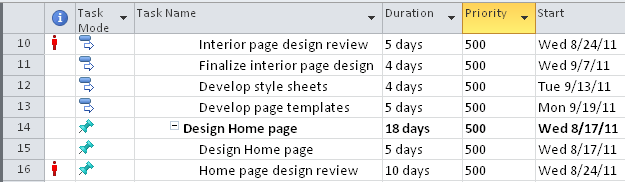
The Priority column appears in your sheet view, as shown in Figure 10-35.
For any task whose priority should be other than the default, enter the number in the Priority field.
You use the Resource Leveling dialog box to set your leveling preferences and give the command to level. However, the default settings of the dialog box work for the majority of resource-leveling needs. It’s a good idea to try leveling with those settings first and see how they work for you. Then you’ll have a better idea of the kinds of controls you want to impose on the leveling operation.
Follow these steps to level all resources using the default settings:
On the Resource tab, in the Level group, click Level All.
This command is available in any view, whether it’s a task or resource view.
If you’ve done any previous leveling, or if you have added leveling delay manually or by using the Prevent Overallocations feature in the Team Planner, it might look at first like nothing has happened. Another possible result is that it might look like more resources are overallocated than before.
If either of these is the case, it’s likely caused by the fact that by default, any values in the Leveling Delay field must first be cleared. Click Level All a second time.
Any overallocated resources throughout the project are leveled, as shown in Figure 10-36.
Examine a task view and resource view to see how Project 2010 has distributed assignments to eliminate all overallocations.
If you see a change that you don’t like, you can change it manually. If you see many changes that you don’t like, simply click Undo on the Quick Access Toolbar to undo the leveling operation.
Note
Remember that leveling does not reassign tasks or units. It does not change work amounts. It causes the start date to move later by adding delays, or it splits a task so that it finishes later when the assigned resources have available time.
Note
To see the changes that leveling has made, see Checking the Results of Leveling.
To level one or more selected resources, follow these steps:
With any view showing, on the Resource tab, in the Level group, click Level Resource.
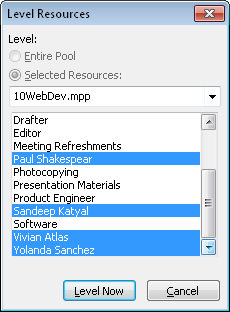
The Level Resources dialog box appears, listing all resources. If you selected resources, they are selected in the dialog box, as shown in Figure 10-37.
Figure 10-37. The Level Resource command resolves any overallocations for selected resources according to the settings in the Resource Leveling dialog box.
Note that the Entire Pool and Selected Resources options are dimmed when you’re working with a standalone file. When you’re working with a project file attached to a resource pool, the options become available, with Entire Pool being the default. If you click the Selected Resources option, you can choose whether the resources listed are from the resource pool file or from the sharer file (the file using the resource pool). Because it’s always a good practice to keep the leveling operation as small and contained as possible, selecting certain resources for leveling is recommended over leveling resources in the entire pool.
Note
For more information, see Sharing Resources by Using a Resource Pool.
You can change the resources selected in the dialog box.
To select multiple adjacent resources, drag from the first to the last resource.
To select multiple nonadjacent resources, click the first resource, hold down the Ctrl key, and then click each of the others.
Click Level Now.
The assignments for the selected resources are leveled as necessary.
Note
You can level selected resources from a task sheet as well. In the Gantt Chart, for example, select one or more tasks that are assigned to overallocated resources. Click Level Resource. All resources assigned to the selected tasks are listed in the Level Resources dialog box. Select the resources you want to level, and then click Level Now.
To level only the assignments on selected tasks, follow these steps:
Switch to a task view and select the tasks whose assignments you want to level. Be sure to select more than one task, as leveling selected tasks needs to be done in relation to at least one other task. To select multiple adjacent tasks, drag from the first to the last task.
To select multiple nonadjacent tasks, click the first task, hold down the Ctrl key, and then click each of the others.
You can click or drag any field in a task row to select it. You must select at least two tasks for the Level Selection button to become available.
On the Resource tab, in the Level group, click Level Selection.
Any overallocations within the selected tasks are leveled according to the settings in the Resource Leveling dialog box.
Remember, in this case the leveling is done only on the selected tasks. The resources might still have overallocations elsewhere in the project.
To see the criteria Project 2010 uses when leveling, open the Resource Leveling dialog box. You can make a variety of adjustments to customize how leveling is done in your project. These settings also control how tasks are moved when you use the Prevent Overallocations mode in the Team Planner.
To set leveling options, follow these steps:
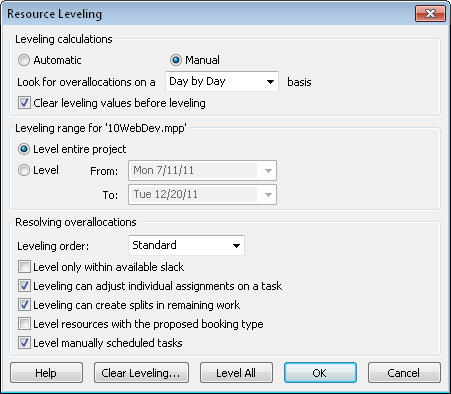
On the Resource tab, in the Level group, click Leveling Options.
The Resource Leveling dialog box appears, as shown in Figure 10-38.
Make any changes to reflect your leveling preferences.
Note
See Understanding Leveling Options in the next section for more details.
Click Level All.
Regardless of whether any tasks or resources are selected, all overallocations throughout the project are leveled according to your settings.
If you’ve leveled your project a few times and want to take more control over how Project 2010 levels, change the options you want in the Resource Leveling dialog box. The following list details the available options:
Calculate automatically or manually. Under Leveling Calculations, be sure that the Manual option is selected. This ensures that resources are leveled only when you explicitly give one of the leveling commands (Level All, Level Resource, or Level Selection).
The Automatic option is available if you want Project 2010 to level resources whenever you make a change that affects scheduling. However, be aware that this setting can cause Project 2010 operations to become sluggish and therefore this option is not recommended. If you do select the Automatic option, clear the check box labeled Clear Leveling Values Before Leveling to improve performance.
Specify the overallocation leveling time period. Resources are considered overallocated if they have even one minute of work scheduled beyond their availability, as determined by their resource calendars and maximum units. You can set the time period at which leveling is triggered in the box labeled Look For Overallocations On A Basis. By default, the time period basis is a day, so if resources are overallocated by one minute within a day, they’ll be leveled. If you set the overallocation leveling time period basis to the week, resources that are scheduled for more work than can be accomplished by their weekly availability will be leveled. The choices are Minute By Minute, Day By Day (the default), Week By Week, and Month By Month.
Clear leveling. The Clear Leveling Values Before Leveling check box is selected by default. This setting specifies that any delays previously entered as a result of leveling or as a result of manually entering leveling delay are to be cleared before the next leveling operation is performed. The Clear Leveling button does the same thing. Use the check box if you’re about to level again and you want to start fresh. Use the button if you’re not planning to level right now, but you want to remove any leveling delay from your project plan. If the Clear Leveling button is dimmed, that means there is nothing to clear.
Level certain tasks or the entire project. Under Leveling Range, you can specify that only those tasks falling within a date range you enter should be leveled. This can be particularly useful in projects that take place over a long period of time or that are subject to many changes. The default is for all tasks in the project to be leveled.
Set the order of leveling operations. When Project 2010 starts to level, it first determines which tasks are causing overallocations. Then Project 2010 works through the project, adding delays and splitting tasks to remove the overallocation. You can control the order in which Project 2010 levels through the project by setting the leveling order. By default, Project 2010 uses the Standard leveling order, which looks at task relationships, slack, start dates, priorities, and constraints to determine whether and how tasks should be leveled. (See Table 10-1.) If you choose the ID Only leveling order, Project 2010 delays tasks with the higher ID numbers before considering any other criteria. If you choose the Priority, Standard leveling order, Project 2010 first looks at any priorities you’ve set and then all the factors of the Standard leveling order.
Level within available slack. By default, the Level Only Within Available Slack check box is cleared. Select this check box if you need to ensure that leveling will not push out the finish date. However, unless your project has a fair amount of built-in slack, if this check box is selected, you might not see many changes to your project.
Selecting this check box, at least for your first try, can be a good way to see what adjustments can be made by delaying assignments and splitting tasks without pushing out the project finish date. If you don’t see many changes as a result, you might realize that you indeed need to add resources, cut scope, or extend the project finish date.
Adjust individual assignments on a task. By default, the check box labeled Leveling Can Adjust Individual Assignments On A Task is selected. This setting controls adjustments to when a resource works on a task, independent of other resources working on the same task.
Create splits in remaining work. By default, the check box labeled Leveling Can Create Splits In Remaining Work is selected. This means that not only can leveling split tasks that haven’t started yet, it can also split tasks that are currently in progress.
Level proposed resources. If you’re working in Project Professional 2010, you can add resources tentatively to your project and assign them to tasks. Such resources have a proposed booking type. By default, proposed resources are not included in a leveling operation; only committed resources are. If you want to include proposed resources in the leveling operation, select the check box labeled Level Resources With The Proposed Booking Type.
Note
For more information about working with proposed and committed resources, see Proposing Tentative Resources. If you’re working with proposed enterprise resources, see Building Your Enterprise Project Team.
Level manually scheduled tasks. By default, the check box labeled Level Manually Scheduled Tasks is selected. This means that if your project includes manually scheduled tasks, they will be leveled along with any automatically scheduled tasks needing to be leveled.
After you change the leveling options to your satisfaction, level the resources in your project plan by clicking the Level All button. To level only selected resources, click OK in the Resource Leveling dialog box, select the resources you want to level, and then use the Level Resource command. To level only assignments within selected tasks, click OK in the Resource Leveling dialog box, selected the tasks, and then use the Level Selection command.
Table 10-2 explains the order in which resource leveling is carried out.
To see the changes made to your project plan as a result of leveling, use the Leveling Gantt. Display the Leveling Gantt as follows:
On the View tab, in the Task Views group, click the arrow next to Gantt Chart.
If Leveling Gantt is not listed, click More Views, and then click Leveling Gantt.
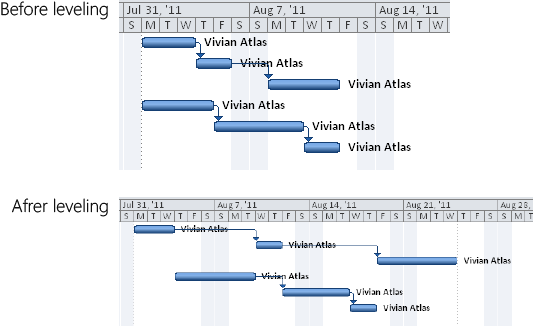
As shown in Figure 10-39, two sets of Gantt bars in this view show task scheduling before and after leveling, which lets you compare the changes made. The Gantt bars also indicate any task delays and splits created by the leveling operation.
If you don’t like the results of leveling, click Undo on the Quick Access Toolbar until the leveling is cleared. Or, click Resource, Leveling, Clear Leveling.