
MICROSOFT Project 2010 and Microsoft Outlook 2010 are well suited for one another. A Project 2010 plan is made up of tasks, and Outlook 2010 includes the Tasks list. Project 2010 schedules when tasks should start and finish; Outlook has its calendar to show when the items on its Tasks list are scheduled to occur. In Project 2010, you specify information about resources who will work on tasks; Outlook has its address book that lists information about people in your organization and beyond. You need to communicate project information to team members and other stakeholders; Outlook can send messages and files to these people.
When you use Project 2010 and Outlook together, you can do the following:
Import tasks from your Outlook Tasks list to your Project 2010 plan or include tasks from a Project 2010 plan in your Outlook Tasks list.
Copy tasks from an Outlook e-mail message to create tasks in your Project 2010 plan, or copy tasks from a Project 2010 plan to an Outlook e-mail message.
Add resource information to your project plan from your Outlook address book.
Send or route an entire project file to others.
Publish a project file to an Exchange folder.
Some of these techniques work only with Outlook. With other techniques, you can use any 32-bit Messaging Application Programming Interface (MAPI)–based e-mail system. These distinctions are made throughout the chapter.
You can pull tasks from your Outlook Tasks list into your project plan. This technique is helpful when you initially identify tasks in Outlook and then realize that they represent work you need to track in your project plan. You can also copy a task from your project plan and add it as a task in your Outlook To-Do List, which comes in handy when you want a reminder about work you need to perform and when it is due. If you’re like many users and keep Outlook open throughout the workday, you can maintain visibility to your most pressing project tasks.
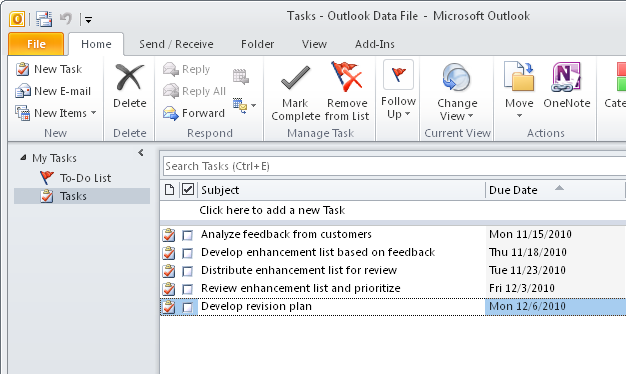
Suppose you started brainstorming tasks for a new project in your Outlook Tasks list, and you’re now ready to import those tasks into Project 2010. (See Figure 20-1.)
Note
If you want to specify the hours of work in Outlook, double-click the task to edit it. On the Task tab, in the Show group, click Details. Type the work value in the Total Work field. Click Save & Close to save the task.
To import Outlook tasks into your project plan, follow these steps:
In Project 2010, open the project plan into which you want to import the Outlook tasks.
On the Task tab, in the Insert group, click the down arrow below the Task button, and then click Import Outlook Tasks.
If a security alert appears, click Allow.
As long as at least one incomplete task is present in your Outlook Tasks list, the Import Outlook Tasks dialog box appears (see Figure 20-2), even if Outlook is not already running. Any tasks marked complete in Outlook are not listed in the dialog box.
Select the check box for each task you want to import. Click the Select All button to import all listed tasks.
Items displayed with a darker background are folders or summary tasks, and you might not want to import them. If the same tasks are saved in multiple folders, be careful to select just one instance of the task for import. Clear the check box for any Outlook tasks not relevant to your project plan.
After selecting the tasks you want, click OK.
The tasks you selected are appended after the last task in your project plan. (See Figure 20-3.)

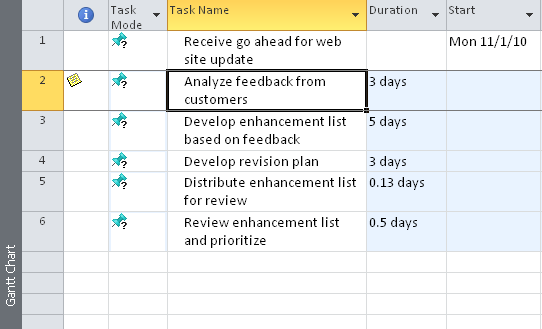
The imported Outlook tasks have the following characteristics:
If the task mode for new tasks is set to Manually Scheduled, the tasks are created as manually scheduled tasks, and durations from the Outlook tasks are copied to the Project 2010 Duration field. The Start field for these tasks remains empty.
If the task mode for new tasks is set to Auto Scheduled, the tasks are created as automatically scheduled tasks, and durations entered in Outlook are not copied to Project 2010. The imported Outlook tasks revert to the default estimated duration of 1 day. The start dates of the imported tasks are set to the project start date with the ASAP constraint.
There are no links, predecessors, or assigned resources.
Any notes entered in Outlook become task notes. Double-click the Note indicator in the Indicators column to review the note.
Copy Tasks To and From Outlook E-mail Messages
Suppose you ask team leads to identify tasks for their portions of your project. They send you e-mail messages with the tasks they identified listed in the body of the message. When you use Project 2010 and Outlook 2010, you can copy these tasks to your Project 2010 file simply by copying the text of the message and pasting it into the Task Name column of a Project 2010 table.
In the opposite direction, you can paste Project 2010 task information into an Outlook e-mail message. The information that you copy is automatically pasted as a table with the headings from the Project 2010 table in the first row. The Project 2010 table data that you paste into an Outlook e-mail message also retains the formatting you applied in Project 2010.
Note
For more information about copying and pasting between Project 2010 and other applications, see Copying from Project 2010 to Another Application and Copying from Another Application to Project 2010.
Adding Outlook tasks to your project plan can help you quickly create tasks necessary to your project. Going the other direction—that is, adding key project tasks from your project plan to your Outlook Tasks list—is helpful when you want to keep a closer eye on critical tasks or milestone tasks, for example. Adding project tasks to your Outlook Tasks list is also helpful when you want to monitor tasks that you’re assigned to.
In Project 2010, you can send several tasks and some of their associated information to your Outlook Tasks list by using the Set Reminder command. However, this command is not on the ribbon by default.
If you plan to frequently add Project 2010 tasks to your Outlook Tasks list, add the Set Reminder command to the Quick Access Toolbar. To do this, follow these steps:
Click the arrow next to the Quick Access Toolbar, and then click More Commands.
In the Choose Commands From box, click Commands Not In The Ribbon.
Click Set Reminder, and then click the Add button.
Click OK.
The Set Reminder button is added to the Quick Access Toolbar.
You can also add the Set Reminder button to a custom group in the ribbon. For information on how to do this, see Customizing the Project 2010 Ribbon.
Now that the Set Reminder button is on the Quick Access Toolbar, you can send Project 2010 tasks to your Outlook Tasks list by following these steps:
Open the project plan that contains the tasks you want to track in Outlook.
Select the tasks you want to send to Outlook.
Drag to select multiple adjacent tasks, or hold down the Ctrl key to select multiple nonadjacent tasks.
On the Quick Access Toolbar, click Set Reminder.
Specify when you want the reminder to alert you. You can set the reminder for a number of minutes, hours, days, or another period of time before the start or finish date of the selected tasks.
Click OK.
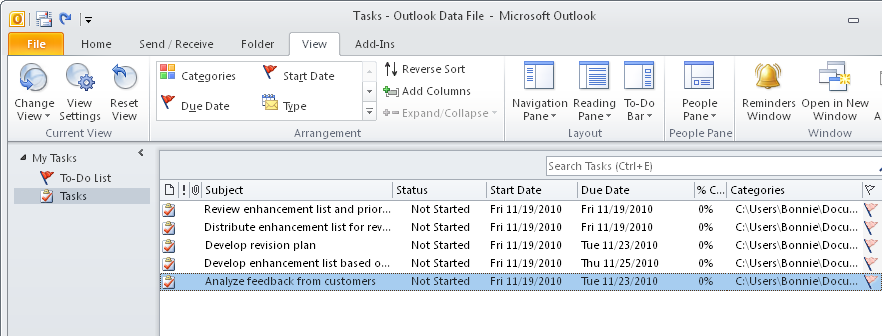
The selected tasks are added to your Tasks list in Outlook. (See Figure 20-4.) The start date, reminder time, and due date (finish date) are included.
Another way to add project tasks to Outlook is to use the Copy and Paste commands. However, you can copy only the task name, and you have to copy the tasks one at a time. To copy and paste a task name to your Outlook task list, follow these steps:
In your project plan, display a task view such as the Gantt Chart.
Select the name of the task you want to copy to Outlook.
You can copy and paste only one task at a time from your project plan to Outlook. Be sure to select only the task name. If you select multiple fields, all the information is pasted together in the task’s Subject field in Outlook.
On the Task tab, in the Clipboard group, click Copy.
Switch to Outlook and display the Tasks view or the To-Do list.
Right-click in the Subject entry box labeled Click Here To Add A New Task, and then click Paste.
The task you copied from your project plan appears in the box.
Press Enter.
The task is added to the Tasks list.
Repeat steps 2 through 6 for any additional tasks you want to copy to Outlook.