
You’re now at the point where you can start Project 2010 and actually create your project plan. When you create a new project file, you first decide whether to schedule from a start date or finish date. You then set your overall project calendar that the tasks will be scheduled against. If you want to, you can attach project documentation such as your all-important scope statement and possibly other project-related documents.
To begin creating your new project plan, start Project 2010 and choose whether you’re creating a new project from scratch, from a template, or from an existing project plan.
Note
If you haven’t installed Project 2010 yet, refer to Appendix A, for installation guidelines and details.
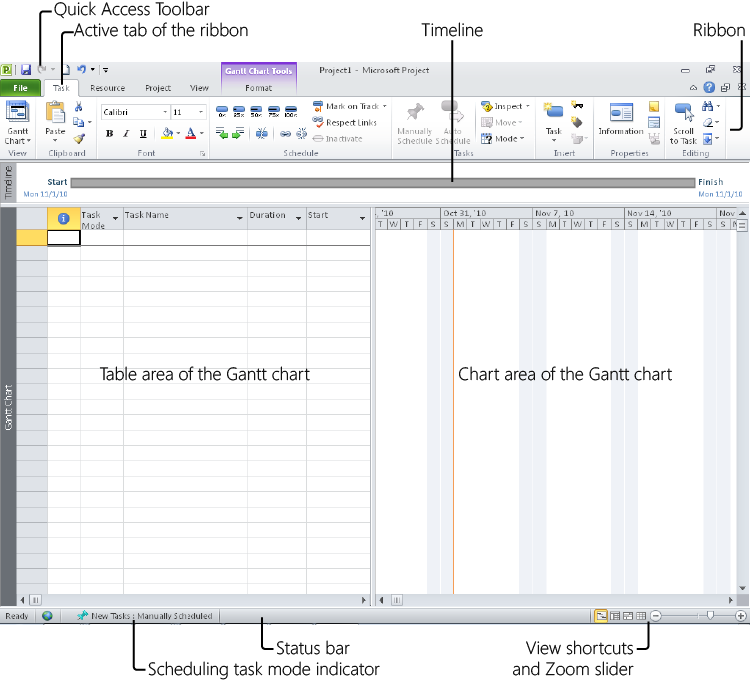
To start Project 2010, click the Windows Start button. Point to All Programs, click the Microsoft Office folder, and then click Microsoft Project 2010. You’ll see a blank project file, as shown in Figure 3-1.
Note
If you’re working with enterprise projects using Microsoft Project Professional 2010, you might first be prompted to enter your account name and password to connect to Microsoft Project Server 2010.
Note
Depending on how you customize your setup, you might also be able to open Project 2010 by double-clicking its icon on the Windows desktop.
The Project 2010 workspace is called the view, and the view that appears by default when you first open Project 2010 is the Gantt Chart. The Gantt Chart is made up of a task table on the left and the chart showing Gantt bars on the right.
Note
For more information about working with the Gantt Chart and the other views available in Project 2010, see Using Views.
If you want to create your new project plan from scratch, you can use the blank project file that appears when you first open Project 2010.
If you already have another project file open, and you want to create a new project from scratch, follow these steps:
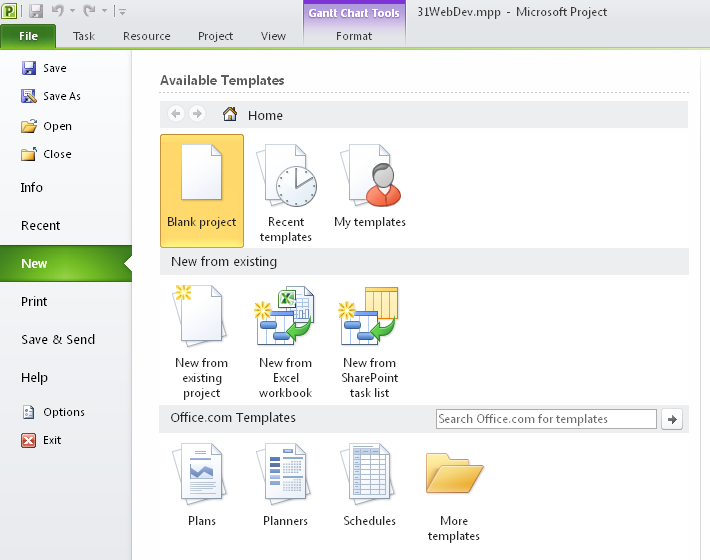
On the File tab, click New.
The Project 2010 Backstage view appears.
Under Available Templates, double-click Blank Project.
A blank project appears.
By default, new blank projects are set for manually scheduled tasks. For more information about manual versus automatic scheduling, see Chapter 5.
Add the New Button to the Quick Access Toolbar
If you frequently create new projects from scratch, consider adding the New button to the Quick Access Toolbar, located in the upper-left corner of the Project 2010 window. Click the arrow at the right edge of the Quick Access Toolbar, and then click New. The New button is added. When you click the New button on the Quick Access Toolbar, you don’t need to go through the Backstage view; a blank project is created in one quick step.
Note
For more information, see Customizing the Quick Access Toolbar.
You can also create a new project from a template. A template is a type of project file that contains project information that helps you start your project more quickly. The template usually contains a list of tasks, already sequenced and organized. The task list might be further detailed with phases, milestones, and deliverables. There might be additional task information in the template as well, such as task durations and task dependencies. You can use this task list as the basis for your project. You can add, remove, and rearrange tasks, adapting the task information as needed to correspond to your project requirements. A template can also include resource information, customized views, calendars, reports, tables, macros, option settings, and more.
A template file has the extension .mpt, indicating that it is the Microsoft Project template file type. When you open and modify a template file, it is saved as a normal .mpp (Microsoft Project plan) file by default.
Note
For more information about file types and project file management, see Chapter 32.
As of Project 2010, all Microsoft Project templates are downloadable from Office.com, rather than built directly into Project 2010. Although you need to be connected to the Internet to access the available templates, you can download and store the ones you use more frequently on your local computer. You also have ready access to new templates as they are added to Office.com from various sources.
In Project 2007, 41 templates were built in to the product. In Project 2010, through Office.com, about twice that number are available, and more are being added. These templates reflect various types of product, service, or activity projects in different industries and organizations, and they are based on widely accepted industry standards. Table 3-1 shows a sampling of the types of templates available.
Table 3-1. Project Templates
Business Development | Startup business plan |
New product plan | |
New product launch | |
Marketing campaign planning | |
Customer Service | Customer feedback monitoring |
Customer service ramp up | |
Post-manufacturing customer service planning | |
Construction and Facilities | Commercial construction project plan |
Engineering project plan | |
Office move plan | |
Residential construction project plan | |
Finance and Accounting | Finance and accounting system implementation |
Audit preparation process | |
Financial service offering launch | |
General Business | Annual report preparation |
Training rollout initiative and plan | |
Proposal development plan | |
Vendor evaluation and consolidation | |
Human Resources | Human resources interview plan |
Performance reviews | |
Evaluating offshoring strategy for HR functions | |
Software development plan | |
Security infrastructure | |
Software localization plan | |
Standards and Process | Project office plan |
Project Management Institute process | |
ISO 9001 management review | |
Six Sigma DMAIC cycle | |
Sarbanes-Oxley (SOX) compliance and technology options |
Search for Templates Online
New Microsoft Project templates are continually being added to Office.com, and you can see those additions from the Project 2010 Backstage view or by going to the Office.com website. These templates are created not only by Microsoft, but also by project management consultants, solution providers, and everyday users.
Although the list is the same when you browse templates from the Project 2010 Backstage view, when you go to the Office.com website, you have the added convenience of sorting or searching for templates.
For the easiest way to open Office.com from Project 2010, follow these steps:
In Project 2010, click the Help button in the upper-right corner.
Near the top of the Help screen, under the search box, click Templates.
The Microsoft Office Templates page appears in your Internet browser.
On the Templates page, click See All Categories, and then click Plans.
Click the subcategory you want—for example, Business. The list of Microsoft Office planning templates appears. Browse through the list, looking for the Microsoft Project templates. You can sort the listed templates by title or rating.
Also on this web page, you can enter keywords for the type of template you’re looking for in the search box. It might help to use “Project” as one of the keywords, because templates for various Microsoft Office programs are included here.
Click the thumbnail for a template, and a preview of the template appears. If you want to download the template, click the Download button, and then follow the instructions. When the download is finished, the template is loaded into Project 2010 as a new file based on that template.
To create a new project from a template, follow these steps:
On the File tab, click New.
The Available Templates Backstage view appears, shown in Figure 3-2.
If the template you want is already on your computer, you can find it by clicking Recent Templates or My Templates.
Otherwise, click one of the categories under Office.com Templates and browse through the templates from Office.com.
When you find the template you want, click Download, Create, or OK, and the template opens as a new project plan. (See Figure 3-3.)


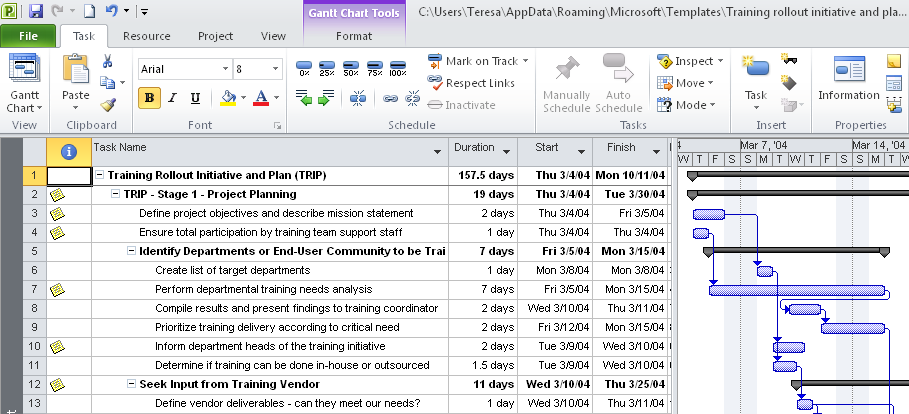
Whenever you download a template from Office.com, it becomes available on your computer, and you can find it under My Templates on the Available Templates Backstage view.

Note
If you use the enterprise features of Project Professional 2010, you use the enterprise global template, a different kind of template, which is set up by your project server administrator. The enterprise global template can include elements such as customized views, tables, and fields that reflect the project standards for your organization.
Whether you are creating a new project from scratch, from a template, or from an existing project file, your next step is to save your new project. To do this, perform the following steps:
On the File tab, click Save As.
In the Save As dialog box, choose the drive and folder in which you want to save the new project file.
If you’re set up for enterprise project management using Project Professional 2010 and Project Server 2010, you’ll see the Save To Project Server dialog box instead.
In the File Name box, enter a descriptive name for your project, and then click the Save button.
If you’re working with Project Server and you want to save the project to the server, click the Save button. Depending on how your organization has set up enterprise project management standards, you might need to add information in custom enterprise fields.
If you want to save the project locally on your own computer instead, click the Save As File button.
Note
For more information about working with enterprise projects, see Creating a New Enterprise Project.
Your first scheduling decision is whether Project 2010 should calculate the schedule of your new project from a start date or from a finish date. Often, you have a finish date in mind, but you can still schedule from the start date and then make sure you hit the targeted finish date. You’ll get more predictable results when you schedule from a start date.
For example, suppose you set up a project with 100 tasks to be scheduled from the start date. You specify task durations and sequence, link the tasks in the order they are to be performed, and indicate whether any tasks have specific dates by which they must be completed. With automatic scheduling, when you do not enter specific task start or finish dates, Project 2010 schedules tasks to be completed as soon as possible. Using task durations, links, and date constraints, Project 2010 schedules the first task to start on your project start date and the remaining tasks from that point forward until the last task is completed. If that last task is finished on a date that is too late for your project requirements, you can adjust the duration and sequencing, as well as the scope and resources assigned, to bring in the finish date to where you need it to be.
However, you might know the project finish date but not when your project will begin, because you’re receiving work from another source that could be delayed. Or the project management methodology you use might require you to schedule from a finish date.
Consider that same project of 100 tasks. In a project scheduled from the finish date, any tasks that do not require a specific date are scheduled to be done as late as possible, rather than as soon as possible. Project 2010 schedules the last task to be finished on your project finish date and works backward from that point until the first task is started. If that first task is scheduled before the current date or too early for your project requirements, you can adjust the tasks and other aspects of the schedule.
To set up your project plan to be scheduled from the project start date, follow these steps:
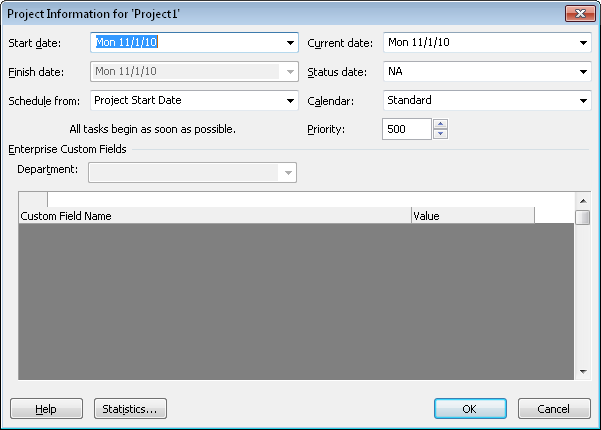
On the Project tab, in the Properties group, click Project Information.
The Project Information dialog box appears, as shown in Figure 3-4.
In the Start Date box, enter the project start date.
By default, the Start Date box shows today’s date.
In the Schedule From box, click Project Start Date.
Note that the date in the Finish Date box is dimmed, so you cannot edit it. Because you chose to schedule from the project start date, Project 2010 will calculate the finish date for you later. This is true whether the project is manually or automatically scheduled, particularly because projects can have a mix of manually and automatically scheduled tasks.
To set up your project plan to be scheduled from the project finish date, follow these steps:
On the Project tab, in the Properties group, click Project Information.
In the Schedule From box, click Project Finish Date.
In the Finish Date box, enter the project finish date.
The date in the Start Date box is dimmed, so you cannot edit it. Because you chose to schedule from the project finish date, Project 2010 will calculate the start date for you later.
Automatically Schedule from the Project Start Date or Today’s Date
In previous versions of Microsoft Project, new tasks were always scheduled from the project start date (or from the project finish date if the project was set to be scheduled from the finish date). In Project 2010, you can specify whether automatically scheduled tasks should start at the project start (or finish) date or the current date.
To specify this preference, on the File tab, click Options, and then click Schedule in the left pane. Under Scheduling Options For This Project, in the box labeled Auto Scheduled Tasks Scheduled On, select Project Start Date or Current Date.
With the project calendar, you establish the working days and times for your project and its tasks. The project calendar also becomes the default calendar for any resources working on your project. The project calendar indicates when your organization typically works on project tasks and when it’s off work. By setting your project calendar, you establish one of the fundamental methods for scheduling the tasks in your project.
You choose a base calendar to become your project calendar. You can create your own base calendar, or you can choose one of the three base calendars that come with Project 2010. A base calendar is rather like a calendar template that you can apply to a set of resources, a set of tasks, or the project as a whole. Table 3-2 describes the working days and times specified in the base calendars provided by Project 2010.
Table 3-2. Base Calendars
If you want to use the Standard base calendar as your project calendar, you don’t need to do much—the Standard calendar is the project calendar by default. If you want to use a different base calendar, you must select it as your project calendar. To do so, follow these steps:
On the Project tab, in the Properties group, click Project Information.
In the Calendar box, select the name of the base calendar.
Click OK.
You can use any of the three base calendars (Standard, Night Shift, or 24 Hours) as the basis for the project calendar, resource calendars, or task calendars. In fact, you could use all three within the same project. For example, you might apply the Standard calendar to the project as a whole, the Night Shift calendar to a certain group of resources, and the 24 Hours calendar to tasks being carried out by automated equipment.
Note
For more information about the task calendar, see Working with Task Calendars. For more information about resource calendars, see Setting Working Times and Days Off for Work Resources.
You can modify the project calendar to reflect your team’s normal working times and days off, including any holidays you’ll all be taking and other one-time calendar exceptions. You can also specify recurring exceptions in your working times calendar.
To modify the project calendar, you change the base calendar that the project calendar is using as its starting point. Any of the base calendars can be customized to reflect specialized working days and times.
As specified earlier in Table 3-2, the three base calendars that come with Project 2010 have their default working days and times. You might apply one of these base calendars to your project to make it the calendar on which your project is based. When you do this, your schedule is governed by the working days and times in that base calendar.
You can change the default working days and times of the normal work week. To do this, follow these steps:
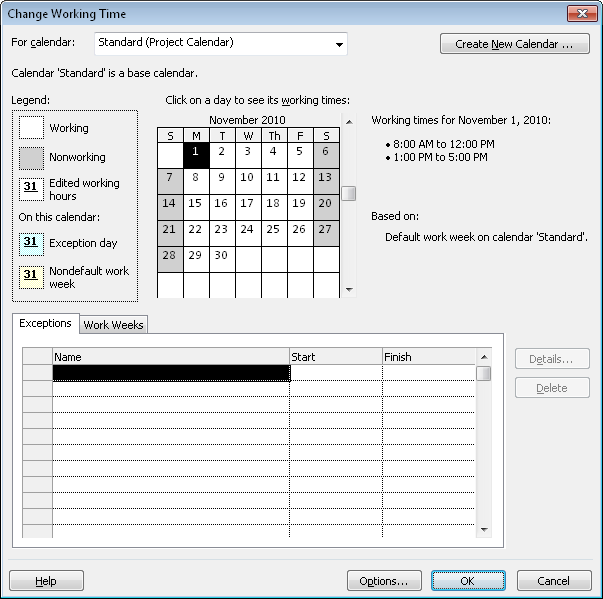
On the Project tab, in the Properties group, click Change Working Time.
In the For Calendar box, click the name of the base calendar you want to modify. (See Figure 3-5.)
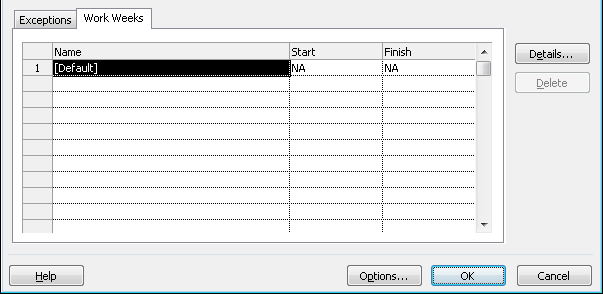
Click the Work Weeks tab, shown in Figure 3-6.
Figure 3-6. Use the Work Weeks tab to change the default work week or to create alternative work weeks.
Notice that row 1 contains the text [Default] with NA in both the Start and Finish fields. This indicates that the default working days and times are to be used whenever an alternative work week is not scheduled.
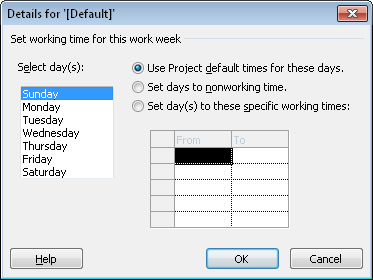
Be sure that the Default row is selected, and then click the Details button to open the Details for ‘[Default]’ dialog box, shown in Figure 3-7.
Figure 3-7. The work week Details dialog box shows the working days and times for the selected work week.
If you click a day of the week in the Select Day(s) box, its working times appear in the From/To table to the right. If no working times appear in the table, this indicates that the selected day is a nonworking day. Above the table, the option labeled Use Project Default Times For These Days is selected.
In the Select Day(s) box, click the day of the week you want to change.
You can drag to select consecutive days. You can also click the first day, hold down the Shift key, and then click the last day. To select several nonadjacent days, click the first day you want to change, hold down the Ctrl key, and then click the other days.
To change the day(s) to nonworking time, click the option labeled Set Days To Nonworking Time.
To change a nonworking day to a working day, or to change the working times of a working day, click the option labeled Set Day(s) To These Specific Working Times. Then, in the From/To table, type the start and finish working times.
Click OK in the Details dialog box, and then click OK in the Change Working Time dialog box.
Your project might need an alternative work week specified for a particular period of time. One example might be a construction company working an accelerated schedule to complete exterior work before winter. Another example might be a training project in which the default work week is used for curriculum development and testing and a different, temporary work week is used when actual training takes place.
You can specify any number of alternative work weeks to make sure your project scheduling reflects such situations. To specify an alternative work week, follow these steps:
On the Project tab, in the Properties group, click Change Working Time.
In the For Calendar box, click the name of the base calendar you want to modify.
Click the Work Weeks tab.
Click in the next blank row below the Default row. In the Name field, type a name for the alternative work week, for example, “Roofing Week” or “Training Week.”
Click in the Start field, and then enter the first date that the alternative working times should be in effect.
Click in the Finish field, and then enter the last date that the alternative working times should be in effect.
With the row for the new work week still selected, click the Details button.
In the Select Day(s) box, click the day(s) of the week you want to change.
To change a nonworking day to a working day, or to change the working times of a working day, click the option labeled Set Day(s) To These Specific Working Times. Then, in the From/To table, type the start and finish working times.
To change the selected day(s) to nonworking time, click the option labeled Set Days To Nonworking Time.
Click OK in the Details dialog box, and then click OK in the Change Working Time dialog box.
To make a one-time exception to an existing base calendar, follow these steps:
On the Project tab, in the Properties group, click Change Working Time.
In the For Calendar box, click the name of the base calendar you want to modify.
Click the day in the calendar thumbnail whose working times you want to change.
When you click a day in the calendar thumbnail, information about that day’s working times appears to the right. This tells you whether the day is a working or nonworking day, and what the working times are. It also indicates which calendar the selected day is using and whether there’s a exception or alternative work week applied.
To change the working time of a day in another month, use the scroll arrow in the calendar thumbnail until you see the correct month.
Be sure the Exceptions tab is selected, click in the first available row in the Name column, and then enter the name of the calendar exception. Press Enter or Tab when you finish.
Although entering a name for the exception is not required, it can be useful for distinguishing the reason for the exception. Examples might include “Martin Luther King, Jr. Holiday” or “Department Offsite.”
After you press Enter or Tab, the name is entered and the Start and Finish dates are entered, defaulting to the date you clicked in the thumbnail calendar.
If necessary, change the date in the Start or Finish field.
When you enter an exception for a working day, by default it changes to a nonworking day.
Note
By default, the Start and Finish dates are the same—the date selected in the thumbnail calendar. If the date of an exception is several months in the future, it’s easier to enter the date in this field rather than scroll to it in the thumbnail calendar.
Also, if the exception goes across a series of days, enter the last day of the exception in the Finish field. This can be useful for entering a two-week holiday shutdown, for example.
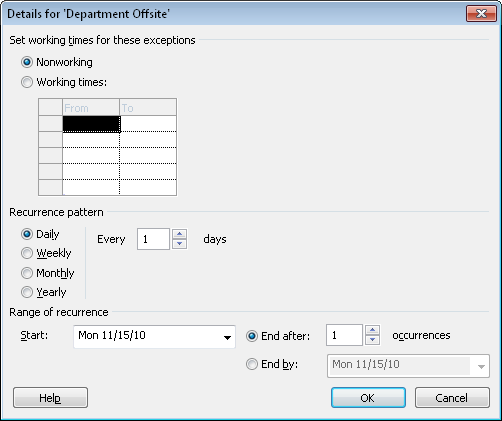
If the exception is a change other than switching a working day to a nonworking day, click the Details button to open the Details dialog box. (See Figure 3-8.)
If you’re changing working time to nonworking time, select the Nonworking option.
If you’re changing the working time to something other than the default, select the Working Times option, and then change the times in the From and To boxes as needed.
Click OK to close the Details dialog box, and then click OK to close the Change Working Time dialog box.
You can set up a calendar exception to take place on a recurring pattern. For example, if you’re developing the plan for a three-year project, you’ll probably want to show that the New Year’s Day holiday exception takes place on January 1 each year, or that the Thanksgiving holidays take place on the fourth Thursday and Friday of November each year.
In the same way, if you know that no work on the project will take place from 9:00 to 11:00 A.M. on the first Monday of every month because of the monthly divisional staff meeting, you can build that into your project’s working times calendar.
To set up a recurring calendar exception to an existing base calendar, follow these steps:
On the Project tab, in the Properties group, click Change Working Time.
In the For Calendar box, click the name of the base calendar you want to modify.
Click the day in the calendar thumbnail whose working times you want to change.
On the Exceptions tab, click in the first available row in the Name column, and then enter the name of the calendar exception. Press Enter or Tab when you finish.
If necessary, change the dates in the Start or Finish field.
Click the Details button.
If you’re changing working time to nonworking time, select the Nonworking option.
If you’re changing the working time to something other than the default, select the Working Times option, and then change the times in the From and To boxes as needed.
Under Recurrence Pattern, specify how often the calendar exception takes place; that is, daily, weekly, or monthly.
Also specify the details of when the recurring calendar exception is to take place during that frequency—for example, every other Thursday or the first Monday of every month.
Under Range Of Recurrence, specify the number of times the recurring calendar exception is to take place or the date when the recurring calendar exception is to end.
Click OK to close the Details dialog box, and then click OK to close the Change Working Time dialog box.
If you need to apply a common working calendar to your project, a group of resources, or a set of tasks that isn’t built in to Project 2010 already, you can create your own base calendar.
To create a new base calendar, follow these steps:
On the Project tab, in the Properties group, click Change Working Time.
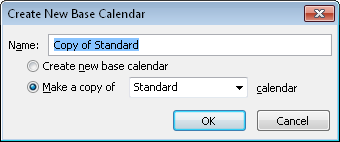
Click the Create New Calendar button. The Create New Base Calendar dialog box appears, as shown in Figure 3-9.
In the Name box, type the name you want for the new base calendar (for example, Swing Shift).
Select the Create New Base Calendar option if you want to adapt your calendar from the Standard base calendar.
Select the Make A Copy Of option if you want to adapt a different base calendar, such as the Night Shift calendar, to create the new calendar. Click the name of the existing calendar you want to adapt, and then click OK.
Make the changes you want to the working days and times of individual days or for a particular day of every week, as needed.
When you finish with your new base calendar, click OK.
Note
You can delete a base calendar you have created, but you cannot do it within the Change Working Time dialog box. Instead, you need to use the Organizer. On the File tab, click Organizer, and then click the Calendars tab. In the box on the right, you’ll see a list of base calendars used by the current project. Select the base calendar you want to delete, click the Delete button, and then click Yes. Click the Close button to dismiss the Organizer dialog box.
Note
For more information about the Organizer, see Sharing Customized Elements Among Projects.
You can make Project 2010 the central repository for all your important project documentation. For example, you might want to attach or link your scope statement to your project plan, as well as other documents, such as the needs analysis, market study, and product specifications.
To attach planning documentation to your project, the first step is to display the project summary task. Not only does the project summary task eventually provide summary date and cost information for the project as a whole, but it can serve as the location for your attached or linked planning documents.
There’s a quicker, more direct route to displaying the project summary task than in previous versions of Microsoft Project. On the Format tab, in the Show/Hide group, select the Project Summary Task check box.
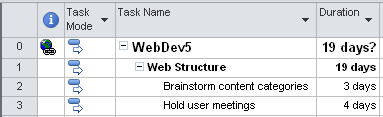
A summary task appears in Row 0 of the Gantt Chart (see Figure 3-10), adopting the name of the file as the project summary task name. If you want to change the name, click twice in the Task Name field for the project summary task. Edit the name and then press Enter.
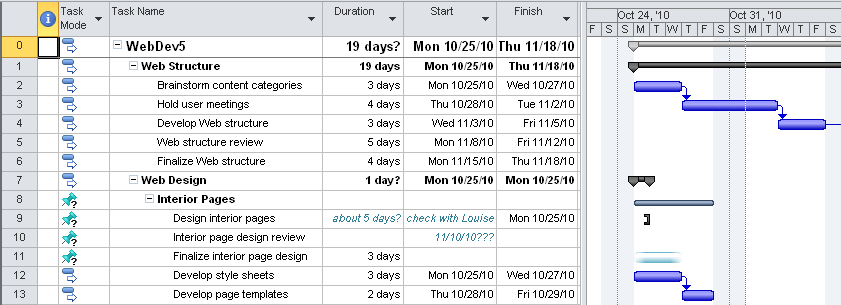
The project summary task appears in any task view for this project—for example, the Task Usage view or the Network Diagram.
You can include planning documents created in other programs within Project 2010. Although this can significantly increase the size of your project file, you’ll know that all your project information is stored in one place. To include the documents, follow these steps:
Select the project summary task.
On the Task tab, in the Properties group, click Notes.
You can also double-click the project summary task to open the Summary Task Information dialog box.
On the Notes tab, click the Insert Object button.
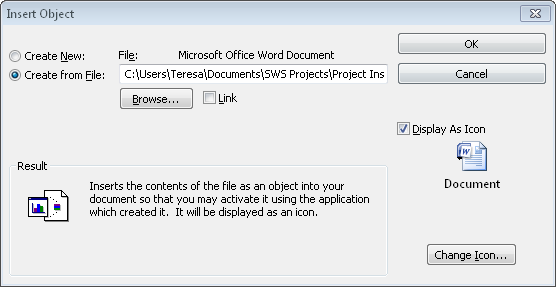
In the Insert Object dialog box, select the Create From File option, and then click the Browse button.
In the Browse dialog box, select the project planning document you want to attach to or embed in your project file. Click the Insert button.
Back in the Insert Object dialog box, select the Display As Icon check box. (See Figure 3-11.)
If the document is small, consider clearing the Display As Icon check box. Clearing this check box embeds the content of the file in your project Notes box, so you can read it directly from there.
Click OK.
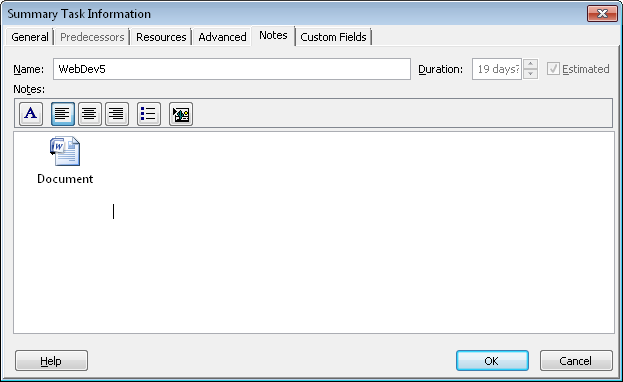
The document’s icon appears in the Notes area of the Summary Task Information dialog box, as shown in Figure 3-12.
In the Summary Task Information dialog box, click OK.
The Note indicator appears in the Gantt Chart, as shown in Figure 3-13.

Now, whenever you need to review the document, just double-click the Note indicator to open the Notes tab of the Summary Task Information dialog box. Then double-click the document icon.
Note
For more information about embedding, see Embedding Information.
Note
In addition to attaching documents to the project summary task, you can attach documents to summary tasks and individual tasks. This can be useful when you have specifications or drawings that further define the scope of a particular subphase or task. You can also attach deliverables or milestone reports to milestone tasks.
Hyperlinking is another way to include planning documents or web references with your project file. Hyperlinking is a preferred method for attaching files when you want to keep the size of your project file trimmer and you know that your project plan and associated planning documents will always be in the same place. It’s also a very efficient method for opening associated documents quickly.
Adding a hyperlink to a document or website on the project summary task ensures that the content is associated with the project as a whole, rather than with an individual task.
Note
In addition to hyperlinking to documents from the project summary task, you can create a hyperlink from summary tasks and individual tasks.
To insert a hyperlink to a project planning document or website, follow these steps:
Right-click the project summary task, and on the shortcut menu that appears, click Hyperlink.
The Insert Hyperlink dialog box appears.
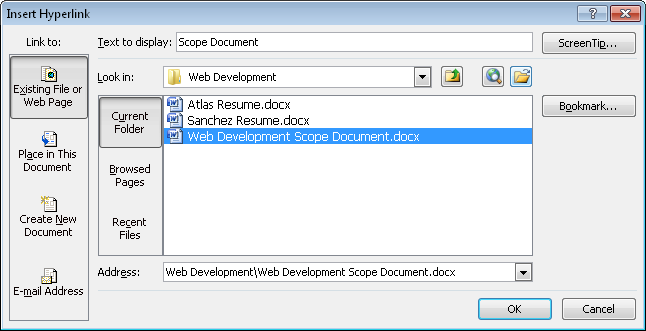
In the Text To Display box, type a descriptive name for the document to which you are linking—for example, Project Scope Statement or Web Dev Team Site.
If you’re hyperlinking a project planning document, be sure that Current Folder is selected, and browse through your computer’s file system to find and select the document. (See Figure 3-14.)
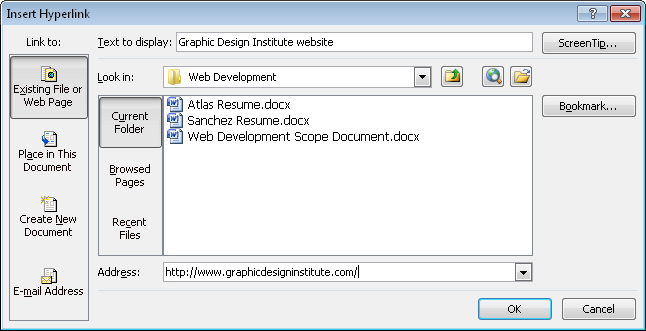
If you’re hyperlinking a web page, select all existing text in the Address box and replace it with the address for the website to which you want to hyperlink. (See Figure 3-15.)
Click OK.
The Hyperlink indicator appears in the Indicators field of the Gantt Chart, as you can see in Figure 3-16.
Now, whenever you need to review the document or go to the website, just click the Hyperlink indicator. The document opens in its own application window, or the website opens in your web browser.
Note
For more information, see Hyperlinking to Websites or Other Documents.
If you’re using Project Professional with Project Server for enterprise project management, the preferred method for keeping all project documents together is to use the document library that’s part of Microsoft Project Web App 2010. With the document library, you can set up, maintain, and share documents with the project team and other stakeholders. This way, everyone involved can view the documents through their web browsers. They can also check documents in and out, which provides vital version control.
Note
For more information about setting up a document library in Project Web App 2010, see Controlling Project Documents.