
A time-constrained project is one in which the project finish date is the most important factor in your project plan. Although you still need to balance budget constraints and satisfy the project scope, the finish date reigns supreme as the top priority.
If your project plan calculates that your finish date will go beyond your all-important target finish date, focus on the critical path. Shorten the critical path and you bring in the finish date.
Before you analyze the critical path, first take a look at your bottom line: what’s the project finish date? Follow these steps:
On the Project tab, in the Properties group, click Project Information.
In the Project Information dialog box, click the Statistics button.
The Project Statistics dialog box appears. The current, or scheduled, finish date appears in the Finish column, as shown in Figure 10-14.
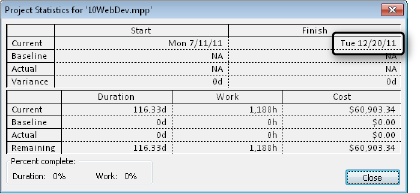
Figure 10-14. The Project Statistics dialog box shows overall project information: project start date, project finish date, total duration, total work, and total cost.
Another way to keep your eye on the project finish date at all times is to add the project summary task row to your project plan. On the Format tab, in the Show/Hide group, select the Project Summary Task check box.
The project summary task appears at the top of any task sheet, including the Gantt Chart, as shown in Figure 10-15. Task information is rolled up for the entire project and its summary total is displayed in the project summary row. Specifically, the Finish field in the project summary row shows the latest finish date in the project.
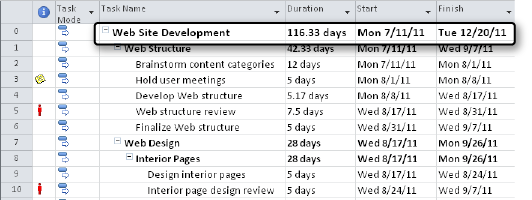
Figure 10-15. The project summary row rolls up task information to display the totals for the entire project.
To see the critical path, on the View tab, in the Task Views group, click the arrow in the Gantt Chart button, and then click Tracking Gantt. By viewing the finish date or the critical path, you can easily see whether you’re hitting your target finish date.
One efficient way to bring in the finish date is to focus on the critical tasks. You can filter your task sheet to show only critical tasks. On the View tab, in the Data group, click the arrow in the Filter box, and then click Critical. To show all tasks again, on the View tab, in the Data group, click the arrow in the Filter box, and then click No Filter.
Note
For more information, see Viewing the Critical Path.
If you’ve determined that you need to bring in the finish date, look first at the schedule itself. Be sure that all the scheduling controls you put into place are accurate and required. The fewer controls you impose, the more flexibility Project 2010 can have with scheduling, and that added flexibility can give you an earlier finish date. In the Gantt Chart or other task sheet, review and update the following:
Date constraints
Manually entered dates
Task dependencies
Durations
Task calendars
You can look at all tasks in the project, but to affect the finish date, you need only make adjustments to critical tasks. If you shorten the sequence of critical path tasks to the point at which a different sequence is now the critical path, check to see if that path finishes before your target finish date. If it does, switch your focus to that new critical path until you achieve the planned project finish date you need.
In fact, as you make adjustments to tasks and enter actual progress information for tasks, the critical path is likely to change several times throughout the span of the project. Keep a close eye on the critical path as part of your monitoring activities. It’s a good idea to apply the Schedule table or show the Total Slack and Free Slack fields in your favorite everyday table. This way you can see how close tasks are to becoming critical.
Note
If you change aspects of your schedule to bring in the finish date, the good news is that you probably won’t adversely affect your project triangle. That is, adjusting your schedule to meet your schedule requirements affects only the schedule side of the triangle; costs and scope will probably stay as they are.
First, look at any date constraints you’ve set on automatically scheduled tasks in your plan, particularly for your critical tasks. This is where you can potentially make a significant impact on your finish date. To look at the constraints you’ve applied, follow these steps:
Display the Gantt Chart or other task sheet.
On the View tab, in the Data group, click Tables, and then click More Tables.
In the More Tables dialog box, click Constraint Dates, and then click Apply.
The table shows the constraint type and constraint dates for all tasks.
If you have the tasks sorted by Task ID—that is, in their outline sequence—you can review constraints for each task within the context of its surrounding tasks. If you like, you can sort the tasks by constraint type, as follows:
Apply the Constraint Dates table to the Gantt Chart or other task sheet.
On the View tab, in the Data group, click Sort, and then click Sort By in the drop-down menu.
In the Sort By dialog box, click Constraint Type, and then click Sort.
The tasks are sorted by constraint type, which lets you see where you might have applied a Must Finish On or Start No Later Than constraint, for example. You can also see the constraints’ associated dates.
To see only the constraints for critical tasks, follow these steps:
Apply the Constraint Dates table to the Gantt Chart or other task sheet.
On the View tab, in the Data group, click the arrow in the Filter box, and then click Critical.
Only critical tasks are shown. When you want to see all tasks again, on the View tab, in the Data group, click the arrow in the Filter box, and then click No Filter.
Be sure that the constraint types and dates you have applied are truly necessary. Wherever you can, change a date constraint to a flexible one such as As Soon As Possible or As Late As Possible. Even changing an inflexible date constraint such as Must Start On or Must Finish On to a moderately flexible date constraint, such as Start No Later Than or Finish No Earlier Than, can improve your schedule. To change the constraint, do the following:
When you need to bring in your schedule’s finish date, also check the dates set for your manually scheduled tasks. While the dates you enter in the Start and Finish fields do not technically create date constraints, those dates essentially serve the same function.
In a task sheet, either group, filter for, or highlight manually scheduled tasks so that you can see them all together. Review their start and finish dates, paying special attention to any manually scheduled tasks on or near the critical path. Change the dates where you can.
The next place to check your schedule for critical path–shortening opportunities is your task dependencies. The Gantt Chart is the best view for reviewing task dependencies and their impact on your schedule. To see critical tasks highlighted, view the Tracking Gantt or Detail Gantt. Focusing on the task dependencies of critical tasks helps you bring in the finish date.
Specifically examine whether the task dependencies are required. If two tasks don’t really depend on each other, remove the link. Another option is to consider whether two tasks can begin at the same time. If so, you can change a finish-to-start dependency to a start-to-start dependency. Change a task dependency as follows:
Double-click the successor task to open the Task Information dialog box.
Click the Predecessors tab.
To change the link type, click in the Type field for the predecessor.
Click the arrow, and then click the link type you want in the list.
To remove the link entirely, click anywhere in the predecessor row and press the Delete key.
Remove All Links
If you want to start over with your task dependency strategy, you can remove all links in the project. Be sure that this is really what you want to do because it can erase a lot of the work from your project plan. A safe approach is to make a backup copy of your project before you remove all the links...just in case.
Click the Select All box just above the row 1 heading in the upper-left corner of the table. On the Task tab, in the Schedule group, click Unlink Tasks. All links on all tasks are removed.
Note
For more information about task dependencies, see Establishing Task Dependencies.
After adjusting date constraints, manually entered dates, and task dependencies, if the finish date is still beyond your target, look at task durations. However, be aware that it’s risky to be too optimistic about durations, especially if you used reliable methods such as expert judgment, past project information, or industry metrics to calculate your current durations.
You can look at durations in the Gantt Chart or most task sheets. If your tasks are sorted by Task ID (that is, in their outline sequence), you can review durations for each task within the context of its surrounding tasks. However, you can also sort tasks by duration so you can see the longer durations first. These longer durations might have more buffer built in, so they might be a good place to trim some time. To sort tasks by duration, follow these steps:
Display the Gantt Chart with the Entry table applied, or display another task sheet that includes the Duration field.
On the View tab, in the Data group, click Sort, and then click Sort By.
The Sort dialog box appears.
In the Sort By box, click Duration, and then click Sort.
The tasks are sorted by duration.
To see only the durations for critical tasks, on the View menu, click the arrow in the Filter box, and then click Critical.
When you want to see all tasks again, on the View menu, click the arrow in the Filter box, and then click No Filter.
To change a duration, simply type the new duration into the task’s Duration field.
The schedule is recalculated with the new duration.
To return to the original task order, on the View menu, in the Data group, click Sort, and then click By ID.
Note
For more information about durations, see Setting Task Durations.
Note
As you make changes to your project plan, remember that you can undo multiple edits. To undo recent edits, on the Quick Access Toolbar, click Undo. Each time you click Undo, the previous edit is undone. You can press Ctrl+Z to reverse the last edit. The series of operations you can undo goes back to the last time you saved your project.
To redo an edit that you’ve undone, click Redo on the Quick Access Toolbar. You can also press Ctrl+Y to redo undone edits.
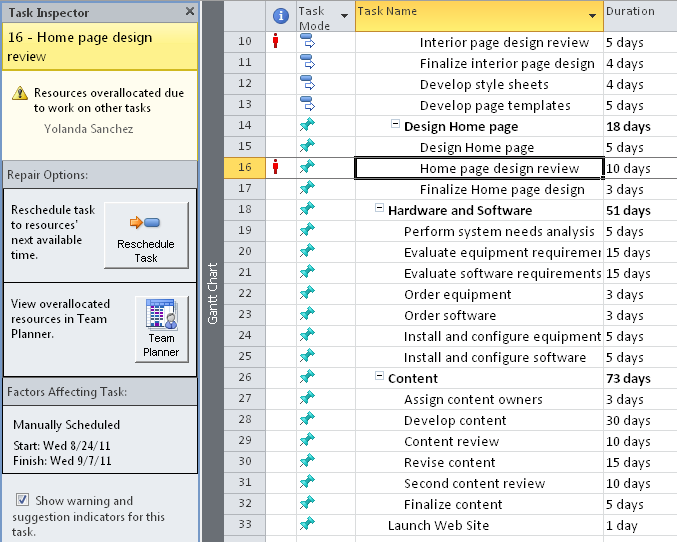
Along with constraints, dates, dependencies, and durations, a number of other factors determine the schedule of any given task. A new tool available in Project 2010 is the Task Inspector. If you used Microsoft Project 2007, you’ll see that this is a revamp of the Task Drivers pane. The Task Inspector lists the specific factors responsible for setting the start date of the selected task—for example, the project calendar, a predecessor task, a constraint date, and whether the task is manually or automatically scheduled.
To use the Task Inspector, follow these steps:
Open a task view, such as Gantt Chart or Network Diagram.
Select the task whose scheduling factors you want to review.
On the Task tab, in the Tasks group, click Inspect.
The Task Inspector appears as a pane to the left of the current view, as shown in Figure 10-16. The Task Inspector lists whether the task is automatically or manually scheduled, its start and finish date, any predecessors or constraints, and more.
You can click the name of a predecessor task to go to that task in the view and to see the task drivers for that task. You can click the name of a calendar listed in the Task Inspector to open that calendar in the Change Working Time dialog box.
Keep the Task Inspector open while you click different tasks in the task view and review their task drivers. When you’re finished with the Task Inspector, click the X in the upper-right corner of the pane to close it.
Note
If you use task calendars in your schedule, examine the tasks and the task calendars to be sure they’re accurately reflecting reality and not impeding progress. Tasks with task calendars assigned display a calendar icon in the Indicators column next to the task name. Place the mouse pointer over the icon to see more information.
Note
For more information, see Working with Task Calendars.
Another way to bring in the finish date is to adjust your resource settings. You can check that the resource availability affecting assigned task scheduling is accurate. You can also add resources to tasks to decrease task duration. Be aware that increasing resource availability as well as adding resources to tasks usually means an increase in costs.
The more availability your resources have, the sooner their assigned tasks can be completed. For example, a 4-day task assigned to a resource who works a regular 5-day week will be completed in 4 days. The same 4-day task assigned to a resource who works a 2-day week will be completed in 2 weeks. For resources assigned to critical tasks, review and update the following:
Resource calendars
Maximum (resource) units
Assignment units
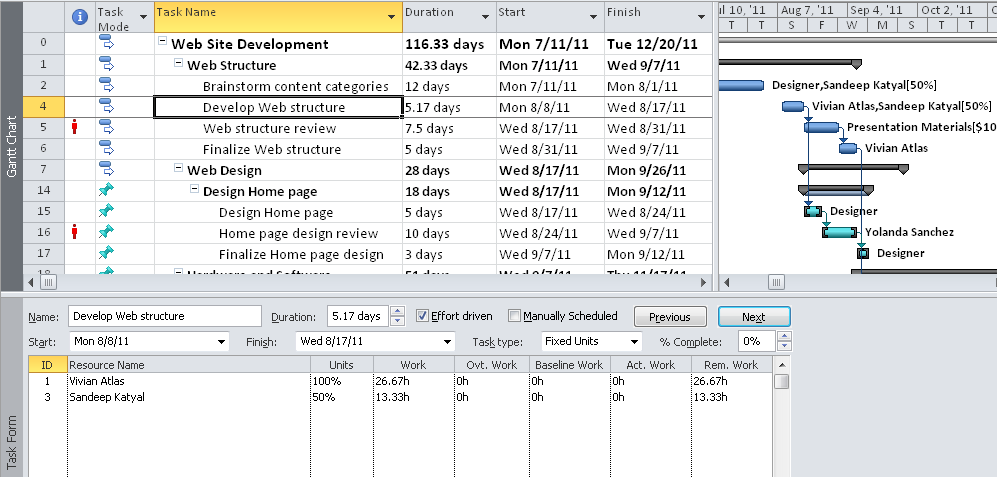
The Task Entry view is best for checking these three items. Apply the view, set the Task Form to show the resource information you need, and then filter for critical tasks, as follows:
On the View tab, in the Task Views group, click More Views.
In the More Views dialog box, click Task Entry, and then click Apply.
To view critical tasks, click in the Gantt Chart—the upper pane of the view. On the View tab, in the Data group, click the arrow in the Filter box, and then click Critical.
Only critical tasks are displayed. You can also show the Tracking Gantt or Detail Gantt, which display critical tasks in red.
Click in the Task Form—the lower pane of the view. On the Format tab, in the Details group, click Work. As shown in Figure 10-17, the Task Form changes to show resource work information, including assignment units and work amounts.
Click a critical task in the Gantt Chart pane.
The resources assigned to the selected task are listed in the Task Form pane.
To check the resource calendar for this assigned resource, double-click the resource name in the Task Form. The Resource Information dialog box appears. On the General tab, click the Change Working Time button. Check the working times set for this resource to verify that they’re correct. When you’re finished, close the Change Working Time dialog box.
Note
For more information about resource calendars, see Setting Working Times and Days Off for Work Resources.
To check resource units, return to the General tab in the Resource Information dialog box. Under Resource Availability, check the resource units and associated dates, if applicable, and ensure that they’re correct. Make any necessary changes, and then click OK.
Note
For more information about resource units, see Specifying Resource Availability with Max Units.
To check assignment units, review the Units field next to the resource name in the Task Form to ensure that the setting is correct.
To switch the Task Entry combination view to a single-pane view of the Gantt Chart, right-click in the Task Form pane, and then click Show Split to turn the split off.
If you filtered tasks and want to show all tasks again, on the View tab, in the Data group, click the arrow in the Filter box, and then click No Filter.
Note
You can check your resources’ working time calendar, their resource units, and their assignment units—and everything might look correct. A great technique is to scan your project for any assignment units of less than 100%. Find out if the assigned resources can provide any more time on these tasks, especially the critical tasks, to help bring in the finish date. It doesn’t hurt to ask, at least.
A key method of shortening the critical path and bringing in the project finish date is to add resources to critical tasks in such a way as to decrease the task’s duration. For example, two people working together might be able to complete a development task in half the time it takes either of them, individually. For this to be the case, the task must be either a fixed-units effort-driven task or a fixed-work task. Obviously, the task cannot be a fixed-duration task.
With fixed-units, effort-driven scheduling, when you assign an additional resource to a task that already has assigned resources, the amount of work scheduled for each assigned resource decreases. Likewise, when you remove a resource from an effort-driven task, the amount of work scheduled for each assigned resource increases.
The same is true for fixed-work tasks, which are effort-driven by definition. When you add or remove resources (that is, assignment units) on a fixed-work task, duration changes but work remains fixed, of course.
Note
For more information about task types and effort-driven scheduling, see Controlling Schedule Changes with Task Types.
To check the task type of an individual task, follow these steps:
In a task sheet, such as the Gantt Chart, double-click the task.
In the Task Information dialog box, click the Advanced tab.
Review the Task Type list and the Effort Driven check box. Make any necessary changes.
You can add the task type and effort-driven fields to a task sheet so that you can see the scheduling methods for all tasks at a glance, as follows:
Display the task sheet to which you want to add the new columns.
Click the column heading to the right of where you want to insert the new column.
On the Format tab, in the Columns group, click Insert Column.
In the drop-down menu that appears in the new column, type ty to move quickly to the Type field in the list.
Click the Type field, and the inserted column shows all task types for each task.
You can use this Type field to quickly change task types.
Follow steps 1 through 5 to add the Effort Driven field to the task sheet.
This field displays Yes or No, indicating whether the task is effort-driven.
When you assign additional resources to your fixed-units, effort-driven or fixed-work critical tasks, the duration of those critical tasks is reduced, which in turn reduces the length of the critical path.
Note
Be aware that as you add resources to critical tasks, you run the risk of reduced productivity. Additional overhead might be associated with bringing on additional resources. More support might be needed to get those resources up to speed on the tasks, and you might lose whatever time savings you thought you might gain. Take care to add resources who are experienced enough to hit the ground running so your efforts don’t backfire.