SOMETIMES the information you use to build a schedule might start in Microsoft Excel 2010. For example, team leaders might use Excel to build task lists for their portion of a project, or detailed information about available resources might be stored in an Excel workbook. Regardless of whether you want to exchange a little or a lot of data with Excel, sharing data between Microsoft Project 2010 and Excel is easy. You can copy data from Excel to Project 2010 or use the Excel-to-Project templates to import information into Project 2010.
Going the other direction, you’ll find plenty of reasons to transfer some of your Microsoft Project data to Excel. For example, you can export project cost and earned value data to Excel, where you can create graphs, such as S-curves, to analyze project performance. If you are spoiled by the power of Excel PivotTables and PivotCharts for other kinds of management reporting you do, you can use Project 2010 visual reports to display Microsoft Project data in Excel PivotCharts and control how that data is presented. Then, you can pivot to your heart’s content.
In addition, some crucial details are easier to deal with in formats such as text documents, spreadsheets, or databases. For example, information about product defects, their causes, and their resolutions is best suited to a spreadsheet or database file. You might want some information like this available in your project schedule. You can even link Excel information to Project 2010 so that the information is updated automatically. For example, you can update the status of change requests that you’ve added to your schedule.
Note
For information about exchanging information with applications besides Excel, see Chapter 17.
Whether you want to integrate Excel information into your project plan or feed information from Project 2010 to an Excel workbook, there are several methods for exchanging information. Transferring data between these two programs can simplify aspects of project planning, progress tracking, status reporting, and stakeholder communication.
The methods for transferring information between Project 2010 and Excel, which are described in detail throughout this chapter, are as follows:
Copy and paste sheet or graphic information.
You could copy tasks identified by your team leads from an Excel workbook to a Project 2010 file to build your initial task list, or you could copy the calculated costs of phases from a Project 2010 schedule to the project’s capital budgeting Excel workbook. You could also paste the Excel cells that summarize software defect status into the Project 2010 Gantt Chart near the testing and debugging tasks.
Insert, or embed, a Project 2010 file in an Excel file.
For example, you could embed a Project 2010 file in the Excel file you use to select or prioritize projects.
Insert, or embed, an Excel workbook or chart in a Project 2010 file.
This is helpful if you want to review pending change requests in an Excel file while you scan your Project 2010 schedule for resources with available time. You might also refer to your risk management plan in an Excel file to determine how to respond to a problem that has arisen in your project.
Link information dynamically between Project 2010 and Excel files so that when that information changes in one file, the same information is automatically updated in the other file to reflect that change.
Linking information is ideal when information changes frequently. For example, linking cost fields in Project 2010 to cells in an Excel cost workbook keeps your cost analyses up to date.
Open, or import, an Excel file as a Project 2010 file.
This method comes in handy when you have schedule-related data in Excel, such as an initial task list or a resource list, that you want to use in Project 2010.
Save, or export, a Project 2010 file as an Excel file. The file is converted to the Excel file format, so it can be opened directly in Excel.
Saving a Project 2010 file to Excel means you can use Excel’s data analysis and formatting capabilities to analyze project information. This is particularly helpful if you don’t have access to Microsoft Project Server 2010 and its enterprise project management features.
By using the Copy and Paste commands, you can exchange sheet data and static graphics between Project 2010 and Excel. For example, if you have an Excel file with a proposed list of tasks (with estimated durations) for a project, you can copy the cells for the tasks into a Project 2010 task sheet to get your project schedule started. Similarly, the Copy and Paste commands work well if you want to display a graphic from one program in the other—for example, within the Gantt Chart for an equipment deployment project, you can show an Excel graph of sensors installed each week.
You can also use the Copy command to insert an embedded object. The benefit of embedding an Excel file within a Project 2010 schedule, or vice versa, is that you can open the embedded object without switching programs and you don’t have to have access to the original file. Embedded objects are particularly helpful when you send files to someone else.
You might want to copy two types of information from Excel worksheets:
Data from Excel worksheet cells into cells in a sheet view in Project 2010.
Copying data from Excel cells to Project 2010 cells is a wonderfully simple way to import data from Excel to Project 2010—as long as the columns of information in Excel and Project 2010 line up.
Images of Excel graphs in graphically-oriented areas in Project 2010.
Excel is the program of choice when you want to graph numeric data. If you want to display a graph, such as a pie chart or a line graph, within your Project 2010 file, you can copy the graph from Excel to the chart area of a Gantt view or to other non-table areas in Project 2010.
Any content within Excel worksheet cells can be copied and pasted into a Project 2010 table. However, the order and data type of the columns of information must match, so some up-front preparation is needed in either the Excel workbook or the Project 2010 table.
Match the Columns
Copying and pasting information is one of the easiest ways to get information from Excel to Project 2010. However, copying and pasting successfully depends on correctly matching up the columns of Excel information you copy and the Project 2010 columns into which you paste.
For example, suppose that your Excel worksheet contains five columns you want to copy to your project plan: Task Name, Resource, Duration, Start Date, and Finish Date. To copy these columns from Excel to Project 2010, you must first make sure that the columns in the Excel worksheet match the order of the columns in a Project 2010 task table. You can rearrange the columns in Excel or in Project.
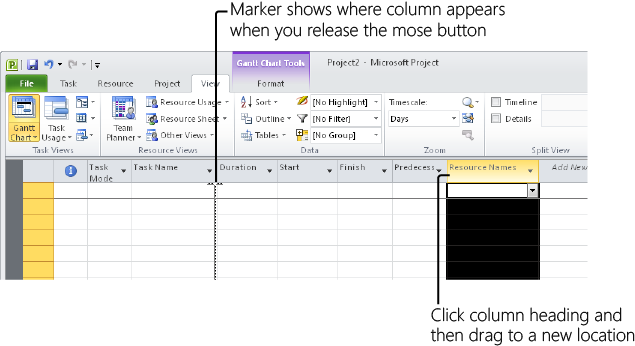
The following are techniques you can use to arrange your Project 2010 view so that the five Project 2010 columns appear in the same order as the incoming Excel data. (See Figure 18-1.)
Move a column to a different location. Click the heading to select the entire column. When the mouse pointer changes to a four-headed arrow, drag to the location where you want the column.
Add a column to a Project 2010 table. Right-click in the column to the right of where you want the new column to appear, and then click Insert Column on the shortcut menu. In the drop-down Field Name list, click the field you want to add.
Remove a column from a table. Click the column heading, and then press the Delete key.
Apply a different table to a Project 2010 sheet view. On the View tab, in the Data group, click the down arrow below the Tables button, and then click the table you want.
To copy and paste Excel worksheet cells into Project 2010, do the following:
Arrange the source Excel columns to match the field order and data type in Project 2010, or arrange the destination columns in Project 2010 to match the incoming Excel data.
In Excel, select the set of cells to be copied.
On the Home tab, in the Clipboard group, click Copy.
In Project 2010, select the anchor cell in the table where you want the incoming information to begin to be pasted.
In Project 2010, on the Task tab, in the Clipboard group, click Paste.
Project pastes the selected Excel data, starting in the anchor cell and then down and to the right to additional cells.
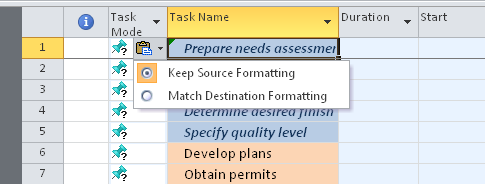
When you paste data from Excel 2010, by default, Project 2010 retains the formatting that is applied to the data in Excel. For example, if the Excel cells are highlighted with a light blue color and the text is in a bold italic font, the cells in Project 2010 will have the same formatting. A Paste Options indicator appears to the left of the anchor cell. You can choose whether to use the formatting from Excel or the formatting in Project 2010 by clicking the indicator and then choosing the Keep Source Formatting option or the Match Destination Formatting Option, as shown in Figure 18-2.
Copying an Excel graph and pasting it as a picture into specific areas of Project 2010 is the most obvious application of copying Excel graphics into Project 2010. However, you can also paste Excel worksheet cells as a picture in Project 2010, instead of pasting those cells into table cells.
To paste Excel information as a static picture, do the following:
In Excel, select the chart or other data you want to insert as a picture in Project 2010.
On the Home tab, in the Clipboard group, click Copy.
In your Project 2010 file, display the location at which you want to place the picture, and click in that location. The following locations in Project 2010 can accept pictures:
Chart area of a Gantt chart
Notes tab in the Task Information, Resource Information, or Assignment Information dialog box
Objects box in the Task Form or Resource Form
Notes box in the Task Form or Resource Form
Header, footer, or legend of a printable view or report
On the Task tab, in the Clipboard group, click the arrow under the Paste button, and then click Paste Special.
The Paste Special dialog box appears.
Select the Paste option.
In the As box, click Picture or Picture (Bitmap), as illustrated in Figure 18-3.
This option ensures that the data, whether it’s a chart or a set of worksheet cells, is pasted as a graphic rather than as an embedded object or straight text.
If the Paste Special command is not available for the location at which you want to paste the picture, press Ctrl+V instead.
Click OK.
The new picture is pasted in Project 2010 at the selected location. (See Figure 18-4.)
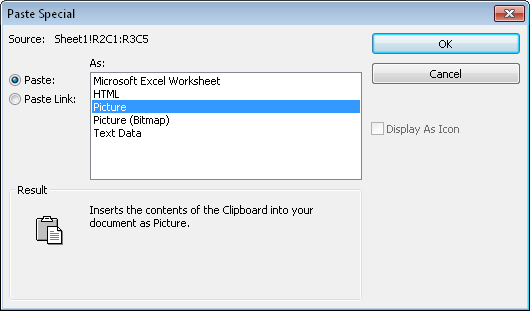
Figure 18-3. Use the As box in the Paste Special dialog box to specify that you want to insert the Excel information as a picture.
Although static pictures look like embedded objects, you cannot open or edit them. However, you can drag the entire object or a side to move or resize the object.
Note
To learn more about embedded objects, see Embedding an Excel Object in Project 2010.
Copying information from Project 2010 and pasting it into Excel worksheets is one solution when you need to process project data in a way that Project 2010 doesn’t handle easily. Likewise, if you’re more comfortable with Excel’s sorting, grouping, and formatting features, you can copy data from Project 2010 to Excel to quickly obtain the results you need—for example, when you’re rushing to prepare for a hastily convened meeting.
Smarter Copying and Pasting
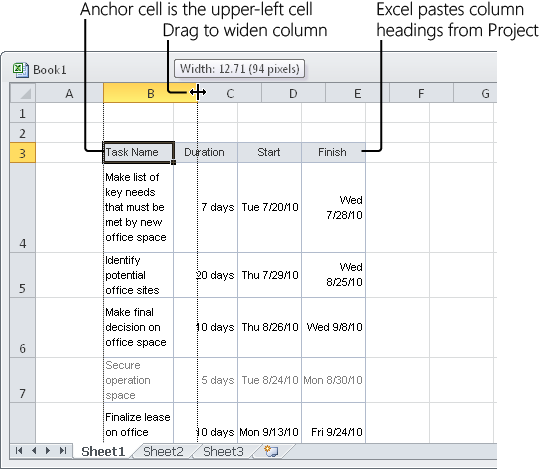
Pasting Project 2010 table data into Excel is more accommodating than before. If you paste table data from Project 2010 into an Excel spreadsheet, Excel automatically pastes the Project 2010 column headings into the first row, even if you don’t select them in Project 2010. With this smarter copy and paste, your pasted data is labeled automatically. You don’t have to waste time copying Project 2010 headings into Excel.
In addition, when you paste tasks at different outline levels into an Excel file, Excel indicates the outline level by indenting the text in the pasted cells. As you can when you paste data from Excel to Project 2010, you can choose whether to retain the formatting from Project 2010 or apply the formatting from the cells in Excel, as shown in Figure 18-2 earlier in this chapter.
Copying and pasting data from a Project 2010 table to Excel worksheet cells is actually easier than the reverse process. Unlike in copying from Excel to Project 2010, the columns or data types don’t have to match, because all Excel fields can accept any data type.
To copy Project 2010 table cells and paste them into Excel worksheet cells, follow these steps:
In Project 2010, display the view that contains the information you want to copy to Excel.
If necessary, apply a different table or add columns that contain the information you need.
Select the cells or columns you want to copy.
To select a column, click its heading. Select multiple adjacent columns by dragging across the column headings. Select multiple nonadjacent columns by holding down Ctrl while you click each column heading.
On the Task tab, in the Clipboard group, click Copy or press Ctrl+C.
In Excel, select the anchor cell in the worksheet where you want the incoming information to begin to be pasted.
On the Home tab, in the Clipboard group, click Paste.
Starting in the anchor cell, Excel pastes the column headings from Project 2010 in the first row and then pastes the selected Project 2010 data to additional cells down and to the right of the anchor cell. Adjust column widths in the worksheet as necessary to see the data. (See Figure 18-5.)
You can copy a picture of any Project 2010 view and paste it into Excel. To do this, follow these steps:
In Project 2010, display the view you want to capture as a picture for Excel.
Manipulate the view to show the information the way you want it to appear in Excel.
On the Task tab, in the Clipboard group, click the arrow next to the Copy button, and then click Copy Picture.
In the Copy Picture dialog box, select the options you want.
In the Render Image section, select the option for the most likely method for viewing the image: on a computer screen (the default), printed, or a GIF image file (ideal for pictures published to the web).
In the Copy section, select the Rows On Screen option (the default) if you want the rows currently showing on the screen to be copied. The Selected Rows option copies the currently selected rows whether or not they appear on the screen.
In the Timescale section, select the As Shown On Screen option (the default) if you want the timescale to be represented as set in the current view. Select the From and To boxes if you want to specify a date range different from what appears on the screen.
When you’ve finished setting the Copy Picture options, click OK.
In Excel, select the location in the worksheet where you want to paste the picture of the view.
On the Home tab, in the Clipboard group, click Paste.
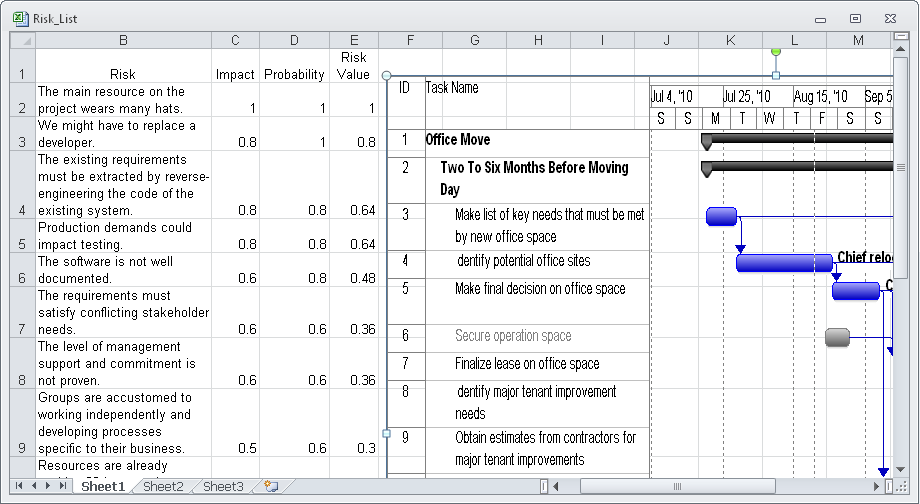
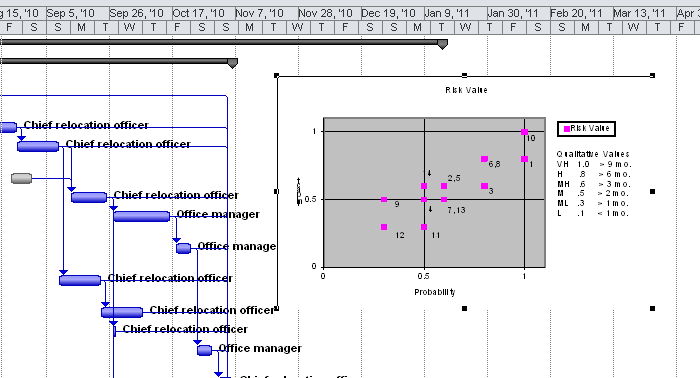
A static picture of the Project 2010 view appears on the Excel worksheet, as shown in Figure 18-6. You can move the image by dragging it. You can also resize the image by dragging any of the edges.
Note
You can also copy a picture of the Project 2010 Timeline view to Excel. With the Timeline active, on the Format tab, in the Copy group, click Copy Timeline, and then choose For Presentation or Full Size. Project 2010 copies the Timeline to the Clipboard. Then you can paste it in an Excel file or in another type of document. For more information on the Timeline, see Highlighting Tasks with the Timeline.