
Uploading Photos and Creating Albums
Before you start using Google+ for sharing images, you need to get images on Google+. You can store as many images as you want on the service.
Follow these steps to add a photo to Google+ from your desktop:
1. On the Photos page, click Upload New Photos.
2. If you’re using Google Chrome, Safari, or Firefox, you can drag the desired image from your desktop to the Drag photos here part of the main window. Alternatively, click Select photos from your computer, locate the image, and click Open.
3. Wait for the photo to upload to Google+ (a load bar graphic runs under the image). The image loads in an album named after today’s date (as shown in Figure 8-2).
4. Give the album a new title using the Album name box. To send the images to a preexisting album, click add to an existing album and choose one from the drop-down list.
5. If you hover your mouse over an image that has been uploaded, four icons appear. These are Rotate left, Rotate right, Edit, and Delete. You learn about editing images later in the chapter.
6. Click Create album (or Add photos if you’re adding to an existing album).

FIGURE 8-2 Uploading images to Google+.
Tagging photos
Google+ has pretty impressive face-recognition technology built in. If Google+ spots a face in the image you upload, a window appears, enabling you to tag the people in the photograph (as shown in Figure 8-3). Tagging is connecting a person’s name to a face in a photograph.
To tag a person, do the following:
1. Click a person (or multiple images of the same person) in the left side of the tagging window.
2. Type the name of the person in the text box in the right. As you type a person’s name, a list of people appears. Select the right person and click Tag.
3. You can tag multiple people in this window by repeating Steps 1 and 2.
4. Click Done tagging when you’re finished.
You can skip the tagging process by clicking Skip tagging at any point.
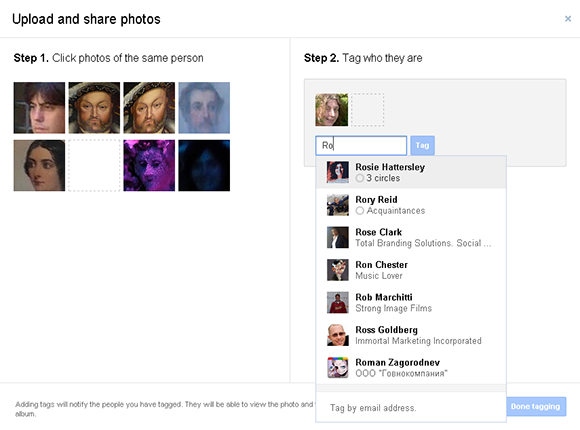
FIGURE 8-3 Tagging people in images.
Sharing albums with Circles
After you upload photos, Google+ prompts you to share the new album with your Circles. Type a comment and then click Add circles or people to share with and choose the desired people. Click Share to post the new album to your Stream. If you click Cancel, the album is still created, but the images are only available to you (a red icon appears underneath the album image in Your albums).
Can I Change the Name of an Album? Yes. Click Photos and Your albums, and then click an album to display the photos. If you click the album title in this window, you can edit the text.
Once your images have been uploaded, you can look at them by clicking Your albums in the left-hand column and clicking the name of your album. The images appear as a montage with a selection of options (as shown in Figure 8-4).
Here are some options available on this screen:
+ Share album. It’s possible to share an album by clicking Share album, typing the name of a person or Circle, and clicking Share.
+ Options. This drop-down list contains two options: Share album via link (which provides a URL link to share) and Delete album.
+ Add More Photos. You can add more images to an album by clicking this button.
+ Visible to. This displays the Circles and people that the album is shared with. To the right is the number of photos in the album and the date that it was uploaded.
You can slightly expand the size of the images in the window by hovering your mouse over them. Click on an image to view it alongside a selection of additional controls called Editing and Sharing. Click the X button to return to the Photos window.

FIGURE 8-4 Viewing images in an album.
Changing Sharing Options and Locking Albums
It is possible to change the sharing options of an album and lock your photos to prevent them from being shared. Follow these steps:
1. Click the Visible to: Limited link to display which Circles you currently share with.
2. Add and remove Circles and individuals by clicking Add more people.
3. To lock the album, select the Lock this album check box.
4. Click Save.
A few things happen when you lock an album:
+ New name tags created by others become text tags (although, as the owner, you’re still able to tag your photos).
+ No one is able to +1 the photos.
+ All posts about the album are also locked (including posts created before the album was locked).
You can unlock an album by repeating the preceding steps and deselecting the Locked album check box.