
Editing Photos with the Creative Kit
The Google+ Creative Kit enables you to customize your images, adding a wide range of visual effects that can improve and transform pictures, as well as some playful effects that can be fun to use.
To edit an image with the Creative Kit, open the image in Lightbox mode, and then click Creative Kit. This opens the image in a new window offering a wide range of controls (as shown in Figure 8-11).

FIGURE 8-11 The Creative Kit.
At the top of the screen sits a selection of options:
+ Basic Edits. These enable you to crop, rotate, and adjust the image.
+ Effects. A wide range of effects can be added to an image, as well as some more specialized functions such as Blemish Fix.
+ Seasonal. Fireworks, Santa beards, Christmas hats, snowflakes, and other holiday-related items can all be added from here.
+ Decorate. Stickers, speech bubbles, fake beards, masks, and hats can all be found here.
+ Text. Add text to an image.
Some other functions are worth looking at here too. Click the settings icon (the small gear) and choose Fullscreen to edit in full screen mode. And you can zoom in on an image using the Zoom slider in the bottom-right of the photo (when zoomed in, you can click and drag an image using a Hand tool).
You can reverse any changes you make by clicking Undo. You can click Undo multiple times to remove any unwanted effects. Clicking Redo reapplies the effect.
Basic Edits
Under the Basic Edits menu are a number of commands worth looking at. At the top is a large red Auto-Fix button that performs the same function as auto-fix in Lightbox mode.
Below that are six interesting tools that perform more detailed edits: Crop, Rotate, Exposure, Colors, Sharpen, and Resize.
Crop
The Crop tool enables you to remove parts of the image and focus on just the part that you want.
1. Click Crop to overlay a crop box on the image (as shown in Figure 8-12).
2. Resize the crop box by dragging the four drag handles at the corners of the box. You can also move the box around by clicking and dragging inside the square.
3. Click the Constraints drop-down list to choose a specific proportion for the image. There are a wide range of options, including Square and Golden Ratio. Scroll down the list and you also see sizes for popular websites, including Twitter, Blogger, and YouTube, as well as the correct constraints for different desktops and even the iPhone.
4. You can resize the image to precision by typing numbers into the Actual size boxes for width and height.
5. Select the Scale Photo check box and the image remains the same size in pixels, but it is zoomed in to the crop-area of the image in the box. Note that you lose some image quality from scaling up the image.
6. Click Apply when you’re happy with the cropped image.
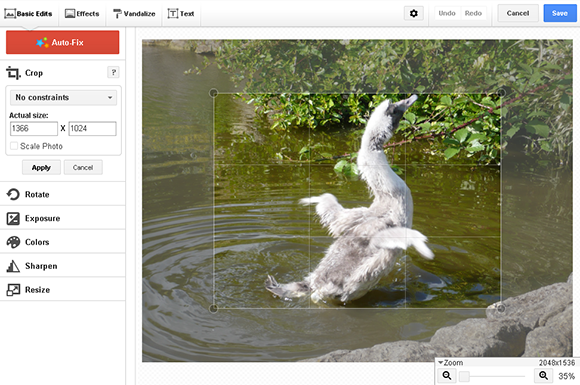
FIGURE 8-12 The Crop tool.
Rotate
The Rotate tool enables you to turn an image on a circular axis. In Creative Kit you can also flip an image horizontally and vertically. Five options are available:
+ Rotate left 90 degrees
+ Rotate right 90 degrees
+ Flip horizontally
+ Flip vertically
+ Straighten
Dragging the Straighten slider overlays a square grid on the image. Moving the Straighten slider left rotates the image left up to 45 degrees, and moving the slider right rotates the image right up to 45 degrees (as shown in Figure 8-13).
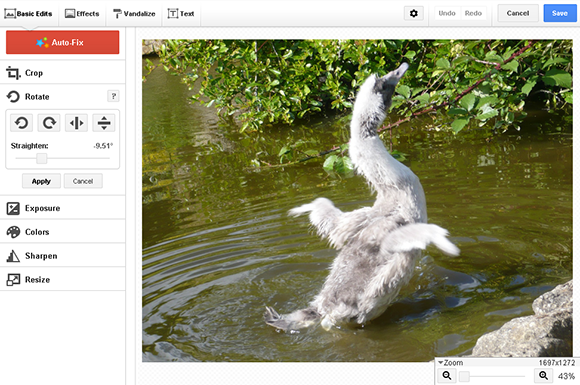
FIGURE 8-13 Using the Straighten slider on a photo.
What If I Want to Rotate an Image by More Than 45 Degrees? You can use the rotate left or rotate right button to rotate the image 90 degrees; then you use the Straighten slider to move it back to a rotation between 45 and 90 degrees until you get the desired effect.
Exposure
This Exposure tool enables you to adjust elements of the exposure in an image. Click the Exposure button to reveal four sliders (as shown in Figure 8-14):
+ Exposure
+ Highlights
+ Shadows
+ Contrast
Move the sliders until you’re happy with the look of your image and click Apply to place the changes.
Colors
You can adjust the color of an image (to a certain extent) using the Colors options (as shown in Figure 8-15). Four options are available:
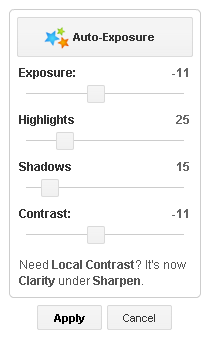
FIGURE 8-14 Adjusting the Exposure.
+ Auto-Colors. Click this button for automatic color adjustments.
+ Neutral Picker. Click this button and an eyedropper tool appears. Use it to click on a neutral (usually gray) part of an image to help set the color balance. You can click multiple times until you get the effect you’re after.
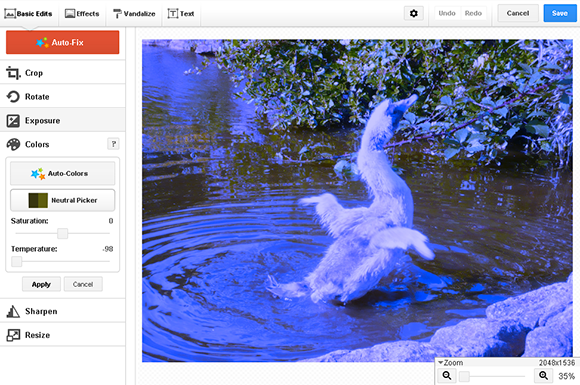
FIGURE 8-15 Using the Neutral Picker tool to adjust the color.
+ Saturation. Use this slider to increase the vibrancy of colors.
+ Temperature. Use this slider to increase or decrease the warmth of colors in an image.
Click Apply to apply the changes.
Sharpen
You can adjust the sharpness of an image (within reason, blurry pictures remain blurry) using the Sharpen tools. Three main tools are available:
+ Sharpness
+ Clarity
+ Unsharp Mask
Clicking Unsharp Mask brings up another set of controls (as shown in Figure 8-16) that enable you to adjust fine control within a set area:
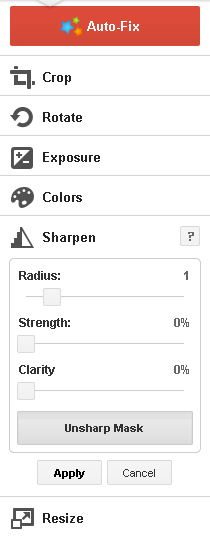
FIGURE 8-16 Using the Unsharp Mask.
+ Radius. Drag this slider to set how many pixels next to each other will be sharpened by the effect.
+ Strength. Drag this slider to set how pronounced the sharpness will be.
+ Clarity. Drag this slider to set how clear the image will be.
Click Apply when you’re happy with the effect.
Resize
You can resize an image to make it larger or smaller using the New dimensions boxes (as shown in Figure 8-17). Type the required size (in pixels) using the width and height text boxes.

FIGURE 8-17 Resizing an image.
You can select two check boxes:
+ Use Percentages. This changes the width and dimensions boxes to represent the percentage size difference (with 100 percent being the default). You can make an image larger by entering an amount such as 200 to make it twice the size.
+ Keep Proportions. This ensures that the image stays proportionally the same in width and height. As you enter new width or height numbers, the corresponding box will have the appropriate amount entered automatically.
Click Apply when you’re happy with the changes.
Effects
The Effects menu offers different visual techniques that you can add to an image (as shown in Figure 8-18). The effects are split into the following categories:
+ Google+ Exclusives. This category includes a wide range of effects such as Polaroid Plus and Reala 400 as well as color effects such as Sun Aged and Magenta Fade.
+ Basics. These are simple but often powerful effects such as Black and White, Boost, and Soften.
+ Camera. There are a range of camera effects here, including Lomo-ish, HDR-ish, CinemaScope, and 1960’s.
+ Color. Here you find specific color effects such as Duo-Tone, Heat Map 2.0, and Cross Process.
+ TouchUp. These tools are particularly good at fixing images. On most of them, you implement the effect by drawing on the image with a Brush tool. Effects include Blemish Fix, Airbrush, and Shine-Be-Gone.
Most of the effects are implemented using a range of sliders, drop-down lists, and the color picker to adjust the image.

FIGURE 8-18 Using the Effects window to add a black-and-white effect.
Decorate
Some of the more wacky effects are in the Decorate menu. Here you can drag and drop effects onto the image to create something wacky (see Figure 8-19).
Google adds new effects to the Decorate menu all the time. When you drag and drop a sticker effect to an image (like my duck with a speech bubble), it appears with four drag handles, enabling you to adjust the size of the effect. A window appears with options for the sticker (as shown in Figure 8-20).

FIGURE 8-19 Livening up an image with the Decorate option.

FIGURE 8-20 The Decorate Properties interface.
Text
It is also possible to overlay text on an image (as shown in Figure 8-21) by doing the following:
1. Open an image in the Creative Kit and click Text.
2. Type the desired words into the text box in the top-left of the screen.
3. Choose a font from the list provided.
4. Click Add. The text appears in the middle of the image. You can move it around and adjust the size using the four drag handles (as shown in Figure 8-22).
5. Adjust the color of the text by clicking in the Font Color box in the Text Properties window.
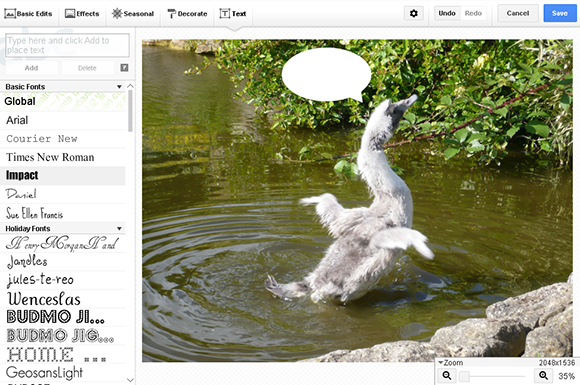
FIGURE 8-21 The options for adding text to an image.
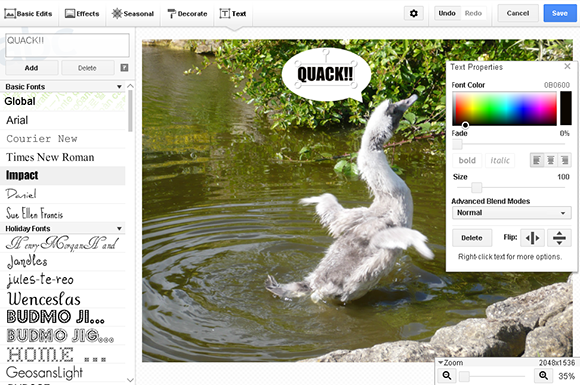
FIGURE 8-22 Adding and repositioning text on the image.
6. Drag the Fade slider to the right to blend the text into the image. You can select a range of Blend modes from the Advanced Blend Modes drop-down list.
7. Use the bold, italic, and justification icons to adjust text.
8. Adjust the size of the text using the Size slider.
9. Use the flip icons to flip the text.
10. Click anywhere on the image to remove the Text Properties box (you can reclick the text to bring it back up). The text is already added to the image, so there is no Apply button.
You can also right-click the text to bring up further text options, including Straighten and Remove Distortion. You can remove text by right-clicking it and choosing Delete Type from the drop-down list.
Using Picasa with Images
Google+ enables you to implement a wide range of visual effects to your photographs. But one of the really great things about using photos in Google+ is that the account is also automatically linked to Google’s photo-management service called Picasa.
You can download the most current version of Picasa for Windows and Mac from http://picasa.google.com. This program syncs with Google+ and enables you to add even more effects to images and manage them with greater finesse.
You can also use a web-based version of Picasa at https://picasaweb.google.com/home. This service enables you to work with images to a greater depth online than Google+. And any changes you make in Picasa are automatically synced with your Google+ account.