Creating a Post to Share in Your Stream
Posting a message from within Google+ is an unsurprisingly simple process (it’d be a bit strange if Google made it complicated). To quickly create a message and share it with the world, do the following:
1. Click the home icon to make sure you’re on the home page.
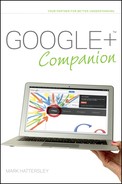
2. Type your message into the text box at the top of the Stream (as shown in Figure 6-1).
3. Click Share.
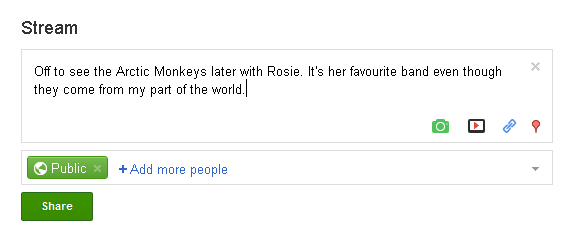
FIGURE 6-1 A post in the Stream.
Your first post is shared publicly (with everybody who is following you or people who have you in their Circles). When you start to select different Circles (I come to that in a bit), then the default posting option is the Circles you used in the last post.
You can cancel a post before sharing it by clicking the X icon in the top-right of the text box.
Writing plain text posts is a good way to quickly share what you’re doing, but ultimately, you’ll be a better Google+ user if you put a bit more effort into your posts. Here are some of the other things you can share:
+ Photos. You can add images from within Google+, from your smartphone, from the web, or from your desktop to Google+.
+ Videos. It’s possible to upload videos from your computer or mobile phone, or share them from YouTube directly within Google+ (you can also cut and paste links from other video-sharing sites).
+ Links. You can add links to web pages that you’ve viewed in your posts.
+ Location information. It’s also possible to add your current location.
You add all these items using the small icons to the bottom-right of the text box (see Figure 6-2). Adding mixed media to your posts makes them more creative and lets you share the things that are going on around you and on the wider web. A lot of people use Google+ almost like a blogging platform, creating long and detailed posts packed with images, video, and location information.
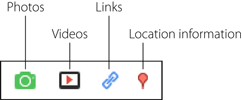
FIGURE 6-2 Click these icons to add photos, video, links, and location information.
Formatting text in a post
One question that many people ask is whether they can format text in posts (make text bold, underline, and so on). Google+ doesn’t have the usual text formatting icons that you find in many text editing programs, but you can add some basic formatting using the following formatting tips (as shown in Figure 6-3 and Figure 6-4):
+ Place text between asterisks *like this* to write in bold.
+ Place text between underscores _like this_ to write in italics.
+ Place text between hyphens -like this- to strikethrough text.
You can also place multiple symbols between the brackets for multiple effects. Using the *_ symbols makes text both bold and italicized.
FIGURE 6-3 Formatting text in a Google+ post.

FIGURE 6-4 The formatted text.
Adding images to your posts
One of the most obvious things you can add to a post is images — these can be found on other websites, stored within Google+, located on your computer, or taken on a mobile phone. Follow these steps to quickly add an image to your post:
1. Click the green Add photos icon.
2. Choose Add photos from the drop-down list.
3. Choose photos from your computer using the Open window.
4. Click Open.
The image or images appear below the text in your post (if you select multiple images they appear as a slide show, as shown in Figure 6-5). You can add additional images to the post by clicking Add more, and you can rotate and remove images by clicking Edit photos. Chapter 8 has more information on adding, editing, and managing photos in Google+.
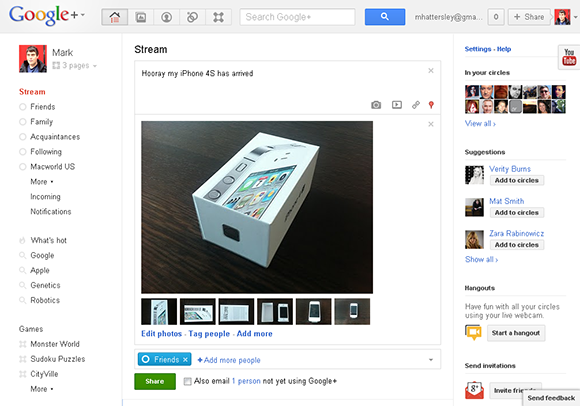
FIGURE 6-5 Adding photos to posts.
Drag and Drop Images In Google Chrome and Safari, you can add individual images to Google+ by clicking on and dragging the images from the Finder or desktop straight to the Google+ text box.
Adding video clips to your posts
The next step up from adding photos to your posts is adding video clips. It is similar to sharing photographs in that you upload the video from your desktop to Google+. However, it’s more typical for people to use an online service like YouTube to share the video and then share that link within Google+.
To share a video in a post, click the Add video icon and choose one of the following options:
+ Upload video
+ YouTube
+ From your phone
The first two options require you to manually add video that is either stored on your computer (as shown in Figure 6-6) or already on Google’s YouTube video service. The last option, uploading video from a mobile phone, is especially interesting (especially if you have a phone running Google’s Android operating system) because it uploads all the video you take from the phone to an online storage area; you then pick and choose which videos to post to Google+.
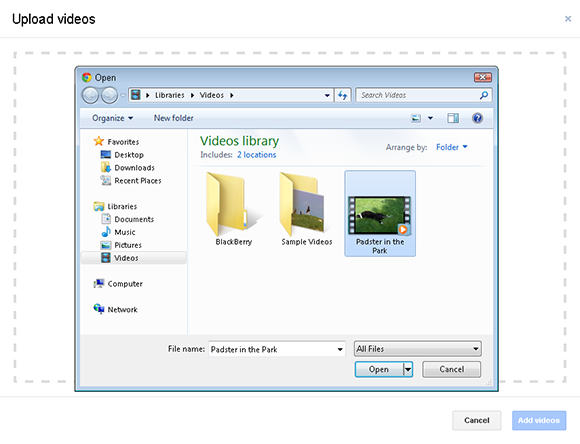
FIGURE 6-6 Choosing a video file to upload.
Uploading a Video
To upload a video file to a post, follow these steps:
1. Click the Add video icon and choose Upload video.
2. Click Select videos from your computer. Alternatively, drag a file from Windows Explorer (or Finder on a Mac) to the Upload videos window.
3. Use Windows Explorer (or Finder on a Mac) to locate the video file and click Open. It takes a few moments for the video to upload to Google+ and be processed (formatted into a video format playable in Google+).
4. Click Add videos.
The video clip appears under your post (as shown in Figure 6-7). You can still add text to it and choose which Circles to share it with before clicking Share. To remove the video clip, click the small X icon to the right of the clip.
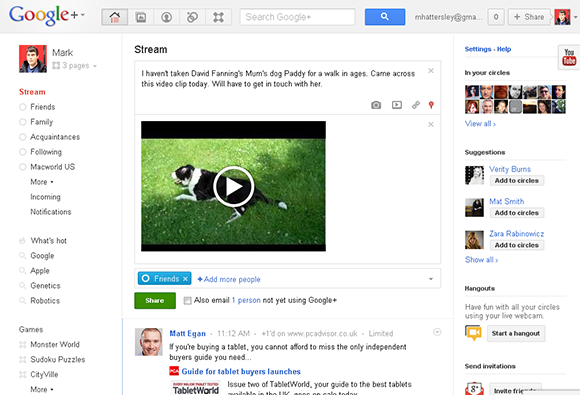
FIGURE 6-7 The video clip appears in the post.
Using YouTube
To add a video clip from YouTube to Google+, follow these steps:
1. Click the Add video icon and choose YouTube.
2. You have three options for including a video (displayed in the top-left of the Choose a YouTube video window):
+ Search. Type a search term into the text box. Choose a video from the search results and click Add video.
+ Enter a URL. If you have a URL for a YouTube video, type it into the text box and click Add video. Note that it has to be a YouTube URL, not just a video clip from a website.
+ Your YouTube videos. Any videos you have uploaded to YouTube appear in the window (as shown in Figure 6-8). Choose a video from the list and click Add video.
The video appears below your post. Edit your text and click Share to send the video out into the world. When you insert a YouTube video, a brief text description (taken from YouTube) appears below the video. It cannot be edited in Google+.
Pasting Direct Links It’s also possible to post links to YouTube clips by copying and pasting the URL directly into the post. The URL will not appear as part of the post. This technique also works with some other video-sharing sites, such as Vimeo.
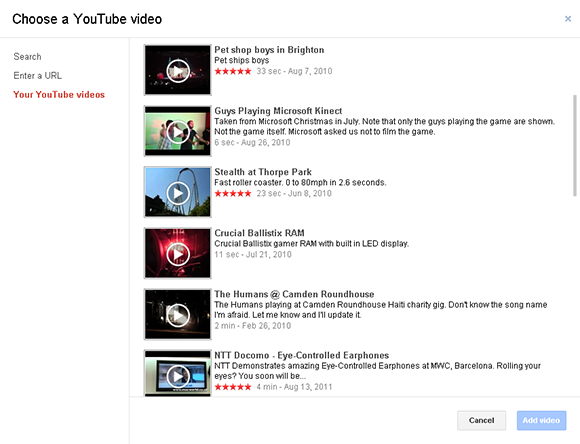
FIGURE 6-8 Choosing video from your YouTube account.
What Files Can I Upload?
Any video you capture using a modern digital camera or cell phone should be compatible with Google+. But if you’re archiving old video footage, you may need to know what file formats to use. Here is a list of compatible file types:
+ WebM
+ MPEG-4
+ 3GPP
+ MOV
+ AVI
+ MPEG-PS
+ WMV
+ FLV
Adding links to web content
One of the key parts of any social networking experience is sharing the information, articles, and entertaining content you find on the web with your friends.
Posting links to web content is incredibly easy in Google+. As you’d expect from a company that cut its teeth on making it easy for people to find content, Google has gone out of its way to help you share the stuff you find on the Internet. There are a number of different ways you can share links in Google+:
+ Add link icon. Click the Add link icon, cut and paste (or type) the link into the text box, and click Add.
+ Cut and paste. Simply cut a URL and paste it into your post.
+ Google +1. Many websites now display the +1 icon with interesting articles. You can click this to indicate that you like the page, but you can also write a comment and share it in Google+ from within the web page itself (as shown in Figure 6-9).
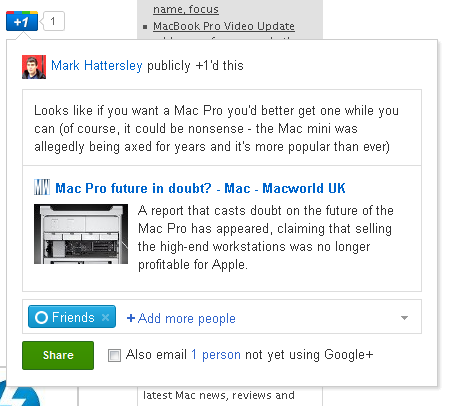
FIGURE 6-9 Sharing a link in Google+ from another website.
+ Drag and drop. You can drag a URL directly to the Google+ post using Google Chrome or Safari web browsers (but not Internet Explorer). First click in the Share text box to activate it. Then drag the URL icon (the small icon to the left of the URL — it appears as a world icon in Google Chrome) directly to the text box.
The link appears below your post with the headline, a sample of text, and an image from the website (as shown in Figure 6-10). You can use the left and right arrows to change the sample image, or click the X icon to remove the image.
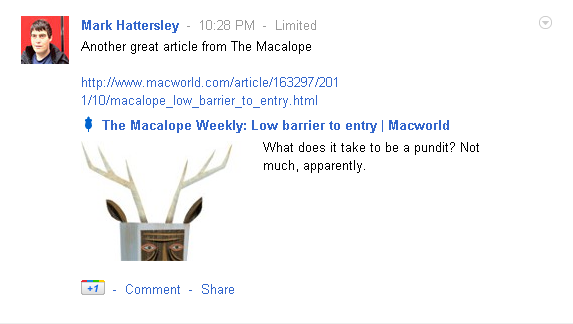
FIGURE 6-10 The post as it appears in your Stream.
Adding location information
Another really neat thing you can add to your posts is location information, the specific place where you are posting at that moment. You might do this because you’re at an event or show and want to tag it or because you’re posting about that part of the world. I often do this whenever I’m talking about a cool tourist spot I’m visiting. That way people can pinpoint where I’m talking about as well as read my posts and see my photographs.
Location information works in Google Chrome, Safari, and Firefox but not in some browsers such as Internet Explorer.
How Can Google Tell Where I Am? Google uses a mixture of IP (Internet protocol) addresses and triangulation of known cellular data towers and known Wi-Fi networks (which it has mapped out while creating Google Street View). If your device has GPS, it also uses this for a reasonably exact match. Google+ uses all these to determine your location.
Follow these steps to add your location information:
1. Type in your post and click the Add your location icon. The first time you add a location, your web browser brings up a message in the top of the bar saying Google+ wants to track your physical location, as shown in Figure 6-11.
2. Click Allow. The address you’re at (or thereabouts) appears below the post, as in Figure 6-12.
3. Click the address, which is a link to Google Maps. You can see how accurate the location information is (it isn’t possible to adjust it in Google Maps, though).
4. Click Share. The post appears with the address listed below the text. Other people can click the link to open Google Maps and view your location along with the post.
I typically don’t recommend sharing your home location with people you don’t know that well (although some people do it all the time with little concern). If you are cautious about location sharing, however, read Chapter 15 on managing your privacy and personal information.
![]()
FIGURE 6-11 Click Allow to enable location sharing.

FIGURE 6-12 The location appears as a link below the post.
Why Won’t Google+ Share My Location?
By default, web browsers do not normally allow web pages to access your location without your permission (for security reasons).
If you want to share location information, Google+ may present a warning message. If you receive this message, you need to follow these steps to share location information in the Google Chrome web browser:
1. Click the wrench icon in the Google Chrome web browser (the icon on the far-right of the toolbar).
2. Choose Options on a PC (Preferences on a Mac) and click Under the Hood (or Under the Bonnet in some locations).
3. Click Content Settings.
4. Under Location, choose Allow all sites to track my physical location or Ask me when a site tries to track my physical location. You use the third option, Do not allow any site to track my physical location, if you do not want to allow location sharing.
5. Click the X icon in the top-right of the screen to close the settings.
When you return to Google+, you should be able to share information about your location. I don’t recommend allowing all websites to track your physical location.