
Uploading Photos on a Computer from an Android Phone
If you have a Google Android-based smartphone, you can upload images from it directly to Google+.
You can learn about the mobile versions of Google+ in Chapter 13, but if you own an Android-based phone and use it as a camera, you might want to investigate the Instant Upload feature. It sends any photographs you take on your mobile phone directly to Google+, where you can share them at your leisure.
First you need to download the Google+ app from Google Play, formerly called the Android Market. On your Android phone do the following:
1. Tap the Market app (Google Play) icon on your phone.
2. Tap the search icon in the top-right and enter Google+ into the Search Google Play box. Tap the search icon again.
3. Tap the Google+ app (it should be at the top of the list).
4. Tap Install. You may be asked to enter your password at this point.
5. Tap Accept & download.
Once you have the Google+ app installed, you need to enable Instant Upload:
1. Tap Open from the Market app if you’ve just installed Google+; otherwise open the app from the Applications folder.
2. If this is the first time you’ve launched Google+, select an account from the list to sign in. It has to be the same account that you use to sign in to Google+.
3. The first time you launch Google+, you are presented with an Enable Instant Upload screen with three options (as shown in Figure 8-5):
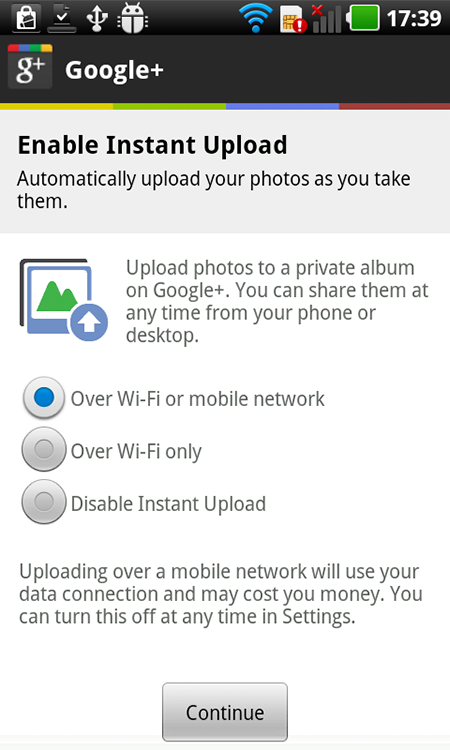
FIGURE 8-5 Enable Instant Upload in Google+.
+ Over Wi-Fi or mobile network
+ Over Wi-Fi only
+ Disable Instant Upload
4. Choose the option you want (be careful with using the default Wi-Fi or mobile network option if you take a lot of photos, as the upload can eat up your data allowance). Tap Continue.
If you are already using Google+, then you need to enable Instant Upload in the settings (there are some extra options here that are also worth investigating):
1. Open the Google+ app.
2. Press the Menu button on the phone and click Settings.
3. Scroll down to Enable Instant Upload and select the check box.
4. Tap When to upload photos and choose Over Wi-Fi or mobile network or Over Wi-Fi only.
5. The Roaming uploads check box is unselected by default. I recommend leaving it this way unless you want to incur significant data charges when using your mobile phone on a different network than usual (such as when you are traveling).
6. The On battery check box is selected by default; this ensures that photos are uploaded when you are using the battery. The Instant Upload feature is far less useful if this box isn’t selected.
7. If you want all the pictures currently on the device to upload to Google+, tap Upload all photos.
8. Press the Back button to return to the Google+ app.
With the Instant Upload feature enabled, any photo you take on your Android phone (using the default camera app) instantly syncs with Google+. To see a picture taken on your Android phone in Google+, click the photos icon and choose Photos from your phone.
Google+ displays a slide show of photos taken from your camera (as shown in Figure 8-6).

FIGURE 8-6 Photos from your phone.
All the images you have uploaded or taken from the phone appear in the Stream and are organized by date. By default they are not visible to anybody else on Google+; they are just stored online, ready for you to share. You can click and highlight images in the window, and three options are available:
+ Share. Click Share to share the images with your Circles. Add a comment, choose which Circles to share with, and click Share.
+ Add to album. Click this to add the photos to your photo albums. You can type the name of a new album or click Add to an existing album and choose one from the drop-down list. When you create an album, a Share window appears (you can click Cancel just to add the images to an album).
+ Delete. Click Delete and Okay to remove the selected images from Google+. The images are not deleted from your mobile phone.
Normally, clicking an image in Photos takes you to a Lightbox view of that image, meaning the screen turns dark so you can better view the photo, and photo editing, comments, and sharing controls appear. Because clicking on an image in Photos from your phone selects the image, you need to double-click on the image (or click the small + icon in the bottom-right of the window) to enter Lightbox mode.