Integrating +1 with Your Website
If you run a website, then you might want to integrate +1 with your own pages. This is easy enough to do, and Google provides a web page that will generate the code for you at www.google.com/webmasters/+1/button.
This web page (shown in Figure 10-7) enables you to create a snippet of HTML code that you can embed in your web page.
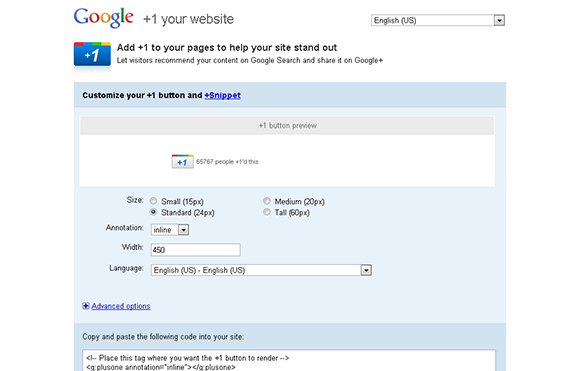
FIGURE 10-7 Creating the code for a +1 button for a website.
What If I Run a Blog? If you use one of the popular blogging platforms (such as WordPress or Blogger), then you’ll find integration with +1 baked into the system. Check your dashboard preferences for sharing options.
Follow these steps on Google’s +1 code generator site to add a +1 button to your website:
1. Choose a size. This is the width of the button on the page. Four sizes are available: Small (15px), Standard (24px), Medium (20px) and Tall (60px).
2. Select the annotation. This relates to the information on how many people have +1’d your content. The annotation can be inline, bubble, or none. If you choose bubble or none, skip to step 4.
3. Type the width. If you choose inline annotation, you can choose the width of the annotation. The default is 450 pixels.
4. Select the language. The default is English (US), but you can choose the language most appropriate to your site.
5. Click Advanced options. The following advanced options are available:
+ Asynchronous. This option (selected by default) ensures that the buttons load independently of the page and reduces load time.
+ HTML5 valid syntax. This option (unselected by default) renders the script in the newer HTML5 syntax.
+ Parse. Two options are in the drop-down list: Default (On Load) and Explicit. Default (On Load) renders all buttons after the page loads, and Explicit renders the button at that point on the page.
+ JS Callback function. With this text box, advanced developers can implement a custom JavaScript function to take place when the +1 button is clicked.
+ URL to +1. You can specify a custom URL to go with the +1 button.
Below these Advanced options you’ll find options for creating the customized snippet. They can be used to customize the content information passed on to Google:
+ Page Type. Choose the type of page (Blog, Article, Event, and so on) that most closely matches the page you’ll use the snippet on.
+ Title. Add a title for the snippet.
+ Image URL. Add a URL to an image to go with the snippet.
+ Description. Add a description of the content you are sharing.
+ Markup Location. Two options for you to place the code are available: <head> and <body>. Choose the place you want to insert the code.
When you are done, you simply cut and paste the code produced in the text boxes to your website and +1 will be integrated.
What If the Code Isn’t Updating Properly? You may need to refresh your browser for the code to update in the main display.