
Looking at the Account Overview
The Account overview settings enable you to access and change your password (and other security options) and email addresses, and delete parts of your account.
Changing your password
Click Change password if you want to choose a new security login. A new screen appears that enables you to choose a new password. Follow these steps:
1. Type your current password. Alternatively, type the secret word you choose when signing up for a Google account. You can see a hint for the word next to the text box.
2. Type the new password in the two text boxes below. Both boxes need to have the same text and a Password strength meter indicates how secure the password is.
3. Click Save.
You remain logged in to Google+, but next time you log in, you need to use the new password.
Changing recovery options
Google provides a recovery system in case you forget your password and login details. By default this is a second email address or a hint to a secret word that only you know, and you set these up during the Google+ sign-up process. Chapter 1 has more information on signing up for Google+.
However, you can add or change the email address, choose a new secret word, or add a cell phone number at any point (as shown in Figure 12-3).
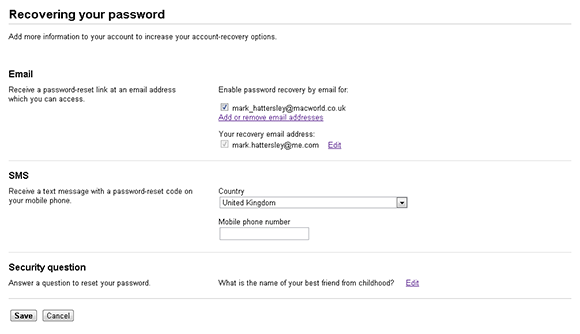
FIGURE 12-3 Changing your recovery options on the Google accounts page.
Click Change recovery options. You may need to reenter your password, and then click OK to see the options available:
+ Email. You can add additional email addresses to recover your email by clicking Add or remove email addresses, or click Edit to change your default recovery email address.
+ SMS. You can sign up to receive a text message on your mobile phone (you can enter this into Google+ to reset your Google+ account). Do the following to add a number to Google+:
1. Click Add a mobile phone number.
2. Choose a country from the drop-down list.
3. Type your cell phone number into the Mobile phone number text box.
4. Click Save.
5. You may be asked to type your password before you click Verify.
+ Security question. Click Edit and choose an option from the Question drop-down list, write your response in the Answer text box, and click Save.
I think it’s a pretty good idea to add your cell phone number to Google as a form of password recovery. It saves a lot of hassle with answering detailed security questions if you ever try to recover your account. But don’t forget to update the number if you get a new phone.
Activating Multiple sign-in
It is possible to sign in to Google with different accounts and switch between them. The Account overview page enables you to activate and deactivate multiple sign-in. Note that this affects not just Google+ but also a set of other Google products, including Calendar, Gmail, and News. As you activate it, the warning message shown in Figure 12-4 appears.
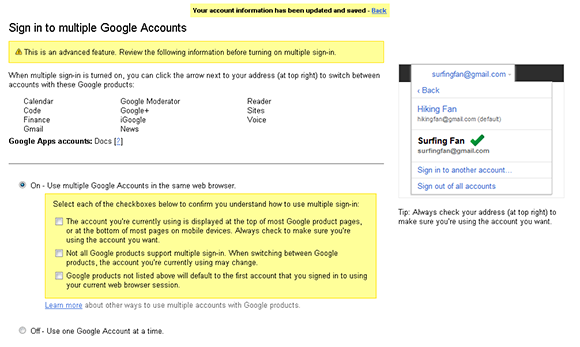
FIGURE 12-4 Controlling multiple sign-in.
How Do I Sign In Using a Different Account?
If more than one person uses Google+ on the same computer, it is possible to set up the service so multiple people can sign in and out on the same web browser. Do the following to sign in with multiple accounts:
1. Click the account icon in the Google+ bar and click Switch account.
2. Click Sign in to another account.
3. Type your email address and password and click Sign in.
Now you are able to switch between accounts by clicking your account icon, clicking Switch account, and choosing the required account from the list.
You can sign out of the account by clicking your account icon and then clicking Sign out, or sign out of all open accounts by clicking the account icon, clicking Switch account, and then clicking Sign out of all accounts.
Two options are available:
+ On. You can use multiple Google accounts in the same web browser. This has three check boxes that you need to select before you can save the changes.
+ Off. You can only use one account at a time.
If this is the first time you are using multiple sign-in, you should read the notes and select each box. From then on, the decision is saved. Click Save to commit to the changes.
Setting up 2-step verification
If you often use Google+ from different computers, you can set up an extra security system called 2-step verification that works in conjunction with your cell phone (in a similar fashion to password recovery).
With this system switched on, you’ll receive a code on your cell phone when using a computer that’s different from one you normally use. This prevents strangers (who may have cracked, or guessed, your password) from accessing your account. To do this, you need to enter your cell phone number into Google+ and enter a code that Google sends via text to your cell phone (as shown in Figure 12-5).
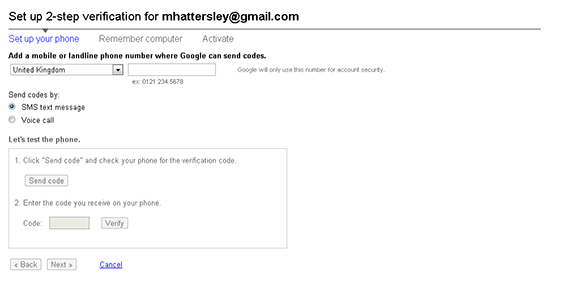
FIGURE 12-5 Setting up 2-step verification.
Follow these steps to set up 2-step verification:
1. Click 2-step verification on the Google Account overview page.
2. Click Start setup.
3. Choose your country from the drop-down list and add your mobile phone number.
4. By default, codes are sent by SMS text message, so click Voice call if you’d prefer Google’s automated voice service to call you and read out the number.
5. Click Send code to receive a test code.
6. Check your cell phone for the code. When it arrives, type it into the Code text box and click Verify.
7. When the test code has been verified, click Next.
8. If you are using a public computer (or one you don’t normally use) you should deselect the Remember this computer for 30 days check box.
9. Click Next.
10. Click Turn on 2-step verification.
11. A warning message appears stating that some third-party apps and mobile devices may not work until you create new passwords (as shown in Figure 12-6). Click Do this later.
A great thing about 2-step verification is that it provides your Google+ account with fairly comprehensive protection from intruders (since they need to have your mobile phone to access your account).
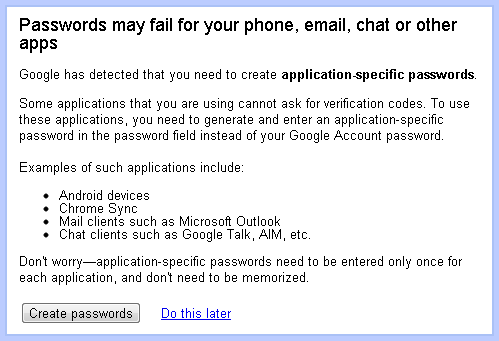
FIGURE 12-6 2-step verification warning that apps may not work.
The downside of this is that you need to authorize every different computer that you use, and the extra step involving your mobile phone can be a pain. And you need to have your mobile phone in hand, it must be charged, and it must have network coverage, which might not be the case if you’re overseas and using a temporary computer (although Google does have a work-around that involves temporary codes, covered later in this chapter).
More important, some applications on your computer (such as Windows Live Mail and Outlook) stop working until you authorize them. This also applies to apps on your mobile phone. So you may need to create special passwords for these apps. You can do this using the Google website or the Google Authenticator app on a mobile phone.
Using the Google Authenticator app to receive codes
If you don’t have cell coverage, you can use the Google Authenticator app on Android, iPhone, or BlackBerry to receive 2-step verification codes. You can use these when you have a Wi-Fi connection but no cell coverage (which is often the case when you’re overseas).
Follow these steps to set up your mobile application to receive codes on an Android mobile device or iPhone (the BlackBerry app works slightly differently, so I explain that next):
1. Go to the Account overview page and click Edit next to 2-step verification.
2. Click Android or iPhone, depending on your phone type.
3. Go to Google Play or the App Store and search for Google Authenticator.
4. Install and open the app. On Android you may also be requested to install a QR barcode scanning app such as ZXing.
5. Tap Scan a barcode in the Google Authenticator app (on an iPhone you need to tap the + icon first).
6. Use the mobile phone’s camera to scan the QR barcode that is displayed on the screen (as shown in Figure 12-7).
7. Type the six-digit number displayed on the Google Authenticator app in the Code text box and click Verify.
8. Click Save.
In many ways, using the Google Authenticator app to authorize a new computer is faster and easier than getting a message sent to your cell phone. So it’s well worth the time to install Google Authenticator. The Google Authenticator app works in conjunction with other apps installed on the phone to provide instant 2-step authorization. (If the developer has provided support, the app itself requests a code be sent to the Google Authenticator app on your phone; you only need to open Google Authenticator to view the code.)
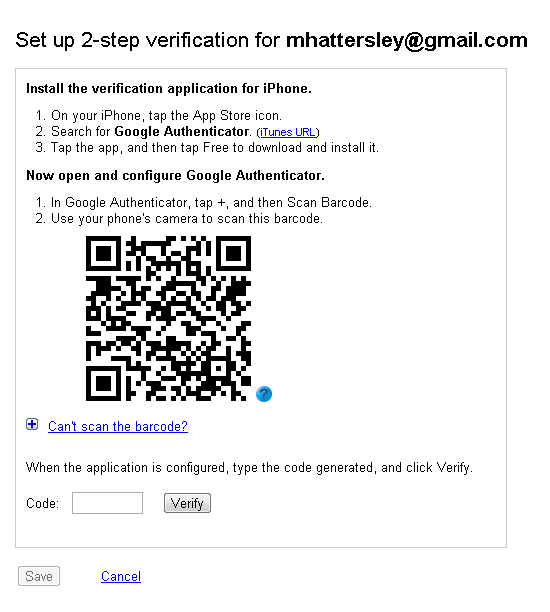
FIGURE 12-7 Scan this QR barcode using Google Authenticator to set up a mobile phone.
If you have a BlackBerry, the process of setting up 2-step verification to receive codes on the phone is slightly different:
1. Go to m.google.com/authenticator on your BlackBerry browser and click Download to get the Google Authenticator app.
2. Choose Yes to Trusted application status and click Select on your BlackBerry, and then click OK.
3. Go to the Account overview page in Google+ on your computer and click Edit next to 2-step verification.
4. Click BlackBerry next to Mobile Application.
5. Open the Google Authenticator app on the BlackBerry phone and choose Manual key entry.
6. Type the full email address associated with your Google account into the Account name box.
7. Type the Secret key code displayed in Google+ into the Enter key box (you don’t need to worry about the spaces). If you enter any incorrect letters or numbers, the BlackBerry displays the message Invalid key format.
8. Ensure that the Type of key menu displays Time based and click Save.
9. Google Authenticator displays a six-digit number. Type this into the Code box in the Google accounts page and click Verify.
10. Click Save. You are now able to use your BlackBerry to receive access codes to authorize remote computers.
Printing backup codes
If you are traveling and don’t have access to your phone, you can use backup codes to access your Google+ account. You can print these out, and each code enables you to sign in to Google once.
1. Go to the Account overview page and click Edit next to 2-step verification. You may need to reenter your password.
2. Click Show/Generate codes (next to Printable backup codes). A set of ten codes appears (as shown in Figure 12-8).
3. Click Print codes.
4. Click Print.
Alternatively, you can choose Save to text file instead of printing them, although you should have a printed copy of the codes if you’re going to be without your own laptop and cell phone.
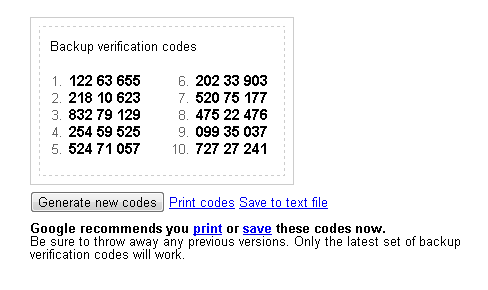
FIGURE 12-8 Backup verification codes.
How Long Do Verification Codes Last? Codes only work once and only one set of codes works at any time. You can get a new set of codes by clicking Generate new codes, but the previous set will no longer work.
Entering a 2-Step verification code
When you get a new computer, you need to enter the 2-step verification code to be able to access your account.
After logging in to Google+, enter a verification code (as shown in Figure 12-9). If you have set up Google Authenticator on your mobile phone, open the app to receive the code. Otherwise it is delivered via SMS or a voice call (depending on which option you choose upon setting up 2-step delivery).
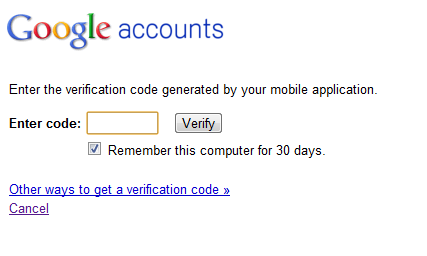
FIGURE 12-9 Entering a 2-step verification code.
If you do not have your mobile phone or wish to receive a code any other way, click Other ways to get a verification code and choose from one of the following:
+ Send to your backup phone number ending in XXXX, where XXXX is the last four digits of your phone number.
+ Use a backup code
+ I no longer have access to any of these
Enter the six-digit number into the Enter code text box and click Verify.
Recovering Your Account
If you click I no longer have access to any of these on the 2-step verification page, you are taken to a Password Help screen to recover your account (this is a unique page for 2-step verification users who no longer have access to the mobile device associated with the account or any backup codes). This is handy if you switch phone numbers without updating 2-step verification and suddenly find yourself trying to access your account while away from your computer.
You need to enter a lot of detailed information regarding your Google account, including your old phone numbers associated with the account, estimates of when you first signed up and last logged in, frequently emailed contacts, and Gmail labels. You don’t need to know all of this information, but if you enter enough of the information as accurately possible, Gmail should enable you to log in to your site.
Authorizing applications and sites
If you decide that you want to combine the added security of having 2-step verification, you will discover that some of your computer programs and phone apps (such as Windows Live Mail, Google Picasa desktop app, and mobile Gmail) no longer work.
This is because they do not support 2-step verification, so you cannot enter the code that Google provides on your phone. Instead, you need to generate a specific password for each application. Follow these steps to authorize Windows Live Mail after you’ve turned on 2-step verification:
1. Go to the Account overview page and click Edit next to Authorizing applications & sites. You may need to reenter your password.
2. Scroll down to Application-specific passwords and enter a reference name for the app in the Name text box. This doesn’t have to be exact; it’s just for your reference.
3. Click Generate password.
4. The password appears inside a yellow box in the browser (as shown in Figure 12-10). Highlight it, right-click, and choose Copy (or write it down). Note that you can only access the code this one instance, so you should type it into the app immediately.
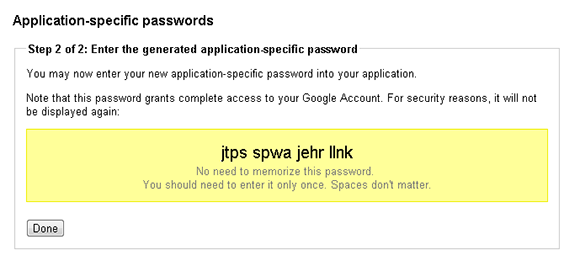
FIGURE 12-10 The application-specific password.
5. Open the application that you want to use the code in (if you have already signed up for Google services, you receive an error message). Locate the preference in that application where you need to enter your password.
6. Enter the password generated in Step 4 instead of your usual Gmail password and click OK (as shown in Figure 12-11).
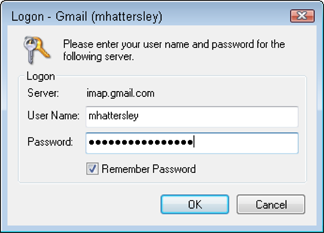
FIGURE 12-11 Typing the password into the application.
You need to do this for each application and phone app that accesses Google services, which can be quite time consuming. But you only need to do it once (or at least once for each program or app), and it does offer a high level of security.
Editing personal information, email addresses, and usernames
By default, Google has two email addresses for you: the one you use to sign in to Google+ and a backup.
You can edit these email addresses (or add additional addresses) as well as change your personal information by clicking Edit next to Email addresses. This brings up a screen (shown in Figure 12-12) with the following options:
+ First name
+ Last name
+ Nickname
+ Zip code
+ Country
+ Time zone
+ Add an additional email address

FIGURE 12-12 Editing personal information and adding email addresses.
Enter any additional information and click Save to enter the details into Google. You can also remove an email address by clicking Remove.
Services
Three final options appear in the Account overview page under the Services heading:
+ Delete profile and Google+ features
+ Delete entire Google account
+ View, enable, or disable web history
As the names suggest, these options are used to delete your Google+ account or entire Google account as well as manage how Google uses your web search history. Chapter 15 has more detailed information on how to use these features to manage your privacy and delete your account.