
WHENEVER YOU’RE FACED WITH A NEW PROJECT, you begin the planning phase of the project. It is during this phase that you figure out how to structure the project. You need to define the project’s goal, which helps you identify the project’s scope so that you don’t bite off more than you can chew and so that you don’t do less than management or your client expects. When you establish a project’s goal and scope, you need to make sure that everyone involved in the project understands and agrees that the goal and scope you’ve identified are, indeed, the goal and scope of the project.
You can then begin to organize the details of the project, identifying when the project will begin and the tasks you need to include, along with figuring out the timing of the tasks. You might also identify resources, assign them to tasks, and then resolve resource overallocations. And you deal with the cost of the project.
This chapter focuses on the actions you take during the planning phase that help you get started on your project.
To get started on a project, you need to define the project and its boundaries. Then you can start Microsoft Office Project 2007 to create your project and establish its overall settings. Be aware that the planning phase can and usually does take a considerable amount of time. In fact, most project managers will tell you that the more time you spend planning effectively, the less likely you are to meet with surprises along the way and the more likely you are to achieve your goal in the timeframe and within the budget you estimate.
Setting goals for a project and defining a project’s scope are two different things. Before you even start Project, you should identify the goal(s) of your project. Talk to the person who asked you to take on this project, talk to your boss, talk to other people who were involved in the discussions when the project was approved. Find out from all of these people what they think the purpose of the project is. Ask each of them, "What should my project achieve? What should change when I complete my project?" You might find that each of them has different, possibly conflicting, ideas. Before you start working, you need to resolve any conflicts and establish a cohesive set of goals for your project; otherwise, the project is doomed to fail because you won’t satisfy everyone involved. Write a goal statement that outlines why you think you’re doing the project and what you hope to achieve by it; then run it by all of the people you interviewed. Get them to sign off, preferably in writing, on the project’s goals. And don’t establish goals by outlining deliverables; save that for your scope statement.
Your scope statement should help define for you and all involved in the project what your project will and won’t do. In your scope statement, you identify an estimated total cost for your project, along with a general idea of how long you expect the work on the project to last and the deliverables you expect to produce. Don’t go into excessive detail here, because you’ll refine the estimates once you begin the detailed planning phase of your project. But you need to provide enough information so that your project team understands the most important aspects of the project. Ask yourself questions like, "What is my project’s budget?" and "Who will be affected by my project?" Identify the people who will work on or contribute to your project and the deadline date for your project. Don’t forget to include criteria by which you and other stakeholders can determine whether your project is complete.
Your goal statement and your scope statement help you and your team focus your energies and therefore stay on track.
In some organizations, you also use your goal and scope statements to prepare a project charter, which typically formalizes your project. The project charter includes your project’s name and written authorization to begin work and to draw on a budget, along with a list of responsibilities.
Remember, projects can last for months or years. As you work on a project, things come up that you didn’t anticipate; that’s the nature of working on a project. Nobody’s perfect and, so far, nobody has been proven to predict the future. So until "knowing the future" becomes a reality, accept the fact that your project will grow and change in unpredictable ways. At some point, you might need to redefine the scope of your project to address these unpredictable events.
See Also
You’ll find more information about redefining the scope of your project in 8.
In Project, you can create a new project from scratch by using a blank project. Or you can create a project based on an existing project or a template that comes with Project or a template you created yourself. Using a template saves you time by establishing a series of tasks for you so that you don’t have to create them yourself. But if your projects don’t resemble each other, you will most likely want to work from a blank project.
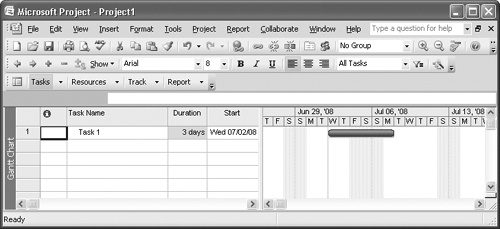
![]() A new blank project appears each time you start Project, or you can click the New button on the Standard toolbar to display a new blank project (see 1-1).
A new blank project appears each time you start Project, or you can click the New button on the Standard toolbar to display a new blank project (see 1-1).

To start a new project from a template, on the File menu, click New; in the Task pane that appears, click the On Computer link. Project displays the Templates dialog box; click the Project Templates tab to see the available templates that come with Project. Click the General tab to see the templates you have created.
Creating a Template
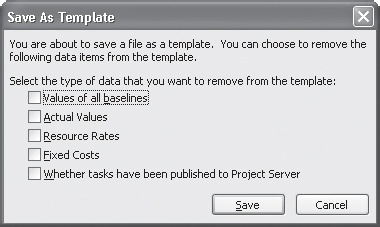
To create a template, set up the information you want to store in the template. Then on the File menu, click Save As. In the Save As dialog box that appears, open the Save As Type list and click Template (*.mpt). Project automatically displays the folder in which it will save the template file. In the File Name box, type a name for the template. When you click Save, Project displays the Save As Template dialog box shown here, in which you can select the type of data that you want to remove from the template.
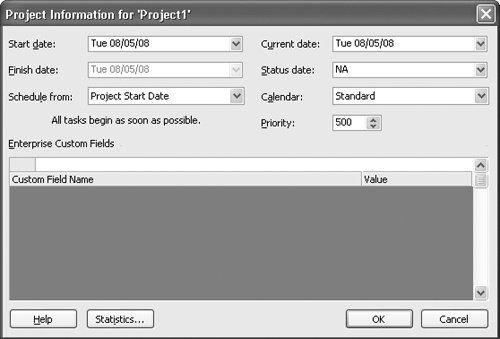
After you start your project, you can establish some general information about your project. Most of the information affects the timing of your project. On the Project menu, click Project Information to display the Project Information dialog box (see 1-2).
Tip
This dialog box doesn’t appear by default, but you can make it appear each time you start a new project, which might be a good idea. That way, you won’t forget to set general project information. On the Tools menu, click Options, and on the General tab of the Options dialog box that appears, select the Prompt For Project Info For New Projects check box.
Note
The bottom portion of this dialog box appears if you use Project Professional; if you connect your project to Project Server, custom fields stored in Project Server also appear.
In the Project Information dialog box, you can make a number of choices for your project. Some of the choices you make determine whether other choices are available to you. For example, either the Start Date field or the Finish Date field is available, depending on the choice you make in the Schedule From field.
Schedule From. This field controls whether Project calculates the schedule from the start or the ending date of your project. The choice you make in this field also determines whether Project makes the Start Date or the Finish Date field available (refer to 1-2).
Start Date. Using this field, you can set a start date for the project. Project uses this date as the start date for all tasks you create until you assign timing or dependencies to them.
Finish Date. Using this field, you can set a finish date for the project. Project uses this date as the finish date for all tasks you create until you assign timing or dependencies to them. If you know your project’s deadline, you can enter it here and then work backward to schedule your project; this approach helps you figure out when you need to start your project to make your deadline.
Current Date. By default, Project displays your computer’s current date setting in this field. If you adjust this date, you can, for example, generate reports that provide information on your project as of the date you select.
Status Date. You set the Status Date when you start recording progress on your project. Project uses the date you set in this field to make earned-value calculations and to display progress lines in your project. If you leave the status date set at NA, Project assumes that the status date should be the same as your computer’s current date setting.
Calendar. Project comes with three overall calendars that you can assign to your project, based on the hours resources work in your organization; if none of these works for you, you can create your own calendar. We’ll examine these three calendars more in the next section.
Priority. Project uses the Priority field—there’s one available for the project and for every task in the project—to try to recalculate the schedule to resolve conflicts. The available priority values are the numbers between 1 and 1000; the higher the number, the less likely Project will opt to delay the project or task. The project’s priority number comes into play when you connect projects through consolidation and then try to reschedule to resolve conflicts.
See Also
See 13, for more information on using priorities at the project level.
The project calendar identifies the default working hours at your company. Project uses the project calendar when it calculates the schedule, eliminating non-working days from the calculations and fitting work into the appropriate hours available on any given day. So it’s important to ensure that your project calendar accurately reflects your company’s working time.
As I mentioned in the previous section, Project comes with three overall calendars that you can assign to your project, based on the typical hours and days resources work in your organization; if none of these works for you, you can create your own calendar. You also can identify non-working days.
The Standard calendar assumes that resources work five days each week (Monday through Friday), eight hours each day (from 8:00 A.M. to 5:00 P.M. with a break between noon, which Project shows as 12:00 PM in the calendar interface, and 1:00 P.M.).
The 24 Hour calendar assumes that you have resources working from midnight to midnight (which Project shows as 12:00 AM in the calendar interface).
The Night Shift calendar sets the following working times for resources:
Monday: 11:00 PM to 12:00 AM.
Tuesday through Friday: 12:00 AM to 3:00 AM, 4:00 AM to 8:00 AM, and 11:00 PM to 12:00 AM.
Saturday: 12:00 AM to 3:00 AM and 4:00 AM to 8:00 AM.
Sunday: No working time.
Remember
If you’re using Project Standard, any changes you make to the calendar will work exactly as described here. If you’re using Project Professional and you’re storing your project in the Project Server database, you will need the Project Server administrator to establish the permissions that allow you to create and save calendars in the Project Server database.
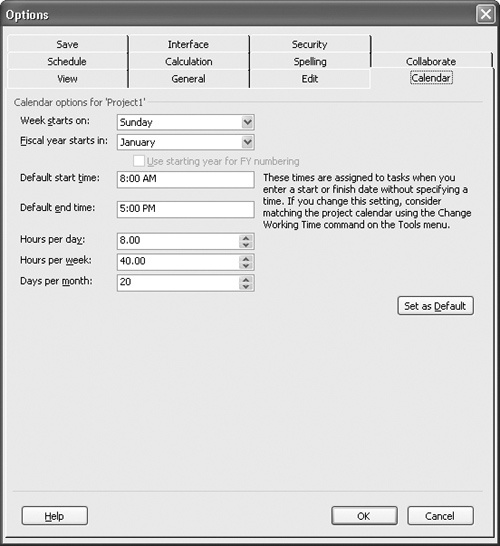
You can change the default working days and hours that Project uses on the Standard calendar by clicking Options on the Tools menu and then clicking the Calendar tab (see 1-3). For example, if your company uses a four-day, 10-hour-per-day work week, you can set up the working week and workday hours here.
You might want to identify holidays that your company observes so that project doesn’t try to schedule resources to work on those days. You can assign any of the three calendars to your project or you can create your own calendars. For the purposes of this discussion, assume that the Standard calendar works for your company, but you want to designate company holidays as non-working days.
Tip
If you’re more comfortable using wizards, try the Calendar Wizard, which is available in the Project Guide. On the View menu, click Turn On Project Guide. In the Project Guide pane that appears on the left side of the Project window, select the Define General Working Times link and follow the steps through the wizard.
On the Tools menu, click Change Working Time to display the Change Working Time dialog box shown in 1-4. The legend at the left side of the box helps you identify the status of any given calendar day. In addition, if you click any given day, the status for that particular day appears on the right side of the calendar.
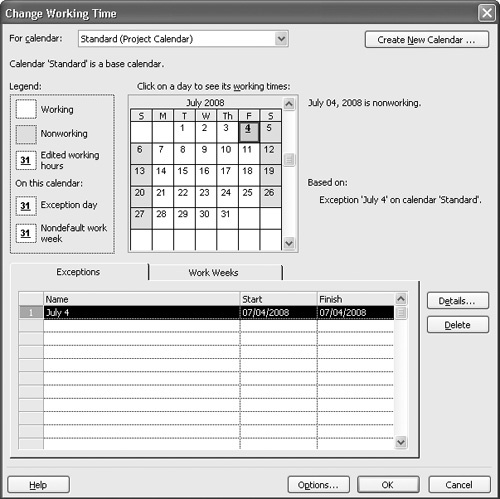
Figure 1-4. Use this dialog box to select or create a calendar for your project and to identify exceptions to the standard workday.
To set exceptions to the calendar for observed company holidays, follow these steps:
Make sure that the calendar you want to assign to your project appears in the For Calendar box.
Tip
Although you can make changes to any of the calendars provided with Project, you might want to create a copy of the calendar and make your changes on the copy, just to make the default calendars that come with Project always available to you. When you click Create New Calendar, Project gives you the option to create a copy of the selected calendar.
Select the day you want to designate as a holiday. You can click the scroll bar arrows beside the calendar to display a prior or future month.
Click in the Name column on the Exceptions tab, type the name by which you want to identify the calendar exception, and press the Tab key.
Project changes the appearance of the selected day to reflect the non-working time you established.
Click OK.
Why would you want to modify the work week? Well, suppose that your standard work week follows the work week shown on the Calendar tab of the Options dialog box (see 1-3 earlier in this chapter), but your business is closed every Monday. You can modify the work week to make all Mondays non-working days. You identify modifications to the work week on the Work Weeks tab of the Change Working Time dialog box. Click the [Default] entry and then click the Details button to display the Details dialog box for the default work week (see 1-5).

Select the day you want to modify and then use the options on the right to identify the way in which you want to modify the day; for this example, I selected Set Days To Nonworking Time. Note that you can simply modify the hours of any given day. For example, you could arrange to work Wednesday mornings but not Wednesday afternoons.
In each case, when you make changes to the calendar, Project uses the changes you identify when it calculates the schedule. Suppose, for example, that your project runs through the month of July and you have a three-day task that starts on July 2. If July 4 is a working day, the task will complete on July 4. But if you set July 4 as a non-working day, Project sets the task to finish on July 7 (see 1-6).