
Many of the resources you use on a project affect the length of time needed to complete a task. On these effort-driven tasks, one person might complete the job in 30 days, while two people might be able to complete the job in half the time, and three people in one third of the time. If the cost of all three resources is the same, using one or three people won’t affect the cost of your project; rather, the number of people you use will affect only the project’s duration. That’s the simple, straightforward, mathematical approach.
In a perfect world, you’d have all the resources you need to complete your project exactly when you need them. But we don’t live in a perfect world. So when you’re planning a project, you need to recognize that you won’t have all of the resources you need all of the time. Some resources might be available to work on your project only for a certain time period. Other resources might have vacation time scheduled. If you identify a resource’s availability in Project, you can use the information to make sure that you don’t accidentally assign a resource to a task when the resource isn’t available.
Note
If your organization shares resources among projects, the information that follows still applies to you, but you may also want to take advantage of resource pooling. See 13 for more information on sharing resources.
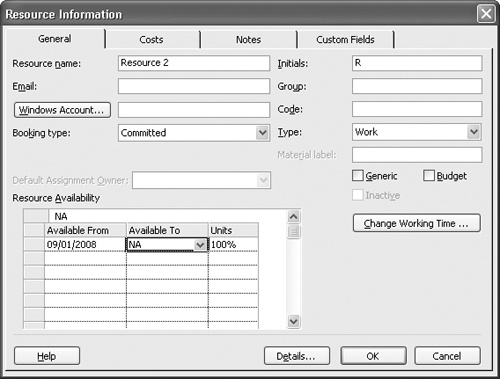
You are bound to run into cases in which a resource is available to you for only some portion of the time your project will be running. Suppose that your project begins on August 1 and a particular resource won’t become available to you until September 1. To account for the resource’s availability, use the Resource Information dialog box.
On the Resource Sheet view (on the View menu, click Resource Sheet), double-click the resource to display the Resource Information dialog box (see 3-5). Use the Resource Availability table on the General tab to set dates that describe when the resource will be available. You can set both starting and ending dates or set just a starting date. And if the resource will be available to you only part-time, use the Units column to specific a percentage less than 100 percent.
You use a resource’s calendar to set exceptions to working time for a particular resource. Don’t get crazy here; if a resource is taking a half day off once for a doctor’s appointment, you really don’t need to set the exception on the resource’s calendar; in all likelihood, the resource will make up the time over the life of the project.
But if a resource has a two-week vacation planned in the middle of your project, you should set up that exception on the resource’s calendar to avoid assigning work to that resource during that period. Or if a resource’s work week doesn’t match the calendar assigned to the project—suppose that the resource works a 32-hour week, Monday through Thursday—you should set up all Fridays as non-working days on the resource’s calendar.
To set up an exception to a resource’s calendar, follow these steps:
Double-click the resource on the Resource Sheet to open the Resource Information dialog box.
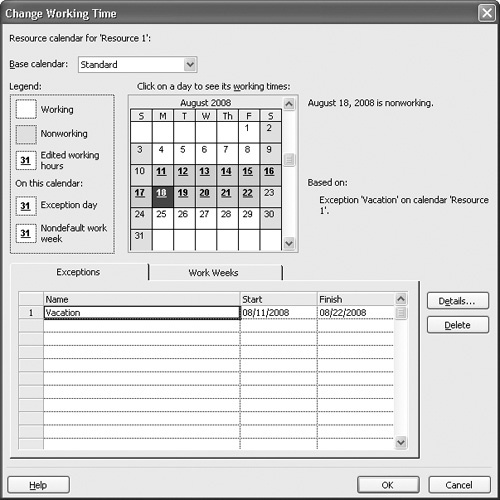
On the General tab, click the Change Working Time button. Project displays the resource’s calendar with today’s date selected.
On the Exceptions tab, type a name in the Name column that helps you remember the purpose of the exception.
In the Start column, select the date on which the exception starts from the calendar that appears.
In the Finish column, select the date on which the exception ends. Project sets every day between the starting and ending dates as an exception on the calendar:
Setting Up a Work Week Exception
To set up a work week exception for a resource who, for example, doesn’t work on Fridays, use the Work Weeks tab. Type a name for the exception such as "Off Fridays," set starting and ending dates, and then click the Details button. Project displays the Details For dialog box.
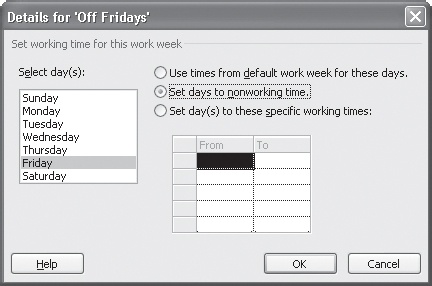
Select the Set Days To Nonworking Time option and click OK. When Project redisplays the Change Working Time dialog box, all of the days you specified between the beginning and ending dates appear underlined on the calendar; all Fridays appear shaded darker than Mondays through Thursdays.
Once you establish a resource’s availability, you can take advantage of your work while you assign resources. Earlier in this chapter, I showed you the basics for assigning resources. But now that you’ve factored in resource availability, let’s see how you can use the availability information while making assignments to avoid assigning an unavailable resource.
Let’s examine a simple case—you’ve got Tasks 1, 2, and 3 in your project, which begins on August 1, and you’ve got Resources 1 and 2 set up in the project. While working in the Gantt Chart view (on the View menu, click Gantt Chart), you select Task 1 and then click the Assign Resources button to display the Assign Resources window. Initially, both resources appear in the window (see 3-6).
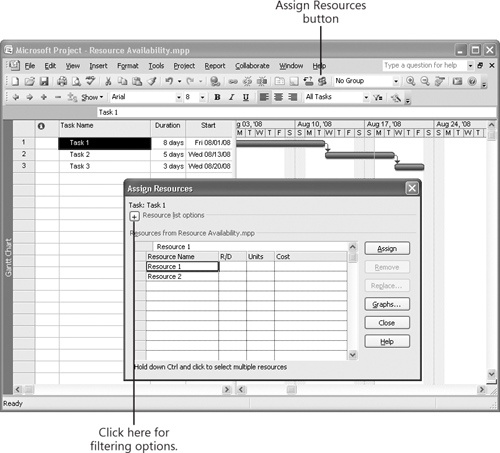
Figure 3-6. Click the Resource List Options plus sign (+) to hide and display options you can use to filter available resources.
You can check availability before you make an assignment if you click the Resource List Options plus sign (+). Then select Available To Work and specify the number of hours per day a resource needs to be available for the task you selected. Project hides any resources not available to work in the timeframe of Task 1 based on examining their availability and their resource calendars and comparing that information to the duration of the selected task (see 3-7).
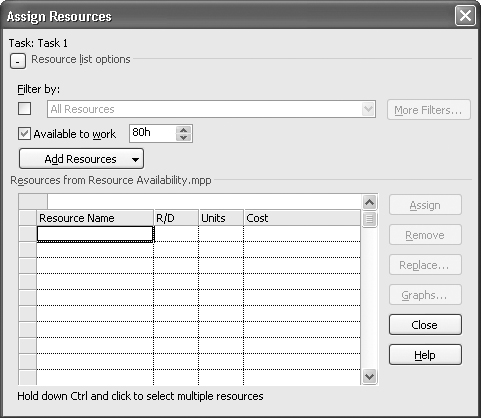
In this example, when you filter for resources available to work 80 hours—the 10 days the task is scheduled to last—Project shows you that neither resource is available. In this example, Resource 1 is scheduled for a two-week vacation running from August 11 to 22, and Resource 2 doesn’t become available to work on the project until September 1. However, in the real world, I won’t be around to tell you why resources are not available. But you don’t need me; you can find out why these resources aren’t available for yourself.
To see what’s going on with your two resources, you can use the Graphs button in the Assign Resources window. First, clear your Available To Work filter so that you can see your resources; then click a resource and click the Graphs button.
Tip
You can display the graphs described below for more than one resource at a time. Press and hold the Ctrl key as you click each resource you want to graph. Then click the Graphs button.
Three graphs, which relate to the resource you selected and not to the task for which you’re considering assignment, are available in the Graphs window that appears:
The Work graph shows the amount of work that is assigned to the selected resource on a day-by-day basis.
The Assignment Work graph breaks down the total workload of the resource that you’re considering, showing you the resource’s workload on the selected task, other tasks, and the resource’s total availability based on the calendar. Using this graph helps you to see whether you’ll overallocate the resource by assigning it to this task.
The Remaining Availability graph shows you only the resource’s unassigned time.
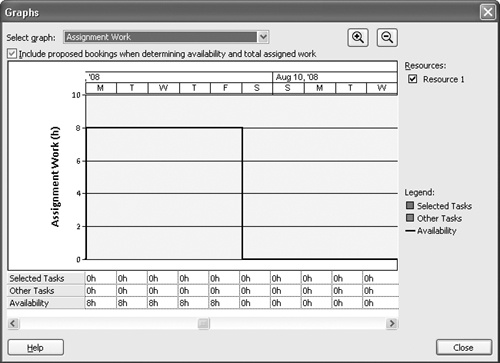
Because the Assignment Work graph shows you what’s going on with the resource’s workload on both the selected task and other tasks, you often can spot an overallocation situation before it happens. In this example, Resource 1 isn’t assigned to any tasks beginning August 11, but Resource 1 also is not available. That information tells you that something is going on with the resource’s availability or calendar, and helps you avoid making an assignment that can’t be completed by this resource.
Sometimes you can avoid overallocating a resource. Assign overtime sparingly for two reasons:
Typically, a resource’s overtime rate is higher than the resource’s regular rate, so assigning overtime can make your project more expensive to complete.
Assigning overtime as a regular practice causes people to burn out and their work to suffer.
While you might think that you can simply replace a burned-out employee who quits, people are actually your most costly resource. You invest money to train them and get them up to speed on the way your company operates, so replacing an employee costs your company money. So don’t make assigning overtime a regular practice—make it the exception to the rule.
See Also
For details on assigning overtime, see 6.