

SOME PROJECTS ARE MORE COMPLEX than others—that’s just a fact of life. Most project managers prefer to manage a complex project by finding ways to reduce its complexity. You can reduce complexity if, for example, you divide a complex project into phases and then establish each phase as a separate project. Microsoft Office Project 2007 refers to this process as consolidation, and you’ll read about creating consolidated projects in this chapter. And to alleviate problems associated with sharing resources, you can set up and use a resource pool.
Most project managers say that large projects—projects with lots of tasks—are the most difficult to manage because they challenge even the best organizational skills. Project uses consolidation to help you manage these types of projects. First you break large, complex projects into smaller projects (called subprojects) that aren’t so complex; then you use consolidation to combine the subprojects and view the bigger picture of the large, complex project. For example, you might take the phases of a complex project and establish them as separate subprojects. A particular phase might be complex enough to be handled as a project on its own, with its own project manager and team. If you use consolidation techniques, you can still treat that project as a subproject in the consolidated project, retaining the dependencies.
Note
If you use the same resources for several projects, you can consolidate those projects so that you can level the resources to resolve overallocations. You also can use a resource pool to share the resources among the various projects that make up a consolidated project. See the section "Using a Resource Pool" later in this chapter for more information.
You might decide when you begin a project that it is too large to handle in one Project file. Or you might start working before you realize that you need to use consolidation. You can take advantage of consolidation techniques in either situation.
If you decide to use consolidation right from the beginning of your planning process, create separate Project files for the various portions of the project that you’ll treat as subprojects. Create tasks, assign durations, and create any necessary dependencies between tasks in each subproject file.
If you start the planning process and then decide to use consolidation, break the original project down into subprojects and create additional subprojects to accommodate the new tasks. Select all the tasks in the original project file that you want to save in your first subproject file, and click the Copy button on the Standard toolbar. Then click the New button; if prompted, select Blank Project to create a new blank project. Click the Paste button, and the tasks you copied from the original project appear in the new project.
In the new project, on the Project menu, click Project Information to display the Project Information dialog box, where you can establish basic information for the subproject, identifying its start date and scheduling method. Save the subproject and close it. Then repeat this process for each portion of the original project that you want to save as a subproject.
Tip
You can make Project display the Project Information dialog box by default each time you start a new project. On the Tools menu, click Options. On the General tab, select the Prompt For Project Info For New Projects check box.
You can close the original file and work in the subproject files to make them independent projects. When you’re ready to connect the subprojects, read the next sections.
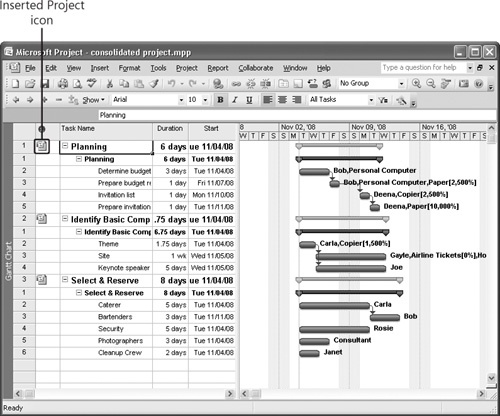
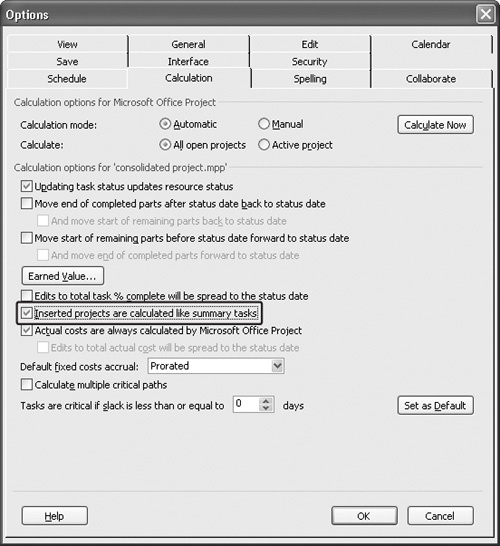
When you’re ready to create a consolidated project, you insert subprojects into another project file. Each subproject that you insert appears as a summary task in the consolidated project file, and Project calculates the schedules and costs of inserted projects like summary tasks. Project also displays an icon in the Indicator field to identify an inserted project (see 13-1).
To create a consolidated project, follow these steps:
Start a new project and switch to the Gantt Chart view.
Click in the row of the Task Name column where you want the inserted project to begin.
On the Insert menu, click Project. Project displays the Insert Project dialog box, which looks and works like the Open dialog box.
Navigate to the folder that contains the project you want to insert.
Select the subproject file you want to insert.
Click Insert.
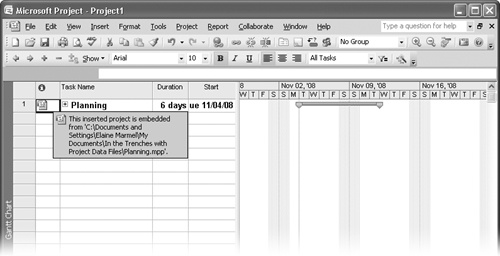
The inserted project file appears as a summary task, with its subtasks hidden (see 13-2). If you move the mouse pointer over the icon in the Indicator field, Project displays information about the folder where the subproject file resides.
To view the tasks of an inserted project, click the plus sign in the Task Name column beside the name of the inserted project.
Note
You can insert projects into a consolidated project at any level in the project outline. The outline level Project assigns to an inserted project depends on the level of the tasks above and below the inserted project. To line up inserted projects at the highest outline level in the consolidated project, collapse projects you’ve already inserted so that you can’t see their tasks.
When you insert a project, the Link To Project check box is selected by default. Typically, you want this option selected because Project then connects the inserted project to its source file and retains and uses all of the information stored in the inserted file, including the information you provided in the subproject’s Project Information dialog box concerning how to calculate the project schedule. If you clear the check box, you are simply copying tasks from one project to another. Project doesn’t connect the inserted project to its source project; no icon will appear in the Indicator field and Project will ignore the information stored in the Project Information dialog box of the inserted project. If you make changes to the inserted project while working in the consolidated project file, Project won’t prompt you to update the inserted project’s source file.
When you link an inserted project to its source file, Windows treats that link the same way it treats any other link. For example, if you move the subproject file to a different folder, the link won’t work anymore unless you update it. To update a link, double-click the inserted project in the Gantt Chart view of the consolidated project; Project displays the Inserted Project Information dialog box for the inserted project, which is the equivalent of the Task Information dialog box for any task (see 13-3). Click the Advanced tab to view and update the path to the linked subproject file.
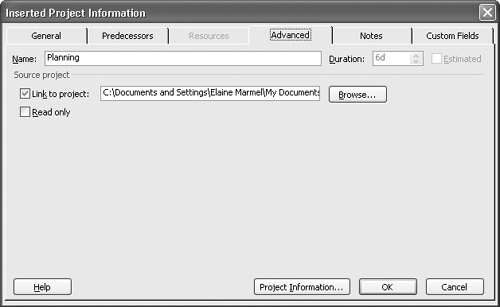
Figure 13-3. You can update an inserted project’s link from the Advanced tab of the Inserted Project Information dialog box.
You can use the Browse button to navigate to the new location for an inserted project, and you also can unlink subprojects from their source files by clearing the Link To Project check box.
Note
If the link to an inserted project isn’t valid and you attempt to expand the outline for an inserted project, Project automatically displays a dialog box that looks like the Open dialog box. Use this dialog box to navigate to the new location of the file, and click OK after you finish. This process also re-establishes the link between the files.
The beauty of the concept of a consolidated project is that you can isolate pieces of a large, complex project into subprojects but at the same time maintain the subproject’s role and position in the larger project. You establish a subproject’s relationship to the larger project by creating dependencies.
You use the same four different types of dependencies between subprojects as those you use between tasks in any project: finish-to-start, start-to-start, finish-to-finish, and start-to-finish. And you can add lag or lead time to links between subprojects, just like you can to links between tasks.
See Also
For details on dependencies, see 2.
To link a task stored in one subproject to a task stored in another subproject, create a consolidated project and then follow these steps within the consolidated project:
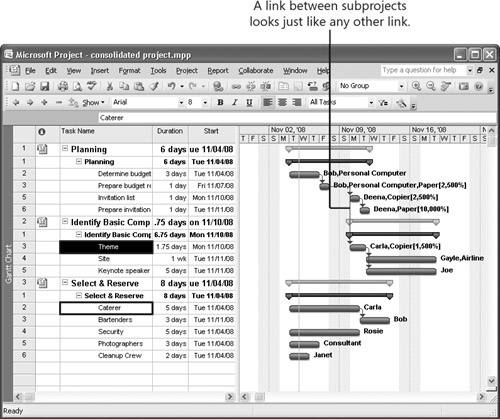
In the consolidated project, the link line between tasks across subprojects looks just like any other link line; no visual cue appears to make you aware that two subprojects are linked.
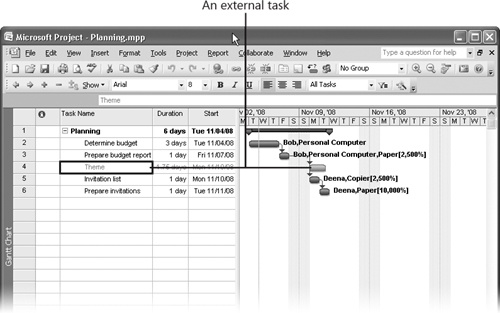
But if you look at either of the subproject files, you’ll find an external task. The names and Gantt bars of external tasks are light gray. In 13-4, Theme (the task that appears on Row 4) is an external task. If you point to the Gantt Chart bar, Project displays information about the task, including the fact that it is an external task.
Tip
If you double-click the task name of an external task, Project opens the subproject to which the external task is linked.
You can make changes to a link between tasks in different subprojects using either the subproject file or the consolidated project file. You use pretty much the same technique regardless of the file in which you work.
If you choose to work in the consolidated project, double-click the line that links the two tasks. Alternatively, if you choose to work in the subproject, double-click the line that links an internal task to the external task. In both cases, Project displays the Task Dependency dialog box. 13-5 shows the version of the Task Dependency dialog box that appears when you open the dialog box from a subproject. The Task Dependency dialog box appears slightly different when you open the dialog box from the consolidated project; you cannot change the path of the link.
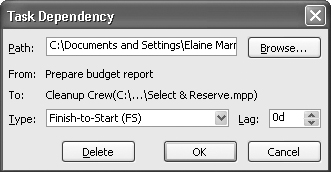
Figure 13-5. Use the Type list in the Task Dependency dialog box to change the type of link, and the Lag box to change the amount of lag time between the linked tasks.
Note
As you would expect, when you close a consolidated project file, Project prompts you to save it. Because you’re closing a consolidated project, Project responds a little differently than it does when you close a regular project. Regardless of whether you decide to save the consolidated project, Project will then ask if you want to save changes that you made to inserted projects. And here’s a point of interest: If you save the subprojects—even if you don’t save the consolidated project—Project saves any external tasks created when you linked subproject files.
Project determines the critical path for a project scheduled from its start date by making calculations using the late finish date of the project. In consolidated projects, Project treats inserted projects like summary tasks by default and calculates the critical path using the finish date of the consolidated project to show you the overall critical path across all the subprojects. This behavior can hide the critical path of the subprojects. In 13-6, each major phase is actually an inserted project. I set up the critical path for the consolidated project to display Gantt bars using a hatched pattern; notice that there are tasks in each inserted project that are not critical.
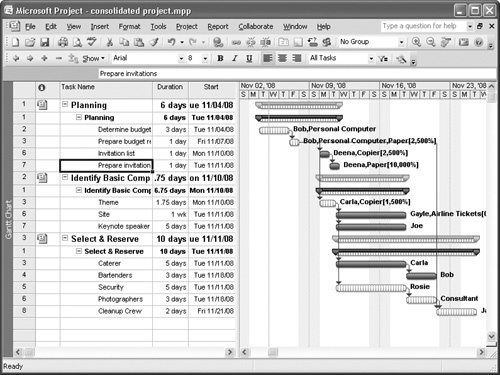
Figure 13-6. Because Project treats inserted projects like summary tasks, only one critical path appears in a consolidated project.
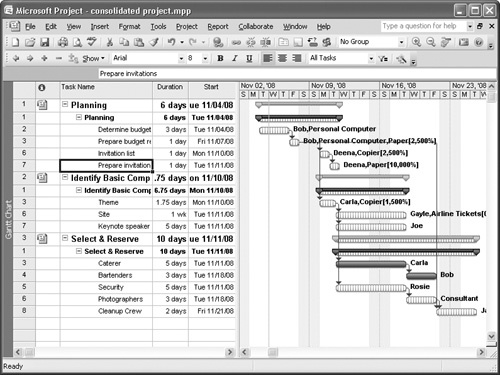
But you can view each subproject’s critical path while viewing the consolidated project if you choose to not calculate subprojects as summary tasks. In this case, Project uses the late finish dates of tasks in the subprojects to determine the critical path; and while viewing the consolidated project, you can see critical paths as they appear in each subproject. In 13-7, only one of the subprojects contains tasks that aren’t critical.
To stop calculating inserted projects like summary tasks, follow these steps:
If you use Project Server 2007, you’ll need to use consolidation to view the critical path of several related projects. You create a consolidated project a little differently, but once you create it, you can create dependencies across subprojects the same way I described in the section "Linking Subprojects" earlier in this chapter. You can then view the critical path across the consolidated project, or you can view the critical path of each inserted project by using the steps in the preceding section, "Examining the Critical Path of a Consolidated Project."
To create cross-project dependencies in a consolidated project for projects residing in the Project Server database, follow these steps:
Log on to Microsoft Office Project Web Access.
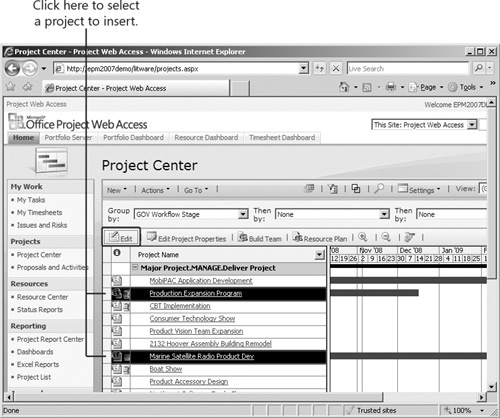
Navigate to the Project Center page.
Press and hold the Ctrl key as you click the row for each project you want to insert into a consolidated project:
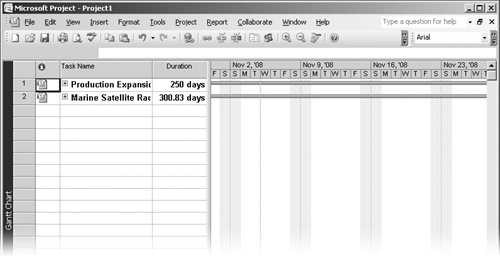
Click the Edit button, which is indicated by the box in the graphic in the previous step. Project automatically creates a consolidated project like the one shown on the following page.
Use the techniques described in the section "Linking Subprojects" earlier in this chapter to set cross-project dependencies. You don’t need to publish the consolidated project in the Project Server database, but if you save the inserted projects when prompted, Project saves your cross-project links in each subproject. The next time you open one of these subprojects, you will see the external tasks Project created.