
There are several approaches you can take to resolve resource conflicts. Some of the approaches work regardless of whether the task is effort-driven. Other techniques work only if the task is effort-driven. Remember, Project adjusts the duration of an effort-driven task based on the number of resources you assign to the task, but Project leaves the duration unaffected by resource assignments if a task is not effort-driven. In some cases, shortening the duration of an effort-driven task might eliminate an overallocation for a resource, but if the task isn’t effort-driven, you can’t shorten the task’s duration.
If a task is not effort-driven, you can try any of the following to resolve a resource conflict:
Swapping out resources
Using overtime
If a task is effort-driven, you can try those techniques along with these techniques:
Adding a resource to a task to shorten its duration and possibly resolve a conflict
Using part-time work assignments to smooth out a resource’s allocation to several tasks
Controlling the date a resource starts working on a task
Contouring a resource’s assignment on a task to resolve a conflict
Leveling resource assignments
It’s also important to understand that you might decide to do nothing about an overallocation. If a resource is overallocated by two hours a day for two or three days, you might decide to permit the overallocation. Just remember that you really can’t permit an overallocation for any extended period of time or your resources will burn out and you won’t be successful as a project manager. And if the overallocated resource is a person who earns overtime for work beyond the standard day, you do need to account for the extra hours in the day as overtime hours to correctly estimate the cost of your project.
When you’ve got an overallocated Work resource working on a task, you can swap out that resource for another with the same qualifications that isn’t overallocated.
Let’s assume that you used the Resource Allocation view to identify an overallocated resource and the task that is causing the conflict. If you swap the top and bottom panes of this view, you can select a task in the top pane and see all resources assigned to it in the bottom pane, along with overallocations. So let’s set up a view to show the Gantt Chart view on top and the Resource Usage view on the bottom. Switch to the Gantt Chart view and then on the Window menu, click Split. Click anywhere in the bottom pane, and on the View menu, click Resource Usage. Your screen will look something like the one shown in 6-4.
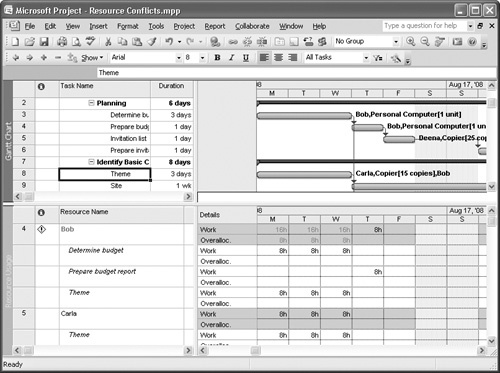
Figure 6-4. Display the Gantt Chart view in the upper pane and the Resource Usage view in the lower pane.
Follow these steps to swap one resource for another:
In the upper pane, click the task containing the resource you want to swap out. In the bottom of the window, Project displays all the assignments for every resource assigned to the task selected in the top pane.
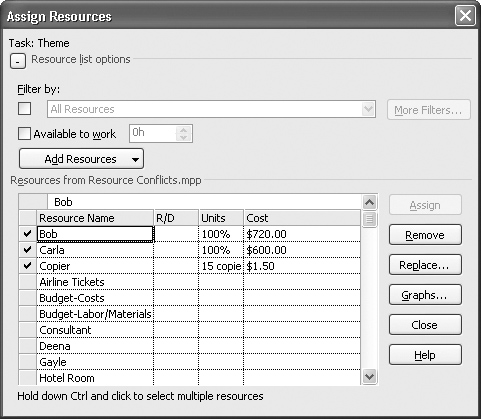
Click the Assign Resources button to open the Assign Resources window:

Highlight the resource you want to swap out.
Click the Replace button. The Replace Resource dialog box appears:
Select the resource you want to use on the task.
Fill in the Units column only if you want to change the number of units of the new resource assigned to the task. If you leave the Units column blank, Project assumes you want the same number of units of the replacement resource as you had assigned to the original resource.
Click OK in the Replace Resource dialog box.
Click Close in the Assign Resources window.

Project will change the assignment without affecting historical actuals, and no resources are affected other than the ones involved in the switch.
In Project, overtime is the amount of work that you schedule for a resource beyond the resource’s regular working hours. Overtime work represents the amount of time a resource spends on a task during non-regular hours; overtime work does not represent additional work on a task. By scheduling overtime, the resource might finish the task faster and therefore eliminate an allocation conflict.
Project charges overtime hours to the project using the resource’s overtime rate, so for overallocated resources that are not salaried and cost extra when working overtime, assigning overtime hours helps you correctly estimate the cost of your project in addition to possibly resolving a resource conflict.
In 6-5, Mary is overallocated on Thursday, August 28, by four hours. I’ve decided to give her four hours of overtime that day to resolve the conflict. For me to do this, I use the Task Entry view, which is a combination of the Gantt Chart view and the Task Form view, to schedule overtime. Here’s how I handle it:
To display the Task Entry view, on the View menu, click More Views. In the More Views window, select Task Entry, and click Apply.
Click the Task Form to make it the active pane.
On the Format menu, point to Details, and click Resource Work. Project displays the Ovt. Work column in the Task Form pane. In this column, "0h" means that you have not yet assigned overtime.
In the top pane, select the task to which you want to assign overtime.
In the bottom pane, fill in the amount of overtime you want to assign to the appropriate resource.

You can try adding a resource to resolve an overallocation. If the task isn’t effort-driven, adding a resource doesn’t reduce the duration of the task, but it can reduce the amount of effort you need from the overallocated resource by spreading the effort out over two resources. And if you’re able to reduce that overallocated resource’s effort on the conflicting task, you just might be able to eliminate the conflict. Essentially, you’re assigning part-time work to an overallocated resource; you can read more about assigning part-time work in the section "Part-Time Assignments" later in this chapter.
When you add a resource to an effort-driven task, you shorten the duration of the task and it’s possible that you’ll eliminate the overallocation if the task is completed more quickly.
See Also
See 3, for details on adding a resource.
What, you’ve run out of resources of your own? You might be able to borrow a resource from another manager. If your organization uses the same resources to work on multiple projects and doesn’t use Microsoft Office Project Server 2007, you might consider setting up a resource pool, which is nothing more than a set of resources that are available to any project. Using a resource pool is closely tied to the topic of managing multiple projects, so you’ll find information about it in 13.
If your organization uses Project Server, you’ll share resources using the Enterprise Resource Pool, and you can use the Resource Substitution wizard to resolve resource conflicts. The Resource Substitution wizard is usually used to substitute real people for generic resources, but you also can use it to help you find someone with the right skills who is also available to work on your project.
You can select one or more projects and have the Resource Substitution wizard reallocate the resources in those projects to better utilize their time. To find a resource with the skills needed to complete a particular task, you can use the Resource Substitution wizard in conjunction with the Resource Breakdown Structure (RBS) code.
The RBS code is a custom outline code—a type of custom field—with an attached value list; in many cases, each value in the list represents a skill or set of skills. The person in your organization who manages the Enterprise Resource Pool assigns to each resource in the pool an RBS code that describes the resource’s skills. The Resource Substitution wizard can use the RBS code to review the skills of resources that are already assigned to tasks and then substitute other resources with the same RBS code.
See Also
For information on custom fields, see 4.
To run the Resource Substitution wizard, on the Tools menu, click Substitute Resources. Then complete the pages that the wizard presents. You can select multiple projects and resources for the wizard to consider while making substitution suggestions.
Here’s the situation: You’ve assigned a resource to several concurrent tasks, and in the process, you’ve overallocated the resource. You don’t have any other resources to add to the tasks or substitute for the overallocated resource, and you’re trying to avoid using overtime to keep costs down.
In this situation, you can assign the resource to work part-time on each of the tasks to solve the conflict. Since the amount of work isn’t changing, the tasks will take longer to complete.
Tip
If you have additional resources available, you can use part-time assignments in conjunction with adding resources to tasks and probably complete the task on time.
When you assign a resource to work part-time, you change the number of units of the resource that you apply to the task. Since Project sets task types to Fixed Units by default, and fixed units tasks are effort-driven, changing the amount of time that a resource works on a task also changes the duration of the task. So if you reduce the number of resource units assigned to the task, Project lengthens the task to accommodate the effort required.
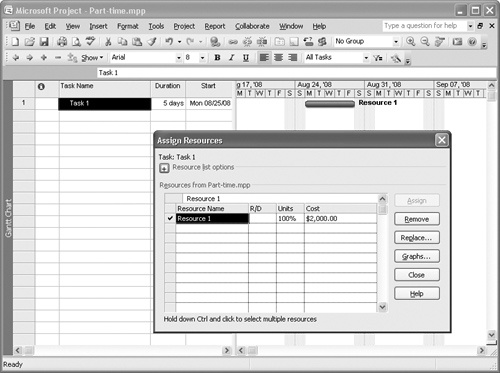
Let’s take a look at an example. In 6-6, I’ve assigned Resource 1 to work at 100-percent capacity on Task 1, a five-day task.
In 6-7, I’ve reduced the number of units of the resource assigned to the task, setting the resource to work half of the time on the task. Project correspondingly doubles the duration of the task. Notice that using this approach doesn’t change the cost of your project, so you don’t need to worry about any budget considerations. You only need to consider what happens to the end date of your project. If this task isn’t on your project’s critical path, the solution is an excellent one, since lengthening the task won’t affect the end date of your project. If, however, the task is on the critical path, you need to confirm with management that the added time needed to complete your project is acceptable.
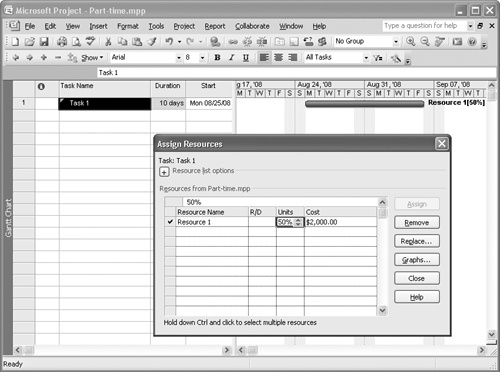
Figure 6-7. Having a resource work part-time on an effort-driven task lengthens the amount of time needed to complete the task.
Note
You might be tempted to change the task type to Fixed Duration to avoid changing the task’s duration when you assign a resource to work part-time on it. By making this change, however, you imply that the task can be completed by the resource in less time than you originally allotted—effectively, you are shortening the amount of time that it takes to complete the task because you’re applying less effort during the same timeframe. If the total amount of effort to complete the task doesn’t change, resist the temptation to use a fixed duration task.
Sometimes controlling when a resource works on a task can resolve a conflict. For example, if you’ve assigned more than one resource to a task, you might be able to delay one resource’s start on a task to resolve a conflict. Or you might be able to change a resource’s work contour to eliminate a conflict.
Back in the beginning of this chapter, I posed a situation that created an overallocation. In that example, your project had two fixed units or fixed work tasks that we called Task 1 and Task 2. The two tasks ran concurrently, with Task 1 being five days in duration and Task 2 being 10 days in duration. You also had two resources (Resource 1 and Resource 2), and you assigned Resource 1 to Task 1 and Resource 2 to Task 2. When you added Resource 1 to Task 2, Project reduced the duration of Task 2 by 50 percent and created an overallocation situation for Resource 1 (see 6-8).
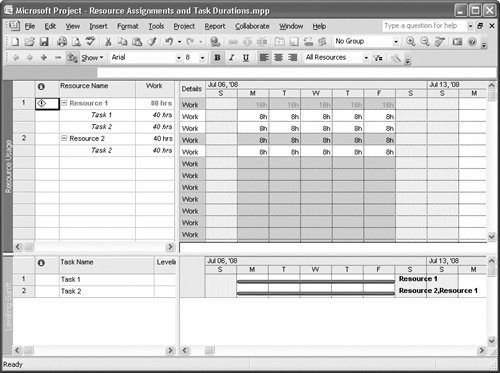
You might have expected Project to recognize that Resource 1 frees up during the second week and would have assigned Resource 1 to Task 2 during the second week, enabling both resources to finish Task 2 in seven and a half days. But Project didn’t make that adjustment because Project looks only at the assignments on a particular task when it recalculates the schedule; it doesn’t look at a resource’s assignments throughout the project.
Although this technique isn’t the most common approach to making an adjustment, you can resolve the resource conflict by changing the dates Resource 1 works on the task using these steps:
Display the Resource Usage view or the Resource Allocation view, where you can easily identify the resource overallocation.
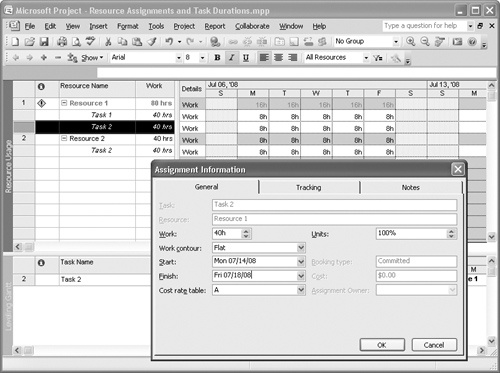
Double-click the name of the task below the resource whose start you want to delay—in this example, Task 2 under Resource 1. Project displays the General tab of the Assignment Information dialog box:
Change the Start and Finish fields below the Work Contour list to reflect the actual start date and actual finish date that Resource 1 will work on during Task 2.
Click OK to save the change, and Project moves Resource 1 (full-time) to work on the task during the second week. Resource 1 is no longer overallocated, and both resources are working full-time during the second week on Task 2.
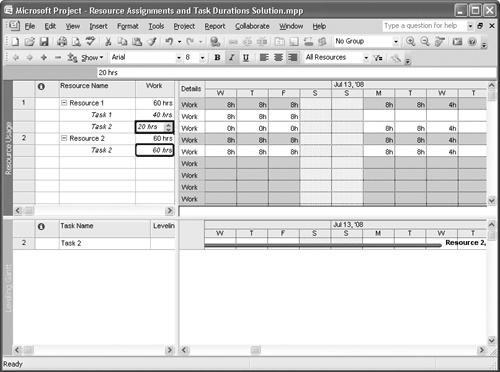
On the Sheet portion of the view, use the Work column to reallocate the hours each resource works on Task 2 from 40 for Resource 1 and 40 for Resource 2 to 20 for Resource 1 and 60 for Resource 2 (see the graphic below). You can see that Project has reset the duration of the task to seven and a half days, with everybody working just the way you thought they would.
Note
As an alternative method to resolving this resource conflict, you can create two tasks to represent Task 2; you’d assign Resource 2 to the part that runs concurrently with Task 1, and you’d assign both resources to the second part. You’d need to calculate the durations for each of these parts of Task 2 separately based on the total effort required and the effort still needed when Resource 1 joins in to work on the task. This approach would net you the same result as shown in the previous graphic.
There are no technological downsides to making an adjustment like this one, except that an experienced Project user might notice the manipulations and wonder how and why you did that. From a conceptual perspective, though, consider this: When you allow Project to schedule as it typically does and correct the overallocation situation for Resource 1 using leveling—which is the most usual way to correct the overallocation, and the method you’ll read about later in this chapter in the section "How Resource Leveling Really Works"—Project extends the duration of Task 2 back to the 10 days you originally estimated (instead of the seven and a half days you thought). In addition, Resource 1 has assignments for the total 10 days, working Task 1 during Week 1 and Task 2 during Week 2, while Resource 2 has an assignment on Task 2 only during Week 1. Although the resource assignments might look strange to you, there is an advantage to leaving things the way Project calculates: If you leave the duration of Task 2 at 10 days, you build two and a half days of slack into your schedule; and if you finish early, you might look like a hero. If you make the manual adjustment and you miss the deadline, well ... management probably won’t be really happy with you.
You can use contours to adjust the way Project assigns a resource’s time, along the way eliminating the conflict. An assignment’s contour refers to the shape of a resource’s work assignment over time. The default contour Project assigns is the Flat contour; when you use this contour, the resource works on a task for the maximum number of hours that he or she is assigned to the task throughout the assignment.
Project includes several other contours; the most commonly used contours, beside the Flat contour, are the Front Loaded, Back Loaded, and Bell contours. When you use a Back Loaded contour for a particular assignment, Project assigns the majority of the resource’s work at the end of the assignment. Using a Front Loaded contour tells Project to assign most of the resource’s work at the beginning of the task. Using a Bell contour tells Project to assign most of the resource’s work in the middle of the task.
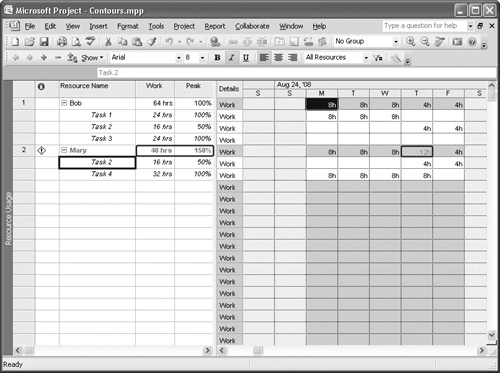
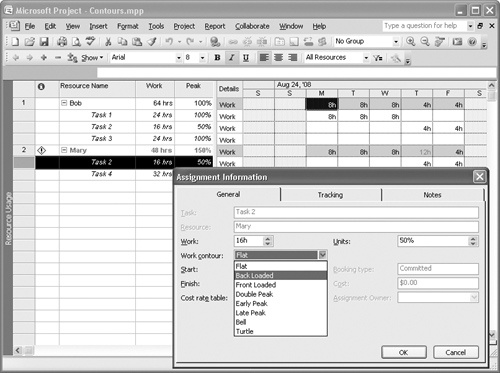
In 6-9, the Resource Usage view shows that Mary is overallocated by four hours on Thursday, August 28. If you could reduce her work on that day by delaying some of her work on Task 2 using a Back Loaded contour, you might be able to eliminate the overallocation, or at least reduce it to something acceptable.
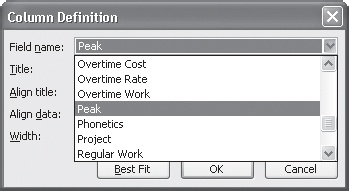
Displaying The Peak Column
In 6-9, I added the Peak column to the view so that I could easily see the maximum effort distributed over time that a resource is assigned to work. You might find this field useful when you use a contour other than the default Flat contour. To display this field, right-click any other field—I right-clicked the Work heading in the sheet area—and click Insert Column. Project displays the Column Definition dialog box. In the Field Name list, type a few characters of the field you want to display until Project displays the correct field. Press Enter and then click OK. Project adds the field to the right of the field you right-clicked; you can drag the field right or left to change its position.
To change Mary’s assignment on Task 2 to use a Back Loaded contour, follow these steps:
Display the Resource Usage view (on the View menu, click Resource Usage).
In the Resource Name column, double-click the name of the task below the resource whose assignment contour you want to change. Project displays the General tab of the Assignment Information dialog box:
In the Work Contour list, click Back Loaded.
Click OK.
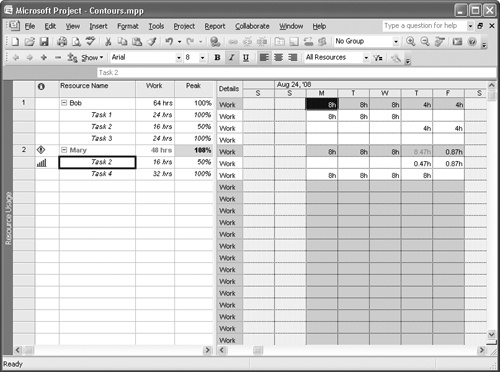
When Project redisplays the Resource Usage view (see 6-10), you see that Mary’s workload during the first week of her assignment to Task 2 has been redistributed, almost completely eliminating the conflict. In fact, Mary is overallocated less than a half hour on August 28. That’s an overallocation that you can accept. Remember, though—if Mary is not a salaried employee and she earns overtime at a higher rate than her standard rate, assign her extra .47 hour on August 28 to overtime to keep your estimated project costs accurate.
Tip
The icon in the Indicators column next to the task reminds you that you selected a contour other than Flat. Move your mouse over the icon to see what contour you assigned.
You should be aware of the ways contours behave when you make changes to tasks. If you increase the duration of a task, Project stretches the contour to include the new duration. And if you set a contour and then change the start date of the task or the start date of a resource’s work on the task, Project preserves the pattern of the original contour by automatically shifting the contour and reapplying it to include the new date.
If you apply a contour other than the default Flat contour to a task and later add new total work values to the task, Project automatically reapplies the contour pattern to the task and the resources. Project first distributes the new task work values across the affected time span and then assigns new work values to the resources assigned to the task.
If you have scheduled several tasks to run concurrently and you now find resource conflicts in your project, you can spread out the resource workload by using Project’s leveling feature. When you level resource loads, Project resolves resource conflicts by delaying or splitting tasks to take into consideration the schedules of assigned resources.
You can let Project level your project whenever a conflict arises, or you can control when Project levels to resolve resource conflicts. Regardless of when Project levels, you can choose to level the entire project or only selected resources, and you can choose a date range for Project to use to level resource assignments.
Project assesses each task to determine if it is the cause of a resource overallocation. For each task that is causing an overallocation, Project evaluates the task to determine if it has a priority of 1000, which tells Project not to level the task. For more information on priorities, see the section "Using Priorities to Control Leveling" later in this chapter.
Next, Project evaluates the task for constraints. Project won’t level tasks with a Must Start On or Must Finish On constraint. If you are scheduling your project from the start date, Project won’t level tasks with an As Late As Possible (ALAP) constraint. Similarly, if you are scheduling your project from the finish date, Project won’t level tasks with an As Soon As Possible (ASAP) constraint.
Finally, Project determines whether you’ve recorded any "actual" information for a task. Project won’t level a task with an actual start date unless you select a leveling option that permits Project to split any remaining work.
By default, Project uses the following criteria in the order listed to select tasks to delay or split:
Project looks at predecessor relationships and selects tasks that do not have successor dependencies before those that have successor dependencies.
Project selects tasks with more total slack before those with less total slack.
Project selects tasks that start later before those that start earlier. If you’re scheduling from the finish date of your project, Project selects tasks that finish earlier before selecting those that finish later.
Project selects tasks with lower priority values before selecting those with higher priority values.
Project selects tasks without inflexible constraints before selecting those with inflexible constraints.
This set of criteria is called the Standard leveling order. You can also choose to level using the Priority, Standard leveling order. In this case, Project uses the same criteria to select tasks to delay or split, but it moves Number 4 in the list above into the Number 1 slot.
Project offers one other leveling order—the ID Only leveling order. When you choose this leveling order, Project delays tasks with higher ID numbers before considering any other criteria.
You can use the Priority field to control the order in which Project selects tasks to delay. The values you can use in the Priority field range from 1 to 1000; Project avoids delaying tasks with higher priority values. For example, suppose that you’ve assigned a priority of 500 to Task 1 and a priority of 700 to Task 2. During leveling, Project will delay Task 1—the task with the lower priority number—before it delays Task 2.
By default, Project assigns a priority of 500 to every task, and you can change the priority value on the General tab of each task’s Task Information dialog box (see 6-11).
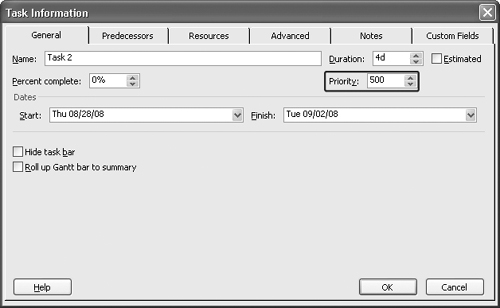
Figure 6-11. You can use the General tab of the Task Information dialog box to change a task’s priority.
You might prefer to add the Priority field to the table portion of the Gantt Chart view or the Task Usage view; that way, you can easily see the priorities of other tasks (see 6-12). To add the field, right-click the field you want to appear to the right of the Priority field and click Insert Column. In the Field Name list of the Column Definition dialog box that appears, type a few letters of the Priority field name until Project highlights it. Press Enter and then click OK.

Note
In addition to setting priorities for tasks, you can set a priority for the project in the Project Information dialog box (on the Project menu, click project Information), which is useful if you work with resources in multiple projects.
After you prioritize tasks, you can sort them by priority to see the tasks project is most likely to level. On the project menu, point to Sort, and click By priority.
You set leveling options using the same dialog box that you use to level resource assignments in your project. On the Tools menu, click Level Resources to display the Resource Leveling dialog box shown in 6-13.
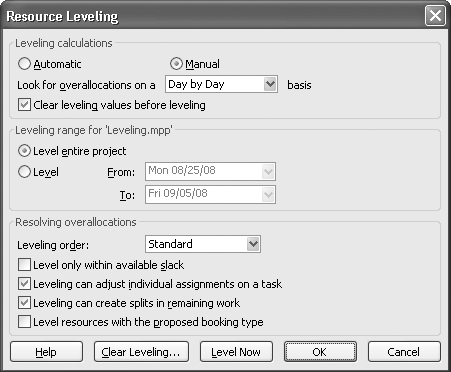
From the resource Leveling dialog box, you can set the following resource leveling options:
In the Leveling Calculations area, select the automatic option button if you want project to level resources if necessary whenever you make a change to your schedule. Select Manual to perform leveling only when you click the Level Now button in this dialog box. Many people prefer to use the Manual option, as automatically leveling your project can slow down schedule calculations when projects are large.
In the Look For Overallocations list, select a timeframe that you want project to use when determining whether leveling is necessary. The icon in the Indicators column of the resource Usage view may contain a note that suggests the appropriate basis. The timeframe you select controls how sensitive project is to recognizing an overallocation. For example, if you select Day By Day, project considers a resource overallocated if scheduled to work more than eight hours a day based on the Standard calendar. But if you select Week By Week, a resource won’t be considered overallocated unless his or her work week exceeds 40 hours based on the Standard calendar. Under these conditions, the resource could be scheduled to work 10 hours in one day but only six hours the next day and not be flagged as overallocated for leveling purposes.
Select the Clear Leveling Values Before Leveling check box to make project reset all delays previously established as a result of leveling or manually entering a leveling delay. If you don’t select this box, project builds upon previously established leveling values. Under these circumstances, project probably won’t change the scheduling of previously leveled tasks but will focus on new overallocations. If you opted to use Automatic leveling, you’ll find that performance will improve if you do not select this check box because project will not need to consider your entire schedule each time it levels.
In the Leveling Range For area, select either to level the entire project or to level only for dates you select.
In the Leveling Order list, click the order that you want project to use when leveling your project. See the section "Understanding Leveling Order" earlier in this chapter for details on how these options work.
Select any of the following check boxes in the Resolving Overallocations area:
Select Level Only Within Available Slack to avoid changing the end date of your project when project splits and delays tasks.
Select Leveling Can Adjust Individual Assignments On A Task to allow leveling to adjust one resource’s work schedule on a task independent of other resources that are working on the same task.
Select Leveling Can Create Splits In Remaining Work to allow leveling to split tasks to resolve resource conflicts.
Select Level Resources With The proposed Booking Type if you want project to level tasks containing proposed resources. Typically, if a resource is not committed to a task in your project, you don’t want to level the resource’s assignments.
Tip
Selecting Leveling Can Adjust Individual Assignments On A Task and Leveling Can Create Splits In Remaining Work affects your entire project. You can, however, apply these settings to only those tasks you select by adding the Level Assignments field and the Leveling Can Split field to a table in a task view and then setting the value for these fields to Yes. You add these fields by adding columns to the table. (See the discussion of adding fields in the section "Using Priorities to Control Leveling" earlier in this chapter.)
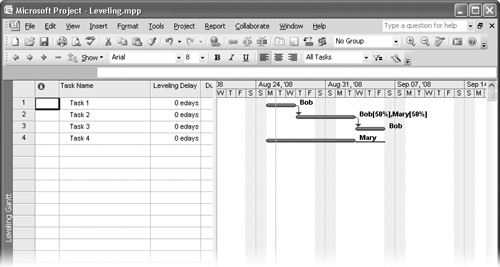
When you finish setting your leveling options, click Level Now to level using those options. 6-14 shows a project in the Leveling Gantt view in which Mary is overallocated because she’s simultaneously assigned to both Task 2 (a four-day task) and Task 4 (a seven-day task).
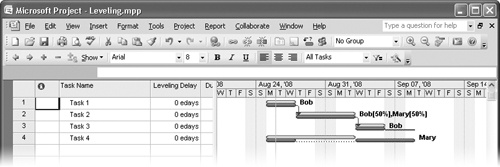
6-15 shows the same project after leveling. After you level a project, project adds green bars to the Leveling Gantt view; the green bars represent the tasks before leveling.
Not happy with what you see? No problem. Simply remove the effects of leveling by reopening the Resource Leveling dialog box (on the Tools menu, click Level Resources) and click the Clear Leveling button. Project displays another dialog box where you can choose to clear leveling for the entire project or for selected tasks only.
Suppose that you’re mostly happy with the results of leveling and that you just want to make a few changes on your own. Or suppose that you’ve got a very small amount of adjusting that needs to happen. You don’t need to level resources from the Resource Leveling dialog box. Instead, you can manually enter delays on tasks. Sometimes the leveling that project applies produces results you don’t like—for example, you might not want to split work on a task to resolve an overallocation; instead, you might want to delay the start of another task.
First, you need to display the Resource Allocation view. To do this, on the View menu, click More Views. From the More Views window that appears, highlight Resource Allocation, and click Apply. In the Resource Allocation view, select the task that you want to delay in the top pane. In the bottom pane, enter an amount in the Leveling Delay field. Project delays the task accordingly and reduces the resource’s conflict. In 6-16, Mary is overallocated because she is simultaneously assigned part-time to Task 2, a four-day task, and full-time to Task 4, a five-day task.
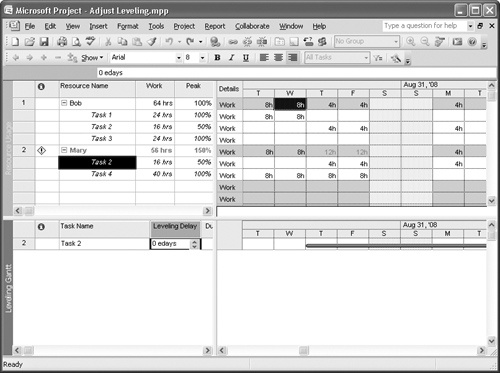
To eliminate the overallocation, I selected Task 2 in the top portion of the view and then, in the Leveling Delay field in the bottom portion of the view, I delayed the task by two days (see 6-17).

Tip
Even though you might not use the Resource Leveling dialog box to apply leveling, you can use the dialog box to clear leveling. On the Tools menu, point to Level Resources, and then click Clear Leveling. Project removes all leveling applied, whether you used the Resource Leveling dialog box or you used the Resource Allocation view to apply the leveling.
When all else fails, you can always ask for more time to complete a project. By adding time to the schedule, you can adjust the durations of tasks to avoid overallocating resources. But before you go off and request more time for the project, you need to evaluate the project’s critical path to determine just how adding time to the schedule will affect the schedule and the cost of the project. For more information on working with the critical path, see 8. You might also want to review 5, to look for and address factors that might be affecting the schedule.