
Even if you don’t use Project Server, working with a resource pool can be very helpful if your organization uses the same resources on multiple projects. A resource pool is nothing more than a set of resources that can be available to work on any project. Setting up a resource pool in Project can be particularly useful for project managers who need to share resources on different projects; a resource pool provides a good way to schedule shared resources and resolve resource conflicts. Even if you’re the only manager and don’t really share resources, setting up a resource pool can save you time when you create projects.
Note
One of the features of Project Server is the Enterprise Resource Pool, which is the server version of what I describe in this section. The method used to set up the Enterprise Resource Pool is actually similar to the method you use in Project to set up a resource pool.
When you connect a resource pool file to your projects, Project tracks the assignment of each resource across all projects that use the resource pool. So if a resource becomes overallocated, you see the same signals that you see if you simply overallocate a resource within your own project; overallocated resource names appear in bold red letters in various resource views in your project.
Setting up a resource pool isn’t difficult; you simply set up a Project file that contains only resource information. You can name it something clever like "Resource Pool." In 13-8, you see the Resource Sheet of the Resource Pool project. This project contains no task information; it contains just resource information.

Note
You can store task information in the file you intend to use as a resource pool, but that information would be available to anyone else who uses the resource pool. To keep things neat and easy to understand, I recommend that you store no tasks in the resource pool file.
In this "resource-only project," not only store resource names and costs, but also set up calendars to reflect available working time. Set up the working times your company uses by default on the Calendar tab of the Options dialog box. To set up your company’s working times, on the Tools menu, click Options; then click the Calendar tab (see 13-9).
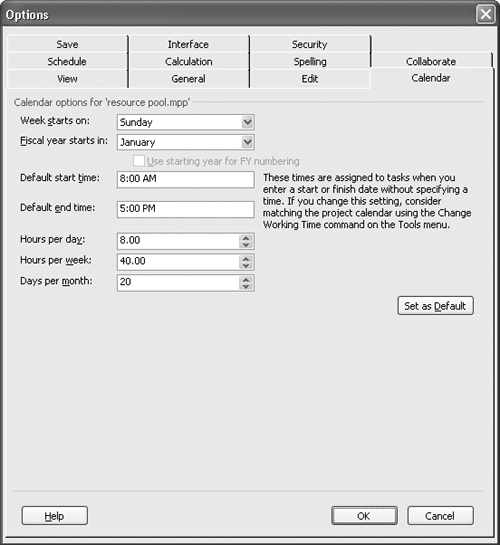
Figure 13-9. Establish your company’s default working times using the Calendar tab of the Options dialog box.
![]() Set up resource calendars by selecting a resource on the Resource Sheet (of any resource-oriented view) and clicking the Resource Information button. In the Resource Information dialog box that appears, click the Change Working Time button to display the Change Working Time dialog box. Use this dialog box to establish any necessary calendar exceptions and specialized work weeks for the selected resource (see 13-10).
Set up resource calendars by selecting a resource on the Resource Sheet (of any resource-oriented view) and clicking the Resource Information button. In the Resource Information dialog box that appears, click the Change Working Time button to display the Change Working Time dialog box. Use this dialog box to establish any necessary calendar exceptions and specialized work weeks for the selected resource (see 13-10).
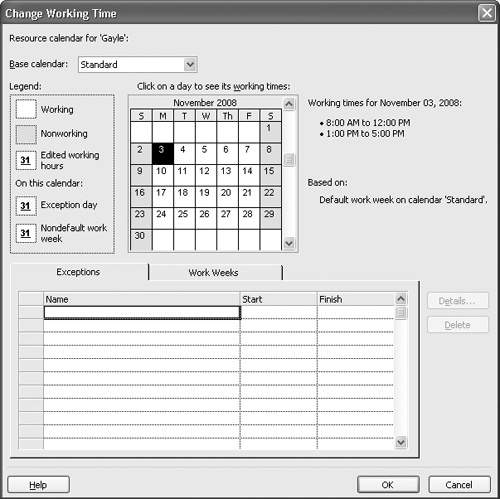
Figure 13-10. Establish working time exceptions and special work weeks in the Change Working Time dialog box.
See Also
For detailed information on setting up resources and resource calendars, see 3.
After you create a Project file that contains resource information, use these steps to connect the resource pool project to a project in which you need to make resource assignments:
Open the project you set up containing resources—we’ll call this project the "resource pool file" from this point forward.
Open a project containing tasks to which you want to assign resources—we’ll call this project the "project schedule file" for purposes of this example.
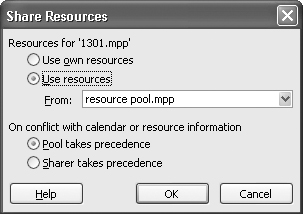
While viewing the project schedule file, on the Tools menu, point to Resource Sharing, and click Share Resources. Project displays the Share Resources dialog box:
Select the Use Resources option and make sure that the resource pool project appears in the From list.
Select an option for handling calendar conflicts. If you select the Pool Takes Precedence option, the resource calendars in the resource pool file take precedence when conflicts arise.
Note
If you select the Sharer Takes Precedence option, the resource calendars in the file that contains your project schedule take precedence over the resource calendars in the resource pool file when conflicts arise. If you’ve followed my advice and not stored resources in your project schedule, your project schedule file contains no resource calendars. Once you connect your project to the resource pool, you can set up calendars in your project for resource pool resources, but nobody else using the resource pool would have access to the calendars you establish.
Click OK.
Note
You can store resources in a project that won’t act as the resource pool, but you defeat the purpose of using a resource pool when you store resources in two places. So I recommend that you set up project schedules in Project files that don’t contain any resources and then connect your files to the resource pool project when you want to assign resources.
If you switch to the Resource Sheet view of the project schedule file, Project displays all the resources that appear in the resource pool file. If you also stored resources in your project schedule file, those resources also appear, and you won’t be able to distinguish between the resources in your project and the resources from the resource pool.
Save the project schedule file and the resource pool file.
When you come back at a later time to work on a project schedule file set up to share resources, you don’t need to open the resource pool file; you can let Project open it for you. When you open the project schedule file, Project displays the Open Resource Pool Information dialog box (see 13-11).
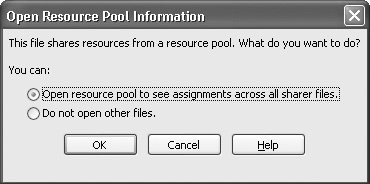
Figure 13-11. This dialog box appears when you open a project schedule file connected to a resource pool file.
When you select the first option (Open Resource Pool To See Assignments Across All Sharer Files), Project opens the resource pool file for you. If you select the second option (Do Not Open Other Files), Project opens only your file. If you intend to make changes that will affect resources in your project schedule file, select the first option; otherwise, you won’t see any resources in your project schedule file.
You’ll find that working in a project schedule file that is connected to a resource pool file is no different from working in a project where you’ve stored resources in the project. You still assign resources to tasks using the Assign Resources window. In 13-12, you can see three tasks in a project that starts on November 2; Bob is assigned to the first task for four days. In 13-13, you can see four tasks in a project that starts on October 31; here Bob is assigned to the second task for three days.
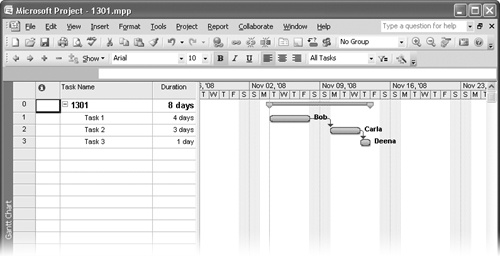

Both projects are connected to the resource pool file, and in this example, Bob is overallocated. If you view the Resource Sheet in either project, you’ll see that Bob’s name appears in bold red letters (see 13-14). You use the same techniques to resolve the overallocation that you’d use if the projects weren’t connected to the resource pool project.
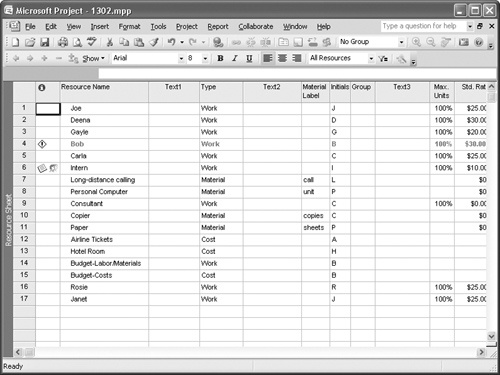
Figure 13-14. Bob’s overallocated status is visible in any resource-oriented view in either project.
See Also
See 6, for information on dealing with resource overallocations.
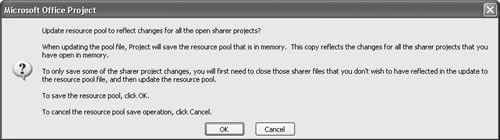
If you make changes that affect resources to your project schedule file, you need to update the resource pool file so that others who are using the resource pool have the most up-to-date information. To update the resource pool, on the Tools menu, point to Resource Sharing, and click Update Resource Pool. This command is available only if you set up resource sharing and you make a change in your project while the resource pool file is open. You won’t see any reaction from Project, but you’ll have updated the resource pool file.
Suppose that you forget to update the resource pool and just click the Save button to save your project. In this case, Project displays a message, shown in 13-15.
You might decide that you no longer want to use the resource pool file. You can disconnect the resource pool for a specific project if you open that project, and then on the Tools menu, point to Resource Sharing, and click Share Resources. In the Share Resources dialog box that appears, select the Use Own Resources option.
You also can disable the resource pool for all files that are sharing the resources of one resource pool.
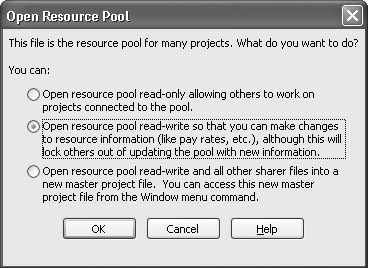
 Click the Open button and navigate to and select the resource pool file. Project displays the Open Resource Pool dialog box.
Select the middle option or the last option in this dialog box; either option lets you disable the pool.
Click the Open button and navigate to and select the Project schedule file that you want to disconnect from the resource pool. Repeat this step for each Project schedule file that you want to disconnect from the resource pool.
On the Window menu, click the resource pool file.
On the Tools menu, point to Resource Sharing, and click Share Resources. Project displays the Share Resources dialog box:
Select the project(s) that you want to disconnect from the resource pool.
Click the Break Link button.
Click OK.
Save and close the resource pool file.
Save and close the project schedule file(s).

After you have disabled the resource pool, any assignments you made from the resource pool will remain in your project.