
Project uses the tracking information you provide to adjust both the schedule and the project’s costs. If Project determines that you’re running late on a task, Project moves dependent tasks into the future. And Project adjusts projected total costs using a combination of actual costs and remaining estimates.
Before you start recording tracking information in Project, you should set the status date and check your calculation options.
In Project, you set a status date that you want Project to use when you record progress as percent complete or total work to date. Project uses the status date to determine where to place actual work and where to schedule the work that you still need to complete. If you don’t set a status date, Project uses the current date. So if today is October 27 and you’re recording progress for the week ending October 24, you might want to set the status date to October 24.
Note
Using the options on the Calculation tab, you can control the way Project uses the status date for placing actual work and remaining work where you want, particularly when assignments are completed earlier or later than scheduled. You can read about these options in more detail in the next section, "Reviewing Calculation Options."
To set the status date, on the Project menu, click Project Information. Project displays the Project Information dialog box for the current project (see 10-2).

In the Status Date list, use the calendar that appears to select the date you want to use when recording progress; then click OK.
As you might expect, Project contains several options that affect the way Project calculates your project’s schedule and costs, and you have control over these options. In particular, Project enables you to control several options that affect the way Project handles progress information when you record it.
To set calculation options, on the Tools menu, click Options to display the Options dialog box; then click the Calculation tab (see 10-3).
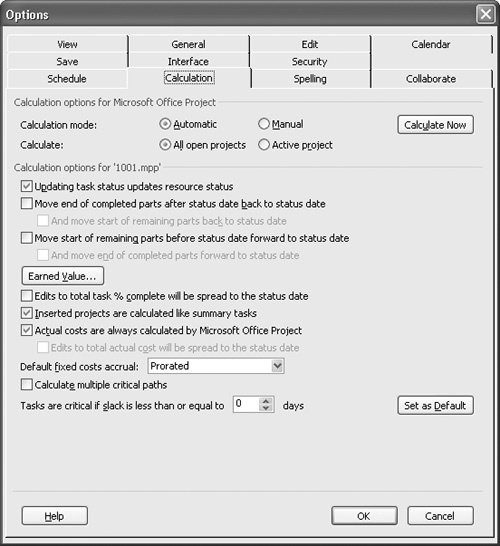
Figure 10-3. Use the Calculation tab of the Options dialog box to control the way Project calculates your project’s schedule and costs.
You can set the following calculation options:
The Updating Task Status Updates Resource Status check box. Selected by default, this option tells Project to update the corresponding resource status if you update a task’s status. Similarly, Project also updates task status if you update a resource’s status. For example, if you update the percentage of completion for a task, Project also updates the % Work Complete field for the resource and the assignment.
The Move End Of Completed Parts After Status Date Back To Status Date check box and the And Move Start Of Remaining Parts Back To Status Date check box. These two check boxes work together, so let’s talk about them at the same time. These options apply only when you record progress by entering a task’s total actual work, a task’s actual duration, the total percent complete, or the percent of work complete; these options don’t apply when you record progress in timephased fields, that is, when you enter the actual hours in the Details portion of the Resource or Task Usage view.
Note
These two options don’t apply when you use timesheet information from Project Server to update your project.
By default, Project doesn’t change the task start dates or adjust the remaining portions of tasks when tasks begin late or early. But if you select these check boxes, Project updates the tasks in relation to the status date. Suppose you set the status date to October 17 and you have a task with a start date of October 22 and a duration of four days. If the task actually starts early, on October 15, and you select the Move End Of Completed Parts After Status Date Back To Status Date check box, Project moves the task start date to October 15, sets the percent complete to 50 percent, and schedules the start of the remaining work for October 23, creating a split task. If you also select the And Move Start Of Remaining Parts Back To Status Date check box, Project makes all of the changes I just described but doesn’t create a split task; instead Project moves the start of the remaining work to October 17.
The Move Start Of Remaining Parts Before Status Date Forward To Status Date check box and the And Move End Of Completed Parts Forward To Status Date check box. Like the preceding pair of check boxes, these two check boxes work together, so let’s talk about them at the same time. Also like the preceding pair, these options apply only when you record progress by entering task total actual work, task actual duration, total percent complete, and percent work complete; these options don’t apply when you record progress in timephased fields.
Note
These two options don’t apply when you use timesheet information from Project Server to update your project.
By default, Project doesn’t change the task start dates or adjust the remaining portions of tasks when tasks begin late or early. But if you select these check boxes, Project updates the tasks in relation to the status date. Suppose that the status date is October 17 and you have a task with a start date of October 11 and a duration of four days that actually starts on October 15. If you select the Move Start Of Remaining Parts Before Status Date Forward To Status Date check box, Project leaves the task start date at October 11, sets the percent complete to 50 percent, and schedules the remaining work to start on the status date, which is October 17, creating a split task. If you also select the And Move End Of Completed Parts Forward To Status Date check box, Project makes the changes I just described but doesn’t create a split task; instead Project moves the task’s actual start date to October 15.
The Edits To Total Task % Complete Will Be Spread To The Status Date check box. By default, Project distributes percent completion changes to the end of the actual duration of a task. But if you select this check box, Project instead distributes the changes evenly across the schedule to the project status date.
The Actual Costs Are Always Calculated By Microsoft Office Project check box. This option, selected by default, tells Project to calculate actual costs so you don’t have to enter actual costs. If you clear this check box, enter costs and then reselect the check box; Project will overwrite any costs that you enter for any tasks that aren’t 100 percent complete and will recalculate the costs for those tasks.
The Edits To Total Actual Cost Will Be Spread To The Status Date check box. This option becomes available if you don’t select the Actual Costs Are Always Calculated By Microsoft Office Project check box. Select this option to have Project distribute changes to total actual cost evenly across the schedule to the status date. Suppose that you’re entering $400 in costs for a four-day task scheduled to run from Monday through Thursday, and you’ve set the status date to Thursday. Further suppose that you’ve recorded, on Monday and Tuesday, two days in actual duration for this task. If you select this check box and enter the actual cost of $400 on the status date of Thursday, Project enters $100 for the task on Monday, Tuesday, Wednesday, and Thursday, spreading the cost across the task’s schedule to the status date. If you don’t select this check box, Project accrues the actual costs to the end of the actual duration of the task, and Project spreads the $400 of actual cost across the two days of actual duration, recording $200 on Monday and $200 on Tuesday. If you haven’t entered any actual duration, Project records the actual cost at the beginning of the task, on Monday.
The Default Fixed Costs Accrual list. Use this option to indicate how you want Project to accrue fixed costs for new tasks. Project can accrue fixed costs at the start of a task or at the end of a task, or Project can prorate the costs throughout the duration of the task.
See Also
You can find information about earned value calculation options in 11.
![]() As you record progress, you might find it useful to make notes about unexpected events or circumstances—both positive and negative—that may affect the completion of a task. You can easily record a note for any task; simply select the task and click the Task Notes button on the Standard toolbar. Project displays the Notes tab of the Task Information dialog box (see 10-4).
As you record progress, you might find it useful to make notes about unexpected events or circumstances—both positive and negative—that may affect the completion of a task. You can easily record a note for any task; simply select the task and click the Task Notes button on the Standard toolbar. Project displays the Notes tab of the Task Information dialog box (see 10-4).
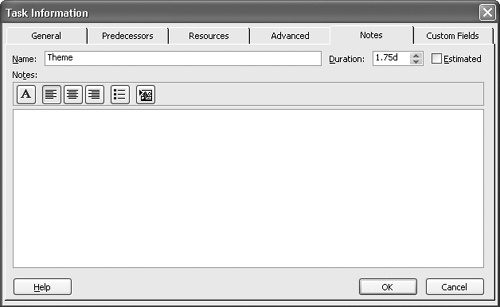
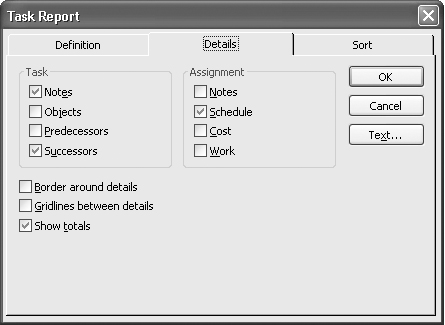
![]() When you record a note for a task, Project displays an icon in the Indicators column that looks like the one you see beside this paragraph. And you can print notes when you print views and some reports. For example, before you print the Gantt Chart view of your schedule, on the File menu, click Page Setup. On the View tab, select the Print Notes check box. Or when you print a report such as the Unstarted Tasks report or the Slipping Tasks report, you can click the Edit button; in the Task Report dialog box that appears, click the Details tab and select the Notes check box in the Task area (see 10-5).
When you record a note for a task, Project displays an icon in the Indicators column that looks like the one you see beside this paragraph. And you can print notes when you print views and some reports. For example, before you print the Gantt Chart view of your schedule, on the File menu, click Page Setup. On the View tab, select the Print Notes check box. Or when you print a report such as the Unstarted Tasks report or the Slipping Tasks report, you can click the Edit button; in the Task Report dialog box that appears, click the Details tab and select the Notes check box in the Task area (see 10-5).
You can record progress on a task by assigning a Percent Complete value to the task. Enter any value less than 100 to indicate that the task is not complete. You can enter a Percent Complete value using the Tracking table on any task-oriented view. To display the Tracking table, right-click the Select All button and click Tracking.
The tools on the Tracking toolbar can help you enter percent complete values; right-click in the toolbar area and click Tracking to display the Tracking toolbar. In 10-6, you see the Task Sheet view using the Tracking table along with the Tracking toolbar.

Note
You can use the Work table to enter the percent of work complete on a task. Enter the percentage value in the Percent Work Complete field (see the "Recording Actual Work" section later in this chapter.).
To record a percent complete progress value, click the task for which you want to record progress and enter the value in the % Complete column (or the % W. Complete column on the Work table). You can enter the standard values of 25%, 50%, 75%, or 100% using the Tracking toolbar. When you enter a Percent Complete value, Project assigns an Actual Start Date unless you entered one previously, and calculates the Actual Duration and Remaining Duration values. If your Calculation options call for updating resources when you update tasks, Project also calculates the Actual Cost and Actual Work values. Project assigns the planned finish date to the Actual Finish Date column if you enter 100 in the Percent Complete column. But if your task doesn’t finish on the planned finish date, don’t enter a Percent Complete value; instead enter an Actual Finish Date.
Entering the values isn’t difficult; deciding what values to enter can be problematic. When a task produces something measurable, you can more easily estimate percent complete. For example, if the task calls for setting up 20 work cubicles and you’ve set up five, the task is probably 25 percent complete. Or if the task calls for doing telephone surveys to 30 employees and you’ve made 15 calls, the task is probably 50 percent complete.
If a task doesn’t produce anything truly measurable, you can only enter your best guess, based on your experience and the information you get from the resources that provide you with information about a task’s progress. For example, if your resources report spending two days on an eight-day task, the task might be 25 percent complete, but then again, it might not. You see, just because resources have put in 25 percent of the time you estimated doesn’t mean that they’ve completed 25 percent of the work.
You might also be tempted to use costs to estimate completeness. If you estimate that three resources assigned to a three-day task will cost $3,000, you might be tempted to estimate that a task is 33 percent complete when the task’s costs reach $1,000. But once again, just because costs have reached the 33 percent mark doesn’t mean that 33 percent of the work on the task is complete.
I suggest that you use the percent complete approach only when you have a good way of measuring the task’s progress. That way, you can rest easy in the knowledge that you’re entering fairly accurate tracking information.
See Also
For information on the distinction between the % Complete field and the Physical % Complete field, see 11.
Recording Progress Quickly
Suppose that you have several tasks that are on schedule or were completed on schedule. You can quickly and easily update the percent complete for several tasks or even your entire project at one time using the Update Project dialog box. Display any task-oriented view. If you plan to update only selected tasks, select them by clicking their ID numbers. Then on the Tools menu, point to Tracking, and click Update Project:
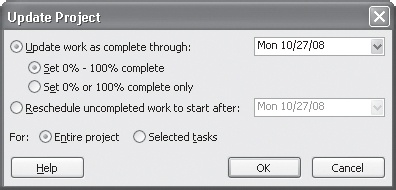
To update on-schedule tasks, select the Update Work As Complete Through option and click a date. Then do one of the following:
Select the Set 0% – 100% Complete option to let Project calculate the percent complete on every task that should have begun by the selected date. Project assumes that tasks have started and are progressing according to your plan and sets the % Complete field value accordingly.
Select the Set 0% Or 100% Complete Only option to have Project mark as finished all tasks that the baseline plan indicates would have been complete by the date you selected; Project leaves all other tasks as 0% complete.
You can choose to update your entire project or only selected tasks. When you update the entire project, Project sets the project status date to the date that you selected in the dialog box.
You can record progress by entering task start or finish dates. If a task doesn’t start or finish on time, you should enter an actual start date or an actual finish date; otherwise, if you mark a task complete, Project assumes that the task started and finished on time. In addition, entering actual start and finish dates lets Project update the schedule to reflect actual timing. If you don’t adjust a task’s duration and you enter an actual finish date that is earlier than the planned finish date, Project assumes that the task started earlier than planned.
![]() The Actual Start and Actual Finish fields appear on the Tracking table of any task-oriented view. If you prefer, you can record actual start or actual finish dates using the Update Tasks dialog box (see 10-7). Select the task you want to update and click the Update Tasks button on the Tracking toolbar, or on the Tools menu, point to Tracking, and click Update Tasks.
The Actual Start and Actual Finish fields appear on the Tracking table of any task-oriented view. If you prefer, you can record actual start or actual finish dates using the Update Tasks dialog box (see 10-7). Select the task you want to update and click the Update Tasks button on the Tracking toolbar, or on the Tools menu, point to Tracking, and click Update Tasks.
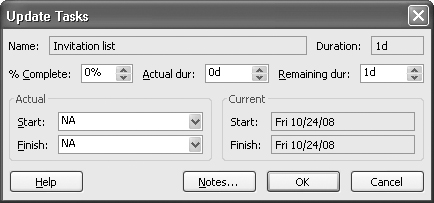
Figure 10-7. You can use the Update Tasks dialog box to record actual start or finish dates for the selected task.
In the Actual area, click a list box arrow to display a calendar and select the task’s start or finish date. When you enter an actual start date, Project changes the task’s planned start date. When you enter an actual finish date, Project changes the planned finish date as well as the Percent Complete, the Actual Duration, the Remaining Duration, the Actual Work, and the Actual Cost fields. If you set only an actual finish date and not an actual start date, Project also fills in the actual start date.
You can record progress by recording actual or remaining duration values. The Actual Duration field for a task shows the amount of time that you needed to complete the task. When you use this approach, Project updates the Actual Start, Actual Cost, Actual Work, and Percent Complete fields. In some cases, Project also updates the Actual Finish field, too. When you record an actual duration without a remaining duration, Project calculates and fills in the Remaining Duration value.
Suppose that you enter an actual duration that is equal to or less than the planned duration. In this case, Project assumes that the task is progressing on schedule. If you didn’t enter an actual start date, Project sets the actual start date equal to the planned start date.
Suppose that you set an actual duration that is greater than the planned duration. In this case, Project assumes that the task is finished but that it took longer than expected to complete. Project fills in the Actual Finish field using the planned finish date and adjusts the planned duration to match the actual duration. Project also changes the Percent Complete field to 100% and the Remaining Duration field to 0%.
Note
If you set calculation options so that Project updates the status of resources when you update a task’s status, Project updates the work and cost figures for resources when you supply an actual duration for a task.
The Remaining Duration field shows how much more time you need to complete a task. Suppose that you enter a value in the Remaining Duration field without entering a value in the Actual Duration field, and that the value you enter is higher or lower than the existing figure. In this case, Project assumes that you are changing the planned duration of the task instead of tracking actual progress for the task and adjusts the schedule based on the new planned duration.
But suppose that you enter a value in the Actual Duration field and follow that entry with a value in the Remaining Duration field. Project assumes that the work for the task will be completed based on the Remaining Duration value and sets the Percent Complete value based on a combination of the Remaining Duration value that you supplied and the original planned duration. Entering 0 in the Remaining Duration field is the same as entering 100% in the Percent Complete column. Project assigns the planned finish date to the Actual Finish Date field. If this value is not correct, you can change the Actual Finish Date field.
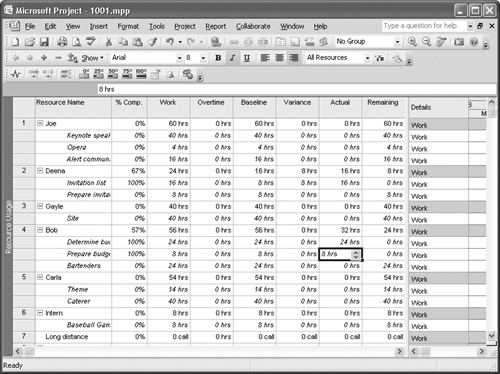
Updating the Actual Work field to record progress is the best approach to use when you schedule tasks based on the availability of certain resources. Typically, you use timesheet information to make your entries. Although you can enter actual work from either the Task Usage view or the Resource Usage view, the Resource Usage view will be easier to use if you’re entering progress information from timesheets, because this view lists resources followed by the tasks assigned to them.
You can record total actual work for resources using these steps:
On the View menu, click Resource Usage to display the Resource Usage view.
Right-click the Select All button and, on the shortcut menu that appears, click Work. Project displays the Work table.
Drag the divider bar almost completely to the right edge of the screen to reveal the Actual column:
Under the appropriate resource, find the task for which you want to record progress.
Enter a value for the resource in the Actual column.
Note
If you opt to work in the Task Usage view, use the Tracking table and enter values into the Actual Work column. You also might want to move the Actual Work column because it appears at the right edge of the Tracking table. Click the column heading to select it. Release the mouse button; once the column is selected, drag the column heading to the left until the vertical bar marking the column’s proposed location appears where you want it. When you release the mouse button, Project moves the column. The Task Usage view and the Tracking table also work well when you want to record costs in the Actual Costs field on the days they occur.
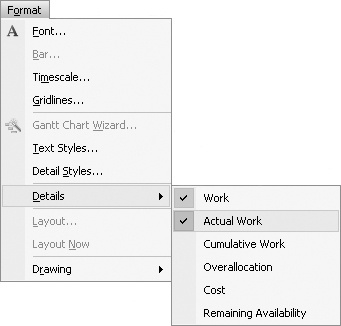
You can also use this view to enter a resource’s work on a task on the day the work occurred; when you use this approach, Project calculates the value in the Actual column for you. Display the Resource Usage view and the Work table using Steps 1 and 2 above. Then on the Format menu, point to Details, and click Actual Work (see 10-8). Project adds a row for every task on the right side of the view.
In the Details portion of the view, enter the hours for the correct resource and task on the Actual Work row in the column of the day on which the work occurred (see 10-9).
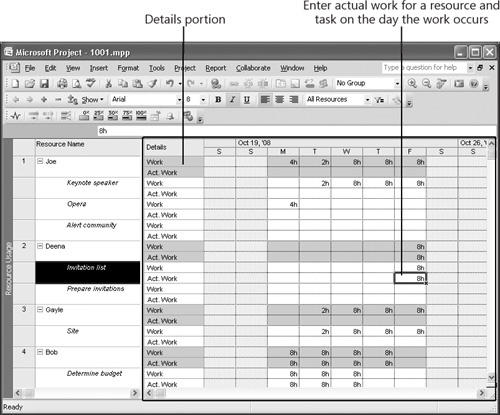
![]() If the timescale of the Details portion of the view doesn’t display the time period for which you want to enter information, click the name of a task that you want to update, and then click the Scroll To Task button on the Standard toolbar.
If the timescale of the Details portion of the view doesn’t display the time period for which you want to enter information, click the name of a task that you want to update, and then click the Scroll To Task button on the Standard toolbar.
Tip
By the way, this handy tool works in all task-oriented views; if you can’t see, for example, the Gantt bar for a particular task in the Gantt Chart view or the Tracking Gantt view, select the task’s name, and then click the Scroll To Task button. In the Resource Usage view, click the name of the task under a particular resource.
Adjusting The Timescale
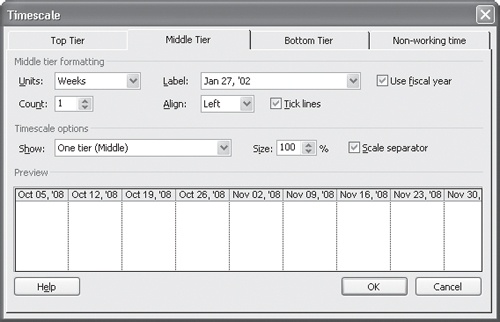
In the Details portion of both the Task Usage view and the Resource Usage view, the default timescale shows each day. If you want to record progress in some other increment—such as weekly—you can adjust the timescale to display weeks instead of days. On the Format menu, click Timescale. Project opens the Timescale dialog box. To change the timescale to, for example, weekly, click the Middle Tier tab, and in the Units list, click Weeks. Then hide the other tiers by clicking One Tier (Middle) in the Show list.
Although it may not seem important to track the use of Material resources, they do affect the cost of your project. You update actual work for Material resources the same way you update actual work for Work resources. To record progress for Material resources, you might find it easiest to work in the Resource Usage view and record total work for the Material resource in the Actual column on the Work table. Or if you want, use the Act. Work timephased field in the Details portion on the right side of the view. Make sure you display the Actual Work row: on the Format menu, point to Details, and click Actual Work. Then on the appropriate day, across from the resource under the appropriate task, record the amount of the Material resource that was used.