
Once you establish your project’s goal(s) and scope and set up the calendar that the project will use, you’re ready to enter tasks. Tasks are things you need to do to complete the project. Yes, you probably started your basic propensity toward project management using a "to-do list." And you can start identifying tasks for your project in the same way—making a list of things that your team needs to do to complete the project. The initial order of things isn’t important; focus on putting your ideas "on paper" or, preferably, in a Project file.
I think of this phase as "outlining" what I want to accomplish—much the same way that I produce an outline for a book. I start with the major headings, which are the chapters of my book, and then I tackle each individual chapter to identify the topics within that chapter that I want to cover. And some of those topics contain topics of their own.
Many people identify what to do in a project using a similar technique. They start by defining the major phases of a project and then define the tasks within that phase. Once again, some tasks contain subtasks of their own.
Life is all about balance, and defining the tasks in a project is no different. Some people specify as project tasks every activity they can imagine. Others go the other direction and don’t provide enough detail. So how do you find the balance?
Unfortunately, the answer here is more art than science. If you include too much information, you’ll end up spending your days recording tracking information without ever really evaluating it—and you’ll lose focus of the project’s purpose. If you include too little, your project plan won’t be useful, and the holes in your schedule might make you deliver late and exceed your budget because you won’t consider the things that "might happen."
To identify phases, think about the deliverables your project must produce and key dates you need to meet along the way; that should help you begin to break your project into manageable chunks. You can then focus on each individual chunk and begin to make a list of things that you need to do within that chunk by the deliverable due date or other key date. As you consider the things you need to accomplish, you might find that listing those things in the order you need to accomplish them helps you identify other tasks. But don’t get too crazy when you’re listing tasks. For example, don’t list tasks that your team members need to track. Instead, list the results of those tasks in your project plan and let your team members list the individual tasks that lead to the results.
You can create different types of tasks in Project. The task type you choose affects the way Project calculates the schedule. In some cases, adding resources changes the way Project handles the scheduling of a task, so it’s almost impossible to talk about task types without including some discussion of resources.
Fixed Units Tasks. Before I explain how Project handles a fixed units task, it’s important to understand what a unit is. The units in fixed units refers to assignment units, which are percentages you use to specify the amount of resource effort you want a resource to expend while working on the task. When you assign a resource to a task, you specify the number of assignment units of that resource as a percentage. In other words, if you set the assignment units for a resource to 100%, you assign the resource to work on the task full-time; if you set the assignment units to 50%, you assign the resource to work on the task half of the available time.
When you create a fixed units task, you essentially tell Project not to make any changes to the assignment unit percentage if you change the duration of the task; that is, the resources continue to work at the assignment unit percentage you specified.
Fixed Duration Tasks. You use a fixed duration task to define a task that will take a specified amount of time, even if you have more than one person working on the task. Pregnancy is a fixed duration task; it takes nine months, give or take some days. If you have two pregnant women, the task of pregnancy still takes nine months for each of them.
Fixed Work Tasks. The duration you set for a fixed work task represents the total amount of work needed to complete the task. Suppose you create a fixed work task that is four days long; you’re saying, essentially, that one person working full-time on the task can complete it in four days. If, however, you assign two resources to the task, each at an assignment unit rate of 100%, the task will take two days to complete. If you assign only one resource to the task at an assignment rate of 50%, the task will take eight days to complete. So you can conclude that, on fixed work tasks, Project assigns a percentage of effort to each resource that is sufficient to complete the task in the time allotted.
Effort-Driven Tasks. An effort-driven task is one that is affected by the number of resources you assign to it. By default, all fixed work tasks are effort-driven, and you can’t change that behavior. If it takes one person an hour to shovel the snow after a snow storm, this fixed work, effort-driven task could be accomplished by two people in half the time, assuming they don’t stop for a snowball fight or to build a snowman.
By default, Project creates fixed-unit, effort-driven tasks, and you can change a fixed-duration task to make it effort-driven also. When you change the number of resources that are assigned to a fixed-unit, effort-driven task, Project changes the duration of the task. When you change the number of resources assigned to a fixed-duration, effort-driven task, Project modifies the percentage of total work allocated to each resource working on the task. In both cases, Project doesn’t modify the amount of work that’s required to complete the task.
Note
The change Project calculates for any effort-driven task is strictly a mathematical calculation. For example, Project calculates that three people get work done in one-third of the time it takes one person to do the job. In real life, however, the time you save is rarely a straight, mathematical calculation. After all, people on a job talk to each other, take breaks, and so on.
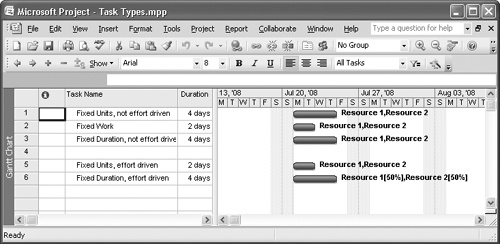
So that you can compare how Project handles each task type, I’ve created a project containing five tasks (see 1-7). Each task is four days long, originally had one resource assigned, and I’ve added a second resource to each task. The project contains two fixed-unit tasks, two fixed-duration tasks, and one fixed-work task. One of the fixed-unit tasks is not effort-driven, and one of the fixed-duration tasks is not effort-driven, while the other fixed-unit and fixed-duration tasks are effort-driven. Note that the fixed-work task and the fixed-unit, effort-driven task were both originally four days long, but when I added two resources to them, Project automatically recalculated the duration of the tasks, assuming that both resources would work full-time on the task.
Earlier in this chapter, I suggested that you begin a project by listing the major phases of the project and then adding tasks to each phase. When you start entering tasks, Project assigns an estimated duration of one day to each task (the question mark indicates that the duration is estimated). Although I show durations in 1-8, don’t worry about task durations initially; just get that list of phases and tasks entered and do a little outline structuring. I supplied durations to show you the behavior of a summary task. Eventually, your phases will become summary tasks, and the tasks listed below each phase will become subtasks.

Tip
That blue highlighting that appears as you work in Project is the result of a feature called change highlighting. Each time you make a change, Project highlights everything in your project affected by the change; knowing the tasks affected by a change can be useful under lots of conditions. For example, knowing the tasks affected as you set up dependency links as described in 2, can be very helpful. If you don’t want to view change highlighting, on the View menu, click Hide Change Highlighting. Also, each time you save your project, the highlighting disappears because Project assumes that you wanted to keep the changes you made.
You can add tasks beneath a phase by simply selecting the row immediately below the phase and pressing the Insert key on the keyboard; Project inserts a blank line, and you can then type the task name. To insert a task between two summary tasks or subtasks, click the task that should appear below the new task you intend to insert and then press the Insert key on your keyboard. Project inserts a blank row above the selected task in the table portion of the view and renumbers the rows of the tasks that fall below the new row.
Tip
You can delete a task by clicking the row number beside the task and pressing the Delete key on the keyboard. If you delete a summary task, you also delete all of the subtasks below that summary task.
As shown in 1-8, my project contains four phases, with a varying number of tasks in each phase. I clearly identify the tasks in a particular phase by selecting them and using the Indent button on the toolbar![]()
When you indent a task, Project automatically turns the task above it into a summary task, which is a special type of task that you use to view, at a glance, the total duration and cost of the tasks indented below it, which are called either tasks or subtasks. (Project users tend to use the words task and subtask interchangeably.) The summary task is represented by boldface type in the Task Name column and a special black bar in the chart portion of the Gantt Chart view. The length of a summary task’s bar will be equal to the length of the bar associated with the longest subtask below the summary task. So, for example, Phase 3’s summary task bar is seven days long because Task 2 in Phase 3 is seven days long.
Warning
Although Project won’t stop you, don’t assign resources to a summary task and don’t try to link summary tasks to other tasks. Summary tasks aren’t intended to serve any purpose other than to summarize duration and cost information of the tasks indented below them. Assigning resources to a summary task can lead you to believe that cost fields don’t add up and that your resources are overbooked if you happen to assign the same resource to a summary task and to one of its subtasks. Linking summary tasks can cause your Project file to develop a circular reference error, particularly if you link the summary task to subtasks under different summary tasks. In addition, it becomes difficult to follow the logic of your schedule if summary task links conflict with subtask links.
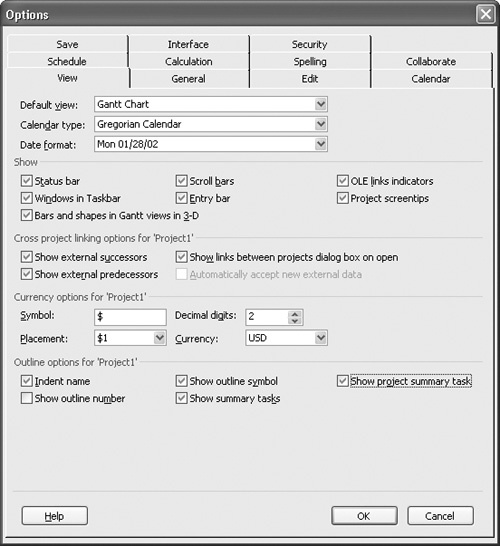
You can display a summary task that represents your entire project so that you can see, at a glance, the total time and cost for your project. On the Tools menu, click Options to display the Options dialog box (see 1-9). On the View page, select the Show Project Summary Task check box and click OK. Project adds the project summary task to the first row of your schedule and numbers it Row 0; the project summary task bar is light gray in color instead of black like the bars of other summary tasks (refer to 1-8 earlier in this chapter).
I found a very cool tip in several places on the Internet for those of you who aren’t afraid to edit the registry. In Microsoft Project 2003 and earlier, the only way to display the project summary task was the way I just described. But in Project 2007, you can display the project summary task in every new project file automatically by adding a DWORD value to your registry. Follow the steps on the next page.
Quit Project.
Click the Start button and then click Run to display the Run dialog box.
Type regedit and click the OK button to display the Registry Editor window.
Navigate to HKEY_CURRENT_USERSoftwareMicrosoftOffice12.0MS ProjectOptionsView.
On the Edit menu, click New, then click DWORD Value, and finally, type Show Project Summary.
Press the Enter key on the keyboard to create a DWORD value.
Double-click the new Show Project Summary DWORD to display the Edit DWORD Value dialog box.
Type 1 in the Value Data field, as shown here.
Click OK and close the Registry Editor window.

Once you’ve made this change, you should see the Project Summary Task (Row 0) automatically displayed in every new blank project whenever you start Project 2007.
Here’s a list of the places where I found this tip on the Internet:
Suppose that you realize, after you create a task, that it really doesn’t belong in the phase where you created it. No problem; you can move it by using Cut and Paste or by dragging and dropping. Select the row number Project assigned to the task, and make your moves. Be aware of the following effects that moving summary tasks and subtasks can have on the schedule’s outline:
When you move a summary task, Project automatically selects its subtasks and includes them in the move. To move a summary task only (without moving any of its subtasks), you must first promote all of its subtasks so that the summary task is no longer a summary task. You can then use the Indent and Outdent buttons to readjust the positions of tasks in the outline.
If you move a task originally positioned at a higher level of the outline to a new location just below a task with subtasks, Project demotes the task that you move.
If you move a subtask so that it appears below a task at a higher level of the outline, Project promotes the subtask that you move.
If you move a subtask from one phase to another and you’ve already set a baseline, baseline data at the summary level will no longer equal the sum of the baseline data for the tasks in both the section from which you moved the task and the section into which you moved the task.
It’s a natural, gut reaction to want to assign a start date to each task, whether it’s a summary task or a subtask. But if you do, you essentially constrain the calculations that Project does automatically when you link your tasks together by defining which tasks are dependent on other tasks. Essentially, by assigning start dates, you can accidentally end up distorting the schedule’s timing. So I recommend that you not enter task start dates unless you have a really valid reason for that start date. I believe you’ll find that, in most cases, you don’t need to enter that start date. Instead, wait to see what start dates Project assigns when you link your tasks together.
Assigning a duration to a task is a fairly simple, mechanical process. You simply type a value in the Duration field for the task followed by a character that represents the units in which you’re specifying the duration: d for days, w for weeks, mo for months. You also can type m for minutes and h for hours.
Unfortunately, that doesn’t tell you how to determine what the value should be. And, once again, the method is more art than science because you must estimate the value based on your experience.
Consider the types of resources you’ll need to complete a task; an experienced programmer can complete a programming task faster than a new programmer. Some photocopy machines produce copies faster than others. Are the parts necessary to build a component available readily, or might there be a delay in obtaining them? And it’s important to factor in the "water cooler" effect. I’ve never met anyone who performs at peak efficiency and productivity 100% of the time. Everybody needs a break once in awhile, and I’ve seen studies that show that workers really achieve complete efficiency and productivity for as little as 50% of their day and as much 75% of their day. So, when you determine that a task should take 8 person-hours, don’t expect that the task will therefore be completed in one day. All of these issues should factor into your estimate.
The Project Management Institute (www.pmi.org) suggests that task durations range from 4 to 80 hours, as a rule of thumb, to help you keep the tasks manageable. Some managers estimate task durations by taking their "best guess" at the duration, doubling their estimate, and some even add 10% to that value. As you become more experienced, your "best guesses" will improve. If you often work on similar projects, consider reviewing other projects to see the durations you estimated and how close you were.
Remember to attempt to make your "best guess" estimates realistic; you stand to lose a great deal if they aren’t. If you underestimate or overestimate how long a task will take, you won’t plan for resources properly or develop appropriate methods to complete the task. Then the people involved in your project will begin to believe that all the duration estimates are unrealistic. Whether you underestimate or overestimate dramatically, resources may not be available when you need them, and team members and management alike might come to believe that delays are inevitable.
One last piece of advice: don’t negotiate for time to complete a project. Do your planning homework and develop a realistic project schedule. If your schedule shows that you can complete the project in nine months and your boss wants it done in three months, don’t be tempted to settle for six months. If you do and your project schedule was truly realistic, you guarantee the failure of your project. Instead of negotiating, show your boss why your schedule is realistic, given the available resources.
See Also
See 11, for more information.
Milestones are road markers. In and of themselves, they have no duration, because they mark a point in your project that helps you evaluate progress. Although it might take you months to produce a deliverable—and producing the deliverable is a task—you might want to create a milestone for each deliverable, using the milestone as a target to mark the expected due date for the deliverable. To create a milestone, create a task and assign it a duration of 0.
Recurring tasks can save you time when you are creating a project because they can help you avoid setting up the same task over and over again. For example, suppose that your company is bringing a new drug to market, and the government testing requirements include running a particular test weekly for six months and preparing a report of the test results. Instead of entering the same task approximately 25 times, use a recurring task. When you create a recurring task, you specify the pattern of the recurrence—monthly, weekly, daily, and so on—as well as a timeframe during which the task will occur. Project then sets up the individual recurrences of the task for you, saving you a lot of keystrokes.
To create a recurring task, select the row immediately below the phase or task where you want the recurring task to appear, and on the Insert menu, click Recurring Task. Project displays the Recurring Task Information dialog box (see 1-10).

![]() When you click OK, Project inserts the recurring task above the task you selected and displays a pair of arrows pointing at each other in a circle in the Indicators column, which appears next to the task’s row number; the icon indicates that the task is a recurring task. Project treats the recurring task as a summary task. A plus sign appears beside the task, hiding all of the subtasks you created. Click the plus sign to view the subtasks.
When you click OK, Project inserts the recurring task above the task you selected and displays a pair of arrows pointing at each other in a circle in the Indicators column, which appears next to the task’s row number; the icon indicates that the task is a recurring task. Project treats the recurring task as a summary task. A plus sign appears beside the task, hiding all of the subtasks you created. Click the plus sign to view the subtasks.